- Android UI Workshop: Build an Interactive Quiz App
- Looking for a Shortcut?
- Step 0: Getting Started
- Step 1: Define a RelativeLayout
- Step 2: Designing for Multiple Screens: Background Image
- Step 3: Creating ImageButtons
- Step 4: Making Your App Accessible
- Step 5: Creating Stylish Text
- Step 6: Making Your App Interactive
- Conclusion
- How to Create a Quiz App In Android?
- Approach
- Android Simple Quiz App Tutorial with Source Code
- Operating System
- Getting Started:
- Layout Design
- Android Manifest File
- Creating The Quiz Content
- The Main Function
- DEMO
Android UI Workshop: Build an Interactive Quiz App
Get a hands-on crash course in building an effective and attractive UI for your Android app, and design an interactive quiz app along the way!
Looking for a Shortcut?
In this tutorial, we’ll build a quiz app from the ground app, but if you’re looking for a quicker solution, check out Envato Market’s Quiz App Template for Android. It’s a well-designed template that you can customize as you wish to create your own quiz app from a solid foundation.


If you’d prefer to build it from scratch by yourself, read on for the instructions.
Step 0: Getting Started
For the Android app developer, user interface (UI) is key. Your app may boast cutting-edge functionality, but if it’s wrapped in an unappealing UI it’s unlikely that users will stick around long enough to discover just how great your app really is.
This tutorial provides a hand’s on, crash course in building an effective UI, using the example of a simple quiz app. The app poses a question and presents the user with four possible answers, implemented as ImageButtons. ‘Correct’ and ‘Incorrect’ messages are displayed via a popup, and the user can see at a glance which version of the app they’re running.
As you build the app, we’ll cover the following:
- RelativeLayout
- Designing for multiple screens
- Adding and leveraging image resources
- String resources
- App accessibility
- Creating stylish text
- Custom XML Styles
- Making buttons ‘tappable’
- Toast notifications
Start by creating an Android project called ‘AndroidGame’ and a new Activity (we’ll stick with the default ‘MainActivity’ filename.) Delete the ‘Hello World’ TextView that Eclipse generates automatically, along with any default parent view that has been added.
EDITOR’S NOTE: This tutorial is based on the Vectortuts+ artwork created in the tutorial «How to Create a Pub Chalkboard UI in Adobe Illustrator» by Sharon Milne.
Step 1: Define a RelativeLayout
A RelativeLayout is a flexible layout that allows you to organize UI elements in relation to one another, making it particularly useful for developers who need fine-grained control over the exact positioning of their UI components.
Create a basic RelativeLayout view group to hold all your UI elements:
Step 2: Designing for Multiple Screens: Background Image
As an open source operating system, Android crops up on all sorts of devices, and is the OS of choice for many different manufacturers — it’s no longer even restricted to smartphones! This presents both exciting opportunities and headache-inducing challenges for Android developers. When developing your UI, keep in mind that your app needs to display correctly across as many devices as possible. While designing for multiple screens is too broad a topic for this tutorial, as a starting point you should provide alternate versions of every image used in your app. These alternate images should be optimized for screens with different pixel densities. When your app launches, Android will automatically load the correct image based on the device’s display characteristics.
Open the ‘res’ folder and you will see four drawable folders that Eclipse generates by default:
- drawable-ldpi
- drawable-mdpi
- drawable-hdpi
- drawable-xhdpi
These folders target screens with different pixel densities, following a 3:4:6:8 scaling ratio (for example, if drawable-ldpi contains an image of 36 x 36 pixels, then drawable-mdpi should contain an image of 48 x 48 pixels, and so on).
Create four versions of your background image based on this ratio, and drag each version into the appropriate folder.

Add the background image to RelativeLayout using the ‘android:background’ attribute, referring to the image resource as you would any drawable object:
Boot up the Android Emulator and take a look at your work so far.

Step 3: Creating ImageButtons
The first step of creating an ImageButton is to add the required images to your project. Again, because you want your device to display correctly across a range of screens, you should provide four versions of each image. We’ll start with the ‘2003’ button, so drag and drop the four versions of your ‘2003’ image into the corresponding folders.
ImageButtons are created using the ‘ImageButton’ tag followed by the usual height/width attributes, and some RelativeLayout-specific alignment attributes.
Create your first ImageButton and tweak the alignment until you’re happy with how it’s positioned. In this example, I’m using the following:
But your ImageButton is missing the most important part: an image! Refer to this image as a drawable resource, but this time using the ‘android:src’ property:
Check how this appears in the emulator.
Repeat this process for the other four buttons. This is a good opportunity to experiment with the various RelativeLayout attributes (the Android docs are a great source of additional information on the different layouts.)
As you fine-tune your layout, you may find it useful to keep the emulator open, switching between it, the graphical layout editor and your XML.
Here’s the code I’m using:
The buttons may be displaying correctly in the emulator, but Eclipse is throwing multiple «Missing contentDescription attribute on image» errors. What’s this all about?
Step 4: Making Your App Accessible
The ContentDescrition attribute makes applications more accessible to users who cannot easily consume graphical content, by providing an alternate text description. This description can be used by screen readers and similar accessibility tools.
The first step is to define some new string resources. Strings are defined in the res/layout/strings.xml file, so open it and switch to the strings.xml tab if necessary.
String resources are created with the following syntax:
Define a string for the ContentDescription of each ImageButton:
Return to your activity_main.xml file and add a ContentDescription attribute to each ImageButton, e.g:
Step 5: Creating Stylish Text
In reality, it’s unlikely you’ll cease developing an app at Version 1.0, as you cook up new content and release fixes for any pesky bugs that users discover. Therefore, it’s handy if people can tell at a glance what version of your app they’re running. The easiest way to do this is with a TextView.
Open the strings.xml file and define the current version number as a string:
You can quickly create a TextView that calls «@string/Version» but Android’s default text style isn’t particularly appealing. Thankfully, TextView has a range of attributes that can give boring old text some pizazz. You can read more about all the available attributes at the Android docs, but in this tutorial we’ll use the following:
- android:textColor — sets the colour of your text. It can either be defined as a string resource, or as a colour value (for more information on values, see the Android Docs: Colour section.)
- android:textSize — sets the text size, which can be given either as px (pixels) sp (scaled pixels) dp (density-independent pixels) in (inches) or mm (millimeters)
- android:textStyle — either italic or bold.
Create your TextView, add some style attributes, and then reference the “Version” string:


This works, but if you’re planning to re-use this set of attributes elsewhere then you should define it as a custom «Style.» A style is a time-saving collection of properties (in this case font colour, font size, and the italic style) that specifies the appearance of a view, or even an entire application.
To define a custom style:
- Open the res/values/styles.xml file, ensure it has opening and closing ‘resource’ tags, and give your style a unique name:
- Define all the attributes that belong to this style:
For this tutorial, we’ll define the following custom style:
Applying this custom style to your TextView is easy, simply replace all the attributes defined by the VersionFont style, with: style=»@style/VersionFont» .
Both of these methods are valid ways of styling text, but keep in mind that a custom style can speed up the coding process if you’re going to re-use the same collection of attributes across your application.
Step 6: Making Your App Interactive
Your UI may be finished, but there’s one final step: letting the user know whether they’ve selected the correct answer. The easiest way to make buttons ‘tappable’ is by implementing the android:onClick property for each button.
We’ll start by adding it to the first button:
The name of the onClick method must correspond to a public method in the MainActivity.Java file, so add the following to your Activity:
Now specify the behaviour that «onClick2003» triggers. A straightforward way of telling the user they’ve got the question wrong, is with a toast notification:
Run this updated code in the emulator and get clicking to check your toast is firing properly.


Add onClick to the other three buttons and create corresponding public methods in your Activity, with appropriate messages attached. Once you’ve finished, boot up the emulator and have a click around to check everything’s working okay.


Conclusion
Over the course of this tutorial you’ve learned the essentials of Android UI design and created a simple, but effective UI that has some working functionality to boot! Try applying some of these techniques to your own Android projects, to ensure your UI doesn’t let your app down.
Источник
How to Create a Quiz App In Android?
Android is an operating system which is built basically for Mobile phones. It is based on the Linux Kernel and other open-source software and is developed by Google . Android is very popular nowadays among students and students are now choosing Android for their projects. It’s very much important for a beginner to build baby Android apps to learn Android. In this article let’s create a simple Quiz App in android using Java. A simple Quiz App that contains a set of curated questions and its answers and checks for the correctness of the answer given by the user. It navigates through the questions using dynamic programming.
Attention reader! Don’t stop learning now. Get hold of all the important Java Foundation and Collections concepts with the Fundamentals of Java and Java Collections Course at a student-friendly price and become industry ready. To complete your preparation from learning a language to DS Algo and many more, please refer Complete Interview Preparation Course.
Approach
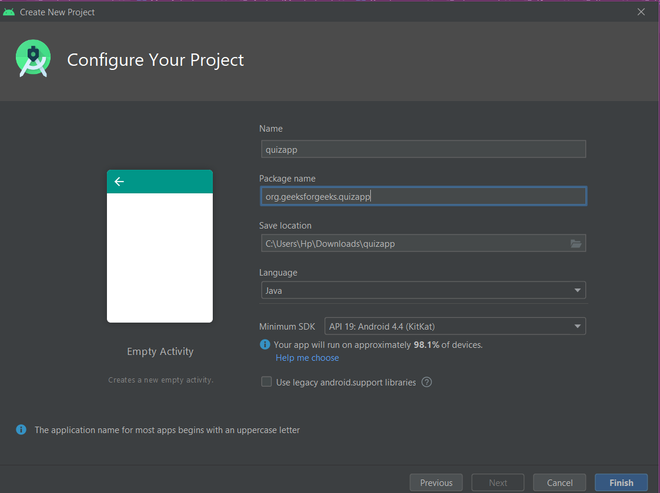
Step 1: Creating a new project
- Click on the File option at the topmost corner in the left.
- Then click on new and open a new project and name the project.
- Now select the Empty Activity with language as Java.
- Name it QuizApp.
Step 2: Designing the UI with activity_main.xml
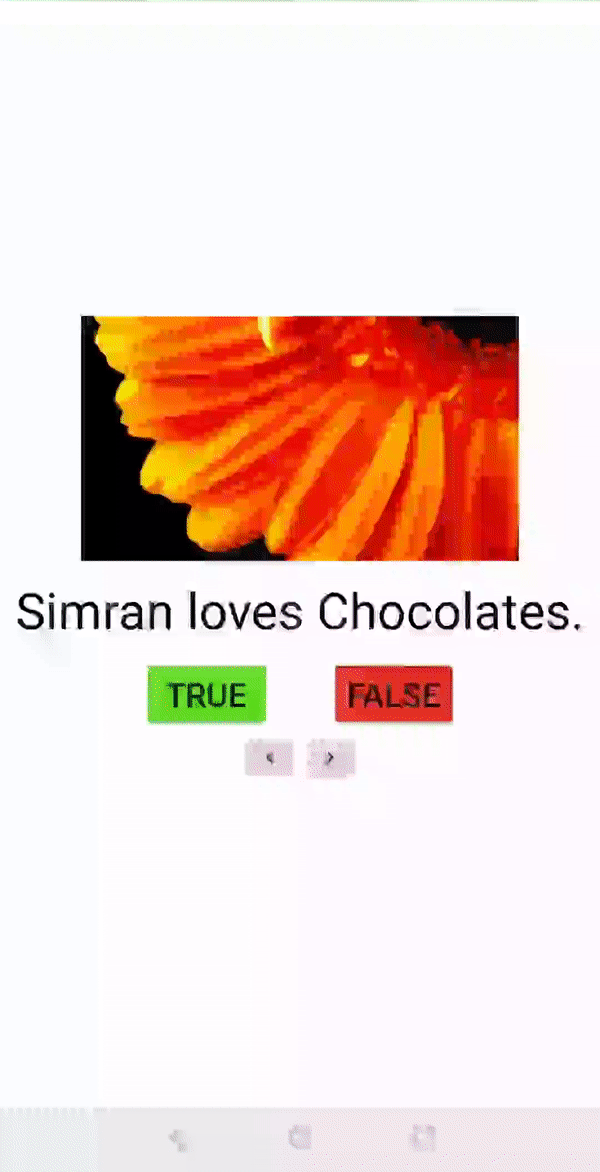
Add the below code in the activity_main.xml file. Here the parent layout is a LinearLayout whose orientation is set to vertical. Inside it, there is one ImageView, one TextView, two Buttons, and two ImageButton. The Button and ImageButton are inside a child LinearLayout for horizontal orientation. ImageView is used for displaying image and TextView is used to display the question and Button is used to indicate true/false and ImageButton for navigating to next/previous question.
Adding images in the drawable folder:
The following are the links given for all the drawable files that are used in this project.
- For flower images (f1/f2/f3/f4/f5/f6/f7): Refer to this.
- For thenext icon: Refer to this.
- For theprevious icon: Refer to this.
- For emoji: Refer to this.
Источник
Android Simple Quiz App Tutorial with Source Code
Operating System

In this tutorial, we will try to create a Simple Quiz App Using Android. This simple application can generate random questions and generate choices to be answered. Android is a mobile operating system developed by Google. It used in several gadgets like smartphones, tablets, and even television. Android is open source to developers who has an interest in developing mobile apps. It also provides an adaptive framework that allows the developer to develop apps in a simpler way. Android is open-source so that developers find it easy to develop and expand new features. So let’s do the coding.
Getting Started:
First you will have to download & install the Android Development IDE (Android Studio or Eclipse). Android Studio is an open-source development feel free to develop your things.
Layout Design
We will now create the design for the application, first locate the layout file called activity_main.xml, this is the default name when create a new activity. Then write these codes inside your layout file.
Android Manifest File
The Android Manifest file provides essential information about your app to the Android system in which the system must require before running the code. It describes the overall information about the application. It contains some libraries that needed to access several method within the app.
Creating The Quiz Content
This code contains the list of all questionnaires within the quiz app. To do that simply create a new java file namely Question then write these blocks of code inside the newly created java file class.
The Main Function
This code contains the main function of the application. This code will automatically generate a random question every time the answer is correct. To start with first locate your MainActivity java file and open it, then write this variable inside the MainActivity class.
Then add this handler as implement to the MainActivity class, this will listened to all button function within the activity
Then write these method to make to code work correctly.
Finally, initialize the require methods inside the onCreate method to run the application.
Try to run the app and see if it worked.
DEMO
There you have it we have created a Simple Quiz App using Android. I hope that this tutorial helps you with what you are looking for. For more updates and tutorials just kindly visit this site.
Enjoy Coding.
Note: Due to the size or complexity of this submission, the author has submitted it as a .zip file to shorten your download time. After downloading it, you will need a program like Winzip to decompress it.
Virus note: All files are scanned once-a-day by SourceCodester.com for viruses, but new viruses come out every day, so no prevention program can catch 100% of them.
FOR YOUR OWN SAFETY, PLEASE:
1. Re-scan downloaded files using your personal virus checker before using it.
2. NEVER, EVER run compiled files (.exe’s, .ocx’s, .dll’s etc.)—only run source code.
Источник


