- Android Toolbar Searchview Tutorial
- Android Search View based on Material design guidelines
- MaterialSearchView
- Download
- Setup
- Usage
- Search history and suggestions
- Modifying the suggestion list behavior
- Styling the View
- Interfaces
- Languages
- Android SearchView Example Tutorial using DataBinding
- Android Tutorial
- Android SearchView
- Android SearchView Example
- Android SearchView Example Code
- Русские Блоги
- Использование SearchView в Android
- Очки знаний в этой статье
- 1. Введение в SearchView
- 2. Функция поиска NetEase Cloud Music
- 2.1 Базовая реализация функции поиска
- 2.1.1 Инициализация и мониторинг кнопки поиска
- 2.2 Украшение интерфейса
- 2.2.1 Текст приглашения по умолчанию
- 2.2.2 Кнопка поиска не исчезает
- 2.2.3 Кнопка поиска, чтобы отменить проблему закрытия значка
- 2.2.4 Расширение панели поиска по умолчанию
- 2.2.5 Изменить значок поиска или удалить значок
- 2.2.6 Изменить цвет текста
Android Toolbar Searchview Tutorial
Hi and welcome to another tutorial from codingdemos, today you will learn how to build an android app that uses android toolbar searchview, using android searchview will allow your users to search for something through your app.
The final result will look something like this:
In this tutorial we will be using the following:
- Android studio version 2.3.3
- Android emulator Nexus 5X with API 24
- Minimum SDK API 16
- Open up Android Studio and create a new project and give it a name, in our case we’ve named it (ToolbarSearchview), choose API 16 as the minimum SDK, then choose blank activity and click on finish and wait for Android Studio to build your project.
- Open (styles.xml) file and change the parent theme from (Theme.AppCompat.Light.DarkActionBar) to (Theme.AppCompat.Light.NoActionBar) like this:
- We changed the parent theme in (styles.xml) file because we want to create a toolbar instead of using the actionbar.
- Open up (activity_main.xml) file and here we will need to add android toolbar to be able to show the search icon later, then we need to add android listview to be able to show the list of items and add an android textview, we use this textview when the listview don’t have any data and show this textview instead to indicate to the user that there is no data available. The code look like this:
- Next we need to create a string array of items that we need to show them in the listview, this string array will have the name of the months in a year like this:
- Now let’s create a menu folder and file, this menu file will have the search menu item that later will show up in android toolbar. Here is the code:
- Next we need to define the toolbar, listview and textview inside (MainActivity.java) file like this:
- In order for android search menu to appear in toolbar, we need to use setSupportActionBar like this:
- Then we need to create an array adapter that will hold the string array data like this:
- Let’s set the listview to the adapter so that the data will show up in the list like this:
- Now let’s make the listview clickable by calling ListView.setOnItemClickListener, once user clicks on any item from the list we will show the selected item inside a toast message like this:
- Let’s set the empty textview that we have declared earlier with the listview, so that when the user searches for something and it’s not available in that listview, instead of showing an empty screen we show a textview that says (No results) like this:
- Now let’s work on the search menu, first thing we need to do is override onCreateOptionsMenu like this:
- Next we need to inflate the menu file (menu_toolbar.xml) that have the search icon, so that we can have access to the search menu item like this:
- Now let’s declare the search menu item like this:
- Now that we have declared the search menu item, we can declare SearchView that we are going to use it to perform the actual search like this:
- In order to detect/listen to the user when performing a search request, we will use SearchView.setOnQueryTextListener like this:
- Inside onQueryTextChange method is where we will listen to the user typed query and instantly show the result from the android adapter that holds our string array data like this:
- Run the app and you will see the following output:

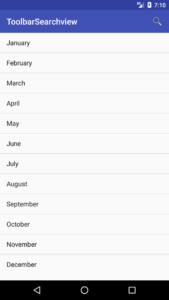
Android Toolbar Searchview App Demo
- There one thing missing!! When you tap on android searchview you don’t see any hint to indicate to the user that they can place the query here, same thing that you see in google search box.
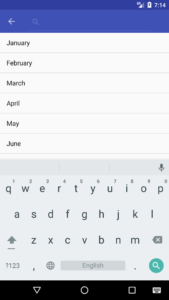
Android Toolbar Searchview without hint
- Let’s fix that by adding a hint to android searchview using SearchView.setQueryHint like this:
- Now run the app again and you will see the hint showing in android searchview
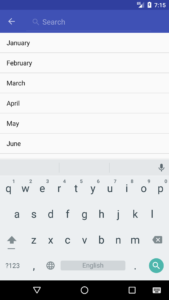
Android Toolbar Searchview with hint
Источник
Android Search View based on Material design guidelines
MaterialSearchView
Android SearchView based on Material Design guidelines. The MaterialSearchView will overlay a Toolbar or ActionBar as well as display a ListView for the user to show suggested or recent searches.
Download
To add the MaterialSearchView library to your Android Studio project, simply add the following gradle dependency:
This library is supported with a min SDK of 14.
Important note: If you’re still using version 1.0.3, it’s recommended to upgrade to the latest version as soon as possible. For more information, please see this issue.
Setup
Before you can use this lib, you have to implement a class named MsvAuthority inside the br.com.mauker package on your app module, and it should have a public static String variable called CONTENT_AUTHORITY . Give it the value you want and don’t forget to add the same name on your manifest file. The lib will use this file to set the Content Provider authority.
Example:
MsvAuthority.java
Or if you’re using Kotlin:
MsvAuthority.kt
AndroidManifest.xml
Proguard note: Some of you might experience some problems with Proguard deleting the authority class, to solve those problems, add the following lines on your proguard file:
Usage
To open the search view on your app, add the following code to the end of your layout:
Then, inside your Activity get the reference:
To open the search view, simply call the searchView.openSearch() method.
To close the search view, call the searchView.closeSearch() method.
You can check if the view is open by using the searchView.isOpen() method.
As from Version 1.2.1 it’s also possible to get the query anytime by using the searchView.getCurrentQuery() method.
To close the search view using the back button, put the following code on your Activity :
For more examples on how to use this lib, check the sample app code here.
Search history and suggestions
You can provide search suggestions by using the following methods:
- addSuggestions(String[] suggestions)
- addSuggestions(ArrayList suggestions)
It’s also possible to add a single suggestion using the following method:
To remove all the search suggestions use:
And to remove a single suggestion, use the following method:
The search history is automatically handled by the view, and it can be cleared by using:
You can also remove both by using the method below:
Modifying the suggestion list behavior
The suggestion list is based on a ListView , and as such you can define the behavior of the item click by using the MaterialSearchView#setOnItemClickListener() method.
If you want to submit the query from the selected suggestion, you can use the snippet below:
If you just want to set the text on the search view text field when the user selects the suggestion, change the second argument from the searchView#setQuery() from true to false .
Styling the View
You can change how your MaterialSearchView looks like. To achieve that effect, try to add the following lines to your styles.xml:
Alternatively, you can also style the Search View programmatically by calling the methods:
- setBackgroundColor(int color);
- setTintAlpha(int alpha);
- setSearchBarColor(int color);
- setSearchBarHeight(int height);
- setTextColor(int color);
- setHintTextColor(int color);
- setHint(String hint);
- setVoiceHintPrompt(String voiceHint);
- setVoiceIcon(DrawableRes int resourceId);
- setClearIcon(DrawableRes int resourceId);
- setBackIcon(DrawableRes int resourceId);
- setSuggestionBackground(DrawableRes int resourceId);
- setHistoryIcon(@DrawableRes int resourceId);
- setSuggestionIcon(@DrawableRes int resourceId);
- setListTextColor(int color);
And add this line on your br.com.mauker.materialsearchview.MaterialSearchView tag:
So it’ll look like:
Interfaces
Currently there are two interfaces that you can use to instantiate listeners for:
- OnQueryTextListener : Use this interface to handle QueryTextChange or QueryTextSubmit events inside the MaterialSearchView.
- SearchViewListener : You can use this interface to listen and handle the open or close events of the MaterialSearchView.
Languages
The MaterialSearchView supports the following languages:
- English (en_US);
- Brazillian Portuguese (pt_BR);
- Italian (Thanks to Francesco Donzello);
- French (Thanks to Robin);
- Bosnian, Croatian and Serbian (Thanks to Luke);
- Spanish (Thanks to Gloix).
Источник
Android SearchView Example Tutorial using DataBinding
Android Tutorial
Today we will look into Android SearchView widget and develop an application that filters a ListView by the queried text. We’ll be using DataBinding to hook up the layouts in the Activities and Adapters. If you haven’t read about DataBinding refer this tutorial first for a better understanding.
Android SearchView
Android allows us to use the search functionality in our app by displaying the SearchView widget either in the ToolBar/ActionBar or inserting it into a layout. Android SearchView widget is available from Android 3.0 onwards.
The SearchView is defined in the XML layout as shown below.
There are many forms for searching in Android such as voice search, suggestions etc. In this tutorial we’ll use SearchView.OnQueryTextListener and Filterable interfaces.
The Filterable interface filters the queried text over a ListView and displays the resulted ListView rows.
OnQueryTextListener interface can detect two events.
- onQueryTextChange is called when the user types each character in the text field
- onQueryTextSubmit is triggered when the search is pressed
Android SearchView Example
Below image shows the final android SearchView example project.

The project consists of an Activity and an Adapter for the ListView.
Android SearchView Example Code
The activity_main.xml is given below. It consists of a ListView with a SearchView on top.
The MainActivity.java is given below.
In the above code, we are passing an ArrayList of Months to the List Adapter.
We’re invoking the filter method that’s defined in the adapter class every time the search query text changes.
The ListAdapter.java class looks like this.
As you can see in the above code we’re performing filtering using an inner class ValueFilter that extends the Filter class. It filters the list by checking if the search query text matches the strings given in the ArrayList.
The XML layout for the ListView row is given below.
The output of the android search view application in action is given below.

The SearchView shown above requires us to press the search icon to activate the text field. Also, it doesn’t contain any hint/placeholder text.
Add the following code in the MainActivity to enable the SearchView by default and display a hint.
The SearchView after customising as above looks like this. 
This brings an end to android SearchView tutorial. We’ll dive into the advanced features of SearchView in a later tutorial. You can download the Android SearchView Project from the link given below.
Источник
Русские Блоги
Использование SearchView в Android

Уважаемые одноклассники, я снова здесь и готов к вождению. , ,
Я не знаю, что вы обычно используете для прослушивания музыки, мне лично нравится NetEase Cloud Music (Не реклама, но что я делаю?), но теперь NetEase Cloud Music не может остановить песню Джея Чоу, это немного. , , В тот день я неожиданно подумал о MaterialDesign, который я недавно изучал, и о том, как реализована строка заголовка NetEase Cloud Music. Позже я использовал различные Baidus, и мои усилия окупились. Я наконец-то понял это! На самом деле, NetEase Cloud Music использует SearchView, упомянутый в заголовке, который фактически является поисковым. Так как это достигается? Пожалуйста, послушайте разложение в следующий раз!
[Загрузка изображений за пределы сайта . (image-41ace8-1524489658384)]
Шучу, студенты готовы и сразу поехали. , ,
Очки знаний в этой статье
- Введение в SearchView
- Реализуйте функцию поиска в NetEase Cloud Music
- Реализация базовой функции поиска
- Украшение страницы
- Некоторые общие проблемы
Позвольте мне кратко объяснить, здесь в основном объясняется, как SearchView реализует строку заголовка NetEase Cloud Music, но все они основаны на Панели инструментов, если вы мало знаете о Панели инструментов и меню!
Пожалуйста, смотрите эти две статьи на моем публичном аккаунте (сильная волна выхода)
Выше подробно объяснено использование и меры предосторожности панели инструментов и меню! ! !
1. Введение в SearchView
SearchView — это элемент управления поиском, который связан с панелью инструментов и задается через меню (я не знаю, можете ли вы понять, как я его обобщил). Кнопка поиска появится в правой части панели инструментов (система поставляется с ней, вы также можете заменить ее). Когда вы нажмете кнопку поиска, появится соответствующее окно редактирования для поиска. При нажатии на крестик этот поиск отменяется, а кнопка поиска восстанавливается.
2. Функция поиска NetEase Cloud Music
2.1 Базовая реализация функции поиска
Вот некоторые изменения в меню, поэтому оно может не совпадать с вашим базовым эффектом, но я опубликую соответствующий контент, чтобы оно было удобно для ленивых больных раком, таких как я, и могло быстро достичь эффекта. В конце концов, когда проект разработки плотный, мне все равно, как его достичь! ! ! Сначала посмотрите на рендеринг основных функций
[Загрузка изображений за пределы сайта . (image-35b1ae-1524489658384)]
Я считаю, что если вы прочтете две предыдущие статьи, вы скоро сможете написать строку заголовка ниже.
- Код файла меню
- Код файла макета
- Код в деятельности
Запустите приведенный выше код, и тогда вы сможете увидеть вышеуказанный контент!
2.1.1 Инициализация и мониторинг кнопки поиска
Потому что, когда вы инициализируете SearcheView, вам нужно работать с соответствующим меню, поэтому оно обычно будет в onCreateOptionsMenu(Menu menu) Получить его в. Конкретный код выглядит следующим образом:
Обратите внимание, что это также может быть использовано при инициализации SearchView MenuItemCompat.getActionView(searchItem); Приобретение только устарело. , , Так что не говорите, что не знаете, видите ли вы это
- Соответствующий монитор setOnQueryTextListener(OnQueryTextListener listener)
Может ли вышеуказанный контент реализовать простой поиск? На самом деле я лично считаю, что этого мало? Почему ты это сказал? Поскольку вы хотите контролировать переключение фрагментов, нет соответствующей временной точки или нет времени для переключения фрагментов. Я долго думал об этом. Позже, когда я увидел исходный код, я обнаружил, что время проекта Google на самом деле Я уже думал об этом для нас. На самом деле, я думаю, что мы можем думать, инженеры Google поймут это для нас!
- setOnSearchClickListener (OnClickListener listener) Метод для обратного вызова при нажатии значка поиска.
- setOnCloseListener (OnCloseListener listener) Метод для обратного вызова при переходе после поиска.
Таким образом, есть соответствующий момент времени. Когда вы входите, открываете вещь и вставляете фрагмент (здесь, если вы хотите добавить эффекты анимации, вы можете использовать ViewPager, а затем переключиться, установив метод для отображения этого. На самом деле, вещи тоже Вы можете установить анимацию, это зависит от того, как вы выберете). Когда вы нажимаете закрыть. Просто замените предыдущий фрагмент. Чтобы все лучше поняли, позвольте мне реализовать это в коде! Давайте посмотрим на эффект (виртуальная машина немного глупа!)

- На самом деле никаких изменений в xml нет, поэтому я не буду публиковать их!
- Код в Activity является наиболее важным, код выглядит следующим образом:
Здесь важнее всего эти мониторы. Пока вы понимаете мониторы, в принципе проблем не будет.
Таким образом, соответствующий эффект может быть достигнут. как насчет этого? Не плохо, верно! ! !
2.2 Украшение интерфейса
2.2.1 Текст приглашения по умолчанию

Приведенное выше изображение отображается, когда текст подсказки отсутствует. Как добавить текст подсказки?
Вы можете добавить текст запроса поиска через вышеуказанный код.
2.2.2 Кнопка поиска не исчезает
Эта кнопка поиска находится внутри поля ввода.При настройке содержимого кнопка поиска исчезнет. Я чувствую, что то, что я описал, не правильно, что с ним? Пока ты понимаешь. , ,
- setIconifiedByDefault (boolean iconified) Этот Api в основном контролирует, находится ли кнопка поиска внутри поля ввода, true означает, что она отображается внутри, а false означает, что она отображается снаружи
2.2.3 Кнопка поиска, чтобы отменить проблему закрытия значка
У некоторых менеджеров по продукту всегда есть странные потребности и они хотят убрать крест после поиска. Скажи бесчеловечность. , , Может быть изменено только тихо. , , На самом деле, мое сердце разбито. , ,
- onActionViewExpanded () устанавливает API, чтобы значок закрытия не отображался
Хотя вы можете отключить этот значок, в этом случае есть проблема: операция отключения и переключения фрагмента, записанного ранее, будет здесь недействительной. Как это решить? Подумав об этом в течение долгого времени, мне нужно иметь дело только с событием возврата, или у меня нет возможности узнать, когда пользователь действительно, когда поиск завершен? Только тогда, когда будет выполнена операция возврата и когда она закончится!
Добавьте этот код, получите onDloseClicked () SearchView через отражение, просто вызовите его
2.2.4 Расширение панели поиска по умолчанию
Продукт снова сказал. Когда вы входите на эту страницу, диалоговое окно поиска должно отображаться по умолчанию. Пользователю требуется на одну операцию меньше и удобство работы. Я сказал в то время. Как насчет пользователя? Продукт говорит, что такой странный пользователь не заботится. , , (Я был в то время! Моя голова была полна черных линий)
- setIconified (boolean iconify) Установить, будет ли расширено поле ввода поиска, обратите внимание здесь! false означает расширенный, true означает закрытый
2.2.5 Изменить значок поиска или удалить значок
Продукты Laogen не собираются работать! Я посмотрел на значок поиска и подумал, что он маленький, я хочу изменить его! Как это сделать?
В теме Активность на странице, добавьте соответствующийsearchViewStyleСвойство, это свойство может быть установлено самостоятельно.
Изображение здесь зависит от вашей игры. , ,
2.2.6 Изменить цвет текста
Если вы считаете, что текст в поле ввода или текст приглашения выглядят чёрно-черными, вы можете изменить его следующим образом.
Я не знаю, есть ли что-нибудь еще. Я думаю, этого достаточно, чтобы иметь дело с вашими менеджерами по продукту. Вы не можете положить нож на стол или положить QR-код или что-то еще. , ,
Я надеюсь, что моя статья будет полезна для вас! Надеюсь, мы добьемся прогресса вместе. , , увидимся!
Источник


