- Creating Simple Application in Android Studio
- Managing Projects from Android Studio
- In this document
- Creating an Android Project
- Step 1: Create a New Project
- Step 2: Select Form Factors and API Level
- Step 3: Add an Activity
- Step 4: Configure Your Activity
- Step 5: Develop Your App
- Creating an Android Module
- Setting up a Library Module
- Adding a dependency on a library module
- Referencing a library module
- Declaring library components in the manifest file
- Using the Android Project View
- Use the Android Project View
Creating Simple Application in Android Studio
In this chapter, let us create a simple Flutter application to understand the basics of creating a flutter application in the Android Studio.
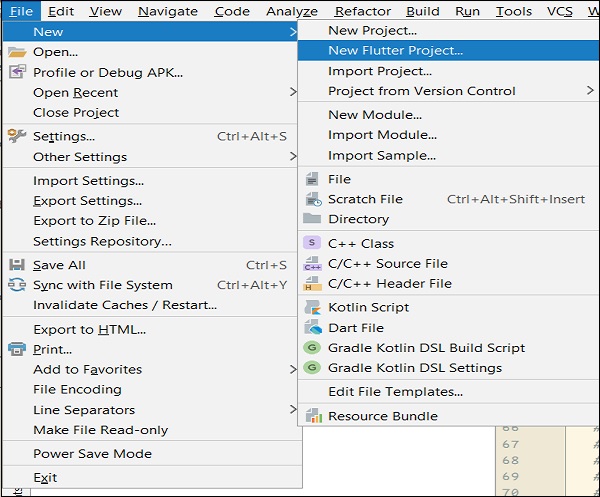
Step 1 − Open Android Studio
Step 2 − Create Flutter Project. For this, click File → New → New Flutter Project
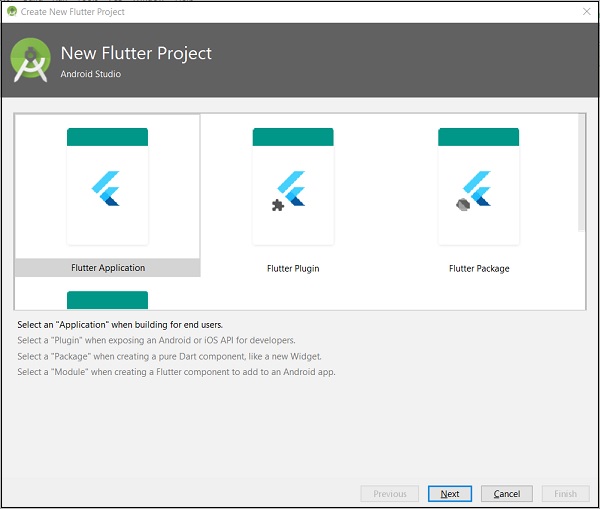
Step 3 − Select Flutter Application. For this, select Flutter Application and click Next.
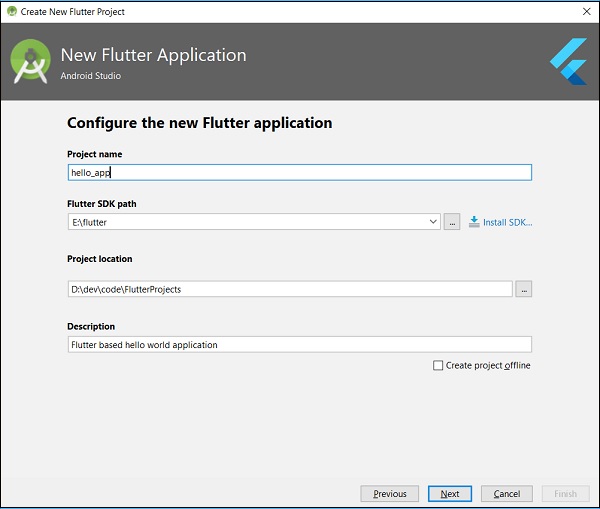
Step 4 − Configure the application as below and click Next.
Project name: hello_app
Flutter SDK Path:
Description: Flutter based hello world application
Step 5 − Configure Project.
Set the company domain as flutterapp.tutorialspoint.com and click Finish.
Step 6 − Enter Company domain.
Android Studio creates a fully working flutter application with minimal functionality. Let us check the structure of the application and then, change the code to do our task.
The structure of the application and its purpose is as follows −
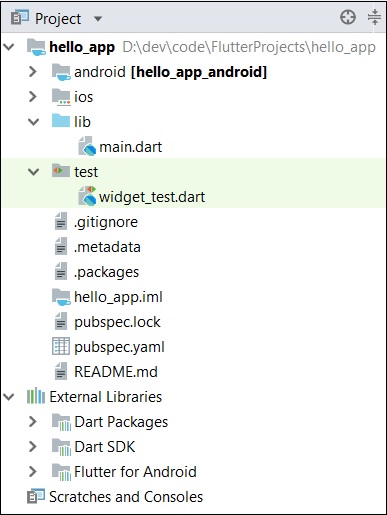
Various components of the structure of the application are explained here −
android − Auto generated source code to create android application
ios − Auto generated source code to create ios application
lib − Main folder containing Dart code written using flutter framework
ib/main.dart − Entry point of the Flutter application
test − Folder containing Dart code to test the flutter application
test/widget_test.dart − Sample code
.gitignore − Git version control file
.metadata − auto generated by the flutter tools
.packages − auto generated to track the flutter packages
.iml − project file used by Android studio
pubspec.yaml − Used by Pub, Flutter package manager
pubspec.lock − Auto generated by the Flutter package manager, Pub
README.md − Project description file written in Markdown format
Step 7 − Replace the dart code in the lib/main.dart file with the below code −
Let us understand the dart code line by line.
Line 1 − imports the flutter package, material. The material is a flutter package to create user interface according to the Material design guidelines specified by Android.
Line 3 − This is the entry point of the Flutter application. Calls runApp function and pass it an object of MyApp class. The purpose of the runApp function is to attach the given widget to the screen.
Line 5-17 − Widget is used to create UI in flutter framework. StatelessWidget is a widget, which does not maintain any state of the widget. MyApp extends StatelessWidget and overrides its build method. The purpose of the build method is to create a part of the UI of the application. Here, build method uses MaterialApp, a widget to create the root level UI of the application. It has three properties — title, theme and home.
title is the title of the application
theme is the theme of the widget. Here, we set blue as the overall color of the application using ThemeData class and its property, primarySwatch.
home is the inner UI of the application, which we set another widget, MyHomePage
Line 19 — 38 − MyHomePage is same as MyApp except it returns Scaffold Widget. Scaffold is a top level widget next to MaterialApp widget used to create UI conforming material design. It has two important properties, appBar to show the header of the application and body to show the actual content of the application. AppBar is another widget to render the header of the application and we have used it in appBar property. In body property, we have used Center widget, which centers it child widget. Text is the final and inner most widget to show the text and it is displayed in the center of the screen.
Step 8 − Now, run the application using, Run → Run main.dart
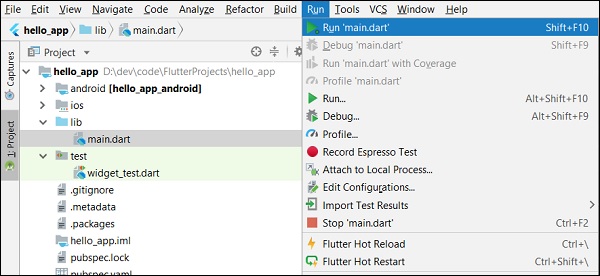
Step 9 − Finally, the output of the application is as follows −
Источник
Managing Projects from Android Studio
In this document
Android Studio provides graphical tools for creating and managing Android projects, which contain everything that define your Android apps, from app source code to build configurations and test code. Each project contains one or more different types of modules, such as application modules, library modules, and test modules.
This guide explains how to create Android projects and different modules using Android Studio. For more information about the Android project structure and module types, read Managing Projects Overview.
Creating an Android Project
Android Studio makes it easy to create Android apps for several form factors, such as phone, tablet, TV, Wear, and Google Glass. The New Project wizard lets you choose the form factors for your app and populates the project structure with everything you need to get started.
Follow the steps in this section to create a project in Android Studio.
Step 1: Create a New Project
If you didn’t have a project opened, Android Studio shows the Welcome screen. To create a new project, click New Project.
If you had a project opened, Android Studio shows the development environment. To create a new project, click File > New Project.
The next window lets you configure the name of your app, the package name, and the location of your project.

Figure 1. Choose a name for your project.
Enter the values for your project then click Next.
Step 2: Select Form Factors and API Level
The next window lets you select the form factors supported by your app, such as phone, tablet, TV, Wear, and Google Glass. The selected form factors become the application modules within the project. For each form factor, you can also select the API Level for that app. To get more information, click Help me choose.

Figure 2. Select the API Level.
The API Level window shows the distribution of mobile devices running each version of Android, as shown in figure 3. Click on an API level to see a list of features introduced in the corresponding version of Android. This helps you choose the minimum API Level that has all the features that your apps needs, so you can reach as many devices as possible. Then click OK.

Figure 3. Choose form factors for your app.
Then, on the Form Factors Window, click Next.
Step 3: Add an Activity
The next screen lets you select an activity type to add to your app, as shown in figure 4. This screen displays a different set of activities for each of the form factors you selected earlier.

Figure 4. Add an activity to your app.
Choose an activity type then click Next.
Note: If you choose «Add No Activity», click Finish to create the project.
Step 4: Configure Your Activity
The next screen lets you configure the activity to add to your app, as shown in figure 5.

Figure 5. Choose a name for your activity.
Enter the activity name, the layout name, and the activity title. Then click Finish.
Step 5: Develop Your App
Android Studio creates the default structure for your project and opens the development environment. If your app supports more than one form factor, Android Studio creates a module folder with complete source files for each of them as shown in figure 6.

Figure 6. The default project structure for a mobile app.
Now you are ready to develop your app. For more information, see the following links:
Creating an Android Module
Android application modules contain the src/main/ , AndroidManifest.xml , build.gradle , build output and other files you need to generate your app’s APK files. Android Studio provides a New Module Wizard that you can use to quickly create a new Android module (or a module from existing code) based on selected application settings, such as minimum SDK level and activity template.
To create a new module, select File > New > Module. Select the desire module type then click Next to enter the basic module settings:
- Enter an Application Name. This name is used as the title of your application launcher icon when it is installed on a device.
- Enter a Module Name. This text is used as the name of the folder where your Java-based activity files are stored.
- Enter a Package Name and Package Location. This class package namespace creates the initial package structure for your applications code files and is added as the package attribute in your application’s Android manifest file. This manifest value serves as the unique identifier for your application app when you distribute it to users. The package name must follow the same rules as packages in the Java programming language.
- Select the Minimum required SDK. This setting indicates the lowest version of the Android platform that your application supports for the selected form factor. This value sets the minSdkVersion attribute in the build.gradle file.
Note: You can manually change the minimum and target SDK for your module at any time: Double-click the module’s build.gradle in the Project Explorer, set the targetSdkVersion and targetSdkVersion in the defaultConfig section.
The wizard creates a new Android application module according to the options you have chosen.
Setting up a Library Module
A library module is a standard Android module, so you can create a new one in the same way as you would a new application module, using the New Module wizard and selecting Android Library as the module type. The created library module will appear in your project view along with the other modules.
You can easily change an existing application module to a library module by changing the plugin assignment in the build.gradle file to com.android.library.
Adding a dependency on a library module
The library dependency can be declared in the module’s manifest file or in the GameActivity :
To add the dependency declaration to the build file, edit the build file for the app module ( app/build.gradle ) and add a dependency on the lib module:
In this example, the lib module can still be built and tested independently, and the build system creates an AAR package for it that you could reuse in other projects.
Note: The library settings in the app/build.gradle file will override any shared library resources declared in the manifest file.
Referencing a library module
If you are developing an application and want to include the shared code or resources from a library module, you can also do so easily by adding a reference to the library module in the module’s dependency page.
To add a reference to a library module, follow these steps:
- Make sure that both the module library and the application module that depends on it are in your project. If one of the modules is missing, import it into your project.
- In the project view, right-click the dependent module and select Open >Module Settings.
- Right-click the plus icon to add a new dependencies.
If you are adding references to multiple libraries, you can set their relative priority (and merge order) by selecting a library and using the Up and Down controls. The tools merge the referenced libraries with your application starting from lowest priority (bottom of the list) to highest (top of the list). If more than one library defines the same resource ID, the tools select the resource from the library with higher priority. The application itself has highest priority and its resources are always used in preference to identical resource IDs defined in libraries.
Android Studio rebuilds the module, including the contents of the library module the next time the project or module is built.
Declaring library components in the manifest file
In the manifest file of the application module, you must add declarations of all components that the application will use that are imported from a library module. For example, you must declare any , , ,
, and so on, as well as
, , and similar elements.
Declarations should reference the library components by their fully-qualified package names, where appropriate.
For example, the TicTacToeMain example application declares the library activity GameActivity like this:
For more information about the manifest file, see the documentation for AndroidManifest.xml.
Using the Android Project View
The Android project view in Android Studio shows a flattened version of your project’s structure that provides quick access to the key source files of Android projects and helps you work with the new Gradle-based build system. The Android project view:
- Groups the build files for all modules at the top level of the project hierarchy.
- Shows the most important source directories at the top level of the module hierarchy.
- Groups all the manifest files for each module.
- Shows resource files from all Gradle source sets.
- Groups resource files for different locales, orientations, and screen types in a single group per resource type.
Use the Android Project View
The Android project view is enabled by default and shows all the build files at the top level of the project hierarchy under Gradle Scripts. The project module appears as a folder at the top level of the project hierarchy and contains these three elements at the top level:
- manifests/ — Manifest files for the module.
- java/ — Source files for the module.
- res/ — Resource files for the module.
Notice how the Android project view groups all instances of the ic_launcher.png resource for different screen densities under the same element.
Note: The Android project view shows a hierarchy that helps you work with Android projects by providing a flattened structure that highlights the most commonly used files while developing Android applications. However, the project structure on disk differs from this representation and maintains the traditional project structure.


Figure 10: Android and Traditional project view
Источник


