- How to Create Classes in Android Studio?
- Creating Java Class in Android Studio
- Step by Step Implementation
- Creating Kotlin Class in Android Studio
- Step by Step Implementation
- How To Create New Java Class In Android Studio
- 1.How To Create New Java Class In Android Studio.
- 2. Java Class SMSBean Usage Example.
- Android tutorial — How to Create New Java Class in Android Studio — android studio tutorial
- What is Java Class?
- New Java Class in Android Studio :
- How to Create New Java Class in Android Studio:
- Related Searches to How to Create New Java Class in Android Studio
- Создание нативных Android-приложений с использованием компилятора Intel C++ Compiler в Android Studio 1.0.1
- Требуемые программные инструменты
- Использование компилятора Intel C++ Compiler в Android Studio 1.0.1
- 1. Создание нового проекта Android с нативным интерфейсом:
- 2. Добавление нативного исходного кода: main.c
- 3. Добавление make-файла: Android.mk
- 4. Добавление make-файла: Application.mk
- 5. Сконфигурируйте свое приложение для выполнения ndk-build с помощью make-файлов
- 6. Добавьте ID «hello_textview» в виджет textview
- 7. Обновите «MainActivity.java», чтобы UI textview вызов нативной библиотеки:
- 8. Запустите виртуальную машину Android Virtual Machine «Intel-Nexus 7 x64» и выполните приложение, щёлкнув кнопку «Run».
How to Create Classes in Android Studio?
In Android during the project development most of the time there is a need for classes in the projects. For example, in the case of CRUD operation, we need a model class to insert and retrieve data. Also to hold the info in our custom view we need to create a getter setter class. So basically in android , there are two types of classes we can create and we use frequently .
- Creating Java Class
- Creating Kotlin Class
So in this article, we are going to create both Java and Kotlin class in Android studio.
Creating Java Class in Android Studio
A class is a user-defined blueprint or prototype from which objects are created. It represents the set of properties or methods that are common to all objects of one type. In general, java class declarations can include these components, in order:
- Modifiers: A class can be public or has default access (Refer this for details).
- class keyword: class keyword is used to create a class.
- Class name: The name should begin with an initial letter (capitalized by convention).
- Superclass(if any): The name of the class’s parent (superclass), if any, preceded by the keyword extends. A class can only extend (subclass) one parent.
- Interfaces(if any): A comma-separated list of interfaces implemented by the class, if any, preceded by the keyword implements. A class can implement more than one interface.
- Body: The class body surrounded by braces, < >.
Step by Step Implementation
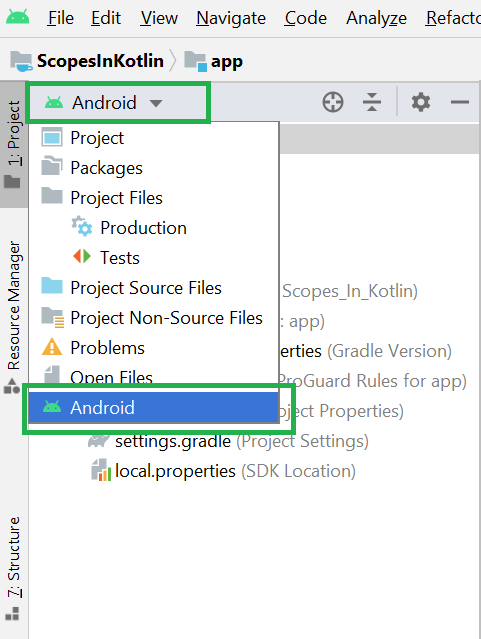
Step 1: Go to Android Studio and open the project in Android mode as shown in the below image.
Step 2: Now go to the app > java > your package name > right-click > New > Java Class as shown in the below image.

Step 3: After completing step 2 a pop-up screen will arise like below. Here enter your class name and choose Class and click the Enter button.

After completing the above steps successfully you can find your Java class here. Go to the app > java > your package name > GeeksforGeeks.java. And you can write your own Java code here.

Creating Kotlin Class in Android Studio
Like Java, the class is a blueprint for the objects having similar properties. We need to define a class before creating an object and the class keyword is used to define a class. The kotlin class declaration consists of the class name, class header, and class body enclosed with curly braces.
Where:
Class name: every class has a specific name
Class header: header consist of parameters and constructors of a class
Class body: surrounded by curly braces, contains member functions and other property
Both the header and the class body are optional; if there is nothing in between curly braces then the class body can be omitted. For example:
Step by Step Implementation
Step 1: Go to Android Studio and open the project in Android mode as shown in the below image.
Step 2: Now go to the app > java > your package name > right-click > New > Kotlin File/Class as shown in the below image.

Step 3: After completing step 2 a pop-up screen will arise like below. Here enter your class name and choose Class and click the Enter button.
Источник
How To Create New Java Class In Android Studio
In android development, the java class is commonly used to implement business logic processes such as database access, send emails, send short messages etc. We always use one java class to encapsulate some related functions.
So we can think java class as the Model role in the MVC pattern. This example will show you how to create a new java class in android studio, and we will create a SMSBean java class that will implement short message send and receives functions.
1.How To Create New Java Class In Android Studio.
- Launch Android Studio, create a new project. You can read the article How To Create New Android Studio Project to learn more.
- After that right-click the default package in the android studio Project View’s Android subview, then click the New —> Java Class menu item.
- You can also click the New —> Package menu item to create a new package or sub-package under exist package. In this example, we create a sub-package model under the existing com.dev2qa.example package.
- Then there will popup a dialog that will let you input java class-related information. Input class name SMSBean in the Name input text box, select Class in the Kind drop-down list, do not input any superclass, do not implement any interface. Input package name value such as com.dev2qa.example.model. Click the OK button.
- After clicking the OK button, the java class SMSBean has been created successfully. We will add two methods in it, one is sendSMS(), the other is receiveSMS(), please see code comments for detail.
2. Java Class SMSBean Usage Example.
This example will use SMSBean as a short messages manager object, it has two methods sendSMS() and receiveSMS().
The user interface of this example is not complex, there will have two buttons on the screen one is used to send short messages, the other is used to receive short messages. When you click any of the two buttons, an AlertDialog will pop up showing some messages.
If you can not watch the above video, you can see it on the youtube URL https://youtu.be/VhM3qIQkuD8
So if you want to run this example, you should create a new activity and layout XML files to implement the user interface. You can read the below articles if you do not know how to create activity and use event listener.
Источник
Android tutorial — How to Create New Java Class in Android Studio — android studio tutorial
What is Java Class?
- In Java, the new keyword is used to create new objects. There are three steps when creating an object from a class − Declaration − A variable declaration with a variable name with an object type. So basically, an object is created from a class.

New Java Class in Android Studio :
- With the Create New Class dialog and file templates, Android Studio helps you to quickly create the following new classes and types:
- Java classes
- Enumeration and singleton classes
- Interface and annotation types

How to Create New Java Class in Android Studio:
- Step 1: Firstly, Select app > Java > package > Right Click on package. After that Click on New > Java Class. Remember to choose your package in which you want to create new class.
- Step 2: After that Enter Class name and Click on OK. Here we create Class Animal as shown in figure below.
- Step 3: New Java Class will be created in your Android project.
Related Searches to How to Create New Java Class in Android Studio
World’s No 1 Animated self learning Website with Informative tutorials explaining the code and the choices behind it all.
Источник
Создание нативных Android-приложений с использованием компилятора Intel C++ Compiler в Android Studio 1.0.1
На момент написания этого текста текущей версией Android Studio была версия 1.0.1. Компилятор Intel C++ Compiler for Android, будучи частью Intel Integrated Native Developer Experience (Intel INDE), поддерживает Android Studio 1.0.1 в Intel INDE 2015 Update 1. Поскольку Android Studio 1.0.1 не поддерживает Android NDK, в этой статье описаны шаги для создания нативного Android-приложения с использованием Android NDK r10d и компилятора Intel C++ Compiler for Android. Поехали!Android Studio в качестве системы сборки использует Gradle. На момент написания статьи Gradle в процессе сборки вызывала систему NDK. В Android NDK r10 и более поздней версии после инсталляции Intel INDE компилятор Intel C++ Compiler for Android (ICC) не является более используемым по умолчанию компилятором в системе сборки NDK.
Представленные ниже шаги дают общее описание подготовки, сборки и выполнения нативного приложения в Android Studio 1.0.1.
Если вы используете Android Studio 0.8.6, почитайте статью «Сборка нативных Android-приложений с использованием компилятора Intel C++ Compiler в Android Studio», где рассказывается о применении Intel C++ Compiler.
Требуемые программные инструменты
Успешная инсталляция INDE 2015 Update 1 с Android Studio Integration гарантирует, что вы располагаете всем необходимым программным обеспечением. Детальные требования к программному обеспечению и системе описаны в документе Intel C++ Compiler Release Notes for Intel Integrated Native Developer Experience 2015.
Приведенные в данной статье инструкции предполагают использование следующего ПО для архитектуры IA-32 и Intel-64:
- Oracle JDK 7 (нативный Intel-64 JDK для систем Windows x64)
- Android SDK 20 или старше
- NDK r10d (предполагается инсталляция в [ndk-dir] )
- Android Studio 1.0.1
Убедитесь, что в переменную среды PATH добавлены следующие директории Android NDK (если они отсутствуют, добавьте):
Использование компилятора Intel C++ Compiler в Android Studio 1.0.1
После инсталляции Intel C++ Compiler 15.0 for Android в папку «[ndk-dir]\toolchains» (директория по умолчанию – «C:\Intel\INDE\IDEintegration\android-ndk-r10d\toolchains») устанавливаются следующие элементы:
- x86-icc
- x86-icc15.0.X.YYY
- x86_64-icc (если NDK поддерживает 64-разрядные цели)
- x86_64-icc15.0.X.YYY (если NDK поддерживает 64-разрядные цели)
Для NDK до r9d: после инсталляции нативным компилятором C/C++ будет Intel C++ Compiler. Дополнительных шагов для использования Intel C++ Compiler с Android Studio не требуется. Ели вы хотите для построения нативного кода использовать GNU gc, следуйте инструкциям в «Замена компилятора по умолчанию с Intel C++ Compiler на GCC для целевых приложений x86».
Для NDK r10 — r10d: компилятор Intel C++ после инсталляции не является компилятором по умолчанию. Чтобы использовать Intel C++ Compiler из Android Studio, следуйте шагам 3, 4, 5 ниже.
Если у вас установлено несколько Android NDK, следуйте инструкциям в статье «Интеграция Intel C++ Compiler for Android с несколькими Android NDK».
Теперь создадим новый проект Android для Intel-64 с нативным вызовом функции, продемонстрировав тем самым использование компилятора Intel C++ Compiler:
1. Создание нового проекта Android с нативным интерфейсом:
1. Откройте Android Studio, создайте новый Android-проект «nativeDemo» с параметрами по умолчанию, например:
2. Откройте «app\src\main\java\MainActivity.java» и добавьте в конец класса «MainActivity» нативную функцию как показано ниже:
Должно получиться примерно так:
3. Чтобы создать проект «nativeDemo», выберите: «Build > Make Project», после чего можно будет использовать «javah».
4. В «View > Tools Windows > Terminal» откройте терминальное окно и выполните указанные ниже шаги для запуска «javah» и создания заголовка jni:
a) В терминальном окне перейдите в подпапку «src\main»:b) Чтобы создать «com_example_nativedemo_app_MainActivit.h» в папке src\main\jni, выполните следующую команду «javah» cmd:
5. В окне Project измените вид на Project, щелкните правой кнопкой мыши на папке «src» и выберите «Synchronize ‘src». Теперь в папке «src\main\jni» можно видеть файл заголовка «com_example_mydemo_nativedemo_MainActivity.h».
2. Добавление нативного исходного кода: main.c
1. Создайте «main.c»: выделите файл «com_example_mydemo_nativedemo_MainActivity.h», используйте волшебные клавиши copy/paste для создания нового «main.c» со следующим кодом:
2. Сохраните изменения
3. Теперь в папке «jni» у вас два файла: com_example_mydemo_nativedemo_MainActivity.h и main.c3. Добавление make-файла: Android.mk
1. Щелкните правой кнопкой на папке «jni», выберите «New > File»
2. Наберите «Android.mk» и щёлкните на «OK»
3. Добавьте в этот файл следующие строки (обратите внимание, что строка LOCAL_SRC_FILES должна содержать исходные файлы, которые находятся в папке «jni»):4. Добавление make-файла: Application.mk
1. Щелкните правой кнопкой на папке «jni», выберите «New > File»
2. Наберите «Application.mk» и щёлкните на «OK»
3. Добавьте в этот файл следующие строки:4. [Опционально] Для изменения параметров компилятора используйте следующее:
5. Сконфигурируйте свое приложение для выполнения ndk-build с помощью make-файлов
1. Откройте файл «app\build.gradle»
2. Добавьте в начало файла следующий импорт:3. И эти строки после секции «defaultConfig»:
4. А следующие строки – в конец файла:
5. Сохраните изменения
6. Теперь создадим проект: выберите [Build > Make Project]. Вы увидите все выходные папки и файлы «libmain.so» в папках «main\libs» и «main\obj\local».6. Добавьте ID «hello_textview» в виджет textview
Откройте «res\layout\activity_main.xml» и измените виджет «textview» как показано ниже:
7. Обновите «MainActivity.java», чтобы UI textview вызов нативной библиотеки:
Для импорта виджета TextView и сохранения изменений нажмите ALT+Enter.
8. Запустите виртуальную машину Android Virtual Machine «Intel-Nexus 7 x64» и выполните приложение, щёлкнув кнопку «Run».
Это означает, что был использован компилятор Intel C++ Compiler for Android.
Источник


 На момент написания этого текста текущей версией Android Studio была версия 1.0.1. Компилятор Intel C++ Compiler for Android, будучи частью Intel Integrated Native Developer Experience (Intel INDE), поддерживает Android Studio 1.0.1 в Intel INDE 2015 Update 1. Поскольку Android Studio 1.0.1 не поддерживает Android NDK, в этой статье описаны шаги для создания нативного Android-приложения с использованием Android NDK r10d и компилятора Intel C++ Compiler for Android. Поехали!


