- Assets Folder in Android Studio
- How the asset folder is different from the Resource Raw folder?
- But when to use which folder?
- How to Create Assets Folder in Android Studio?
- How To Create Different Folders For Adding Different Resolution Images In Android Studio
- How to Add/Create different folders for adding different resolution Images in Android Studio
- Split layouts into subfolders in Android Studio
- Step 1: create layouts container
- Step 2: create feature Res Folders
- Step 3: Add resources to each subfolder
- Step 4: Resync
- Access the resources
- Other solutions?
- In Conclusion
- How To Create Different Folders For Adding Different Resolution Images In Android Studio
- How to Add/Create different folders for adding different resolution Images in Android Studio
Assets Folder in Android Studio
It can be noticed that unlike Eclipse ADT (App Development Tools), Android Studio doesn’t contain an Assets folder in which we usually use to keep the web files like HTML. Assets provide a way to add arbitrary files like text, XML, HTML, fonts, music, and video in the application. If one tries to add these files as “resources“, Android will treat them into its resource system and you will be unable to get the raw data. If one wants to access data untouched, Assets are one way to do it. But the question arises is why in the asset folder? We can do the same things by creating a Resource Raw Folder. So let discuss how the assets folder is different from the Resource Raw folder?
How the asset folder is different from the Resource Raw folder?
In Android one can store the raw asset file like JSON, Text, mp3, HTML, pdf, etc in two possible locations:
- assets
- res/raw folder

Both of them appears to be the same, as they can read the file and generate InputStream as below
But when to use which folder?
Below is some guidance that might be helpful to choose
1. Flexible File Name: (assets is better)
- assets: The developer can name the file name in any way, like having capital letters (fileName) or having space (file name).
- res/raw: In this case, the name of the file is restricted. File-based resource names must contain only lowercase a-z, 0-9, or underscore.
2. Store in subdirectory: (possible in assets)
- assets: If the developer wants to categories the files into subfolders, then he/she can do it in assets like below.

3. Compile-time checking: (possible in res/raw)
- assets: Here, the way to read it into InputStream is given below. If the filename doesn’t exist, then we need to catch it.
- res/raw folder: Here, the way to read it into InputStream is:
So putting a file in the res/raw folder will provide ensure the correct file-name during compile time check.
4. List filenames at runtime: (possible in assets)
- assets: If the developer wants to list all the files in the assets folder, he/she has used the list() function and provide the folder name or ” “ on the root folder as given below.
- res/raw: This is not possible in this folder. The developer has to know the filename during development, and not runtime.
So, in assets, one can read the filename during runtime, list them, and use them dynamically. In res/raw, one needs to code them ready, perhaps in the string resources file.
5. Filename accessible from XML: (possible in res/raw)
So if you need to access your file in any XML, put it in the res/raw folder. Let’s make a table to remember the whole scenario easily.
| Res/Raw Folder |
|---|
| Flexible File Name NO |
| Store in subdirectory NO |
| Compile-time checking YES |
| List filenames at runtime NO |
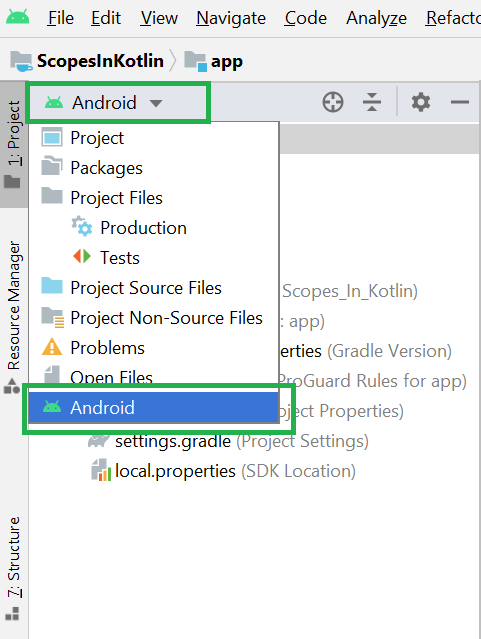
Filename accessible from XML How to Create Assets Folder in Android Studio?Now let’s discuss how to create an assets folder in the android studio. Below is the step-by-step process to create an assets folder in Android studio. Step 1: To create an asset folder in Android studio open your project in Android mode first as shown in the below image.
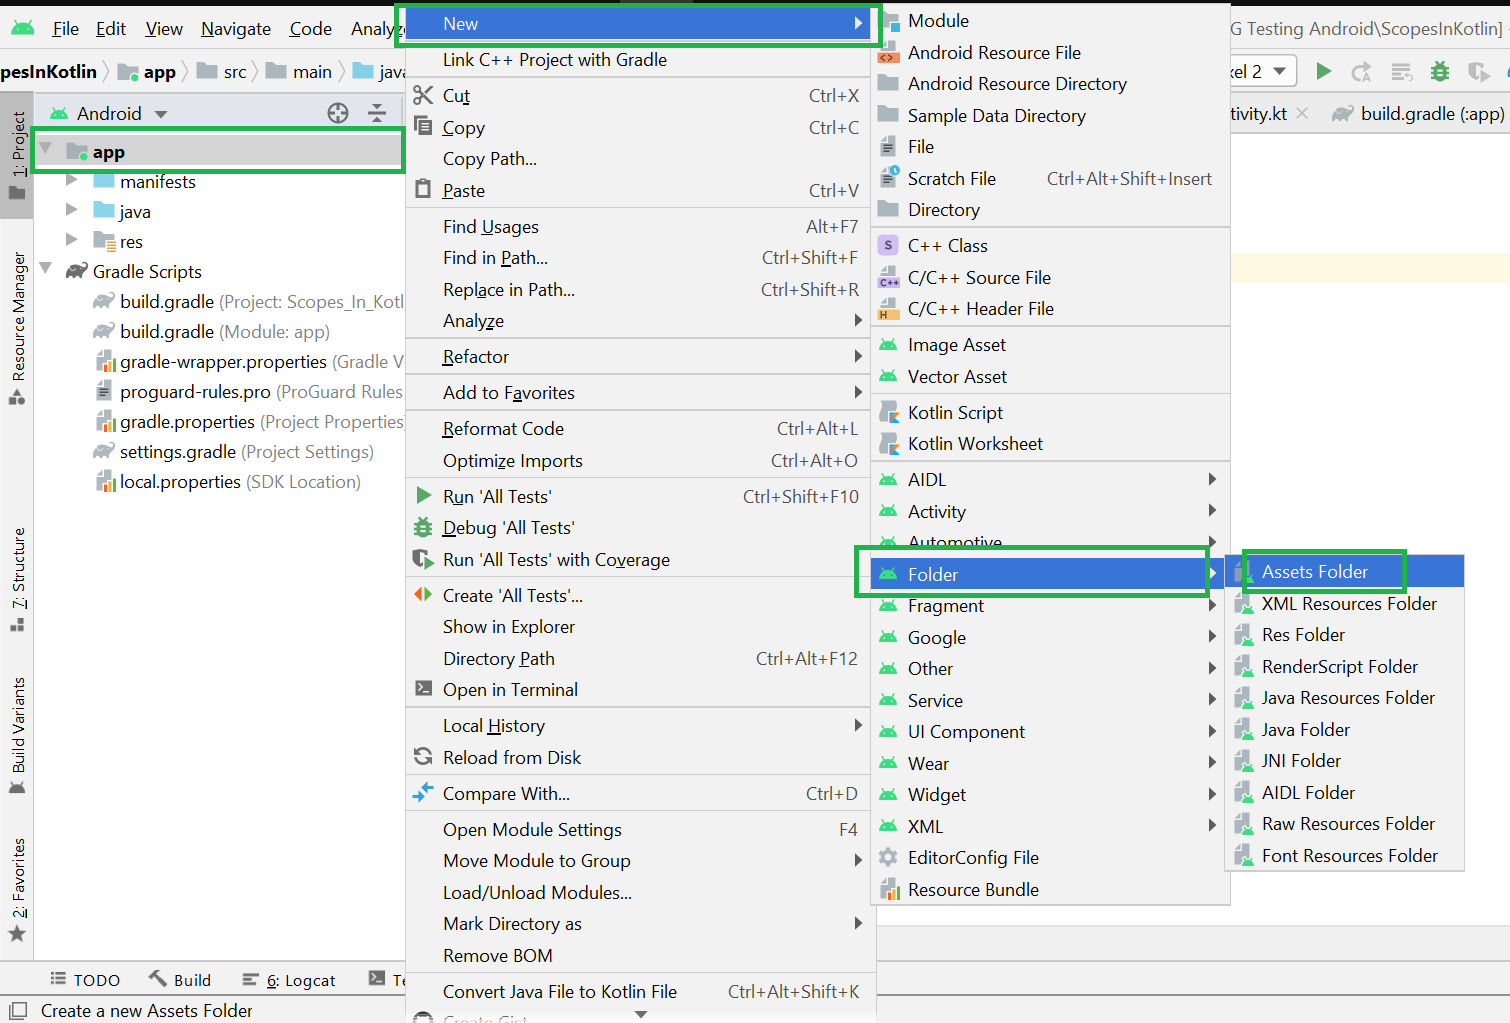
Step 2: Go to the app > right-click > New > Folder > Asset Folder and create the asset folder.
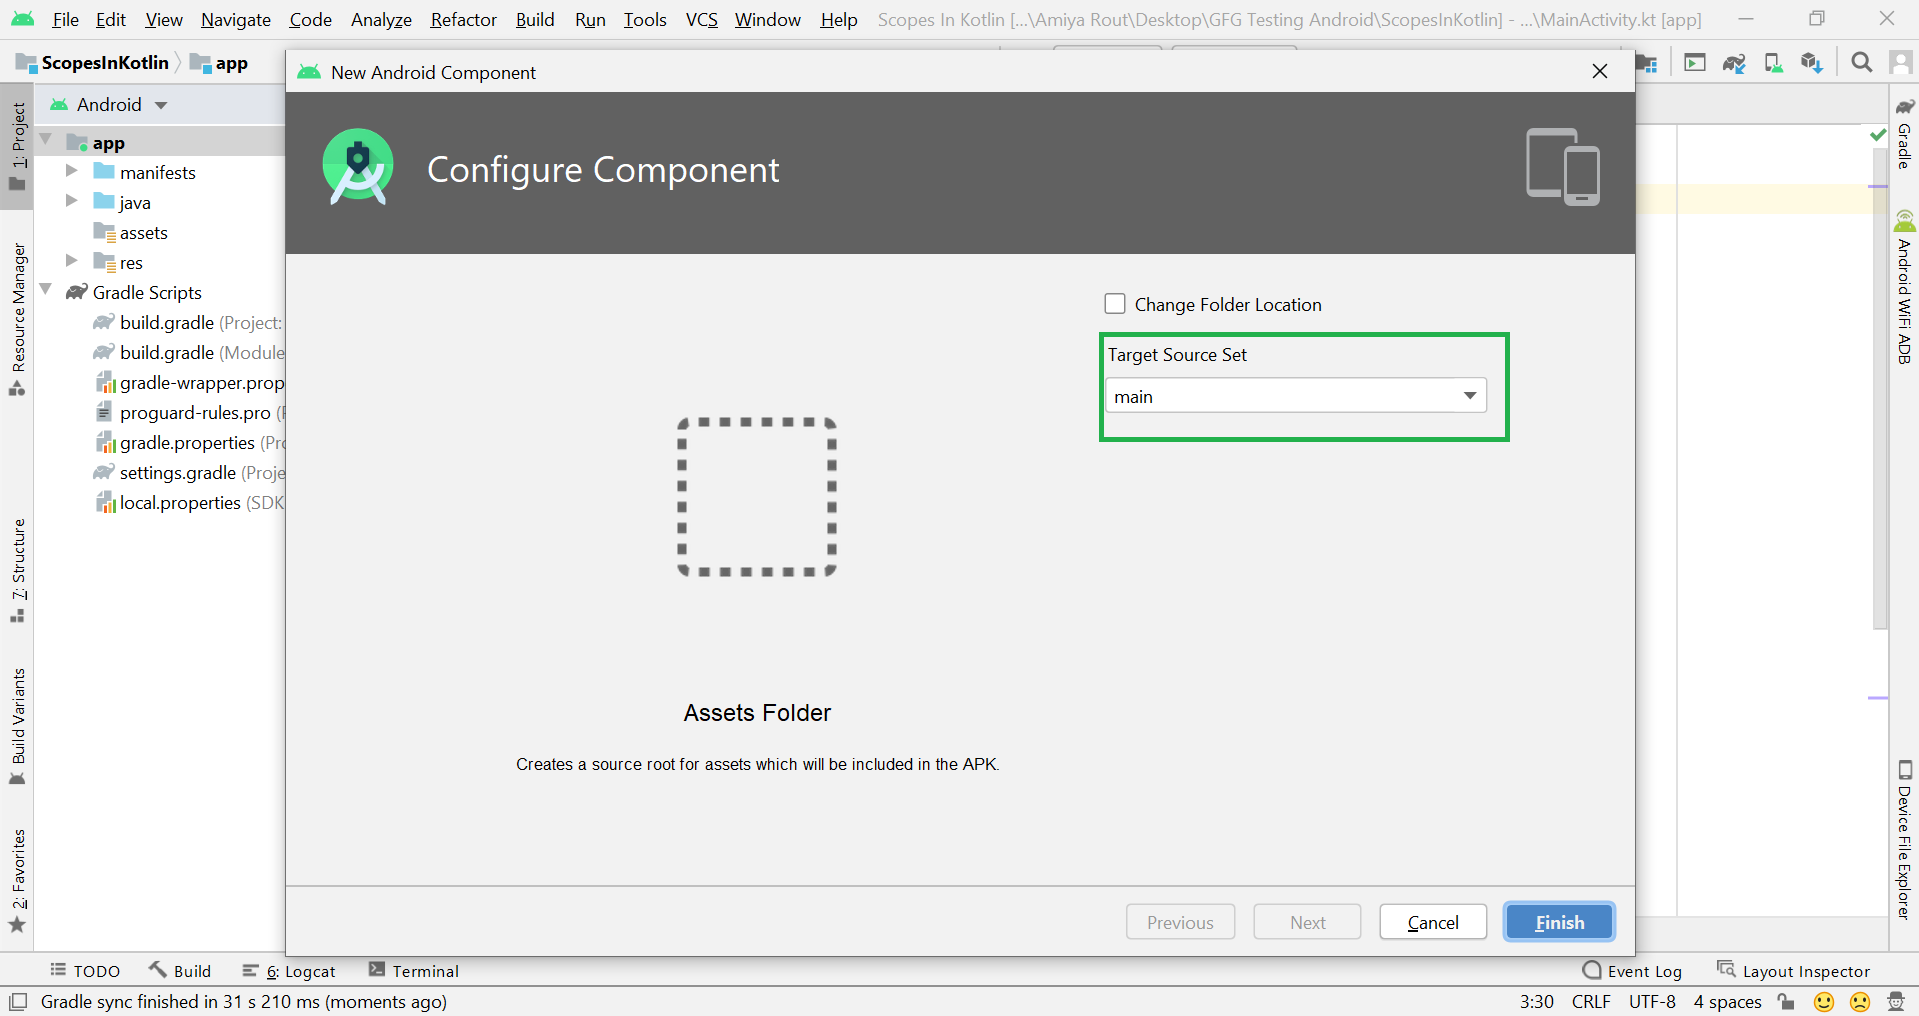
Step 3: Android Studio will open a dialog box. Keep all the settings default. Under the target source set, option main should be selected. and click on the finish button.
Step 4: Now open the app folder and you will find the assets folder by the name of “assets” as shown in the below image. Источник How To Create Different Folders For Adding Different Resolution Images In Android StudioAndroid support a wide range of devices and if you want to create an application in android then your application must be compatible with the different mobile devices. For supporting the different screen sizes you must have different size images which you will save in various folders. Usually Android has four folder which covers almost every device:,drawable-ldpi, drawable-mdpi, drawable-hdpi,drawable-xhdpi. Background Images Dimensions for these different folders are as follows: ldpi = 240×320 pixels mdpi = 320×480 pixels hdpi = 480×800 pixels xhdpi = 720×1280 pixels How to Add/Create different folders for adding different resolution Images in Android StudioStep 1: First of all you must have different images for these folder with given resolution. You can get the images in different resolutions through 9-Patches or you can use any high end image editor tool like Adobe Photoshop.
Step 2: Once you have all the images with you, now it’s time to create the folders for images. Navigate to Project View in Android Studio
Step 3: Go to App folder src > main > res folder. Step 4: right click on res folder. select New and then click Directory.
Step 5: Enter the name of your directory for example: drawable-ldpi.
Step 6: Now you have”drawable-lpdi” folder inside res folder. You can create rest of the folder “drawable-mdpi”,”drawable-hdpi” and “drawable-xhdpi”. Step 7: You can paste the different resolution images inside respective different folders. Источник Split layouts into subfolders in Android Studio
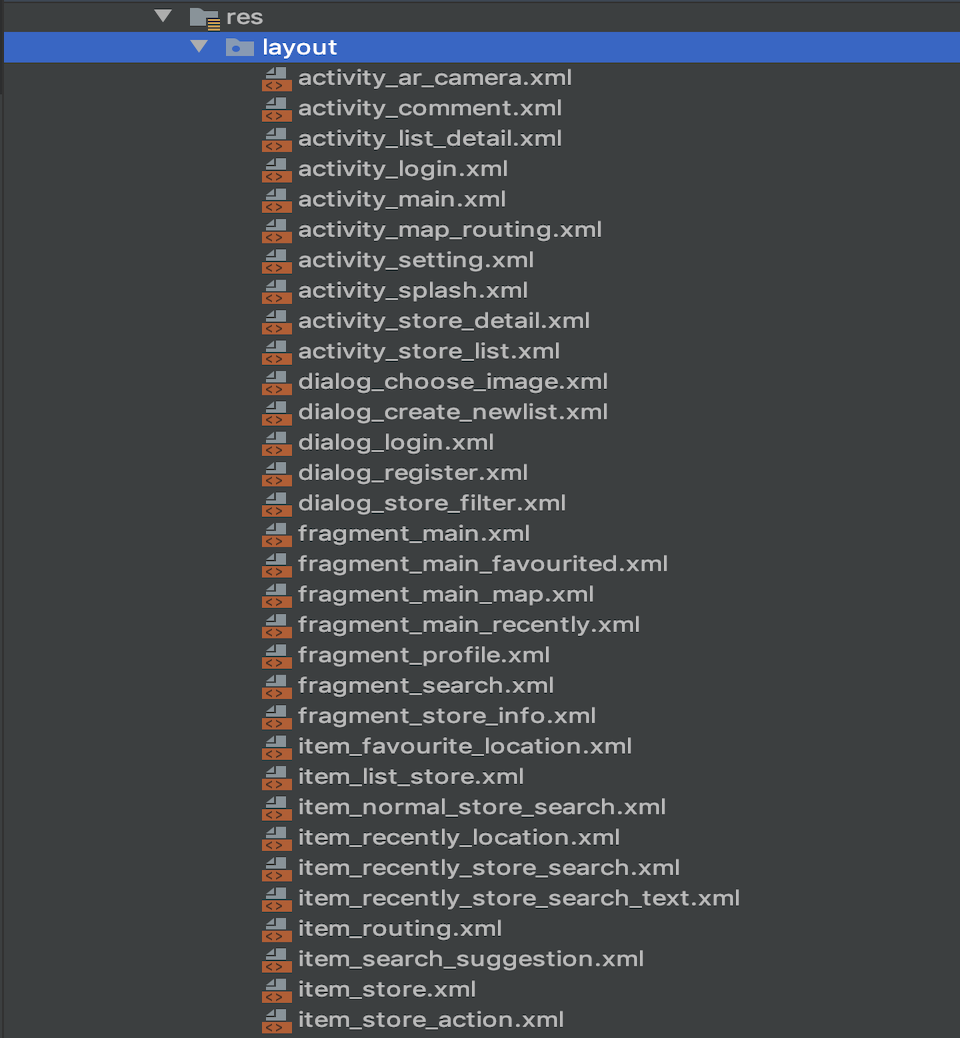
Today when optimizing the codebase of my school project, I saw this:
Look at the list of XML files inside my res/layout folder. Now, look at yours. Is your res/layout too big, hard to control? Your project has too many features, too many screens? Let imagine while confusing running for the deadline, and you can’t find the XML layout that needs to be fixed just because you cannot remember the file name! Wandering search online, I find out that many developers have the same problem. So I decided to write an article to share some tips about how to manage the resources folder in Android Studio.
Step 1: create layouts containerCreate a parent folder that contains all the layouts of our project. Switch project tree explorer to Project view. Right-click in res , select New → Directory, type layouts (remember the ‘s’ or it will be duplicated).
This step is a must-have at the moment. When changing the project tree to Android view, you cannot see the separated subfolders. They are actually NOT merged into one, but Android Studio shows them in the same folder. Step 2: create feature Res FoldersSelect layouts , right-click and select New → Folder → Res Folder. This resource folder will represent a “feature category” that you want.
If you have N vertical features, you need to create N folders. For example, you are developing a Chat app that has 3 categories “home”, “profile” and “chat” corresponding to vertical groups of features. First, I will add chat as new Res Folder, wait a while for Gradle syncing to re-structure the codebase. After that, you will see a yellow chat folder in the res but not inside the layouts . Actually it’s still in layouts , however, because we’ve just added only one folder chat so it only shows chat . Continue to create two more Res Folder for home & profile . Then the project tree will appear exactly as what you expect:
At this point, you’ve successfully divided the layouts into 3 separate categories. Step 3: Add resources to each subfolderAdd a layout folder (without ‘s’) to each subfolder corresponding to each category — like the traditional res/layout . Now you can add any XML layout file that belongs to the current feature into that layout folder. You can also add other types of resources: menu , drawable , anim . Step 4: ResyncTry re-sync Gradle and rebuild the project, you will see the following code was added inside the android tag of app/build.gradle file. This code corresponds to adding 3 categories: 3 resource folder chat , home & profile . If it does not exist, you can add it manually. Access the resourcesAfter resync, you can access these resources normally in Java/Kotlin code using R.layout.chat_activity.xml , R.drawable.chat_send_button.xml ,… Whenever you need to find any XML file, just go to the subfolder of that feature to look for it! Other solutions?Another way is to modularize your project: moving code and resources into a separate feature module. It’s much cleaner and follows SRP principle. In ConclusionYou can organize your resources XML files (layout, drawable. ) into separate subfolders corresponding to the app’s features. I hope these tips above will help you manage your project better, saving your precious time — especially when you need to maintain a huge codebase with many vertical groups of features.
Источник How To Create Different Folders For Adding Different Resolution Images In Android StudioAndroid support a wide range of devices and if you want to create an application in android then your application must be compatible with the different mobile devices. For supporting the different screen sizes you must have different size images which you will save in various folders. Usually Android has four folder which covers almost every device:,drawable-ldpi, drawable-mdpi, drawable-hdpi,drawable-xhdpi. Background Images Dimensions for these different folders are as follows: ldpi = 240×320 pixels mdpi = 320×480 pixels hdpi = 480×800 pixels xhdpi = 720×1280 pixels How to Add/Create different folders for adding different resolution Images in Android StudioStep 1: First of all you must have different images for these folder with given resolution. You can get the images in different resolutions through 9-Patches or you can use any high end image editor tool like Adobe Photoshop.
Step 2: Once you have all the images with you, now it’s time to create the folders for images. Navigate to Project View in Android Studio
Step 3: Go to App folder src > main > res folder. Step 4: right click on res folder. select New and then click Directory.
Step 5: Enter the name of your directory for example: drawable-ldpi.
Step 6: Now you have”drawable-lpdi” folder inside res folder. You can create rest of the folder “drawable-mdpi”,”drawable-hdpi” and “drawable-xhdpi”. Step 7: You can paste the different resolution images inside respective different folders. Источник  Когда к мобильному устройству присоединены наушники  ОС Google Android развивается, и по всему видимому |