- Review: Power Support Anti-Glare and Crystal Film Sets for iPhone 3G
- Question: Q: Smudge/scratch protective film — Fit
- All replies
- Power Support Crystal Film Set for iPhone 4
- Statusnone88
- Statusnone88
- Statusnone88
- ROFLtron
- Statusnone88
- Lurchdubious
- robby818
- Как подключить Android, iPhone, ноутбук через MiraScreen или AnyCast к телевизору по Miracast и AirPlay?
- Подключение MiraScreen/AnyCast адаптера к телевизору
- Повтор экрана iPhone и iPad на телевизор через MiraScreen адаптер
- Трансляция экрана с MacBook и других компьютеров на Mac OS через AirPlay
- Как подключить Android через MiraScreen/AnyCast (Miracast) к телевизору?
- Подключение ноутбука/ПК на Windows к телевизору через MiraScreen или AnyCast
Review: Power Support Anti-Glare and Crystal Film Sets for iPhone 3G

Some have suggested that the glass screens of iPhones and iPod touches don’t need protection. Having seen scratched and chipped screens, neither a pleasant sight, we seriously disagree. And apparently, so do millions of users of these devices; sales of packages containing nothing but screen protectors have been tremendous, and the best of them remain options from Japan’s Power Support: the Anti-Glare Film Set ($15) and Crystal Film Set ($15) for iPhone 3G. Both come in packages of two, and each can be washed off and reapplied if you screw up the first time. As always, a credit card can be used as a squeegee to help remove the few air bubbles that may appear underneath the static cling surface.

While there isn’t a ton to say about these two options, we can tell you that we have continued to rely upon and prefer these two types of film over the pack-ins that come with some—not all—of the iPhone cases we’ve tested. With the Crystal Film Set, the difference between Power Support’s $15 package and the freebies has become marginal: Power Support’s film is a little better made, and if properly applied more completely transparent and invisible, but it’s not so different that you’d need to buy it as a replacement.


The Anti-Glare Set is another story. Matte-finished and light-diffusing, Anti-Glare has actually become a favorite of iLounge’s editors due to its ability to effectively remove harsh reflective light as an impediment to seeing the iPhone’s screen outdoors. Power Support’s iPhone 3G version is of course properly cut to the device’s screen, and as shown in our photos here provides virtually complete visibility of whatever’s on the display, only with a slight frosting. On balance, we prefer it to the Crystal Film, but you’ll have to decide for yourself whether near-perfect clarity or light diffusion is better suited to your needs.

Anti-Glare Film Set

All that’s new this year is the inclusion of a white pre-installation sticker sheet that lets you remove dust specks from your iPhone 3G’s screen prior to placing the screen protector on. We tried this during installation, and it worked, though it helps more to have a small clean microfiber cloth to fully eliminate finger smears as well; this is not included.

Since other companies, including DLO and Griffin, are now selling competing packages of screen film with lower quality, greater quantity film protectors for the same price, Power Support needs to keep differentiating its Sets by making the user experience as easy and positive as possible. The white sticker goes part of the way there. On a related note, we’d strongly like to see Power Support come up with a Home button coverage solution, which is presently missing from the Anti-Glare and Crystal Film sets, as well as most of their competitors.

Crystal Film Set

Overall, if your iPhone 3G case didn’t include film, or if you’re just looking for a strong anti-glare solution, Power Support’s film sets should be high on your list of options. While we’d like to see even more protection or frills in these $15 packages—you get a better value for the price in a full-film set such as the FullBodyFilms Protection Set for iPhone 3G, or United SGP’s SGP Shield for iPhone 3G—these are very good options for those needing only front-of-iPhone coverage.
Источник
Question: Q: Smudge/scratch protective film — Fit
Posted on Jul 13, 2008 1:09 PM
0.3 mm around the edges and around the ear and home button. The fit is much better than the protector included with the Marware cases, and it’s barely noticeable when on the iPhone.
Posted on Jul 13, 2008 1:22 PM
All replies
Loading page content
Page content loaded
0.3 mm around the edges and around the ear and home button. The fit is much better than the protector included with the Marware cases, and it’s barely noticeable when on the iPhone.
Jul 13, 2008 1:22 PM
it sounds like you may have bought a film for the original iphone. they don’t work on the 3g iphone. different sizes.
Message was edited by: cyberspastic
Jul 13, 2008 1:28 PM
Did you buy the crystal film set for the 3G.
There is a difference from first gen. iPhone compared to iPhone 3G.
On the packaging itself it says «for Iphone 3G»
Jul 13, 2008 1:29 PM
I had the Power Support film for my original iPhone. It fit perfectly.
I just ordered some iPhone 3G specific films directly from Power Support and expect it to fit the same. they get the dimensions from Apple so it is a fairly safe bet.
Shiznito, the Power Support film is a really great product as long as you clean the screen super well and apply it correctly. You may also want to check out zagg.com for the unscratchable body skin. It is slightly thicker than the Power Support but you can literally take a knife to it and it wont scratch. I’m using the back and side piece with the Power Support film on the screen. It is awesome protection if you don’t want to leave the phone in a shell case all day.
Jul 13, 2008 1:37 PM
The Apple stores only got about 50 packages of the Crystal Film Set for the 3G iPhone — so unless you bought the 3G version, the older iPhone Crystal Film Set is too small
If your Apple salesperson sold it to you, return it and ask for a refund or store credit to get the proper size when it comes in.
They are sold out in all Apple Stores right now, and ATT never had them.
I am in a similar boat — I got the 3G films, and messed up both of them with so much lint on them they were unusable. I immediately noticed my old iPHone film was too small when I tried the leftover from my last iPhone. so I’m waiting too.
Источник
Power Support Crystal Film Set for iPhone 4

Statusnone88
macrumors 68000
So I had mine arrive today. Install was a lot more tedious then I imagined. So I got them both on, they look pretty good except there are a few peices of dust under the back and front that to get out I’d have to take the whole thing off. but honestly every time I lift them up MORE dust gets in there.
So my question is this: Does removing the film take away it’s adhesive? I’m lifting it with tape, so I’m in no way damaging the film. And how do you guys keep your environments so dust-free? I have a pretty clean area I do it in, but I just can’t seem to keep the dust out.
Also is there anyway to actually clean the films? Plain old microfiber doesn’t seem to be doing the trick.
Maybe I should just do a wet install. but yet again I have no idea how to do that either.
Any help is greatly appreciated!
Statusnone88
macrumors 68000
Statusnone88
macrumors 68000
ROFLtron
macrumors newbie
^That shows you how to get the dust out from under it.
Statusnone88
macrumors 68000
^That shows you how to get the dust out from under it.

Lurchdubious
macrumors 65816
robby818
macrumors 6502a
So I had mine arrive today. Install was a lot more tedious then I imagined. So I got them both on, they look pretty good except there are a few peices of dust under the back and front that to get out I’d have to take the whole thing off. but honestly every time I lift them up MORE dust gets in there.
So my question is this: Does removing the film take away it’s adhesive? I’m lifting it with tape, so I’m in no way damaging the film. And how do you guys keep your environments so dust-free? I have a pretty clean area I do it in, but I just can’t seem to keep the dust out.
Also is there anyway to actually clean the films? Plain old microfiber doesn’t seem to be doing the trick.
Maybe I should just do a wet install. but yet again I have no idea how to do that either.
Any help is greatly appreciated!
I messed up mine up a bit too. Had problems because I used a new Costco yellow microfiber towel which shed little dust particles all over the place. The dust stuck to the back of the PS pieces and a few pieces got under the screen.
When I put one of these on my 3g I used one of the optical cloths that come with eyeglasses (feels silky) and I did a perfect install.
I may give it another try. I apply it in the bathroom to reduce dust. Next time, I will try remove the bottom section of the protector first, then remove the other sections of backing. I did not read the instructions so did not see that the backing can be torn away in segments. PS is close enough to my house that I may just go there and have them do it.
Источник
Как подключить Android, iPhone, ноутбук через MiraScreen или AnyCast к телевизору по Miracast и AirPlay?
Если вы зашли на эту страницу, то скорее всего у вас уже есть MiraScreen или AnyCast адаптер (возможно, у вас он называется как-то иначе) и вы хотите через него подключить к телевизору свой телефон или планшет на Android, iPhone, iPad, или компьютер для трансляции изображения на телевизор без проводов. Если вы вообще не понимаете о чем идет речь, то рекомендую сначала почитать статью Miracast, AirPlay, DLNA адаптер для телевизора. Что такое MiraScreen и AnyCast? Подключив любой Miracast адаптер к телевизору по HDMI и выполнив несложную настройку самого адаптера (можно обойтись и без нее) у нас появится возможность дублировать экран своих мобильных устройств и даже компьютера на большой экран телевизора по Wi-Fi. Используется технология Miracast (для подключения устройств на Android и Windows) или AirPlay (для iPhone, iPad, MacBook, iMac) .
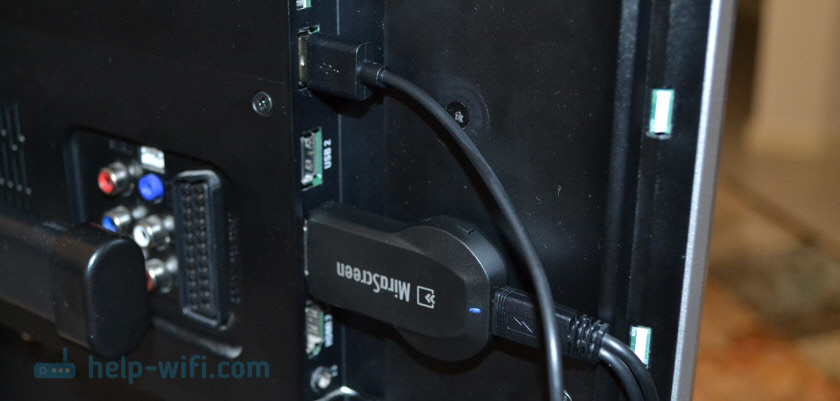
Подключение MiraScreen/AnyCast адаптера к телевизору
Если вы еще не подключили свой Miracast адаптер к телевизору, то сейчас я быстренько покажу как это сделать и перейдем к подключению устройств. Адаптер подключается в один из HDMI портов на телевизоре. Питание адаптера можно подключить в USB-порт телевизора (если он есть) , или в розетку через любой адаптер питания (желательно 5V/1A) .
Включите телевизор (если он был выключен) . Если на экране телевизора автоматически не появится заставка адаптера, то нужно в настройках телевизора в качестве источника выбрать HDMI вход к которому подключен Miracast адаптер (каждый HDMI порт на телевизоре имеет свой номер) . Обычно это можно сделать через отдельное меню, которое открывается кнопкой SOURCES или INPUT с пульта дистанционного управления телевизором.

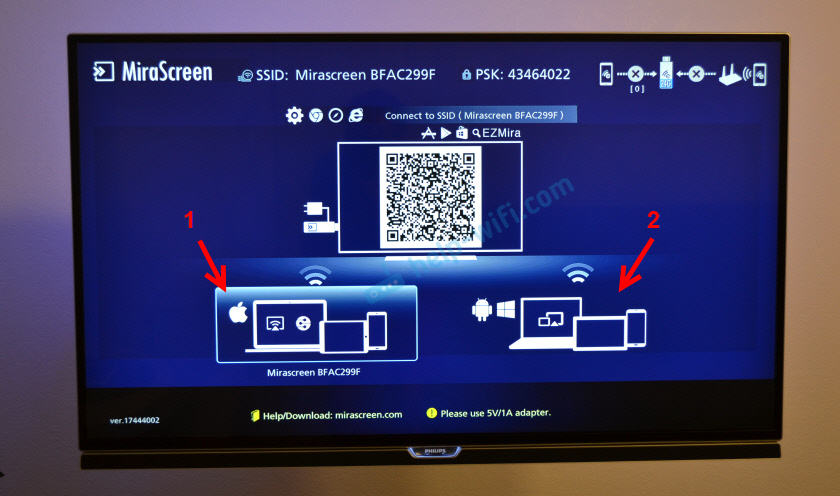
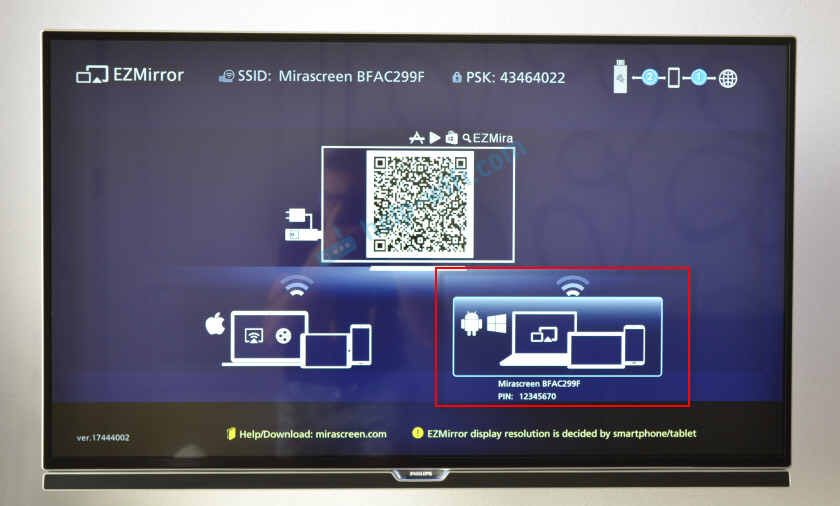
На экране телевизора должен появится рабочий стол (если его можно так назвать) нашего адаптера. У меня MiraScreen MX Wireless Display.

Дальше желательно настроить MiraScreen адаптер. Основная настройка – подключение к роутеру по Wi-Fi сети. Это необходимо для работы соединения по DLNA и вывода изображения на телевизор с iPhone, iPad и компьютеров на Mac OS (трансляция по AirPlay) . Вот подробная инструкция по настройке: 192.168.203.1 – настройка Miracast адаптера. Что делать, если не заходит в настройки MiraScreen и AnyCast? Windows и устройства на Android соединяются с адаптером напрямую, не через роутер.
Практически все эти адаптеры имеют два режима работы:
- AirPlay и DLNA (нарисован значок DLNA и логотип Apple) .
- Miracast (логотип Android и Windows) .
Выбранный режим работы выделен на рабочем столе.
Переключаются эти режимы нажатием на единственную кнопку на самом адаптере.

Или через панель управления (ссылка на инструкцию выше) , но кнопкой удобнее. Нажали один раз на кнопку и режим работы изменился. Выбираем нужный режим в зависимости от того, с какого устройства мы хотим транслировать изображение.
Повтор экрана iPhone и iPad на телевизор через MiraScreen адаптер
Мобильные устройства и компьютеры от Apple не поддерживают Miracast. У них своя технология – AirPlay. На данный момент в телевизорах нет встроенной технологии AirPlay (читал, что возможно в новых телевизорах некоторых производителей она появится) . Но китайцы каким-то образом умудрились реализовать поддержку AirPlay в этих MiraScreen и им подобных адаптерах.
Значит наш адаптер подключен, включен и настроен. Он должен быть подключен к той же Wi-Fi сети, что и наш iPhone, или другое устройство, с которого мы будем делать повтор экрана. Если адаптер не подключен к роутеру, или роутера нет, то нужно наше iOS или Mac OS устройство подключить напрямую к Wi-Fi сети самого адаптера. Имя сети (SSID) и пароль (PSK) указаны на экране телевизора (см. фото ниже) .
Адаптер должен быть переключен в режим AirPlay (где иконка Apple) . Как это все подключить, настроить и переключить режим я показывал выше.

На Айфоне или Айпаде открываем центр управления и выбираем «Повтор экрана». Если все подключили правильно, то в списке доступных устройств должна отображаться наша MiraScreen приставка. Просто выбираем ее.
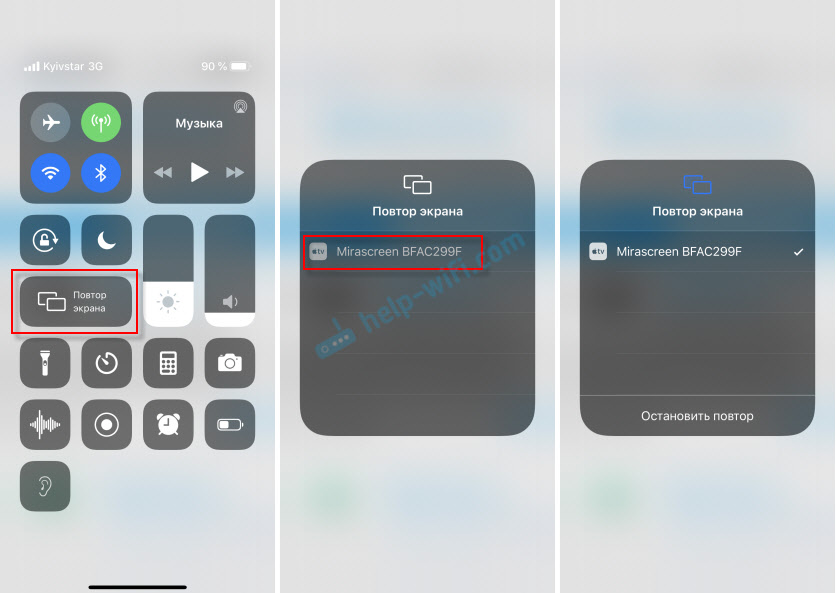
Через несколько секунд экран iPhone или iPad будет дублироваться на экран телевизора.

В горизонтальном режиме тоже все работает.

Можно так же, например, открыть фото или видео на iPhone, нажать на кнопку «Поделиться» и выбрать там «AirPlay». После выбора своего адаптера фото и видео можно будет просматривать на экране телевизора.
Чтобы остановить трансляцию, достаточно в меню «Повтор экрана» нажать на «Остановить повтор».
Трансляция экрана с MacBook и других компьютеров на Mac OS через AirPlay
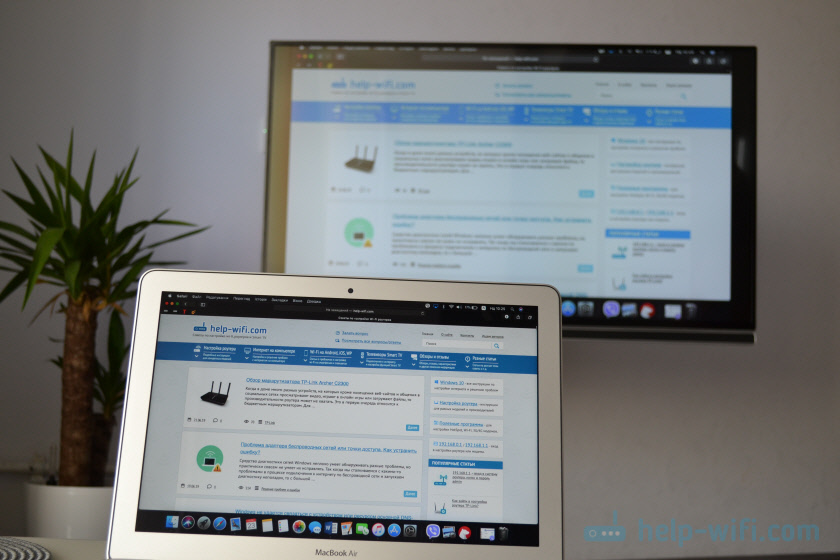
Я все проверил на MacBook Air. В этом случае точно так же необходимо, чтобы компьютер был подключен к той же Wi-Fi сети, что и MiraScreen приемник. Или подключить ноутбук непосредственно к Wi-Fi сети самого адаптера.
Когда Mac OS увидит, что есть возможность подключения к беспроводному дисплею по AirPlay – в статус баре появится соответствующий значок. Нажав на который, нам нужно только выбрать MiraScreen адаптер.

Изображение с MacBook появится на экране телевизора.
По умолчанию на телевизор выводится отдельный дисплей. Но нажав на иконку «AirPlay» можно изменить режим трансляции экрана на беспроводной дисплей. Есть возможность дублировать как отдельный дисплей, так и дисплей AirPlay, или встроенный. Там же можно отключить дублирование экрана.

Думаю, вы найдете для себя подходящий режим.
С iPhone, MacBook и других устройств через эти MiraScreen/AnyCast адаптеры передается не только изображение на телевизор (который в нашем случае выступает в роли беспроводного дисплея) , но и звук.
Как подключить Android через MiraScreen/AnyCast (Miracast) к телевизору?
MiraScreen/AnyCast адаптер для подключения к телевизору устройств на Android нужен только в том случае, когда в вашем телевизоре нет встроенной поддержки Miracast. Поддержка этой технологии есть практически во всех современных телевизорах (которые с Wi-Fi) .
Адаптер нужно переключить в режим Miracast (там где иконка Android и Windows) . Сделать это можно кнопкой на адаптере. Писал об этом в начале статьи.
В зависимости от версии Android, от производителя телефона/планшета, от оболочки – функция Miracast может называться по-разному. «Беспроводной дисплей», «Smart View», просто «Miracast». Ищите пункт в меню, кнопку в настройках или в центре управления. На моем Samsung это функция Smart View.
Запускаем функцию и выбираем нашу приставку. Если на вашем устройстве появится запрос PIN, то он указан на экране телевизора (у меня это 12345670) .

Все работает. Экран телефона дублируется на телевизор через MiraScreen адаптер.

И так тоже работает.

В настройках Miracast на Android можно приостановить трансляцию, или отключить ее. Звук так же передается на телевизор.
Подключение ноутбука/ПК на Windows к телевизору через MiraScreen или AnyCast
В Windows 10 есть функция «Беспроводной дисплей», которая позволяет подключаться к телевизору (в нашем случае через адаптер) по Miracast. Такая же возможность (именно встроенная функция) есть в Windows 8.1. В Windows 7 с этим сложнее, там нужны специальные программы и т. д.
У меня компьютер на Windows 10, так что покажу на примере этой системы. О настройке функции «Беспроводной дисплей» я уже писал отдельную инструкцию: Беспроводной дисплей Miracast (WiDi) в Windows 10. Ее без проблем можно применять для подключения через адаптер.
Сам адаптер должен работать в режиме «Miracast».

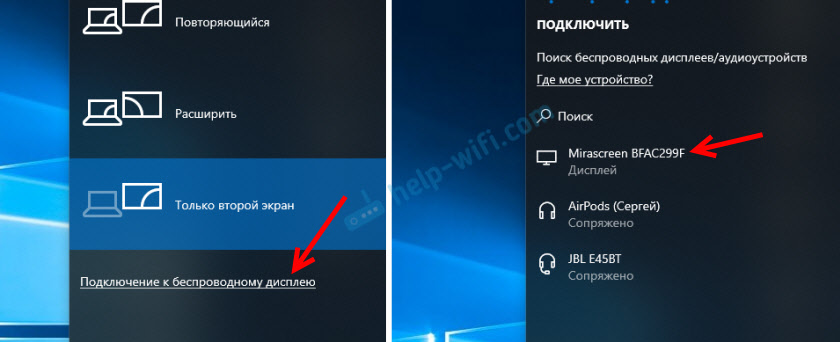
На компьютере нужно нажать сочетание клавиш Win + P, затем выбрать «Подключение к беспроводному дисплею» и в списке доступных устройств выбрать свой адаптер.
Если у вас нет пункта «Подключение к беспроводному дисплею», то смотрите статью по ссылке выше (о функции «беспроводной дисплей» в Windows 10) . Причина может быть в видеокарте, Wi-Fi адаптере, драйверах. Нужно проверять.
На телевизоре должен появится рабочей стол нашего компьютера.

По умолчанию он подключается в режиме «Расширить». Но режим можно сменить через меню Win + P уже после подключения. На экране будет отображаться небольшая менюшка с настройками трансляции изображения на беспроводной дисплей.

Звук так же вместе с изображением уходит на телевизор. Все вполне неплохо работает. Но качество и скорость самого соединения напрямую зависит от производительности железа компьютера и качества самого MiraScreen адаптера. Если в телевизоре есть встроенный Miracast, то лучше подключаться напрямую, без адаптера. Задержка в передаче изображения, зависание, отставание звука – частые проблемы при таком соединении. Через HDMI кабель надежнее будет.
Вроде ничего не забыл. Если что, вы всегда можете написать мне в комментариях и дополнить статью, поделиться какой-то полезной информацией по этой теме, или задать вопрос. На связи!
Источник


