- Полный список
- Custom Array Adapters made Easy!
- Why Custom Array Adapter??
- Lets Start!
- Android Custom Simple Adapter Tutorial With Example In Android Studio
- Custom Simple Adapter Basics
- Methods of Custom Simple Adapter
- 1. getView()
- 2. getCount()
- 3. getItem(int position)
- 4. getItemId()
- 5. getItemViewType(int position)
- Custom Simple Adapter With Example
- Step 1. Download Images
- Step 2. Layout Files
- Step 3. Custom Adapter Generation
- Step 4. Dealing With Main Activity
Полный список
— создаем свой адаптер на основе BaseAdapter
Предоставляемые нам адаптеры универсальны и полезны, но иногда их возможностей не хватает для реализации задуманного. Тогда возникает необходимость написать свой адаптер. Попробуем и мы. Создавать будем не с нуля, а используя BaseAdapter.
Сделаем подобие интернет магазина. Будем выводить список товаров. Каждый пункт списка будет содержать название товара, цену и изображение. Также будет возможность отметить пункт галкой, поместив его тем самым в корзину.
Внизу списка сделаем кнопку, которая будет отображать содержимое корзины. В настоящем интернет-магазине мы повесили бы на нее, например, переход к созданию заказа.
Project name: P0541_CustomAdapter
Build Target: Android 2.3.3
Application name: CustomAdapter
Package name: ru.startandroid.develop.p0541customadapter
Create Activity: MainActivity
В файл strings.xml добавим текстовый параметр для названия кнопки.
layout для пункта списка – item.xml:
Чекбокс, пара текстовых полей и картинка.
Теперь пишем код. Можно все написать в MainActivity.java, но тогда он получится достаточно большим и неудобным для чтения. Я раскидаю весь код по трем классам.
Product.java – класс, описывающий товар:
Тут все просто – только конструктор и элементы класса. Не заморачиваюсь с доступом и методами Set/Get, чтобы не усложнять код.
BoxAdapter.java – созданный адаптер, который будем использовать
На всякий случай напомню общий принцип действия адаптера: он получает данные и выдает View для отображения пункта списка.
Смотрим код. В конструкторе мы заполняем наши внутренние переменные и получаем LayoutInflater для работы с layout-ресурсами. В objects у нас теперь хранится список товаров, которые надо отобразить в списке.
Методы, отмеченные аннотацией @Override, мы обязаны реализовать при наследовании BaseAdapter. Эти методы используются списком и должны работать корректно.
Метод getCount должен возвращать кол-во элементов. Мы возвращаем кол-во товаров.
Метод getItem должен возвращать элемент по указанной позиции. Используя позицию, получаем конкретный элемент из objects.
Метод getItemId должен возвращать id элемента. Здесь не заморачиваемся и возвращаем позицию. Кстати, также сделано в некоторых адаптерах. Поэтому мы и видели в обработчиках, что >
Метод getView должен возвращать View пункта списка. Для этого мы создавали layout-ресурс R.layout.item. В этом методе мы должны из R.layout.item создать View, заполнить его данными и отдать списку. Но перед тем как создавать, мы пробуем использовать convertView, который идет на вход метода. Это уже созданное ранее View, но неиспользуемое в данный момент. Например, при прокрутке списка, часть пунктов уходит за экран и их уже не надо прорисовывать. View из этих «невидимых» пунктов используются для новых пунктов. Нам остается только заполнить их данными. Это значительно ускоряет работу приложения, т.к. не надо прогонять inflate лишний раз.
Если же convertView в этот раз нам не дали (null), то создаем сами view. Далее заполняем наименования, цену и картинку из данных по товарам. Для чекбокса мы присваиваем обработчик, сохраняем в Tag позицию элемента и ставим галку, если товар уже в корзине.
Tag – это некое Object-хранилище у каждого View, куда вы можете поместить нужные вам данные. В нашем случае я для каждого чекбокса помещаю в его Tag номер позиции пункта списка. Далее в обработчике чекбокса я смогу этот номер позиции извлечь и определить, в каком пункте списка был нажат чекбокс.
В итоге, метод getView возвращает списку полностью заполненное view, и список его отобразит как очередной пункт.
Далее идет пара методов, которые не обязательно было создавать при наследовании BaseAdapter. Я их создал для удобства.
Метод getProduct – это аналог getItem, но он сразу конвертирует Object в Product. Он используется всего пару раз. И в принципе, можно было бы и без него обойтись.
Метод getBox проверяет, какие товары отмечены галками и формирует из них коллекцию-корзину.
myCheckChangeList – обработчик для чекбоксов. Когда мы нажимаем на чекбокс в списке, он срабатывает, читает из Tag позицию пункта списка и помечает соответствующий товар, как положенный в корзину.
Тут важно понимать, что без этого обработчика не работало бы помещение товаров в корзину. Да и на экране — значения чекбоксов в списке терялись бы при прокрутке. Потому что пункты списка пересоздаются, если они уйдут «за экран» и снова появятся. Это пересоздание обеспечивает метод getView, а он для заполнения View берет данные из товаров. Значит при нажатии на чекбокс, обязательно надо сохранить в данных о товаре то, что он теперь в корзине.
Остается накодить MainActivity.java:
Тут кода совсем мало.
В onCreate создаем адаптер и список.
В методе fillData генерируем данные для адаптера. В качестве картинки используем стандартную для всех пунктов. В идеале, для каждого товара своя картинка.
Метод showResult получает из адаптера список товаров корзины и выводит их наименования. Этот метод вызывается по нажатию кнопки на экране, т.к. прописан в ее свойстве onClick.
Все сохраняем и запускаем. Отмечаем товары и жмем кнопку для просмотра содержимого корзины.

Достаточно непростой получился пример из-за чекбокса.
Вполне может быть, что есть другой способ реализации этого примера. Но смысл был в том, чтобы показать создание своего адаптера. Для закрепления темы посмотрите еще этот гугловский пример.
На следующем уроке:
— используем Header и Footer в списках
— разбираемся, как и где используется HeaderViewListAdapter
Присоединяйтесь к нам в Telegram:
— в канале StartAndroid публикуются ссылки на новые статьи с сайта startandroid.ru и интересные материалы с хабра, medium.com и т.п.
— в чатах решаем возникающие вопросы и проблемы по различным темам: Android, Kotlin, RxJava, Dagger, Тестирование
— ну и если просто хочется поговорить с коллегами по разработке, то есть чат Флудильня
— новый чат Performance для обсуждения проблем производительности и для ваших пожеланий по содержанию курса по этой теме
Источник
Custom Array Adapters made Easy!

In the Field of Android Development, Array Adapters have always played an important role in populating and controlling the ListViews and Spinners. Whenever we need to show our data as a list to the user, Array Adapters always come handy to easily manage the behaviour of the ListView and their items. But does the default Adapter class help us to create our own list item that we want to show to the user?? I guess not..So I have created a sample project called Popular Movies in which we will create a custom array adapter which which will help us to add an Image and Text to the ListItem (For those who don’t know, ListItem is an item of your total list whose layout will remain the same for every item and data will change).
Why Custom Array Adapter??
Android framework by default provides us the ability to create listItems which includes only a single information or a single TextView. But we always come across apps that show multiple information in a single ListItem such as Instagram, BookMyShow, Whatsapp and many more. Implementing your own custom array adapter can seem an intimidating job at first but once you create some more, you will get hold. As a beginner when I started with ArrayAdapters it was very difficult to hold on to the concepts which were used to correctly implement it but I made atleast 4–5 implementations just to make sure I understand what exactly was going on in the code. I would suggest that you should practice it because custom array adapters are very important when it comes to showing information in List.
Lets Start!
We am going to make a custom project which is called PopularMovies App in which we will list the information of some movies with their poster. This will be the final stage of the app :

Create a layout xml file which will have the design of your ListItem.
All the files related to the layout of the app are contained in the layout folder of the res directory. So first navigate into the directory

Notice that this folder contains only single file i.e activity_main.xml. This file will contain the layout and design to your Main Activity which contains your ListView. We are going to make a list_item.xml file that contains the code to the basic structure and design of the list item of the List view. Here is a snippet of the list_item.xml file :
In this file we added a ImageView and 2 TextViews to display the movie details.
Create a Java class which will define your ListItem and store data for every Movie.
It is important to create a Java Class that will store the details for your movie. These classes are called pojos (plain old java objects). These are used to define a collection of related information which can be used to bind that information together and use it to show in Lists or store in databases. In a pojo you should define the type of information you are about to show in the list. For example, if I intent to show an image and textView so I will create variables that will store the image and the data. Pojo should contain getter() and setter() methods which are used to set values to the pojo object and get the data from the object. Here is a code snippet for a pojo class for Movie :
It is important that your Java class should be declared public because you will need to create an instance of it in the MainActivity Class. The variables should be declared as private as there are cases in which you need to make variables with same names in different objects. This is the reason we need to create the getter and setter methods which are used to add and extract to and from the object.
Create a Java class which will extend the Default ArrayAdapter class.
Now is the time when you implement your own array adapter. Create a java class and give it any relative name. I named it MovieAdapter.class . Your class should extend ArrayAdapter class where T should be replaced by the pojo class you just made. It is done to tell the adapter about what type of data the adapter has to display. The first step is to define a constructor. You can use any type of constructor mentioned in the documentation here. We will make a constructor which takes 2 arguments i.e the Context and the list of movies. The arguments received in the constructor should be saved in a private variable as they are used to inflate and add data into the view.
Next, you need to Override a method called getView() method. This view is called when a listItem needs to be created and populated with the data.In this method first the View is inflated using the LayoutInflator.inflate() method. It is important that you check that if the view you are trying to inflate is new or reused. If convertView == null then the view should be inflated. In this view, you should set the data into the views. First get the correct movie from the list of movies using the get() method on moviesList and passing position as the argument.
Now using the getter methods defined in the pojo class, store the information encapsulated in the object in different variables. This information is to be set in the view you just inflated so, findViewById() is called on the inflated view and the information is set. At last the view is returned. Here is code snippet of the MovieAdapter.class file :
Add a ListView in the appropriate layout where you want to show your list.
After creating the Custom Adapter you need a ListView which will show the adapter contents. So in the layout file of you Activity (in this case MainActivity) add a tag. Here is code snipet of the activity_main.xml file :
Create an instance of the Custom ArrayAdapter class which you just created and add it to the ListView
This is the final step. After the Custom Adapter is created and ListView is added to the layout file of the activity, an instance of the adapter is to be created and is set to the listView by calling setAdapter() method on the listView. Here is code snippet of the MainActivity.java file :
It is always a good practice to go through the documentation of the topic as you may find the best method for your use. You can now start by customizing the list item to the way you want to show your data and easily make a custom array adapter to control the flow of list.
Thank you for reading this far! If you found this useful , kindly show some love and share it! Stay tuned for more blogs…
Источник
Android Custom Simple Adapter Tutorial With Example In Android Studio

Android Custom Simple Adapter Tutorial With Example In Android Studio is here.
Adapter in android is working as a link or connection between a data source and the multiple view like listview, gridview or spinner.
To connect the data source with listview in an easy manner, we can use android’s in built class named Simple Adapter.
Simple Adapter uses very less lines of codes to make listview, gridview or spinner.
Using simple adapter, we can create basic listview with limited functionality.
Custom Simple Adapter Basics
To create more complex functionalities, we need to make custom simple adapter.
Functionalities like click events of UI widgets, checkboxes maintenance, radio buttons maintenance etc. are complex events with adapters.
Custom adapter helps us to handle these events seamlessly.
Simple adapter can not inflate the view in the row layout of listview which have various UI widgets.
Here, custom simple adapter comes into the picture.
You can use custom simple adapter to develop listview, gridview or spinner with easy and simple coding lines.
Custom adapter extends the simple adapter so that we can modify or override the basic methods simple adapter.
Following is the example of the custom simple adapter
As you can see that the class is extending the Simple Adapter.
Because simple adapter is the sub class of Base adapter, you can override the methods of base class even in custom adapter.
You should define the constructor as per shown in the above code using super keyword.
Methods of Custom Simple Adapter
Let us understand methods present in the above code one by one.
1. getView()
This method helps us to create the each view for the row item of listview or cell of gridview.
We can inflate the view using the super.getView() method.
Using this inflated view, we can get the access to the various UI widgets present in the row item XML file.
For example, I have inflate the textview using it’s id and also have implemented it’s click scenario.
Similarly, you can access other UI widgets as per your necessity.
2. getCount()
This method will return the number of rows in the listview.
Number of cells in case of gridview.
We can use data set like arraylist to check the total number of count and then just return this number.
3. getItem(int position)
This method will return the data at the specified position.
For example, a hashmap from arraylist of hashmap at the specified position will be returned by this method.
4. getItemId()
This method will return the specific id associated with the data set.
5. getItemViewType(int position)
Listview can have more than two types of row.
For example, a header row, sub header row, normal child row, footer row etc.
When compiler is creating the every row of listview, there should be something which tells it type of the row.
This work will be done by the getItemViewType method.
Custom Simple Adapter With Example
Follow all the below steps to use the custom simple adapter.
Make a fresh new project in the android studio.
Select “Empty activity” while you are selecting the default activity.
Step 1. Download Images
Click the following link to download required images.
When you are complete with the download, copy these images to the res->drawable directory.
Step 2. Layout Files
Now let us make a layout file which will help us to create the UI of listview item.
Create a new file and give it a name like simple_item.xml
This file holds the textview and one imageview.
So every row of listview will have one textview and one imageview.
Now in the activity_main.xml file, write down the following coding lines
Just add the listview in the main file. Nothing else.
Step 3. Custom Adapter Generation
Make a new JAVA class and give it a name CustomSimpleAdapter.java
Code structure for CustomSimpleAdapter.java looks like the below
There is a constructor in this file.
Constructor will get context, arraylist of hashmap (data source), resource (XML file ), from (string array) and to (integer array).
Below line will take care about all the parameters.
Compiler will get the XML view file and it will set automatically to every row.
Similarly, it will set the data, from and to at appropriate place.
Now focus on the getView() method.
Here, compiler will inflate the view from and using this view, it will find the textview by it’s id.
Then, it will set the logic when the user clicks on the textview.
Step 4. Dealing With Main Activity
Source code for MainActivity.java goes as the below
One string array has the names of the cars.
One integer array has the integer reference to the images present in the drawable.
for loop will create the data set which is the arraylist of hashmap.
In the every iteration of for loop, compiler will create one hashmap.
This hashmap will have two children.
One is the name and other is the image.
Now, a string array named “from” has two values, “name”,”image”
These values are same as the two key of the hashmap.
Integer array “to” has the reference to textview and imageview. (R.id.name and R.id.imgView)
Finally, in the object of the Custom Adapter Class, we will pass all these in parameter adn then set this adapter to the listview.
Final result of the above example is
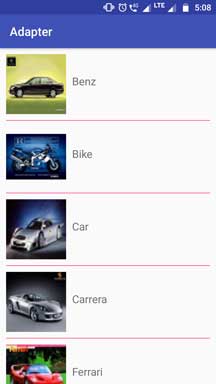 ListView
 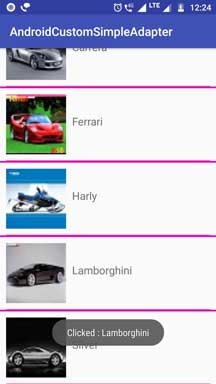 Click Event
Источник


