- Загрузочная анимация (Bootanimation) Андроид создание и замена
- Прежде всего!
- Загрузочная анимация Android что это такое?
- Где находится Bootanimation и как выглядит?
- Что находиться внутри Bootanimation?
- Создание Bootanimation
- Правила создания Bootanimation
- Как правильно создать файл desc.txt
- Расшифровка и объяснение
- Автоматизация и упрощение создания файла DESC.TXT
- Создание Bootanimation для Samsung
- Пример создания анимации
- Как устанавливать загрузочную анимацию Андроид?
- Установка Bootanimation с помощью Adb Run (для HTC)
- How to Change Boot Animation on Android Phones
- How to Change Boot Animation on Android Phones
- STEP 1: Root your Android Phone
- STEP 2: Download the Custom Boot Animations
- STEP 3: Install a Root Supported File ExplorerApp
- STEP 4: Install Custom Boot Animation on Android
- How to Fix Bootloop after Changing Boot Animation
- About Chief Editor
- Sadique Hassan
Загрузочная анимация (Bootanimation) Андроид создание и замена
вкл. 17 Март 2015 . Опубликовано в Android — Общее

Загрузочная анимация (Bootanimation) Андроид создание и замена. Для тех кто любит всячески модифицировать Андроид или надоела стандартная загрузочная анимация Android и есть желание ее заменить, данный материал поможет осуществить вашу мечту!
Прежде всего!
Для того чтобы можно было производить замену загрузочной анимации Android (bootanimation), прежде всего необходимо иметь установленные root права на Android!
Загрузочная анимация Android что это такое?
Bootanimation (загрузочная анимация Android) — это загрузочная анимированная картинка (точней картинки), которая показывается во время загрузки Android.

Где находится Bootanimation и как выглядит?
Загрузочная анимация может находиться в трех различных разделах ОС Android, а именно:
- /system/media
- /data/local/media
- /system/customize/resource
Bootanimation это чаще всего, не сжатый ZIP архив, который может иметь различные названия:
- bootanimation.zip
- spc_bootanimation.zip
- VFAU_bootanimation.zip
Как правило в смартфонах и планшетах компании Samsung файл загрузочной анимации называется — bootsamsung.qmg и находиться в разделе /system/media.
Что находиться внутри Bootanimation?
Как выше было сказано bootanimation — это не сжатый ZIP архив, в котором содержаться папки с последовательно пронумерованными картинками, а также файл инициализации desc.txt, который служит для того чтобы объяснять системы порядок воспроизведения анимации.

архив bootanimation.zip с папками и файлом инициализации desc.txt

папка в которой последовательно пронумерованы картинки
Создание Bootanimation
Данный материал предназначен для всех марок смартфонов и планшетов Android, кроме Samsung (если установлена кастомная прошивка CyanogenMod, Aopk, Aosp, Omni Rom, то данное правило не распространяется). Для Samsung информация представлена ниже.
Правила создания Bootanimation
- размер картинок должен соответствовать вашему размеру экрана
- объем bootanimation не должен превышать 12 мб или иметь более 500 кадров
- файлы картинок должны быть последовательно пронумерованы
- формат картинок JPG (JPEG) или PNG
- При создание архива он должен иметь 0% сжатия, без сжатия
- Название архива должно соответствовать названию вашего bootanimation (то есть если файл имел название spc_bootanimation.zip, то и созданная анимация должна иметь соответствующее название, если bootanimation.zip то, переименовать на bootanimation.zip)
Для того чтобы создать правильную загрузочную анимацию Android прежде всего нужно иметь какой-то навык работы в графических редакторах.
Как правильно создать файл desc.txt
Прежде всего файл desc.txt необходимо создать, для этого создайте простой текстовый файл и переименуйте его на desc. Открываем и редактируем его:

Расшифровка и объяснение
480 480 — размер картинки
24 — скорость воcпроизведения
p 1 0 — один раз показать файлы из папки part0 без задержки
part0 — папка с картинками part0
p 0 0 — показывать файлы из папки part1 без задержки, пока не закончится загрузка
part1 — папка с картинками part1
В конце необходимо сделать переход на следующую строку, то есть нажать кнопку Enter

Автоматизация и упрощение создания файла DESC.TXT
Для новичков можно предложить программу Boot Animation Creator которая упростит создание правильного desc.txt и bootanimation.zip в целом.
Создайте проект (папку) в которой будут находиться папки с анимацией, в которых уже будет пронумерованные графические файлы. После того как скачали и установили программу, запустите ее и укажите проект.

Укажите разрешение экрана и скорость потока


Сохраните готовый проект загрузочной анимации Android

ВНИМАНИЕ!
В сети Internet можно найти схожую по названию программу Boot Animation Creator — bootanimationstudio.com. Ни в коем случае не скачивайте данную программу!

Данная программа содержит вирусы! Повторюсь Boot Animation Creator — bootanimationstudio.com содержит вирусы!

Создание Bootanimation для Samsung
1. Скачайте программу Samsung Theme Designer и установите ее
2. Скачайте понравившуюся загрузочную анимацию bootanimation.zip с интернета и распакуйте ее
3. Запустите программу Samsung Theme Designer
4. Выбрать создание проекта (не сенсор)

5. Выбрать любой телефон из списка. В поле Select Showcase выбрать «Default». В поле Name создать любое имя.

4. В новом открывшемся окне, активировать вкладку «The View Window» и выбрать пункт «Idle BackGround»
5. С правой стороны в поле «Background Type» сменить с fixed на animated

6. С распакованного архива анимации, в первой папке смотрим количество картинок
7. Открыть файл desc.txt и посмотреть скорость (частоту) кадров
8. В поле «Frame» ввести значения равному количеству картинок (п.6)
9. В поле «Duration» ввести скорость кадров (п.7)
10. В поле «Repeat» оставить значение False

11. Перетянуть картинки с первой папки на проект
12. Нажмите кнопку сохранить вверху и выполните экспорт темы

13. После создание анимации откроется папка или перейдите в папку с проектом и добавьте расширение ZIP файлу с расширением SMT

14. Откройте архив и извлечь файл IdleBgAnimObj.qmg и и переименовываем его наbootsamsung.qmg
15. Теперь необходимо добавить вторую папку для того чтобы анимация повторялась, возвращаемся к проекту удаляем все картинки и смотрим количество картинок во второй папке и прописываем, меняем в поле «Repeat» на значение True, сохраняем и создаем новую тему. Вынимаем с нового архива IdleBgAnimObj.qmg и и переименовываем его на bootsamsungloop.qmg
16. Полученную анимацию переместить в /system/media
Пример создания анимации
Как устанавливать загрузочную анимацию Андроид?
После того как создали bootanimation.zip (или создали анимацию для Samsung) или скачали, переместите его на карту памяти или внутреннюю память (если нет карты памяти). Установите приложение Root Browser
После чего переместить и заменить загрузочную анимацию Android по одному из пути (в зависимости от вашей модели) :
- /system/media
- /data/local/media
- /system/customize/resource
Установка Bootanimation с помощью Adb Run (для HTC)
Если нет желание возиться с файловым менеджером, переброской загрузочной анимации на Android, после установкой, то стоит обратить свое внимание на приложение ADB RUN

Ознакомится с данной программой, узнать другие особенности а также скачать можно на данной странице — ADB RUN.
Источник
How to Change Boot Animation on Android Phones
In this guide, we will show you the steps to change the boot animation on your Android device. To give it a personal touch, every OEM has its own distinguishable startup screen. While some like to take the basic route, others add a few customizations to the same. With that said, though it remains on your screen for only a few seconds, yet it is the first piece of content that you would be seeing after powering on your device. Well, as the popular saying goes, the first impression is indeed the last impression.
The same could be applied here as well. Imagine booting up the screen with hundreds of lines of codes in Matrix-style running continuously. Or incorporating the Linux logo to the startup screen would surely give your device a tech geek look. All in all, there are a plethora of reasons why you would want to change that boring, dull and monotonous boot animation on your Android device. So with that in mind, let’s start off with this guide.
Table of Contents
How to Change Boot Animation on Android Phones
The entire instructions have been listed out in separate sections for ease of understanding. Proceed ahead in the exact same sequence as mentioned. They might not be able to function along the expected lines in Samsung Phones and in some heavily customized Android ROMs.
Furthermore, you are ready to try it out, then make sure to take a backup beforehand. Droidwin and its members wouldn’t be held responsible in case of a thermonuclear war, your alarm doesn’t wake you up, or if anything happens to your device and data by performing the below steps.
STEP 1: Root your Android Phone
The first requirement to carry out this task is that you will need a rooted device. This is because the stock boot animation that we are going to change is placed in the system partition of your device. To access this partition, you would need administrative level privileges. So before moving ahead, make sure to root your device via the following guides:
STEP 2: Download the Custom Boot Animations
Next up, you will have to grab hold of your preferred boot animation. For that, this XDA post (credit: XDA senior member mauam) might come in handy as it has a plethora of boot animations (over 200!) spread across various domains. It is definitely worth a checkout. Once you have got the desired boot animation, it’s time to install it onto your Android device. Follow along.
STEP 3: Install a Root Supported File ExplorerApp
Now that you have downloaded the desired boot animation, it needs to be placed inside the system partition of your device. And for that, you will need a file explorer. The stock file manager app installed on your device might not have the required root privileges.
So you will have to download the one from Play Store that comes with this feature. As far as this guide is concerned, I am using the Solid Explorer File Manager. You may try any of your preferred root explorers, just make sure that they have root capabilities.
STEP 4: Install Custom Boot Animation on Android
- To begin with, rename the downloaded file to bootanimation, hence the complete name will be bootanimation.zip. Now transfer this file to your device.
- Launch the File Explorer app on your phone (in this guide, we are using Solid Explorer, however, the instruction will be near about the same for others as well).
- Now tap on the hamburger menu situated at the top left and select Root.
- You will now get a Magisk permission popup, tap Grant.
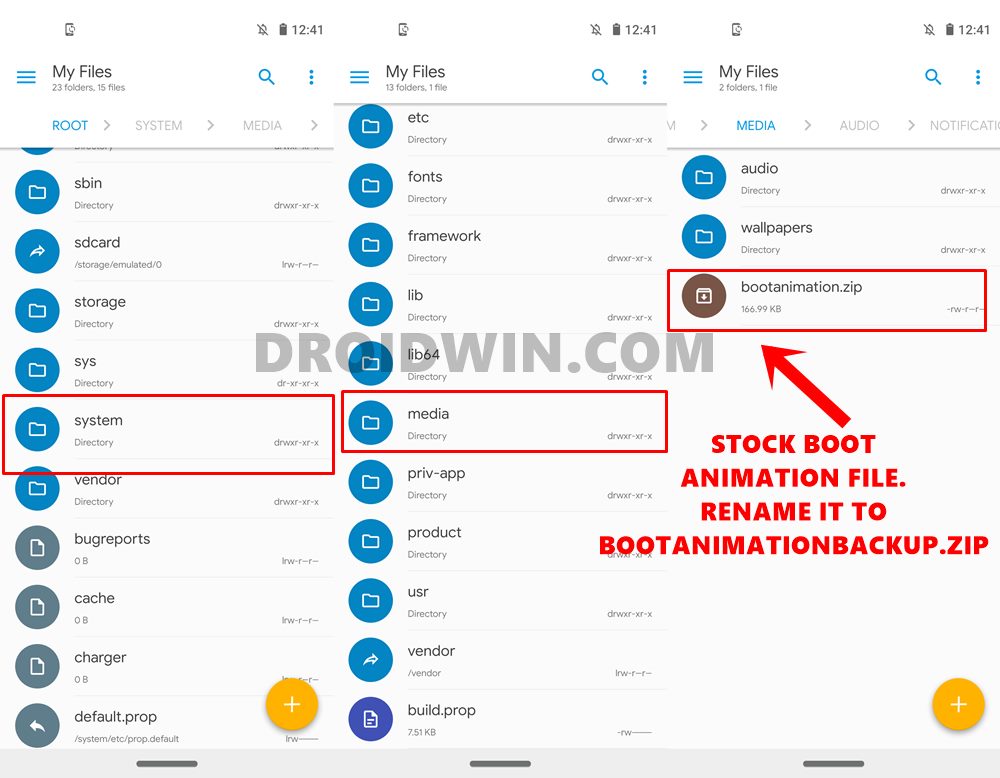
- Navigate to the following location: system > media.

- Within that, you will already find the file bootanimation.zip. This is the original boot animation provided by the OEM. As of now, don’t delete it rather take its backup.
- For that, the best way is to rename it to something along the lines of bootanimationbackup.zip.
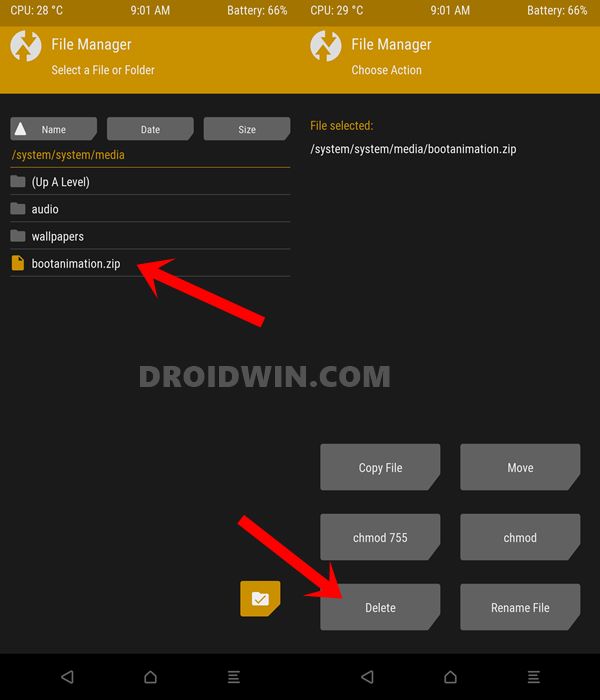
- Now copy the custom boot animation file that you had named bootanimation.zip and transfer it to this directory (system > media).
- Now select this file and head over to its Properties section.
- Within that, go to the Attributes tab and you need to give it the Permissions- 666 (RW-R–R–). In other words,
- Owner: R, W
- Group: R
- Global: R
- Once the required file permission has been set, save the changes by hitting the Apply button.
- You may now reboot the device and enjoy the newly set custom boot animation

That’s it. These were the steps to change the boot animation on your Android device. Do let us know your preferred boot animation that you ultimately ended up applying on your device. Talking about which, if you have any queries with the instructions, do let us know in the comments section below. We will get back to you with a solution at the earliest. With that said, let’s now turn our attention towards the next section.
How to Fix Bootloop after Changing Boot Animation
While the chances are extremely rare, but we should never say never when it comes to custom developments and bootloops! So if your device ends up in a bootloop after changing the boot animation, then there is quite an easy way out to fix it. here is what needs to be done:
- To begin with, your device needs to have the TWRP Recovery installed. If that is not the case, then refer to our detailed guide: How to Install TWRP Recovery on Android.
- Boot your device to TWRP Recovery. Once that is done, head over to Mount and enable System.
- Now that the system partition has been mounted, go to the Advanced section of TWRP.
- Select the File Manager option and navigate to the following directory:


So this was all from this guide on how to fix bootloop on any Android device after installing a custom boot animation. Still, have any queries? Drop them in the comments below!
About Chief Editor
Sadique Hassan
A technical geek by birth, he always has a keen interest in the Android platform right since the birth of the HTC Dream. The open-source environment always seems to intrigue him with the plethora of options available at his fingertips. “MBA by profession, blogger by choice!”
Источник


