- CheckBox (Флажок)
- Отслеживаем смену состояния флажка
- Собственные стили
- Собственный вид
- AnimatedStateListDrawable. Анимация между переключением состояния
- res/drawable/toggle.xml
- res/drawable/toggle_checked.xml
- res/drawable/toggle_unchecked.xml
- res/drawable-v21/toggle.xml
- res/drawable-v21/toggle_unchecked_checked.xml
- res/drawable-v21/toggle_checked_unchecked.xml
- Custom checkbox android example
- Android UI Control Checkbox
- Adding Checkbox to UI
- Checkbox Attributes
- Chckbox Styles
- Customizing CheckBox Styles for Application
- Customizing Styles for Individual CheckBox
- Customizing checkbox color
- Checkbox text color
- Customizing checkbox button shape
- Checkbox Listener
- Setting Checkbox State
- Listview Checkbox
- Activity layout
- ListView item layout
- Activity
- ListView Custom Adapter
- About
- Android checkbox example
- 1. Custom String
- 2. CheckBox
- 3. Code Code
- 4. Demo
- Download Source Code
- References
- Comments
CheckBox (Флажок)
Компонент CheckBox является флажком, с помощью которого пользователь может отметить (поставить галочку) определённую опцию. Очень часто флажки используются в настройках, когда нужно выборочно выбрать определённые пункты, необходимые для комфортной работы пользователю.
Компонент находится в группе Buttons.
Для управления состояниями флажка используйте методы setChecked() или togglе(). Чтобы узнать текущее состояние флажка, вызовите свойство isChecked.
Для экспериментов воспользуемся программой «Счетчик ворон», которую писали при изучении щелчка кнопки.
Как вы помните, в программе была кнопка и текстовое поле. Добавим ещё два элемента CheckBox, а также четыре текстовые метки TextView. Нам нужно постараться, чтобы элементы были аккуратно сгруппированы. Для этой цели воспользуемся вложенными компоновками LinearLayout. Заодно применим интересный приём — мы не будем использовать текст у флажков CheckBox, а воспользуемся текстовыми метками с разными размерами шрифтов. Верхняя метка с крупным шрифтом будет указывать на основную функциональность флажка, а нижняя метка с мелким шрифтом будет использоваться в качестве своеобразной подсказки, в которой содержится дополнительная информация для пользователя.
На самом деле вы можете попробовать другие способы разметки, не воспринимайте как догму. А мы идём дальше. Флажки в нашем приложении нужны для того, чтобы пользователь мог менять вывод текста в текстовом поле. По желанию, можно выводить текст красным цветом и жирным стилем по отдельности или в совокупности. Для этого нам нужно добавить дополнительные строчки кода в обработчик щелчка кнопки.
Запустите проект и попробуйте снимать и ставить галочки у флажков в разных комбинациях, чтобы увидеть, как меняется текст после щелчка кнопки. Код очень простой — проверяется свойство isChecked. Если галочка у флажка установлена, то свойство возвращает true и мы меняем цвет (красный) или стиль текста (жирный). Если флажок не отмечен, то свойство возвращает false, и мы используем стандартные настройки текста.


Отслеживаем смену состояния флажка
С помощью слушателя-интерфейса OnCheckedChangeListener с его методом onCheckedChanged() можно отслеживать смену состояния флажка.
Собственные стили
Если вы используете стандартный проект, то флажок будет использовать цвета Material Design, в частности цвет colorAccent для фона флажка.
В файле res/values/styles.xml добавим строки:
Свойство colorControlNormal отвечает за прямоугольник в невыбранном состоянии, а colorControlActivated за закрашенный прямоугольник в выбранном состоянии.
Присваиваем созданный стиль атрибуту android:theme:
Теперь цвета флажков изменились.

Собственный вид
Если вас не устраивает стандартный вид элементов CheckBox, то не составит никакого труда реализовать свои представления о дизайне.
В папке res/drawable создаём файл checkbox_selector.xml:
Также необходимо подготовить два изображения для двух состояний флажков — выбран и не выбран. В нашем случае это две звезды — серая и жёлтая.
Осталось прописать селектор в компоненте CheckBox (атрибут android:button):
Готово! Можете запускать проект и проверять работу флажков. Ниже код для реагирования на смену состояния флажков:


AnimatedStateListDrawable. Анимация между переключением состояния
Когда мы создали собственный вид флажка, то переключение происходит сразу без анимации. В API 21 появилась возможность установить анимацию при помощи нового класса AnimatedStateListDrawable.
Создадим как прежде файл для собственного вида флажка.
res/drawable/toggle.xml
Далее нужные два значка. Они сделаны в векторном виде.
res/drawable/toggle_checked.xml
res/drawable/toggle_unchecked.xml
Присвоим созданный вид атрибуту android:button.
Код будет работать на устройствах, которые поддерживают векторную графику (API 14), но анимации не будет. Для анимации создадим альтернативный вариант файла в папке res/drawable-v21.
AnimatedStateListDrawable похож на обычный StateListDrawable, но позволяет указать анимацию перехода между двумя состояниями. Мы также указываем две картинки, но также добавляем элементы transition.
res/drawable-v21/toggle.xml
res/drawable-v21/toggle_unchecked_checked.xml
res/drawable-v21/toggle_checked_unchecked.xml
Если запустить пример на старом устройстве, то никакой анимации не увидим, но код будет работать без ошибок. На новых устройствах анимация будет работать.
Источник
Custom checkbox android example
Android UI Control Checkbox
September 08, 2017
To capture user selections out of given multiple options or to capture input for fields which have only two states, Checkbox is used. Android Checkbox is a subclass of CompoundButton which intern is a subclass of Button, so it inherits all the attributes from CompoundButton, Button, TextView and View.
Adding Checkbox to UI
You can add Checkbox to android UI by defining CheckBox element in xml manually or using android studio layout design tool which can be accessed by opening layout xml and clicking design tab. Below xml is an example of simple CheckBox definition.
Checkbox Attributes
To define checkbox, main attributes which need to be used are focusable, clickable, textAppearance, textColor, gravity, background, button, and buttonTint. These properties are usually set by device default styles which you can customize to change appearance of checkbox.
Chckbox Styles
Android platform provides styles including material styles for check box. If you set application theme to one of the app compact material themes, Widget.AppCompat.CompoundButton.CheckBox style is applied to checkbox.
Below screen shot shows checkboxes both in checked and unchecked states when application theme is set to Theme.AppCompat.

Customizing CheckBox Styles for Application
You can customize checkbox styles for entire application or specific check box. To change fill colors for all controls including checkbox, you need to set colorAccent to the desired color in your custom app-compact theme that will be applied to your application.
Below are custom app compact theme with colorAccent set to custom color and screen shot showing checkboxes in both states after applying the custom theme to application.

Customizing Styles for Individual CheckBox
To customize individual checkboxes, first create custom theme by inheriting app compact checkbox theme and then apply it to individual checkbox using theme attribute.
Customizing checkbox color
To change checkbox color when it is in unchecked state, you need to set colorControlNormal attribute to the desired color. To change checkbox color when it is in checked state, attribute colorControlActivated needs to be set. You can make checkbox show different color when it is touched or highlighted using colorControlHighlight attribute.
If you want same color applied to checkbox in both states, you can use buttonTint attribute, but the style containing this property needs to be applied to checkbox as style.
Custom checkbox style.
Applying custom style to checkbox.
Checkbox custom style output.

Checkbox text color
To change text color of checkbox text, you can use textColorPrimaryDisableOnly or textColor attribute. If you define textColor style in your custom theme to change checkbox text color, it won’t work if style is applied as theme. You need to apply the custom style to check box using both style and theme in order for check box colors and checkbox text color to be effective. It is better to create two styles one containing check box colors that will be used as theme and second style containing text color for check box text that will be used as style, as shown in the below example. Or you can use textColorPrimaryDisableOnly attribute in custom style and apply it as theme to application or checkbox.

Customizing checkbox button shape
You can customize CheckBox shape by defining drawable as xml in res/drawable folder and setting button attribute of CheckBox to the drawable.
Below is an example of drawable xml definition for CheckBox. It uses cust_chk_select and cust_chk checkbox images for both states, which need to be saved in res/drawable folder.
Using custom drawable in checkbox style.
Custom CheckBox output.

If you need a kind of checkbox that uses colors instead of check mark to indicate whether a checkbox is selected or not, then you can define shapes as xml and use them as drawables as explained below.
Shape with one color saved in res/drawable as my_chk_checked.xml
Second shape with different color saved in res/drawable as my_chk_normal.xml
Selector drawable xml saved in res/drawable as my_chk.xml
Setting the button attribute of checkbox to the selector.
Checkbox Listener
Checkbox event can be handled by setting onClick attribute of Checkbox element in layout xml. To do that, first define a method as shown below and set it as a value for onClick attribute.
Checkbox click event can also be handled by adding on click listener to check box as shown below.
Setting Checkbox State
CheckBox state can be changed using checked attribute in layout xml. By default checkbox is unchecked. You can make it checked by setting checked attribute to true.
You can change the state of checkbox using setChecked method of Checkbox as shown below or you can use toggle method also.
Listview Checkbox
In your app if there are multiple options to be displayed for user selection, then presenting multiple options can be done using ListView and CheckBox. Below example shows how to display checkboxes with ListView by taking ecommerce category search filter as an example.

Activity layout
Activity layout contains ListView.
ListView item layout
ListView item layout is used to display each row of options and it contains TextView and CheckBox
Activity
ListView Custom Adapter
About
Android app development tutorials and web app development tutorials with programming examples and code samples.
Источник
Android checkbox example
By mkyong | Last updated: August 29, 2012
Viewed: 410,805 (+25 pv/w)
In Android, you can use “android.widget.CheckBox” class to render a checkbox.
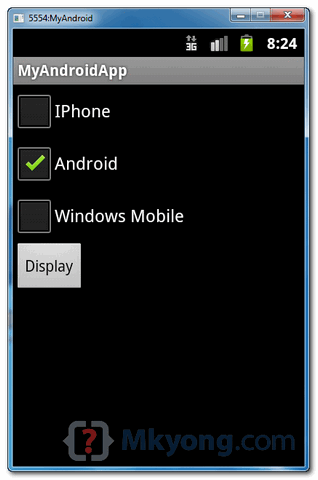
In this tutorial, we show you how to create 3 checkboxes in XML file, and demonstrates the use of listener to check the checkbox state – checked or unchecked.
P.S This project is developed in Eclipse 3.7, and tested with Android 2.3.3.
1. Custom String
Open “res/values/strings.xml” file, add some user-defined string.
2. CheckBox
Open “res/layout/main.xml” file, add 3 “CheckBox” and a button, inside the LinearLayout .
3. Code Code
Attach listeners inside your activity “ onCreate() ” method, to monitor following events :
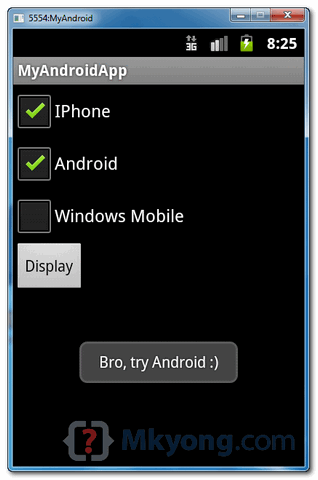
- If checkbox id : “chkIos” is checked, display a floating box with message “Bro, try Android”.
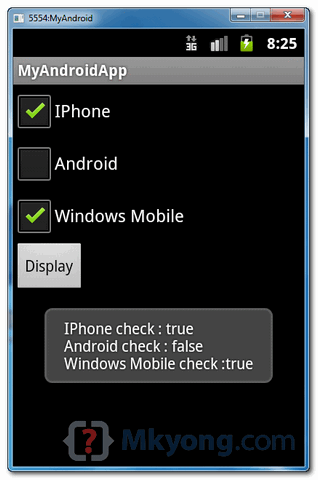
- If button is is clicked, display a floating box and display the checkbox states.
4. Demo
Run the application.
2. If “IPhone” is checked :
3. Checked “IPhone” and “Windows Mobile”, later, click on the “display” button :
Download Source Code
References
mkyong
Founder of Mkyong.com, love Java and open source stuff. Follow him on Twitter. If you like my tutorials, consider make a donation to these charities.
Comments
I had run this code. by the way I cannot find symbol variables: chkDriver, chkCarOwner, buttonDisplay. Please I wish to have your advice.
how to arrange password edittext and checkbox(hide/show)?
But how to check the widget programmaticaly? How to set text to appear on the left of the checkbox?
sir how can i arrange check box in single row
By using linear layout orientation horizontal..
hi,is this possible without using xml (i.e. using java),because my reqirement is creating checkboxes dynamically
this is what I looking for. thanks from Indonesia рџ™‚
Thank you man, it helped me рџ™‚
Thank you man it helped me
i have problem with this one
chkIos = (CheckBox) findViewById(R.id.chkIos);
chkIos = (CheckBox) findViewById(R.id.chkIos);
chkAndroid = (CheckBox) findViewById(R.id.chkAndroid);
chkWindows = (CheckBox) findViewById(R.id.chkWindows);
btnDisplay = (Button) findViewById(R.id.btnDisplay);
error about “chkIos cannot be resolved or is not a field”
you did not mention the type of chklos. you have to write like CheckBox chklos=(CheckBox) findViewById(R.id.chkIos);
As a beginner I like this site. Easy to understand each topic in detail..
Learned lot from here…. Hats off to U…
Dear friend
Very Good tutorial and simple to understand.
Thank u
Latheef
Hi, I’m a software developer just like you. I just want to congratulate you for this fantastic work of delivering concrete and useful source code. I’m know that there is more of you that can be appreciated in your web pages. I don’t know if you are Christian and/or believe in The Lord Jesus Christ, but I will certainly include you in my prayers, as a Christian Catholic. God be with you, Lord Jesus Christ always protect you, and give you the strength to contribute more to the SW Developer Community with this kind of work. Thank you, and God bless you.
Источник


