- Полный список
- Android custom dialog example
- 1 Android Layout Files
- 2. Activity
- 3. Demo
- Download Source Code
- References
- Comments
- Android Custom Dialog Example – Making Custom AlertDialog
- Android Custom Dialog Example
- Android Custom Dialog | RecyclerView,ListView,EditText,Rounded Corner
- 1. Android Custom Dialog with Recyclerview
- See RecyclerView in Dialog
- Step 1. Adding required Dependencies
- Step 2. Two Necessary XML files
- Step 3. Adapter Class For dialog
- Step 4. Final Changes in code
- 2. Android Custom Dialog With ListView | Dialog onitemclicklistener
- Outcome of listview dialog
- Step 1. Two XML files
- Step 2. Main File codes
- Looking above code confidently
- 3. Android Custom Dialog With EditText Example Tutorial
- Last Output
- Step 1. Custom Drawables
- Step 2. Dialog Layout
- Step 3. Last Codes
- Reading Carefully
- showDialog() method
- 4. Android Custom Dialog Rounded Corners Programmatically | Border
- See Your Dialog
- Step 1. Changing Colors
- Step 2. Twitter Images
- Step 3. XML Layout File For Dialog
- Step 4. Required Drawable Files
- Step 5. Last and Important Task
- Dive Deep In Main
- 5. Android custom dialog with image, title, close and two buttons
- Final Views For Android custom dialog with image and title
- Step 1. Custom Image
- Step 2. Drawable resource files
- Step 3. Layout Of the Custom Dialog
- Step 4. Final Work
- Setting The Custom Title
- Button Clicks
- 6. Android Custom Dialog With Transparent Background | Background Color
- Creating Transparent Background
- Step 1. Making Colors
- Step 2. XML files for dialog
- Second file
- Third File
- Step 3. Last Main Changes
Полный список
— используем свои View для построения диалога
Кроме сообщения или списка мы можем помещать в диалог свои View-компоненты. Для этого доступно как основное тело диалога, так и заголовок. Для этого нам необходимо создать View и с помощью методов setCustomTitle или setView вставить этот View соответственно в заголовок или тело диалога. Я буду использовать только setView и работать с телом диалога. Использование метода setCustomTitle и работа с заголовком диалога полностью аналогична.
Нарисуем приложение, которое будет использовать свой View-компонент в теле диалога и рассмотрим, как можно модифицировать содержимое этого компонента. Будем добавлять и удалять TextView в теле диалога.
Project name: P0651_AlertDialogCustom
Build Target: Android 2.3.3
Application name: AlertDialogCustom
Package name: ru.startandroid.develop.p0651alertdialogcustom
Create Activity: MainActivity
В strings.xml пропишем тексты:
main.xml – экран с двумя кнопками для удаления и добавления элементов в диалог
dialog.xml – наше будущее кастом-тело диалога.
В tvTime— будем отображать текущее время, а в tvCount – кол-во добавленных TextView.
Рассмотрим код. В методе onCreate выполняем стандартные процедуры и создаем коллекцию textViews для хранения добавляемых TextView.
Метод onclick – обработчик нажатий на кнопки, сохраняет в btn идентификатор нажатой кнопки и показывает диалог.
В методе создания диалога onCreateDialog мы задаем текст заголовка диалога, создаем view из layout-файла dialog.xml и с помощью метода setView говорим диалогу, что надо использовать наше view в качестве тела диалога. И теперь, работая с view, мы будем формировать тело диалога. В только что созданном view сразу находим tvCount – для отображения кол-ва добавленных TextView.
Метод onPrepareDialog – здесь мы с помощью метода getWindow получаем доступ к View-компонентам диалога, находим среди них tvTime и показываем в нем время. Далее определяем, какая кнопка была нажата. Если кнопка добавления, то создаем TextView и помещаем его в view (который определили в методе onCreateDialog) и добавляем в коллекцию textViews. Таким образом TextView добавится в тело диалога. Если же хотим удалить TextView, то находим в коллекции последний добавленный и удаляем его из компонента view и из коллекции textViews. В конце обновляем счетчик кол-ва добавленных TextView в диалоге.
Обратите внимание, что я использую два разных способа для получения доступа к tvCount и tvTime. tvCount я нашел сразу после создания view в методе onCreateDialog. А в случае с tvTime я показываю, как найти View-компонент в диалоге без использования объекта view. Какой вам удобнее по ситуации, тот и используйте.
Все сохраним и запустим приложение. Нажмем кнопку Добавить

Появился диалог. Отображает время, кол-во добавленных TextView и собственно сами добавленные TextView.
Закрываем диалог кнопкой Назад, жмем еще раз добавить

Добавилось еще одно TextView.
Закрываем диалог, жмем кнопку Удалить.

Последнее TextView удалилось.
На следующем уроке:
— рассматриваем обработчики событий диалога
— программно закрываем и показываем диалог
Присоединяйтесь к нам в Telegram:
— в канале StartAndroid публикуются ссылки на новые статьи с сайта startandroid.ru и интересные материалы с хабра, medium.com и т.п.
— в чатах решаем возникающие вопросы и проблемы по различным темам: Android, Kotlin, RxJava, Dagger, Тестирование
— ну и если просто хочется поговорить с коллегами по разработке, то есть чат Флудильня
— новый чат Performance для обсуждения проблем производительности и для ваших пожеланий по содержанию курса по этой теме
Источник
Android custom dialog example
By mkyong | Last updated: August 29, 2012
Viewed: 974,753 (+118 pv/w)
In this tutorial, we show you how to create a custom dialog in Android. See following steps :
- Create a custom dialog layout (XML file).
- Attach the layout to Dialog .
- Display the Dialog .
- Done.
P.S This project is developed in Eclipse 3.7, and tested with Android 2.3.3.
1 Android Layout Files
Two XML files, one for main screen, one for custom dialog.
2. Activity
Read the comment and demo in next step, it should be self-explorary.
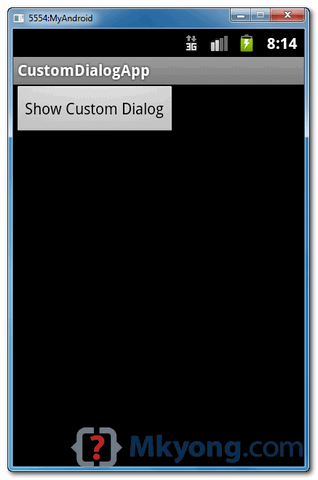
3. Demo
Start it, the “ main.xml ” layout is display.
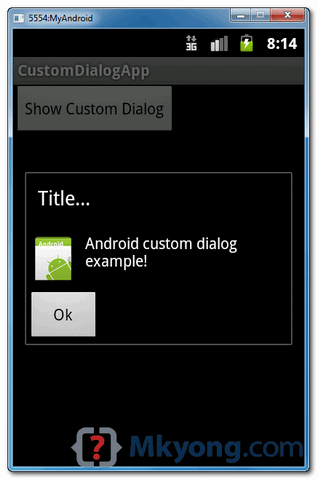
Click on the button, display custom dialog “ custom.xml ” layout, if you click on the “OK” button, dialog box will be closed.
Download Source Code
References
mkyong
Founder of Mkyong.com, love Java and open source stuff. Follow him on Twitter. If you like my tutorials, consider make a donation to these charities.
Comments
pl z solution this problem.
This time problem on create how to drop down list item click to open in the popup windows and alert show on activity.
for example drop down 4 item (a, b, c, d) choose the a activity start the first popup or alert message after that show in main activity
Hi Thank you this topic is useful.
hi iam moein thank you very much for your tutorials
Simple as possible example..what a searcher always want to see. HIGHLY Recommended … easy to digest.. keep up the good work
Thanks alot my teacher
this was very useful to me but can some please let me know how to call a custom dialog from service i wrote the code inside onClick part in a different file passed the context from service and called the custom.xml file from the java file i wrote but its failing
Thank you so much ! you saved me so much time
I really like and appreciate your blog post.Thanks Again.
Please try to put some new android dialog box easy example to us.
I really like and appreciate your blog post.Thanks Again. febdcacdkefdkcce
this tutorials is very helpful thank you
Nice one! easy to understand
Thanks, that’s helpful me too.
Very helpful thx
when i put another button so it crash When i comment it works perfectly Please help me see my code here Thanks in advance
final Dialog dialog = new Dialog(MainActivity.this);
// set the custom dialog components – text, image and button
TextView text = (TextView) dialog.findViewById(R.id.textDialog);
text.setText(“ARE YOU SURE WANT TO LOG OUT?”);
// ImageView image = (ImageView)
Button Yes = (Button) dialog.findViewById(R.id.btn_dialog_yes);
// if button is clicked, close the custom dialog
public void onClick(View v) <
Intent logIn = new Intent(getApplicationContext(),
Button No = (Button) dialog.findViewById(R.id.btn_dialog_no);
// if button is clicked, close the custom dialog
public void onClick(View v) <
Why not take a look at my blog about how to create an Android app that displays an Image in an ImageView control of the main Activity at the full width of the screen.
The app uses the following Android SDK objects:
. Display
. ImageView
. LinearLayout
. Bitmap
. Activity
. XML layout
. LayoutParams
Also:
. layout_width
. layout_height
. orientation
. id
. vertical
. match_parent
Источник
Android Custom Dialog Example – Making Custom AlertDialog
In this post we will see an Android Custom Dialog Example. I hope you know about creating Dialogs in Android, and then you might be thinking that what if I can customized the dialog completely as per my need. Then the answer is “YES” you can customized it as you want, you can put whatever design or component you need in your Alert Dialog.
Enough talking right? Now let’s start our Android Custom Dialog Example.
Android Custom Dialog Example
- Again the first thing is creating a new Android Studio project. You can implement the same in your existing project too.
- I have created a project named Android Custom Dialog.
- First come inside colors.xml and change the default colors to the following.
- Now below you can see the design of the Custom Dialog that I am going to create.
 Android Custom Dialog Example
- For the above design we have defined the colors, now we need the background of the OK button and the icon for the header.
- For the button background just create a new drawable resource file named button_background.xml and put the following code.
- For the icon that is displaying in the header, create one more drawable file. I created ic_success.xml and put the following code inside.
- You can also use any other icon if you want.
- Now for our Custom Alert Dialog create a layout. I have created my_dialog.xml. Inside this file we will design our Android Custom Dialog.
- The above layout code will generate the following design.
Android Custom Dialog Example
- Now we need to display the above Custom Dialog Design as an Alert Dialog when a button is clicked.
- For this come inside activity_main.xml and create a button inside the activity.
- So your activity_main.xml will look as below.
 Android Custom Dialog
- Now the last task is to display our Custom Dialog when the button is clicked.
- For displaying the dialog come inside MainActivity.java and write the following code.
- Now run the application and you will see your custom alert dialog on clicking the button.
 Android Custom Dialog Example
Bingo! It is working absolutely fine. Let me know in comments if you are having any question regarding this Android Custom Dialog Example.
And if you found this post helpful, then please help me by sharing this post with your friends learning Android Application Development. Thank You 🙂

Hi, my name is Belal Khan and I am a Google Developers Expert (GDE) for Android. The passion of teaching made me create this blog. If you are an Android Developer, or you are learning about Android Development, then I can help you a lot with Simplified Coding.
Источник
Android Custom Dialog | RecyclerView,ListView,EditText,Rounded Corner

Android Custom Dialog Tutorial With Example welcomes you.
In android, we can create custom dialog with many widgets like recyclerview, listview, edittext, rounded corners, custom border color, image, title, two buttons and transparent background color.
Below are the examples of various custom dialogs in android studio.
1. Android Custom Dialog with Recyclerview
Learn to create Android Custom Dialog with Recyclerview.
We will create a custom dialog with RecyclerView in this example.
Developers use dialog with RecyclerView when they want to have a quick selection from the user. For example, to select the city or country of the user.
We will also implement onitemclicklistener for the RecyclerView inside dialog.
Alert dialog with recyclerview can be used as an alternative to spinner, where user can select any item from several options.
See RecyclerView in Dialog
Step 1. Adding required Dependencies
Make a new project with android studio.
Then add the below lines in build.gradle(Module :app) file.
First line will integrate recyclerview classes in the project.
Second line will help us to create card views for each recycler view item cell.
Step 2. Two Necessary XML files
We need to make two separate XML files that will help us to create custom views.
First is for dialog. So go ahead and make a new file under res->layout directory. Name of this file can be dialog_recycler.xml
One text view, one recycler view and one button is there in the above file.
This layout will give the look and feel to our custom dialog.
Now make another XML file named rv_layout.xml.
Write down the following code lines in rv_layout.xml.
This will give the user interface to the every cell of the recycler view.
It typically includes one card view. Inside this card view I have added one text view.
Step 3. Adapter Class For dialog
Time to create a new JAVA class and give it a name of “AdapterRe.java”
Give this a below source code
This class will act as a bridge between data source and recycler view.
Our data store is one string array which we will define in the main activity. We will get this data source from the parameter of the constructor of this adapter.
onCreateViewHolder() method will inflate the rv_layout.xml file, which we have created in step 2.
In onBindViewHolder() method, we will set the value text view using our string array data source.
Now look at the constructor of MyViewHolder class.
See the below code lines from this class.
Above lines are acting as the click event of the recycler view.
Whenever the user clicks the any row of recycler view, getAdapterPosition() method will give us the position which is clicked.
Now inside onClick() method, we can write our logic.
I have made public static text view and dialog variables in the main activity. so we can use these two instances in this adapter class.
Text view will show the name of the clicked item and dialog will be removed then after.
Step 4. Final Changes in code
Now we are left with two files. activity_main.xml and MainActivity.java
Fill the activity_main.xml file with the below code structure.
One button and one text view is there in the above file.
When the user clicks the button, compiler will open the dialog box.
Text view contains the name of the selected item.
Now in the MainActivity.java file, add the below source code
Look at the below lines
First two lines are making public instances that we have used in the adapter class.
One is text view and another is dialog.
Then an object of the button and one string array variable.
This string array holds the various names of vehicles and cars. It is our data source.
In onCreate() method, when the user clicks the button, compiler will execute the showDialog() method.
Below is how the showDialog() method look a like
Compiler will initialize the dialog object. then it will set the dialog as non cancelable.
Then using .setContentView() method, it will inflate the dialog_recycler.xml file.
There is one button in dialog_recycler.xml file, so compiler will find it using id and then will implement it’s click method. It will simply dismiss the dialog when it is clicked.
Then an object of recycler view is there. Also an object of AdaoterRe.java class.
Finally, compiler will set the adapter in recyclerview using our data source (string array variable) and we are done !!
2. Android Custom Dialog With ListView | Dialog onitemclicklistener
Android Custom Dialog With ListView Tutorial welcomes you.
In this example, we will create a custom dialog with listview.
We will also implement onitemclicklistener for the dialog listview.
Developers use dialog with listview when they want to have a quick selection from the user. For example, to select the city or country of the user.
Alert dialog with listview can be used as an alternative to spinner, where user can select any item from several options.
Outcome of listview dialog
Step 1. Two XML files
First of all, make a new project in android studio.
Here, select “Empty activity” as the default template so that we can have clean work space without any pre-written code lines.
We need two XML files separately. One is for custom dialog and another is for listview layout.
Create a new XML file under res->layout directory and give it a name like dialog_listview.xml
Add the following source code in dialog_listview.xml file.
Above file create the view layout for our custom dialog.
It contains one text view, one list view and one button.
We will inflate this file in the JAVA class to create custom dialog view.
Now time create another XML file named list_item.xml under same directory.
Following is the code block for list_item.xml file.
ListView in custom dialog will have some row items. Every row items will create it’s look and feel with help of above file.
Above file contains one text view and one view. So every row of listview will also contain them with their background colors.
Step 2. Main File codes
When you have created a new project, system must have created two files automatically.
One is activity_main.xml and another is MainActivity.java
Write down the following code snippet in activity_main.xml
It contains two UI widgets. One is Button and another is text view.
When the user click the button, we will open the custom dialog.
Text view will hold the name of the selected car.
Now in MainActivity.java file, add the below code structure
Looking above code confidently
Let us understand the logic behind the code of main activity.
First of all, read the below one
First line is making the object of text view class. Second line will help us to use button in our project.
Last line is making one string array. This string array contain the names of the cars.
We will fill the listview with these car names.
In onCreate() method, compiler will first use findViewById() method to find textview and button.
On click method for button is like below
As per the above code, compiler will call showDialog() method when the user touches the button.
Code for showDialog() method is as the below
First of all, compiler will create the Dialog object.
Then it will set it as non cancelable. It means that if user touches outside the dialog, system will pop down the dialog.
.setContentView() method will give the look and feel to our custom dialog. File dialog_listview.xml will help us in this task.
Then compiler will find the Cancel button using it’s id and will implement is’s click event.
Then compiler will find the listview.
After this, it will create the array adapter to populate the listview.
Here, it is using string array variable to show them (car names) in listview.
On click event of list view is also written. When the user clicks the listview, compiler will set the value of selected car name into text view.
3. Android Custom Dialog With EditText Example Tutorial
Android Custom Dialog With edittext example and tutorial is the main focus here.
In this example, we will create a custom popup alert dialog with multiple edittext.
User will be able to type his string in our custom input dialog. You can use this dialog with edittext to get password from the user.
Dialog will have custom layout. You add many UI widgets like TextView, EditText, Button etc. as per your requirements.
This custom popup alert dialog contains two buttons, Ok and Cancel
So, follow all the below steps to make your desired custom dialog with edittext.
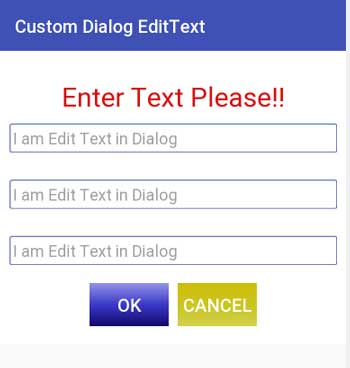
Last Output
Your custom dialog will look like below
Step 1. Custom Drawables
We are going to customize the look and feel of EditText and Buttons For our custom dialog.
Due to this purpose, we need to make some drawable xml files.
First of all, create a new xml file under res->drawable directory. edittext.xml should be the name of this file.
Add the following code into this file.
Above layout file with customize the edittext of the dialog with blue rounded borders.
Now make another xml file named button.xml under the same directory.
Copy below source code in button.xml file.
This file will give blue colored look and feel to the dialog’s button.
Prepare third xml file named button_yellow.xml
Write down below source code in it.
Above file will give yellow gradient effect to the button of the custom popup alert dialog.
Step 2. Dialog Layout
Let us create a layout resource file which will represent the custom layout of the dialog.
Create new xml layout resource file under res->layout directory.
Put the following code in it
You can see that the xml files we created in the drawable folder are used in this file.
In the edittext, we have set it’s background with reference to the edittext.xml file.
For button, button.xml and button_yellow.xml are used to customize the background of the buttons.
This file give it’s exact layout to the custom dialog. This file will generate layout like the below image.
Step 3. Last Codes
At last, we need to write code for Main Activity.
Write down the following code in activity_main.xml file
Here, I have taken one button and three TextViews.
Now add the below source code in MainActivity.java file.
Reading Carefully
Consider the below code
First of all, button and three textviews are defined then button’s on click method written.
When the user will click the button, showDialog() method will be called.
showDialog() method
Below is the code for this method.
First line will declare the object of the dialog.
Second line will remove the title from the dialog.
Third line will set the cancelable property as a true. It means that when user touches outside the dialog, the dialog will not go away. He need to click the cancel button for this.
Consider below code
First three lines will declare the objects of the EditText.
Second will declare the object of the Button (This is OK button.)
When the user clicks on the OK button , following compiler will execute the following code
Compiler will set the text for the textviews.
It will fill the first TextView with the text of the first EditText. Similarly, second and third TextView will get their texts.
Then compiler will remove the dialog from the screen.
Now read the following code
Above code is representing the CANCEL button.
When user clicks the CANCEL button, simply compiler will remove the custom dialog which have three edittexts.
4. Android Custom Dialog Rounded Corners Programmatically | Border
Tutorial is about Android Custom Dialog Rounded Corners Programmatically.
We will create total of three custom dialog with rounded corners in this tutorial.
All three dialog will have different background and rounded corners.
You will learn how to set rounded corner to custom dialog Programmatically as well as using drawable XML files.
Separate Drawable XML file enable us to make fully customizable background for any custom dialog.
Third dialog will have borders along with rounded corners.
You can also set the size and color of the border as per your requirements.
See Your Dialog
Step 1. Changing Colors
There is a file under res->values->colors.xml directory.
Add the below lines in colors.xml file.
Step 2. Twitter Images
We require images in res->drawable directory.
Click the below link to download twitter images.
After downloading images from above link, add them in drawable folder.
Step 3. XML Layout File For Dialog
Now we need to make one XML layout resource file, which will help us to make unique layout for custom dialog.
Make a new XML file under res->layout directory.
Name of the file should be round_corner.xml
Add the below coding lines in round_corner.xml file
Above file is the basic structure of the custom dialog.
You can add any UI widget like TextView, Button, ImageView etc. in this file.
I have mainly taken One ImageView, Two buttons and one Textview.
Root element of this file is a RelativeLayout. I have given a black color opacity value 67 as the Background of this RelativeLayout.
It will make the transparent background of our dialog.
Step 4. Required Drawable Files
Now let us create three drawable XML files to provide some background features to dialog.
Create a new XML file under res->drawable directory.
Set the name of the file as dialog_bg.xml and add the below code in it
- Above file will set the color, padding and radius size.
- tag helps us to define the radius of the rounded corners.
Make another file in the same directory named dialog_second_bg.xml
Code block for dialog_second_bg.xml file is as the below
This file has the same code as of dialog_bg.xml , only color value is changed.
Now prepare another XML file under same directory.
Name for this file is dialog_third_bg.xml
Following is the code structure for dialog_third_bg.xml file.
This file has one extra tag than the above two files. This tag is tag.
tag will enable us to give borders to custom dialog.
Using this tag, we can also set the color and width of the border as per our particular requirements.
Step 5. Last and Important Task
Final step is to write main files.
Code for activity_main.xml should look like the below
- There are three buttons in this file. Every button will open unique custom dialog.
Now write down the following source code in MainActivity.java file.
Dive Deep In Main
Consider the below code block
Above snippet consist of three button click implementation.
Every button will call separate method.
First button will call showDialog() method.
Code snippet for showDialog() method is as the below
Above method will create the object of the Dialog class.
Then compiler will set the content view for the dialog. Here, it will set the round_corner.xml as a content view.
After that, compiler will set the title of the dialog into the Textview.
Then it will set the click events of OK and CANCEL buttons.
Finally, dialog.show() line will pop up the custom dialog.
Now button click of second button will call showDialogSecond() method.
Code structure for showDialogSecond() method is as the following
This method performs the similar task as the previous one like dialog object, then set content view, then set title and button clicks.
But it has one extra feature.
After setting the content view, compiler will inflate the LinearLayout of round_corner.xml file.
Then it will set the dialog_second_bg.xml file as the background of this linearlayout.
Thus dialog will have the view of dialog_second_bg.xml file.
We have create the dialog with rounded corners programmatically here with this method.
Third button will call the showDialogThird() method.
- This method will set the background of linearlayout as the dialog_third_bg.xml file.
Other functionalities are same as the showDialogSecond() method.
5. Android custom dialog with image, title, close and two buttons
We will create Android custom dialog with image and title in this tutorial.
This custom popup alert dialog contains two buttons, Ok and Cancel
You will learn how to add images in your custom dialog.
In this example, we will create one specific layout file where you can customize your pop up dialog.
You will be able to add any number of UI widgets(Buttons, TextView, Images etc.) you like.
Final Views For Android custom dialog with image and title
After going through all the above steps, you will have a demo app like below gif
Step 1. Custom Image
I am using one image to show on the custom dialog.
Download this image by clicking the below link.
[sociallocker]Download Custom Image[/sociallocker]
After downloading the image, copy this image into res->drawable directory.
Step 2. Drawable resource files
In this example, we need to create two drawable resource files. These files are used to give radiant effect to our buttons.
- Create a xml resource file named button.xml in res->drawable directory.
Add below source code in it.
- It will add the gradient effects with blue as a core color.
- Now create another xml resource file named button_yellow.xml in res->drawable directory.
Copy below code in this file
- It will add the gradient effects with yellow as a core color.
Step 3. Layout Of the Custom Dialog
Here, we will create another layout resource file named dialog_layout.xml
Source code this file is as following:
- You can create any layout as per your requirements using this file.
- I will show one image and two buttons in this example.
This file will generate the following preview.
Our custom dialog will exactly look like the above image.
Step 4. Final Work
Only thing required now is to change code for activity_main.xml and MainActivity.java file
Put following code in activity_main.xml file
Copy the below source code in MainActivity.java
- showDialog() method will create our custom dialog and will pop up it to the user.
Read the below two lines of code
First line will disable the cancelable property of dialog. It means that when user taps on the outside of the dialog to cancel it, it will not be canceled.
Second line will set our custom view or representation in the dialog.
We have made our custom look for dialog in dialog_layout.xml file. Second line will tell the compiler to make the look and feel of the dialog as per our dialog_layout.xml file.
Setting The Custom Title
As I have already said that we are able to set custom title for our dialog with this example.
To set the custom title, you have to send your title when you are calling the showDialog() method.
Set your custom title in the second parameter of the showDialog() method. I have set the title as “First Custom Dialog.”
Following line will set the title of the dialog
Button Clicks
Let us show how to handle button clicks. I have taken two buttons in this dialog.
Following code will handle the first button’s (OK button) click event.
- Dialog will be dismissed when the user clicks on the OK button.
Similarly you can customize this click event as per your requirements.
6. Android Custom Dialog With Transparent Background | Background Color
This article is on Android Custom Dialog With Transparent Background Color Example.
You will learn to make custom dialog with transparent background.
We will also learn to change background color with different level of transparency.
For this purpose, we will make separate XML layout files for every dialog.
One easy trick for transparent background is to make the root layout of XML file as a transparent.
Creating Transparent Background
Step 1. Making Colors
First of all, we will define various colors with different opacity.
Write down the below lines in res->values->colors.xml file.
Here, colorTransparent and redTransparent are the colors we will use in dialog background.
See the below image,
Above Image shows us how to define color with different opacity.
For this, open your colors.xml file.
Here, you will see squares filled with colors define in tags. These squares are at the left side of the tags.
Click on that square. System will open a dialog window like the above image.
In this window, there two horizontal sliders (A & B as per the above image) .
With the help of the A, you can set the color and by using B, you can set the opacity of that color.
Lower the opacity, more transparency is there.
Step 2. XML files for dialog
Before making drawable files, we need to add two images in the drawable folder.
After downloading images from above link, add these two images in res->drawable folder.
For every custom dialog, we will make separate XML drawable files.
So, create a new XML file under res->drawable directory.
Set the name of the file as dialog_transparent.xml and add the following code
Above code will generate custom dialog with fully transparent background.
The parent element of this file is RelativeLayout.
I have set the background color of this relativelayout as the fully transparent with opacity 67.
Elements other than relativelayout will create attractive custom dialog with twitter image, text and two buttons.
Second file
Now under res->drawable directory, make another XML file and give it a name dialog_second.xml
Code structure for dialog_second.xml is as the below
It has the same dialog structure as the previous one. A twitter image, text and two buttons.
But I have set the background of square in which twitter image, text and two buttons are present, as the WHITE color.
For real view of this dialog, you can see the output video present at the bottom end of this tutorial.
Third File
Under the same directory, prepare another XML file named third_dialog.xml
Code structure for third_dialog.xml is as the following
This file also create custom dialog with same elements.
But it will hold the red background with opacity 127.
I have set the red color with opacity 127 at the root element of this file, which is RelativeLayout.
Step 3. Last Main Changes
Now it is time to make final changes in this project.
Copy the below coding lines in your activity_main.xml file
- I have taken three buttons in this file.
- Every buttons will create custom dialog using different drawable XML files which we have just created in step 2.
Code snippet for MainActivity.java is as the following
Consider the below coding lines
There are three button clicks in the above snippet.
Compiler will call showDialog() method when the user clicks the first button.
It will call showDialogSecond() method when the user clicks the second button.
On the click of third button, compiler execute the showDialogThird() method.
Code For showDialog() method is as the below
Compiler will create the object of the Dialog class.
Then it will set the content view as the dialog_transparent.xml file.
So this custom dialog will have the view created by the dialog_transparent.xml file.
Then compiler will set the text in the textview of the dialog.
After this, compiler will set the button clicks for OK and CANCLE button.
Finally, dialog.show() method will create the dialog with a transparent background.
Similarly, showDialogSecond() method and showDialogThird() method will create dialogs.
- showDialogSecond() method will inflate dialog_second.xml file and showDialogThird() method will inflate third_dialog.xml file.
Thus, you have seen that creating a custom dialog with transparent background is not a complex task if you make it with proper XML file.
Transparent background with any color is also possible with little trick and tips.
Источник


