- Совет: Работаем со своими шрифтами в Android O
- Добавление ваших шрифтов в проект
- Использование своих шрифтов
- Создание семейства шрифта
- Не забудьте протестировать!
- Заключение
- Android и кастомные шрифты или «Да здравствует API 26»
- Как было раньше. Краткий обзор
- view.xml
- CustomFontTextView.class
- Но все изменилось в API 26
- Fonts in XML
- Creating a font family
- Using fonts in XML layouts
- Adding fonts to a TextView
- Adding fonts to style
- Using fonts programmatically
- Kotlin
- Using the support library
- Kotlin
- Custom and Downloadable Fonts on Android
- Version
- History: Difficulties in the Past
- Getting Started
- Requirements
- Add the latest support library
- Bundled fonts
- Creating a font family
- Custom fonts in layouts
- Custom fonts programatically
- Downloadable fonts
- How Font Providers work
- Security & certificates
- Downloadable fonts programatically
- Creating a font request
- Retrieving font information
- Downloadable fonts as XML resources
- Pre-declaring fonts in manifest
- Where To Go From Here?
Совет: Работаем со своими шрифтами в Android O
Russian (Pусский) translation by Ellen Nelson (you can also view the original English article)
А вот и первая предварительная версия Android O!
В этой серии мы рассмотрим некоторые из современных функций пользовательского интерфейса, с которыми вы можете начать экспериментировать сегодня, в версии Android O для предварительного ознакомления разработчиками.
В первом совете я показал вам, как настроить свою разработку для поддержки этого раннего предварительного просмотра O, и как создать текст, который автоматически масштабируется в соответствии с текущей конфигурацией экрана. В этом совете мы увидим, как Android O сделает работу с пользовательскими шрифтами беззаботной.
Добавление ваших шрифтов в проект
Вы когда-нибудь хотели выделить отдельный фрагмент текста? Или, может быть, вы были убеждены, что ваш шрифт станет отличным способом добавить в ваше приложение дополнительную индивидуальность?
Хотя есть много преимуществ при использовании пользовательских шрифтов, работа с ними на Android традиционно была болезненным опытом, требуя, чтобы вы либо использовали библиотеку, либо создали пользовательский View .
К счастью, работа с пользовательскими шрифтами в Android будет намного проще, так как пользовательские шрифты станут полностью поддерживаемым типом ресурсов в Android O. Это означает, что добавление пользовательского шрифта в ваше приложение будет таким же простым, как добавление любого другого ресурса, например изображения и текста.
Чтобы следовать этому руководству, вам понадобятся несколько файлов шрифтов, которые вы можете добавить в проект с Android O, который мы создали в первой части.
Android O поддерживает оба формата: .otf (OpenType) и .ttf (TrueType). Существует множество веб-сайтов, предлагающих такие шрифты бесплатно, поэтому потратьте несколько минут на поиск в Google, пока не найдете нужный шрифт.
Поскольку мы просто экспериментируем с новыми функциями Android O, не имеет особого значения, какой шрифт вы используете, но если вы ищете шрифты для использования в релизах вашего приложения, вы всегда должны смотреть условия использования этого шрифта. Только потому, что файл доступен для загрузки, не означает автоматически, что нет ограничений на то, как вы можете использовать и обращаться с этим файлом, поэтому всегда читайте мелкий текст!
Вы также должны задуматься о цели, содержании и целевой аудитории вашего приложения, так как разные шрифты передают разные сообщения. Если вы разрабатываете приложение, помогающее людям заполнять их налоговые декларации, то ваша аудитория с трудом сможет серьезно отнестись к финансовым и юридическим советам в вашем приложении, если оно поставляется со непонятным и странным шрифтом!
Как только вы найдете шрифт, с которым хотите работать, загрузите и разархивируйте его. На этом этапе вы должны проверить имя файла шрифта на наличие недопустимых символов — по сути это, что угодно, что не входит в строчные a-z, 0-9 или символ подчеркивания. Попробуйте использовать любые другие символы и Android Studio выдаст ошибку, как только вы попытаетесь сослаться на этот ресурс.
Так как у вас есть файл(ы) шрифтов, вам надо будет где-то их хранить:
- Правый клик по папке app/res вашего проекта и выберите New > Android resource directory.
- Откройте выпадающее меню и выберите font.
- Введите font в File name.
- Нажмите OK.


- Убедитесь, что вы добавили все файлы шрифта в папку res/font вашего проекта.
- Щелкните правой кнопкой мыши по папке res/font вашего проекта и выберите New > Font resource file.
- Дайте этому файлу имя и нажмите OK.
- Откройте этот XML-файл и определите все различные версии этого шрифта, а также их атрибуты стиля и веса, например:
- Right-click the font folder and go to New > Font resource file. The New Resource File window appears.
- Enter the file name, and then click OK. The new font resource XML opens in the editor.
- Enclose each font file, style, and weight attribute in the element. The following XML illustrates adding font-related attributes in the font resource XML:
- In the layout XML file, set the fontFamily attribute to the font file you want to access.
- Open the Properties window to set the font for the TextView .
- Select a view to open the Properties window.
- Expand the textAppearance property, and then select the font from the fontFamily list.

Figure 4. Selecting the font from the Properties window
The Android Studio layout preview, shown in the rightmost pane of Figure 5, allows you to preview the font set in the TextView .
Figure 5. Previewing fonts in layout preview
Adding fonts to style
Open the styles.xml , and set the fontFamily attribute to the font file you want to access.
Using fonts programmatically
To retrieve fonts programmatically, call the getFont(int) method and provide the resource identifier of the font you want to retrieve. This method returns a Typeface object. Although the system picks the best style for you from the fonts information, you can use the setTypeface(android.graphics.Typeface, int) method to set the typeface with specific styles.
Note: The TextView already does this for you.
Kotlin
Using the support library
The Support Library 26.0 provides support to the Fonts in XML feature on devices running Android 4.1 (API level 16) and higher.
Note: When you declare font families in XML layout through the support library, use the app namespace to ensure your fonts load.
To retrieve fonts programmatically, call the ResourceCompat.getFont(Context, int) method and provide an instance of Context and the resource identifier.
Kotlin
Content and code samples on this page are subject to the licenses described in the Content License. Java is a registered trademark of Oracle and/or its affiliates.
Источник
Custom and Downloadable Fonts on Android
See how to make great looking apps using the new custom and downloadable fonts capability available in Android Studio 3.0, all in Kotlin.
Version
- Kotlin 1.2, Android 4.4, Android Studio 3
Since the beginning of Android, there was no out of the box solution for using custom fonts. Only a small set of preinstalled fonts on the device was available.
You had to be creative and write a lot of code for such a trivial thing.
Recently, Google introduced Custom and Downloadable fonts for Android 8.0. They’ve also provided support for earlier Android versions through Support Library version 26.
In this tutorial, you’ll get to know how to use them by creating a simple quiz app. In the process, you’ll learn:
- How to add custom fonts in your app
- How to define font families
- How to add downloadable fonts from a provider
- How to retrieve font information
Let there be fonts! :]
History: Difficulties in the Past
Up until recently, to use a custom font on a View, you had to do several things:
- Put your font files in the assets folder
- Load the font from the asset file into a Typeface object
- Set that Typeface to your view using setTypeface()
The main disadvantage in this approach was that you couldn’t set the font in layout files – you had to do it in code:
To remedy that you could extend your view classes and add a custom attribute for passing the font file from layout. That was a little bit better but there were still issues:
- You had to extend every type of View you wanted to apply a custom font to
- On some devices loading from assets could take a long time so you had to cache fonts in memory
- In some cases things could get messy – for example if you had to change the font on Toolbar
Not to mention that it felt wrong extending a TextView just for setting a custom font.
Getting Started
Requirements
To work with custom fonts you’ll first have to install the latest Android Studio 3.x. This is important as some of the features are not supported on Android Studio 2.x – for example the font resource directory.
Install Android Studio by following the instructions in our Beginning Android development tutorial.
Your first task will be to switch to the latest support library. You can download the starter project here.
Open up Android Studio and import the starter project with File\Open. Select the location where you extracted the starter project and click Open on the dialog.
Once the project is open and synced, build and run the project.
You have a simple font quiz app. If you start the quiz you’ll get a series of 5 questions which ask you to guess the font of the text.
But wait – the text is always in the same (default) font! We’ll get to that shortly. First let’s add the latest support library.
Add the latest support library
Open build.gradle file in \app folder (in the Android project view you can find it under Gradle Scripts) and update the support library line in the dependencies < … >section:
This will add the latest version of the Android support library that ports Custom and Downloadable fonts back to Android from API versions 14 up.
You also need to change your compileSdkVersion and targetSdkVersion to 27. Finally, change the other support library dependencies (i.e., appcompat and design) to version 27.0.2.
Once done, click Sync now on the gradle notification on top of editor window.
After gradle has synced up, build and run the app again to make sure everything is still working:
There is no visible change for now, but hold tight – we are ready to add some custom fonts!
Bundled fonts
Google introduced a new feature with Android 8 – font resources. Put font files into the res\font folder to bundle them in the .apk as resources. These fonts compile in the R file and are available in Android Studio the same way as string, drawable and color resources.
The next thing you will do is add a custom .ttf font to the app. Download the OpenSans-regular font here.
Go back to Android Studio and make sure you select Android in Project navigator:
Click on the res folder, press ⌘N (or File\New) and select Directory.
A dialog to enter a new directory name will pop up. Name it font:
Now, right click on the new directory and click Reveal in Finder (macOS), Reveal in Explorer (Windows), or Show in Files (Linux). Move the downloaded OpenSans-Regular.ttf file to the fonts folder you’ve opened and rename it to opensans_regular.ttf. Only alphanumeric characters and underscore are valid in an android resource name.
Go back to Android Studio and open the res\layout\activity_main.xml file. Find AppCompatTextView with the id tvFontQuiz . Add the following property to it:
The layout code for the text view should look like this now:
Build and run your project.
You can see that the message is now in OpenSans font. Easy peasy!
Creating a font family
Another new capability is that you can create font families which contain a set of font files along with their style and weight details. To create a new font family you will actually create a new XML font resource. The benefit is that you can access it as a single unit instead of referencing individual font files for each style and weight as a separate resource.
You’ll now create a new font family. First, let’s get the bold version of OpenSans.
Repeat the same procedure from the last step and add new font file to the font folder of the project. Rename the file to opensans_bold.ttf.
The next thing you’ll do is create a font family resource.
Click on the res\font folder, press ⌘N (or File\New) and select Font resource file.
Type opensans under File name and click Ok.
Android studio will generate an empty font family resource:
Add two font files to the font family by using the element. It has three attributes:
- font: font file resource identifier
- fontStyle: style to which the font file corresponds, can be normal or italic
- fontWeight: text weight to use for the font
To add regular and italic font resource you’ll add two elements:
Note that to be backwards compatible to Android versions older than 8.0 you have to declare all font properties in the app namespace as well. This will use the custom font implementation from the support library. After adding them your resource file should look like this:
Now go back to res/layout/activity_main.xml and change the app:fontFamily property on tvMessage to opensans:
Build and run your project.
Custom fonts in layouts
You’ve already seen in previous steps how to add a custom font to TextView . Now you will add a custom font to a Theme, changing the default font on all Activities that use the Theme.
Open the file res/values/styles.xml.
Change app theme Theme.FontQuiz – add the fontFamily attribute:
Build and run the app.
You can see that across the app, OpenSans is now used:
Custom fonts programatically
You can set the custom font programatically as well. To do that you will use the ResourcesCompat class from the support library. Type the following at the end of the onCreate() method in MainActivity :
Build and run your project.
You can see that the font on the start button has been set to OpenSans Bold.
Note again that you use the support library to support Android versions earlier than Android 8.0.
Downloadable fonts
Now that you’ve seen how custom fonts work, let’s jump onto another novelty – downloadable fonts. Downloadable fonts allow you to add fonts to your application that download on demand or when your application starts.
This has more benefits:
- fonts get downloaded only when required
- reduced application .apk size
- more applications can share fonts through font providers which can reduce used disk space
How Font Providers work
Font providers take care of retrieving and caching downloadable fonts used across applications. This is what the process of requesting a font looks like:
All applications that use downloadable fonts pass their requests via FontsContractCompat . It then communicates with the requested font provider. A font provider is an application that takes care of fetching and caching the appropriate fonts. There can be more of them installed on a device but currently only a Google font provider is available.
Security & certificates
To ensure security when using font providers, you have to provide the certificate used to sign by the font provider. This enables Android to verify the identity of the font provider. You have to do this for font providers that are not pre-installed on the device or when using support library.
Your next task is to add the certificate for the Google font provider.
Click on the res\values folder, press ⌘N (or File\New) and select Values resource file.
In the dialog, name it font_certs and click Ok.
You define font provider certificates in a string-array . If the font provider has more than one set of certificates, then you must define an array of string arrays. The Google font provider used with the support library uses two sets of certificates, and the next step is to define an array for each set.
Add a string array in the new file by adding in the section and name it com_google_android_gms_fonts_certs_dev.
Add a single item to it with the following content:
Now add another string array with the name com_google_android_gms_fonts_certs_prod and add a single item to it with the following content:
Finally, create an array named com_google_android_gms_fonts_certs and add the two previously defined string arrays as its items.
Your font_certs.xml file should now look like this:
Build and run your project.
There is no visible change but you are now ready to add downloadable fonts.
Downloadable fonts programatically
The FontQuiz application is still missing one key feature – text in quiz questions always must be in font from the question.
You can implement requests to fetch downloadable fonts and apply them to a View in code as well. You must use the FontsContractCompat class from the support library to support Android versions older than 8.0.
Your task will be to use it to request and set a random font on the quiz question Activity .
Open QuestionActivity and find the showFont() method.
Font family names available for the quiz are in a list in res\values\family_names.xml file. The logic to pick a random font for the question and four offered answers is already there. Your job is to request and show the font with the name passed to showFont() .
First, hide all the buttons and show a ProgressView that will show hat font is loading by adding:
Build and run your project.
Click on “Start Quiz” and you’ll see disabled buttons and a progress indicator when the first question opens up:
Time to add the font request.
Creating a font request
Your next task is to add requesting downloadable fonts to QuestionActivity.
Create a query string and a request for the downloadable font:
When creating a FontRequest you have to pass:
- provider authority – only Google provider com.google.android.gms.fonts is available so far
- provider package – for Google font provider it’s com.google.android.gms
- query – query string that describes the font you are requesting
- array of certificates – to verify the provider
To request a new font use requestFont() method from FontsContractCompat . Add following to the end of showFont() :
Requesting a downloadable font is an asynchronous operation. Method requestFont() passes the result through a FontsContractCompat.FontRequestCallback interface. If the request is successful, FontContractorCompat calls onTypefaceRetreived() . Use the Typeface instance passed to set the font on a View. Enable all the buttons and hide progress indicator:
In case of an error, FontContractorCompat will call onTypefaceRequestFailed() . Use it to display an error message by calling showError() and passing it error code:
The last thing you need when requesting fonts is a Handler instance.
FontContractorCompat uses it to execute retrieving a font on a Thread associated with that Handler . Make sure you provide a Handler that is not associated with a UI thread.
For convenience, create a private field that will hold the handler and a property that will initialize and retrieve it:
Using the handlerThreadHandler property will initialize the handler on the first use and return it.
The call at the end of showFont() should now look like:
Build and run your project. Start the quiz:
Now you can see the text on each question in the appropriate font! :]
Retrieving font information
After you answer a question on the quiz, it would be cool to display a simple fact about the font in question. So your next task will be to retrieve information about a font family.
Go to loadFontFact() in QuestionActivity .
To get information about available fonts use fetchFonts() from FontsContractCompat . Like in the previous task, create a FontRequest first:
Then pass it to fetchFonts() :
This will return the information about the requested font family if there is one available with the given name. You’ll look it up in the fonts array of the object returned.
There are several properties for each font:
- uri – a URI associated to the font file by the font provider
- ttcIndex – If providing a TTC_INDEX file, the index to point to. Otherwise, 0.
- weight – font weight as an integer
- italic – boolean with value true if the font is italic style
Check that the status code of the result is ok and show the weight of the font to the user:
The string R.string.correct_answer_message is already prepared and takes one integer format param that represents the font weight.
Fetching font data is a blocking operation that should execute in the background. Use doAsync and uiThread blocks from Kotlin to execute it on a background thread:
Finally, add error handling and hide the progress indicator. The final code should in loadFontFact() look like:
Build and run your project. After answering a question you’ll see a fun fact about the font.
Downloadable fonts as XML resources
You can also define downloadable fonts as XML resources.
Right click on the res\font folder. Choose New\Font resource file. For the name type acme in the dialog.
Add font related attributes to the element:
All this looks familiar. Yes, that’s right – you are setting the attributes that you earlier passed to requestFont() . Only this time using XML.
Refer to the created font resource like you did with font family and .ttf files. Open res/activity_main.xml layout and set the acme font to tvFontQuiz textView:
Now repeat the process and add the font named Bilbo Swash Caps.
Open res/activity_main.xml and set the bilbo_swash_caps font on tvTheGreat textView:
Build and run your project:
You should see the FontQuiz labels in fonts now. When you first run the app you’ll notice that the font takes a little bit to load before showing because it’s not downloaded and cached yet.
Pre-declaring fonts in manifest
As a bonus – you can specify fonts that Android should preload before your app starts! To do this, you must specify them in the manifest.
Click on the res\values folder, press ⌘N (or File\New) and select Values resource file.
Name the file preloaded_fonts in the dialog.
Add an array of fonts with the resources tag and name it preloaded_fonts :
Open manifests\AndroidManifest.xml and add the following element inside tag:
Build and run your project:
Voila! Your fonts are now preloaded and ready to use once the app starts.
And, you have a nice Font Quiz app – it’s time to have fun! Can you score 5 / 5? :]
Where To Go From Here?
Here is the final project with all the code you’ve developed in this tutorial.
Now you know how to add custom and downloadable fonts in your application.
A great place to find more information is the official documentation from Google on
font resources, Fonts in XML and Downloadable fonts.If you want to browse fonts that are available from the Google font provider check here.
If you have any questions or tips for other custom and downloadable font users, please join in the forum discussion below!
Источник
Переместите файлы вашего шрифта в новую папку res/font.
Использование своих шрифтов
Вы можете применить свой шрифт к тексту, используя новый XML атрибут android:fontFamily :


Вы можете добавить пользовательский шрифт к любым стилям, которые вы создали в приложении.
Если вы хотите использовать свой шрифт программно, когда вы можете извлечь ваш шрифт используя метод getFont(int) , например:
Создание семейства шрифта
Иногда при распаковке папки со шрифтом вы можете обнаружить несколько версий одного и того же шрифта, например, курсивную версию, или шрифты с различной толщиной.
Если вы используете несколько версий одного и того же шрифта, вы можете сгруппировать их вместе в семейство шрифтов. Семейство шрифтов по существу является отдельным XML-файлом, в котором вы определяете каждую версию шрифта со всеми связанными с ним атрибутами стиля и веса.
Чтобы создать семейство шрифтов:
Затем вы можете ссылаться на любой из шрифтов в этом семействе, используя атрибут android:fontFamily . Например:
Не забудьте протестировать!
В то время, как легко увлечься новыми функциями, не заходите за рамки пользовательских шрифтов! Согласованные UI легче в навигации и понимании, а если ваше приложение постоянно переключается между шрифтами, тогда ваши пользователи скорее обратят больше внимание на то, как выглядит ваш текст, а не на то, что о чем он говорит.
Если вы добавляете пользовательские шрифты в свой проект, важно проверить, как этот шрифт отображается в широком диапазоне различных конфигураций экрана, поскольку вашим главным приоритетом всегда должна быть удобочитаемость текста.
Заключение
В этом совете я показала вам, как создать более стильный и уникальный текст, добавив пользовательские шрифты в свои проекты. В заключительном посте этой серии мы переведём наш фокус с текста на изображения, так как я покажу вам, как создавать адаптивные значки запуска, которые автоматически адаптируют свою форму в соответствии с текущим устройством.
В то же время ознакомьтесь с некоторыми из наших других руководств по разработке приложений для Android!
Источник
Android и кастомные шрифты или «Да здравствует API 26»
Как было раньше. Краткий обзор
Если было много view где требовались нестандартные шрифты, то мы использовали что-то вроде такого:
view.xml
CustomFontTextView.class
И это я пропустил огромный кусок который отвечает за то, чтобы не писать каждый раз путь к шрифту, а указывать
Ну, или шли на гитхаб и в результате находили Calligraphy (7000 звезд!)
Ни для кого не секрет что этот подход содержал много минусов как в огромном количестве boilerplate кода, так и в том, чтобы сделать это эффективно и где-нибудь не утечь по памяти запрашивая каждый раз Typeface.
Но все изменилось в API 26
Похоже, гугл наконец-то сдался и решил отказаться от навязывания Roboto и сделал удобное подключение сторонних шрифтов, за что ему огромное спасибо.
Линк для тех, кто любит читать в оригинале.
Теперь подключение состоит всего из нескольких несложных шагов:
1. Создаем папку font в res
Resource type выбираем font

2. Перетаскиваем в новую папку все нужные нам в проекте шрифты
3. Создаем файл для семейства шрифтов.
Обратите внимание: я сразу добавил в пример то как должен выглядеть файл, если вы хотите поддерживать и более старые версии Андроида. (Начиная с 14). Если вам повезло и у вас таргет только на супер-новые девайсы, то ваш файл сократится в 2 раза
Ну а дальше остается только наслаждаться сборкой
Использование в TextView
Используем в стилях
И у вас больше не болит голова об эффективности 🙂
Источник
Fonts in XML
Android 8.0 (API level 26) introduces a new feature, Fonts in XML, which lets you use fonts as resources. You can add the font file in the res/font/ folder to bundle fonts as resources. These fonts are compiled in your R file and are automatically available in Android Studio. You can access the font resources with the help of a new resource type, font . For example, to access a font resource, use @font/myfont , or R.font.myfont .
To use the Fonts in XML feature on devices running Android 4.1 (API level 16) and higher, use the Support Library 26. For more information on using the support library, refer to the Using the support library section.
To add fonts as resources, perform the following steps in the Android Studio:
- Right-click the res folder and go to New > Android resource directory.
The New Resource Directory window appears.
In the Resource type list, select font, and then click OK.
Note: The name of the resource directory must be font.

Figure 1. Adding the font resource directory
Add your font files in the font folder.
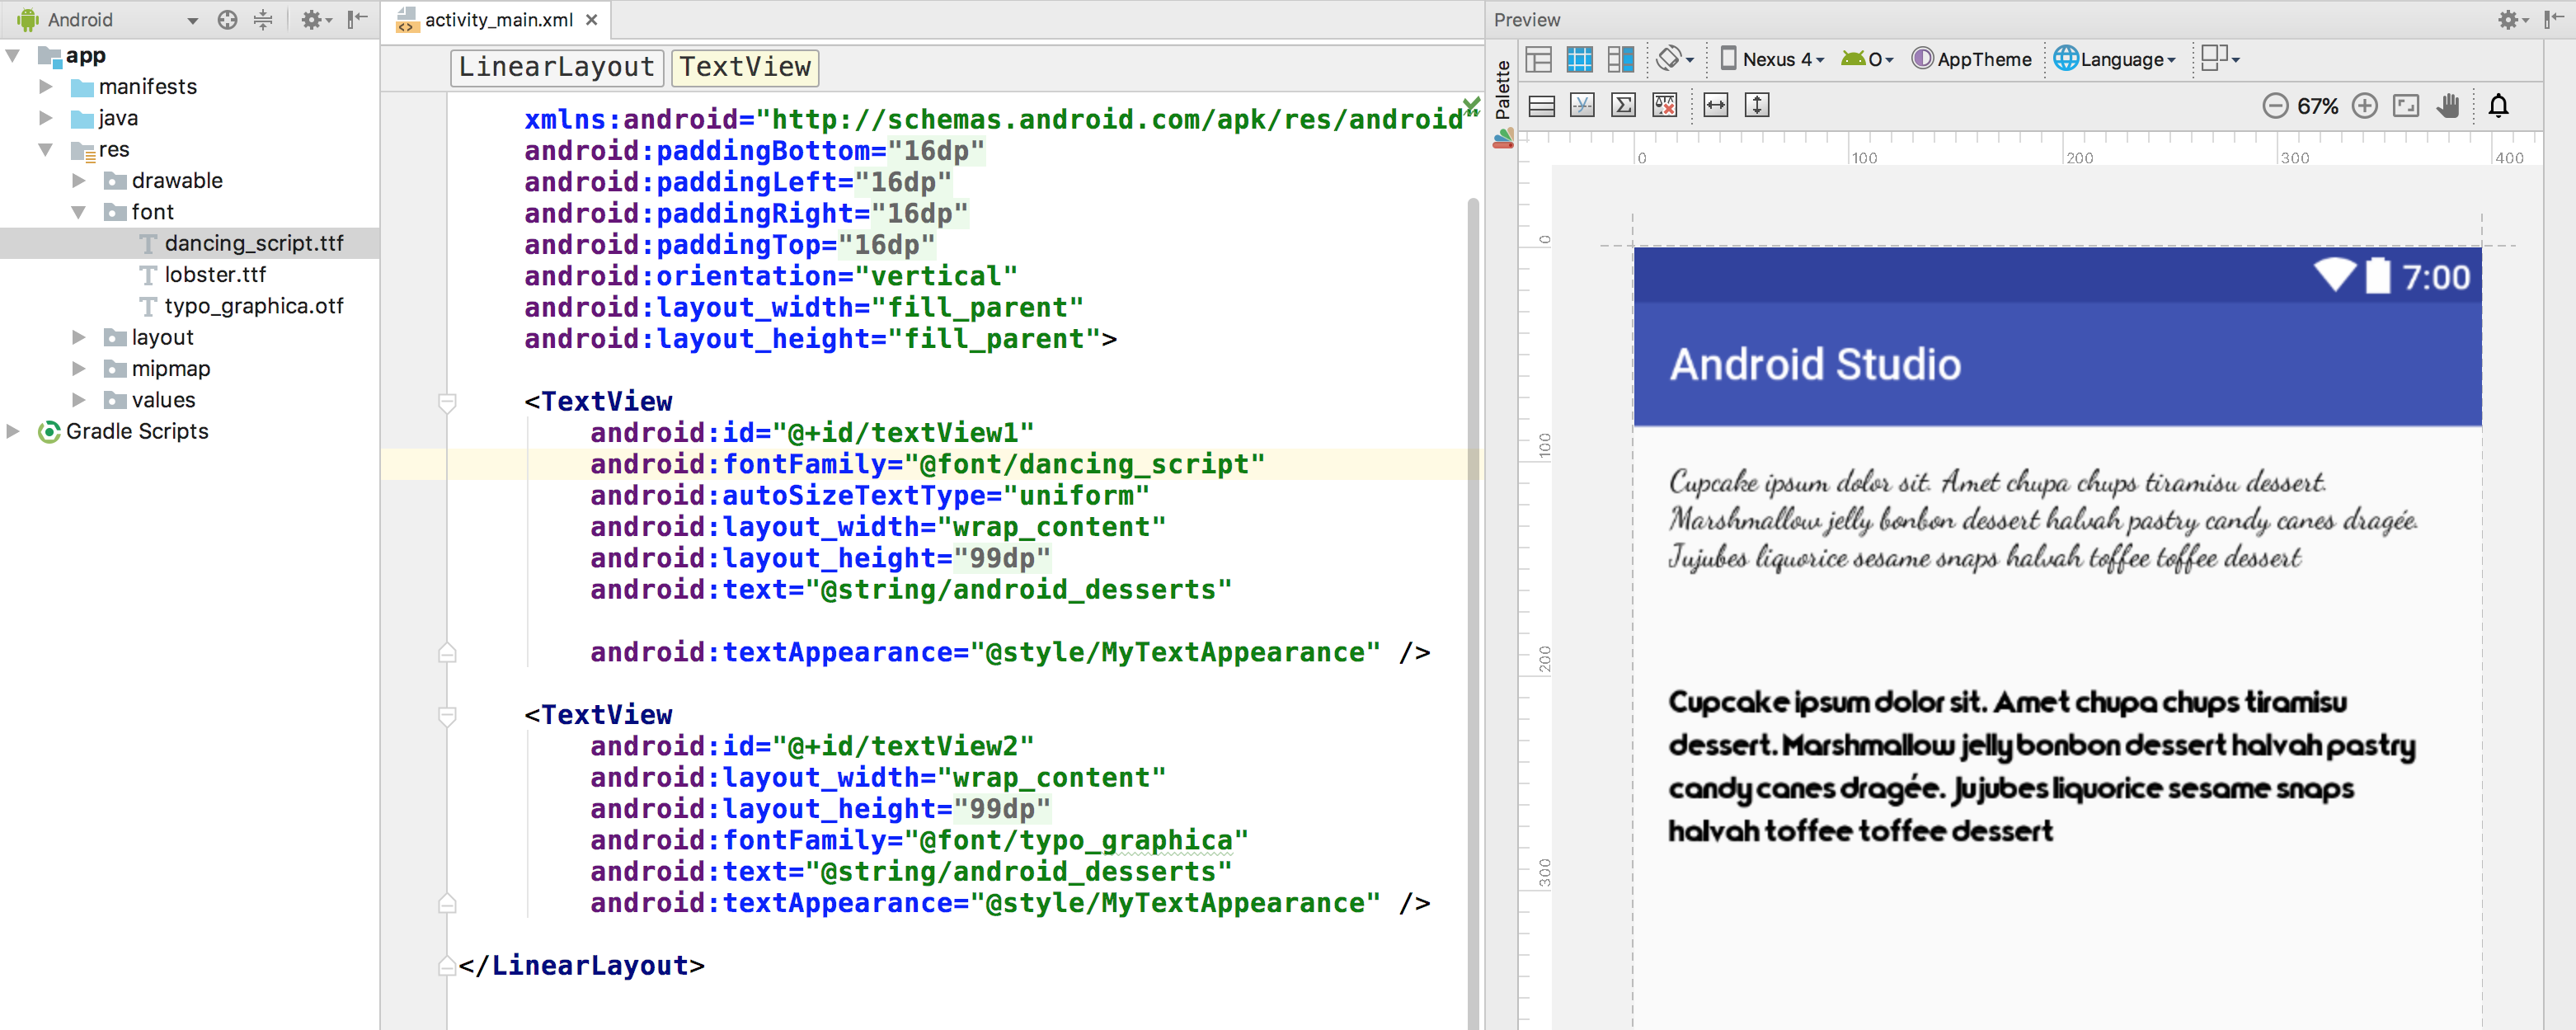
The folder structure below generates R.font.dancing_script , R.font.lobster , and R.font.typo_graphica .

Figure 2. Adding the font files in the resource directory
Double-click a font file to preview the file’s fonts in the editor. 
Figure 3. Previewing the font file
Creating a font family
A font family is a set of font files along with its style and weight details. In Android, you can create a new font family as an XML resource and access it as a single unit, instead of referencing each style and weight as separate resources. By doing this, the system can select the correct font based on the text style you are trying to use.
To create a font family, perform the following steps in the Android Studio:
Using fonts in XML layouts
Use your fonts, either a single font file or a font from a font family, in a TextView object or in styles. To add fonts to the TextView or in styles, use the fontFamily attribute.
Note: When you use a font family, the TextView switches on its own, as needed, to use the font files from that family.
Adding fonts to a TextView
To set a font for the TextView , do one of the following:
Note: The Properties window is available only when the design editor is open. Select the Design tab at the bottom of the window.