- OneSignal Push Notification Service Documentation
- OneSignal Help & Documentation
- Android Notification Icons
- What’s Next
- Notifications на основе билдера с кастомным лейаутом и картинкой
- Custom Notifications for Android
- Why custom notifications?
- Starting with the basics
- XML files
- Side note on styles
- Adding the information
- Adding the actions
- Almost done!
- Final note on sizing
- Results
OneSignal Push Notification Service Documentation
OneSignal Help & Documentation
Welcome to the OneSignal New IA developer hub. You’ll find comprehensive guides and documentation to help you start working with OneSignal New IA as quickly as possible, as well as support if you get stuck. Let’s jump right in!
Android Notification Icons
Adding custom icons to some or all of your notifications. Works with Android (and derivatives like Amazon).
Icons are a way to provide a more unique, branded experience for your Android and Amazon app.
You may add a default icon that appears with every notification you send, or you may add icons to just certain types of notifications. The below tutorial shows you how to do both.
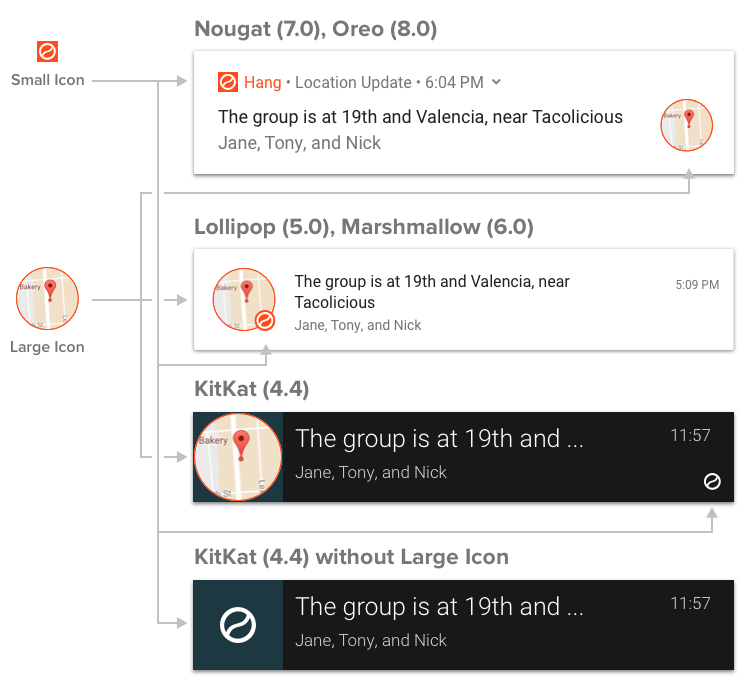
Android supports both Small and Large Notification Icons.
The small icon is displayed on the top status bar as well as the notification itself. By default OneSignal will show a bell icon, however we recommend you customize this so users recognize it’s a notification from your app. Note that Android only uses the alpha channel for the icon. It will display monochrome in the status bar but an accent color can be applied to the left side the notification itself.
The large notification icon will show up to the left of the notification text on Android 4.0.3 — 6.0 devices, and shows on the right for Android 7.0+ devices. If you do not set a large icon, the small icon will be used instead. OneSignal will auto scale large notification icons for you to prevent the icon from being cropped. The recommended size of the large icon is 256×256 pixels.
We strongly recommend adding default icons to every Android and Amazon app.
REQUIRED: Add every icon size listed below
You must add each image with listed size and alpha transparency.
For help generating images with alpha transparency, see this clipart link for examples in the Android Asset Studio.
Recommended
To quickly and easily generate small icons with the correct settings, we recommend using the Android Asset Studio. Use ic_stat_onesignal_default as the name.
If you prefer to create your own icons, you must make your icons the following sizes and make the small ones in white with a transparent background.
You must be sure the icon filenames are correct for Native, Unity, PhoneGap, Cordova, Ionic, PhoneGap Build (PGB), Xamarin, React Native, Ionic Package (Cloud Build)
Note: If you used Android Asset Studio for your small icon then this step may have already been done for you.
Required: Each name and pixel size must be present in the app.
If using Solar2D/Corona the file names and sizes are different, as follows:
Make sure the following paths exist, create any folders you are missing.
Required: Each image must be present in the following paths.
res/drawable-mdpi/ (24×24)
res/drawable-hdpi/ (36×36)
res/drawable-xhdpi/ (48×48)
res/drawable-xxhdpi/ (72×72)
res/drawable-xxxhdpi/ (96×96)
res/drawable-xxxhdpi/ (256×256) (Large Icon)
Assets/Plugins/Android/OneSignalConfig/res/drawable-mdpi/ (24×24)
Assets/Plugins/Android/OneSignalConfig/res/drawable-hdpi/ (36×36)
Assets/Plugins/Android/OneSignalConfig/res/drawable-xhdpi/ (48×48)
Assets/Plugins/Android/OneSignalConfig/res/drawable-xxhdpi/ (72×72)
Assets/Plugins/Android/OneSignalConfig/res/drawable-xxxhdpi/ (96×96)
Assets/Plugins/Android/OneSignalConfig/res/drawable-xxxhdpi/ (256×256) (Large Icon)
PhoneGap, Cordova, Ionic, Intel XDK
/platforms/android/app/src/main/res/drawable-xxxhdpi/ (256×256) (Large Icon)
PhoneGap Build (PGB), Ionic Package
(Cloud Build)
/locales/android/drawable-xxxhdpi/ (256×256) (Large Icon)
See this github link for more details on the directory structure if you’re having issues.
android/app/src/main/res/drawable-mdpi/ (24×24)
android/app/src/main/res/drawable-hdpi/ (36×36)
android/app/src/main/res/drawable-xhdpi/ (48×48)
android/app/src/main/res/drawable-xxhdpi/ (72×72)
android/app/src/main/res/drawable-xxxhdpi/ (96×96)
android/app/src/main/res/drawable-xxxhdpi/ (256×256) (Large Icon)
Add files to root (all sizes)
Resources/drawable-mdpi/ (24×24)
Resources/drawable-hdpi/ (36×36)
Resources/drawable-xhdpi/ (48×48)
Resources/drawable-xxhdpi/ (72×72)
Resources/drawable-xxxhdpi/ (96×96)
Resources/drawable-xxxhdpi/ (256×256) (Large Icon)
Screenshot
Issue with Older Versions of Cordova
With versions of Cordova before 7.0, you will need to use
/platforms/android/res/drawable-
instead of the path shown above when adding the icon resource to config.xml
Add the following lines to your config.xml under the Android section.
Troubleshooting Icons Not Showing
If you see the default OneSignal bell icon, you did not add all icon sizes. Please add all icons sizes and correct paths.
If you see a solid square, you set the image to the correct path, but the image does not have alpha transparency. For more help, try using images from this Android Asset Studio clipart.
You should be all set with your new default icons.
Optional
After you’ve added your default icons, you may choose to add more non-default icons. These will let you show different icons depending on the types of notifications your app sends. For instance, a game with a title like «Jewel Breaker» may wish to have a different colored jewel icon for every notification sent that represents the player’s level. Meanwhile, a social network may wish to show a chat bubble icon when the user receives a message from another user to differentiate those notifications from more generic system notifications.
OneSignal supports overriding default icons on a per-message basis.
Follow the steps above to generate icons and place them in the appropriate folder for your SDK.
To add non-default icons, you must name them something other than the default names specified above. For instance, you may name one message_icon .
If you’ve followed the above steps for creating default icons, and have updated your app, you’ll be able to reference those icons when you send a notification. To send a notification with a custom icon:
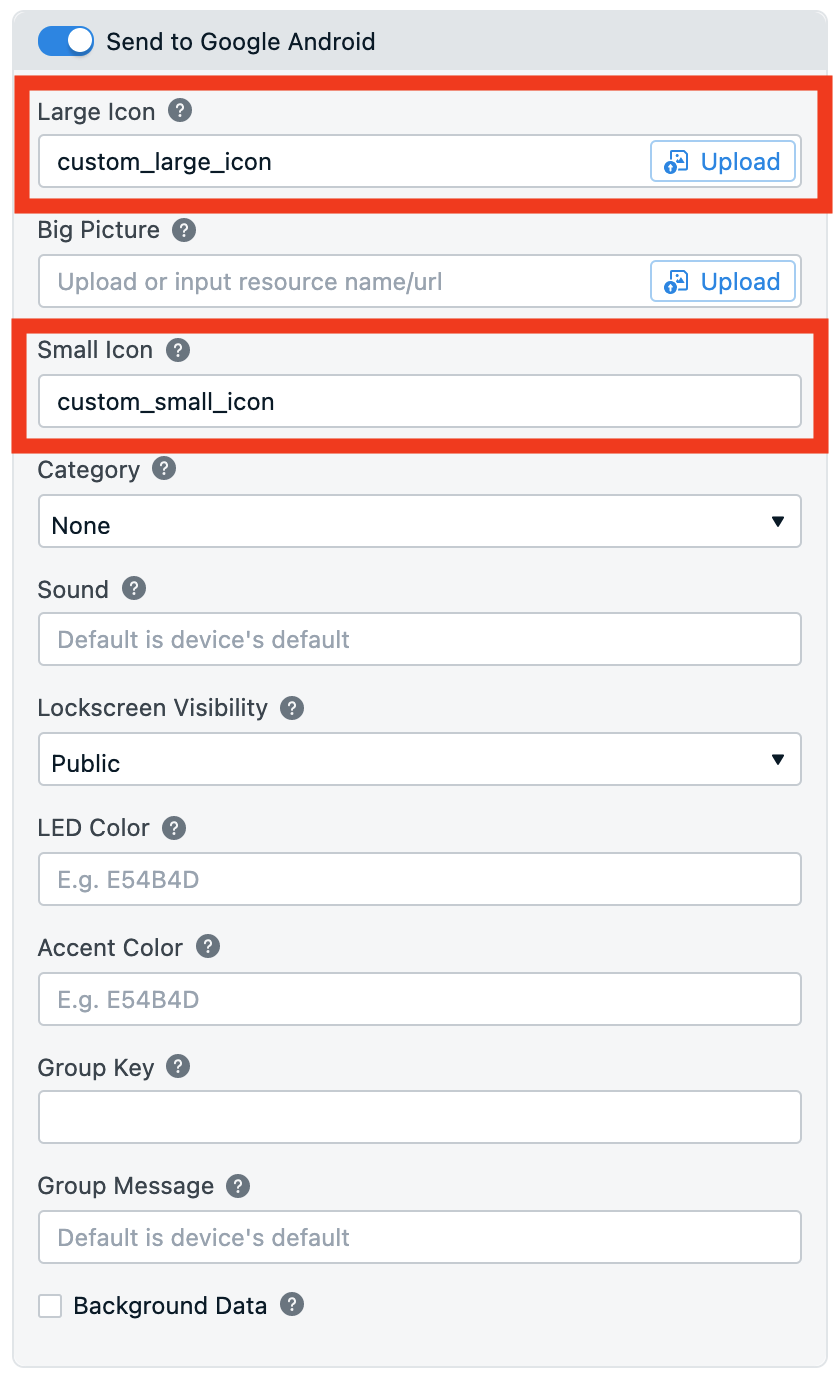
- Dashboard: Messages > New Push > Platform Settings > Google Android Options > Set the icon name without the file extension. With Large Notification Icons, you can also supply a URL where the icon will be displayed from.
- REST API: Instead of sending via the dashboard, you can send notifications with icons in the REST API by using the appropriate parameter and file extension depending on your platform (see more in Create notification REST API docs).
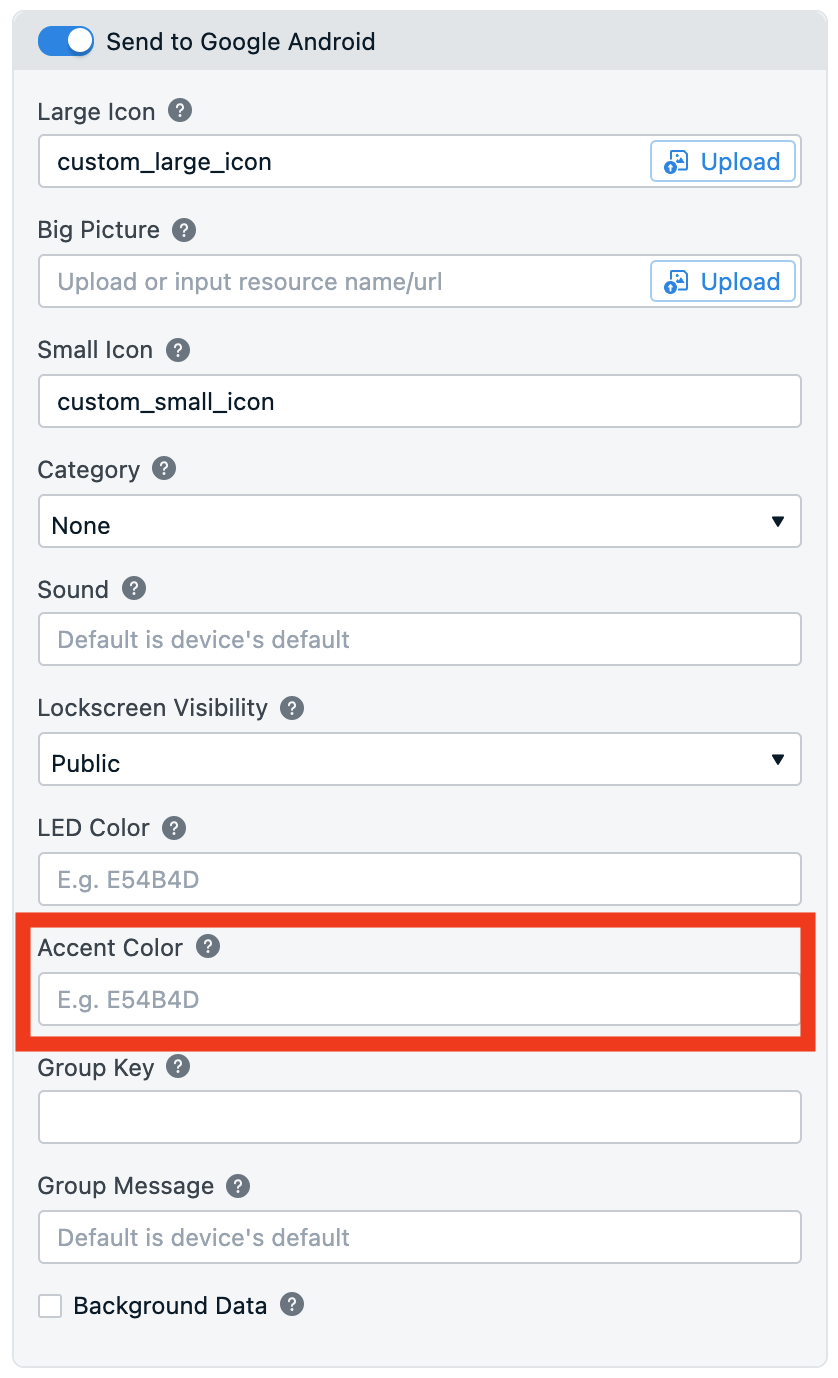
Android 5.0+ enforces your icon to only be white and transparent however it still allows tinting on the notification shown in the shade, known as the «accent color». (The status bar icon color will still be unaffected). These may be adjusted in Messages > New Push > Platform Settings > Google Android Options or as defaults in your manifest.
To set a default color add the following line to your res/values/strings.xml file in your project.
- If you want a different color for dark mode add the key to your res/values-night/strings.xml as well.
To set the color on per notification bases set android_accent_color on our Create notification API call, or enter a value in the Accent color field under Messages > New Push > Platform Settings > Google Android Options.
New icons take a while to propagate to all users
If you’ve very recently added an icon resource to your app, you may want to wait a few days before sending notifications using the icon. This is because it can take many days or even weeks for the majority of your users to update their apps to the latest version which contain your new icons.
Some device manufactures display the image as-is (basically ignoring the alpha channel rule). You can setup a custom notification layout based on Android’s documentation if you wish to use non-alpha channel images across all devices.
We highly recommend following the alpha rule as the icons may not look consistent on all devices. Google designed it this way as the icon is small enough you can’t see any meaningful detail, so enforcing a single color helps enforce an easier to recognize icon at a glance.
Updated 2 days ago
What’s Next
Learn about setting up more features, or start using the OneSignal Dashboard
Источник
Notifications на основе билдера с кастомным лейаутом и картинкой
Балуюсь разработками приложений под Android, но до сих пор не использовал Builder для создания уведомлений, а делал это старым добрым методом, как описано, например, в данной статье. Однако данный метод не только уже устарел, но даже больше — он является deprecated. Кроме того, передо мной еще стояла задача выводить в каждом Notification-е свою картинку, которой при том нет в составе проекта и я не могу на нее сослаться через R.drawable, как, например, аватарка пользователя, которого я добавляю в процессе использования приложения и т.п. Если интересно — добро пожаловать под кат.
Builder для создания Notifications введен с АОС 3.0 и если минимальный уровень SDK для приложения ниже, как в моем случае, то необходимо использовать библиотеку совместимости v4, т.к. я использую для разработки AndroidStudio, то включение библиотеки в состав проекта состоит в добавлении ее в build.gradle в раздел зависимостей:
Тот, кто использует для разработки старый добрый Eclipse может найти соответствующую jar-ку в папке, где установлен Android SDK в папке /extras/android/support/v4/ и копирнуть ее в папку libs своего проекта.
Собственно для создания уведомлений я написал небольшой класс-хелпер — NotificationHelper. Обычно такого рода классы я наполняю public static методами, а если внутри требуется ссылка на Context, то инициализирую такой хелпер из класса Application, используя Context самого приложения, т.е. Application Context. Хранить данный контекст абсолютно безопасно даже в статик-поле, в отличии от того, который Activity — этот хранить в статиках нельзя, во избежание утечек, короче говоря, Activity Context (он же — Base Context) предпочитаю вообще нигде никогда не хранить. Итого NotificationHelper выглядит так:
Т.к. в методе инициализации я прописал appContext = context.getApplicationContext(), то инициализировать этот хелпер можно откуда угодно, главное чтобы был доступ к контексту, можно даже в активити передав саму активити в качестве параметра.
Метод, используемый для создания обычного, стандартного уведомления я создал такой:
Вызывается этот метод, например, из активити, так:
Это обычное стандартное уведомление. В принципе так как у меня во всех приложениях иконка приложения всегда называется именно ic_launcher, а не как-то еще, то данный хелпер универсален для меня. Т.е. его без изменений можно включать в состав любого приложения, где это требуется.
А вот вариант с картинкой, которой нет в составе проекта, как я уже отмечал выше, уже не получится сделать столь же универсальным, т.к. к нему требуется layout в придачу. Именно этот layout и дает возможность вывести что угодно, с него и начну, пожалуй (notification_layout.xml):
Думаю тут все ясно из самих наименований id-шек:
notification_image — место под аватарку
notification_message — место для отображения текста уведомления.
И собственно метод создания уведомления с картинкой, загруженной приложением во время работы:
Вызывается этот метод, например, из активити, так:
Собственно, вот и все. Ну почти…
Все же остаются ньюансы, например, если приложение состоит из нескольких активити, то тупо запускать определенную активити через уведомление — несовсем правильно. Ведь, во-первых, эта активити может как раз быть открыта в приложении, и таким образом через уведомление такая активити запустится еще раз. Это можно обойти, указав в манифесте для такой активити следующий флаг типа запуска:
Но это для исключения повторного запуска активной (topmost) активити, т.е. если активити запущена (в стеке), но «накрыта» какой-то еще, то способ не поможет. Можно попробовать подобрать еще какой-то из возможных параметров типа запуска.
А что делать, если приложение не запущено? Ведь нельзя же взять и запустить отдельную активити, которая обычно в приложении запускается по цепочке через другие активити, и ее нельзя запускать отдельно от других, да и выход из нее повлечет выход из приложения, вместо ожидаемого пользователем возврата на предыдущий «экран». А если в приложении стартовая активити — онлайн авторизация, что является обязательным условием для продолжения работы приложения, что тогда? Получится что запустим какую-то активити, минуя авторизацию, а это может привести к непредсказуемым последствиям. Можно ограничиться вызовом основной, стартовой активити из уведомления, но опять же, это хорошо, когда приложение не запущено, но когда пользователь уже в приложении, то к чему ему повторная авторизация? Здесь поможет разве что полезная нагрузка уведомления, т.е. передача в нем Bundle с некими параметрами.
Лично решил это следующим образом: создал активити-заглушку NotificationActivity, которая и вызывается из уведомления, при этом в бандл уведомления закидываю ту активити, что мне реально надо запустить, в NotificationActivity проверяю условия и выполняю соответствующие необходимые действия:
Здесь я комментировал вызовы метода isActivityRunning(), т.к. это требует еще одного разрешения в манифесте. Кому это некритично, тот спокойно может удалить вызов статического метода до комментария, и раскомментировать вызов этого метода. Я же решил, что лучше мансов с манифестом избежать и потому написал статические методы в обе активити:
Изменения, которые для этого потребовалось внести в хелпер уведомлений (в оба метода createNotification()):
Источник
Custom Notifications for Android
Why custom notifications?

Arriving at Hootsuite, my first project was to revamp our Android push notifications — from single lines of text to ones that contained the same information as our in-app notifications. This would allow customers to reply to mentions, check out new followers, publish Instagram posts and much more right from their home screen, reducing the friction of their workflow. The original plan was to switch from InboxStyle to BigPictureStyle or BigTextStyle, but it soon became clear that default styles were not enough. They forced us to choose between showing media or text when we wanted to display images with multiline text, formatted to be consistent with our in-app user interface. This article will cover creating completely custom rich notifications with actions using the DecoratedCustomViewStyle introduced in API level 24.
The original notifications, using InboxStyle. Each one was a line of text in a single Android notification, and users had to enter the app to get more value out of them:


The first iteration using BigTextStyle and BigPictureStyle. We have a lot more information and actions, but it’s a tradeoff between text and media, and we can’t format or style the Views:


The final iteration using DecoratedCustomViewStyle. The Views are completely custom and support rich media, including images, videos and GIFs:


So let’s dive into the world of rich notifications! We’ll be making a sample app that can send this notification:

You can find the complete code for it here.
Starting with the basics
We’ll use NotificationCompat.Builder, the builder class that makes it easy to specify the appearance and behavior of our NotificationCompat object. (NotificationCompat includes the features introduced to the Notification class after API level 4 while remaining backwards compatible with devices that are at a lower API level.) Custom notifications start out like any other notification:
All notifications require these three fields to be set, although you won’t actually see them once you add your custom views. We’ll add two more lines:
This ensures that the notification is automatically cancelled and MainActivity launches when the user taps it.
XML files
Now let’s make the layout files for our custom views, which we’ll eventually inflate into RemoteViews objects. (RemoteViews is a view hierarchy that can be displayed outside of your app’s process, and the only View subclass that NotificationCompat.Builder will accept as an argument for CustomContentView or CustomContentBigView.) You can style your XML layout files however you want, but keep in mind that RemoteViews only support FrameLayout, LinearLayout, RelativeLayout, and GridLayout, and a limited set of View subclasses. If you want to customize both the collapsed and the expanded view, you’ll need to create a layout file for each of them.
Here’s the layout for our collapsed notification…
and our expanded one.
Side note on styles
My sample app’s layouts look similar to the default Android notifications. If you want your UI to be consistent with the Android design as well, notifications, like any other widget, have built-in default styles that you can apply. For example, I used
to style the timestamp.
Adding the information
Notifications are most interesting when they contain relevant, dynamic information. In the sample app, we’ll make the notification display whatever the user types and also set the time stamp to be the current time. We’ll create new RemoteViews objects using our XML files.
There are numerous setter methods that you can call to programmatically populate the view — just pass in the viewId and whatever you want to put there. The ones I ended up using were setTextViewText(), setImageViewResource() and setOnClickPendingIntent(), since together they provide the features of a standard Android notification.
Adding the actions
For the demo app, we’ll just make the button trigger a Toast message helpfully telling you which button you clicked. We’ll set a PendingIntent for the button using setOnClickPendingIntent(), which allows a foreign application, such as the home screen, to execute code with your application’s permissions. We’ll make an IntentService and call PendingIntent.getService() to retrieve a PendingIntent that starts the service, since all we want to do is display a Toast.
You’ll have to set the action string whenever you have multiple actions, so that you can do a switch statement in onHandleIntent. Since the IntentService runs on a background thread that doesn’t display UI, we’ll have to make a Handler object on the main thread to make the Toast show up.
In the actual Hootsuite app, we made the Toast on the main thread using RxJava:
Don’t forget to register your IntentService in AndroidManifest.xml!
By the way, the other options for creating a PendingIntent are getActivity() (the PendingIntent begins an Activity), getActivities() and getBroadcast() (the PendingIntent performs a broadcast, and could be better choices depending on what your intended actions are.
Almost done!
We’re ready to turn the NotificationCompat.Builder into a *real* NotificationCompat — just call builder.build().
You’ll have to get the system level NotificationManager from the system service.
Finally, we’ll call notificationManager.notify() to send the notification to the system. We’re passing in 0 as the id parameter but if you want your app to display multiple notifications, you’ll need to pass in a unique int each time.
Here’s our complete MainActivity.java:
Final note on sizing
Sizing will vary from device to device, so it’s important to make sure our layouts will fit on every screen. The height measurements are 64 dp for a collapsed notification and 256dp for an expanded. I ended up adding maxLine attributes to TextViews and maxHeight attributes to ImageViews to prevent elements from getting pushed off the screen.
Results
There were two main problems that rich notifications were meant to address: our old notifications didn’t contain enough information to be very useful to users, and Instagram publishing had a complicated workflow. We were happy to see that Instagram publishing notifications were the most used, with the “publish” action making up 85% of all user notification actions.
However, one customer sent feedback that he didn’t like the update because he received hundreds of notifications every day. This was fine when he’d have a single InboxStyle notification informing him that he had a few hundred unviewed messages, but when they arrived individually, they became distracting. We realized that actions are ideal for users who have enabled the few notifications that they find really important. For those with many notifications enabled, grouping their summaries into a single notification would be more useful. So now, with a simple check of the notification count, we’re sending the first four notifications as rich ones for users to action on and combining them once again into an InboxStyle notification when the count reaches five. After users clear it, the count resets and they’ll receive rich notifications again. After this change, the number of notifications cleared dropped significantly, to a tenth of what it was before. We’ll continue to listen to customer feedback and tweak notifications to improve the experience as much as possible.
Источник


