- Custom Glass iPhone Backs
- iPhone Battery & Power Repair
- iPhone battery replacement
- iPhone battery replacement pricing — United States
- Your repair options
- iPhone power issues
- How To : Make Custom Text Tones for Your iPhone Using iTunes
- Step 1: Add Your Sound File to iTunes
- Step 2: Set Time Parameters (If Applicable)
- Step 3: Convert Your File to AAC
- Step 4: Change Your File Type from M4A to M4R
- Step 5: Sync Your Text Tone to Your iPhone
- Step 6: Add the File to Tones (iTunes 12.6 & Under)
- Step 7: Clean Up Your iTunes
- Step 8: Sync Tones with Your iPhone (iTunes 12.6 & Under)
- Step 9: Set Your Text Tone on Your iPhone
Custom Glass iPhone Backs
Make your own custom iPhone back glass images!
I figured out how to separate the glass panel from an iPhone back and put any image on it.
What follows is my step by step howto for transferring a laser printed image to the inside of the glass back on an iPhone 4 or 4S and the story of how I started out trying to make the back out of brass and why that turned out to not be a good idea.
.JPG)
I kept breaking the glass back on my iPhone so I decided to see if I could replace it with something beside the standard black Apple logo’d back. The first thing I needed to do was remove the broken glass from the phone’s back. This turned out to be fairly easy using heat–but more on that later. The next thing I needed was a way to cut the iPhone back glass shape out of brass, for I wanted to make an etched brass plate for my phone.
I made careful measurements of the glass and wrote some GCode for my CNC mill. I ran the code, compared the results, tweaked it, and re-run about four times before I had a perfect fit. The hardest part was figuring out the radius for the corners, quarter circle arcs are amazingly hard to eyeball!
The camera lens is easily removed and glued in place an I used this clear resin to cast the flash window into the brass.
Once I had it down I cut a .035″ thick piece of scrap brass and glued it onto the back. It looked and felt great but I lost 2 bars of signal! Clearly, this was not going to work.
Here’s the GCode:
I had been planing on etching the brass plates using a toner transfer method and I wondered if it would be possible to transfer the toner image directly to the glass iPhone back without breaking it, so I did a test piece and it came out great!
This steampunk design was drawn in InkScape, printed on transfer paper, and the laser printer toner fused to the back of the iPhone glass with a layer of gold paint sprayed on behind it.
Here’s how I did it:
I ordered the iPhone replacement backs from Amazon, the are 3 types: iPhone 4 AT&T, iPhone 4 Verizon, and iPhone 4S. The process for modifying them is identical.
With an X-acto knife I gently pried off the camera and the flash diffuser. The action for removing the diffuser is more of a “cut-under” than a “pry-off.”
Then I heated the glass to weaken the double-stick membrane that holds it to the plastic back. I had success with a heat-gun set to medium hot, being careful not to melt the plastic. My heat gun was set to 360 degrees Fahrenheit.
I began by pushing down with a popsicle stick or tongue depressor on the plastic part right at the edge of the glass. Then worked the stick in and added another and slowly slide them across the gap between the glass and the plastic. I re-heated often, letting the temperature do the work.
Even easier than the heat gun was this dish warmer which warmed to a little over 100 degrees Celsius. It takes two to three re-heats to get the glass off cleanly and when using the dish warmer I could quickly do 5 backs in a row, working each until it cooled and then moving on to the next. The steady temperature also ensured that the plastic parts of the back did not melt.
Next I stripped the paint off of the backs with Jasco Epoxy Remover. The paint on these things is very tough and I had to really scrub it off with steel wool and stripper. If you try this wear stripper gloves and eye protection and be careful not to scratch the glass, it’s thin enough so that a scratch can cause it to break later.
A buffer usually takes the Apple logo off quickly. I say ‘usually’ because there were a few backs that I could simply not get clean. The metallic logo is diffused into the glass itself with some sort of vacuum deposition process.
I used a suction cup to help me handle the backs without getting finger prints on them and I highly recommend silicon baking sheets as a work surface for thing that have to stay really clean.
I made the artwork up in InkScape and printed it on transfer paper. I tried a whole bunch of different things but settled on that glossy newsprint flyer paper that the inserts in the Sunday newspaper come printed on for pure black and white images (See here for how to get it through your printer) and Press-N-Peel Wet for any images with shades of grey or color in them.
Using the suction cup I aligned the glass back with the image and secured it with a piece of Kapton high temperature tape.
Next I covered the transfer paper and back with a piece of plain paper and rolled it through my heat rollers. This is basically the fuser form a 1980’s Xerox machine that I removed and added a solid state relay and industrial temperature controller to.
I’m sure an iron would work for this if you follow the techniques here just be careful to heat the glass evenly and do not overheat it. Also you’ll want to do it on a hard surface, not an ironing board. Perhaps a piece of wood protected with one of the aforementioned silicone baking mats.
The paper simply floats off after soaking the Press-N-Peel Wet in warm water.
This is what the toner on the glass looks like.
Next I sharpened a piece of brass tubing and cut little circles of Kapton tape to mask the flash window from the backing paint.
This design required both silver and gold paint so I carefully brushed in the silver before spraying the back with gold.
I think this is my favorite, it’s a promotional poster for the movie “Metropolis.”
All of the full color panels are backed with white paint.
The full set. The one of Isambard Kingdom Brunel is backed with a light green paint. I tried silver to make it look like a daguerreotype, but it was too dark.
This shot was taken on my light table. Krylon flat white spray paint interacted with the toner and made these cracks, they are not visible on the mounted back, but I thought they were interesting. Rustoleum white primer did not have this problem but takes 24 hours to cure.
Finding the right glue to re-attach the flash diffuser was a challenge. I settled on this Solarez UV cure surfboard repair putty. It has glass fibers in it but you can easily get a fiber-free drop on the end of a tooth-pick to secure the diffuser. If you don’t have a UV curing lamp you can just put it in the sun for about 10 minutes. E-6000 industrial cement was perfect for reattaching the camera lens.
To re-attach the glass to the back I used this 444 3M double-sided adhesive film tape. It’s essentially the same thing in roll form as the die-cut piece originally used by Apple (or the third party replacement part manufacturer).
These tapes stick instantly so be careful with alignment but they take a minute or so to fully bond.
Making sure the back, glass, and tape are happily married.
Since the edges are the hardest to bond I used clothes pins for 10 minutes or so to clamp the pieces together.
The black and white and grey scale pieces backed with gold and silver paint.
Full color pieces backed with white paint
Waterhouse’s Magic Circle, This one is for my phone. I love Waterhouse’s work very much and I have a bit of a thing for witches in general.
Metropolis! For my bro, Libby Bulloff.
This particular one is for my bestie Nathaniel Johnstone! This is my own original art, if I were to make these for sale, would you be interested? Follow me on Twitter and I’ll let you know when I put them in my Steampunk Workshop Etsy Store.
Police boxes are cool, for my daughter Lyra.
Источник
iPhone Battery & Power Repair
iPhone battery replacement
If your iPhone is covered by warranty, AppleCare+, or consumer law, we’ll replace your battery at no charge. Not sure if you’re covered? Check if you have AppleCare+ by entering your iPhone serial number.
If your iPhone has any damage that impairs the replacement of the battery, such as a cracked screen, that issue will need to be resolved prior to the battery replacement. In some cases, there may be a cost associated with the repair.
See the chart below for battery replacement pricing for all iPhone models.
iPhone battery replacement pricing — United States
| iPhone model | In-warranty or with AppleCare+ | Out of warranty |
|---|---|---|
| iPhone X, iPhone XS, iPhone XS Max, iPhone XR, iPhone 11 Pro Max, iPhone 11 Pro, iPhone 11, iPhone 12 Pro Max, iPhone 12 Pro, iPhone 12, iPhone 12 mini, iPhone 13 Pro Max, iPhone 13 Pro, iPhone 13, iPhone 13 mini | $ 0 | $ 69 |
| iPhone SE (2nd generation), iPhone SE, iPhone 6, iPhone 6 Plus, iPhone 6s, iPhone 6s Plus, iPhone 7, iPhone 7 Plus, iPhone 8, iPhone 8 Plus, and all other eligible models | $ 0 | $ 49 |
These prices apply only to battery repairs made by Apple. Pricing offered by Apple Authorized Service Providers may vary. We’ll add a $ 6.95 shipping fee if your repair requires shipping and isn’t covered under warranty or AppleCare+. All fees are in USD and exclude local tax.
Your repair options
Send in for repair
Avoid waiting for an appointment or traveling to a store. We can send you a box right away to collect your iPhone. Arrange a shipment to an Apple Repair Center and we’ll replace your battery and deliver your iPhone back to you in 3-5 business days.
Bring in for repair
Make an appointment at an Apple Store or one of our Apple authorized service locations. We’ll try to fix your iPhone during your visit. In more complex cases, we might need to send it to an Apple Repair Center. If we do, your iPhone will be ready for pickup in 3-5 business days.
To protect your data, learn how to get your iPhone ready for service.
iPhone power issues
Some iPhone power issues are caused by factors other than the battery. If you can’t turn on your iPhone, follow these steps to see if the issue resolves.
We’ll test your iPhone to see if it has a battery issue or a different power issue. If your iPhone has a non-battery power issue, we’ll give you the repair price after we determine the cause. To identify your issue and set up service, start a service request.
Источник
How To : Make Custom Text Tones for Your iPhone Using iTunes
Your iPhone comes packed with a long list of excellent text tones to choose from. Bamboo anyone? Of course, for some of us, stock sounds from 2013 don’t cut it anymore. We want customizability, something that’s found more on Android than iOS. However, you can add your very own text tones to your iPhone right now, so long as you have a sound file in mind and a computer running iTunes.
Text tones aren’t the only sounds you can customize on your iPhone, though. You can even create custom ringtones for phone calls, alarms — anything you can think of that could use a longer tone. We’ll focus on text tones here, sounds that you’d normally expect to last just a couple seconds at the most, but check out our ringtones guide if you’re interested in learning custom ringtones.
Step 1: Add Your Sound File to iTunes
Whether you want to use a small clip from a song for your tone or you have a killer sound you’d like to use instead, you’ll want to make sure to add the file to iTunes before starting. To do so, take the sound file and drag and drop it over to your iTunes window. The file will automatically import, ready to begin the text tone process.
Step 2: Set Time Parameters (If Applicable)
Text tones are meant to be as short as possible — most of us don’t want ringtone-length alerts playing every time we receive a text! As such, if you want to use a small portion of a song as your text tone, you won’t just want to upload the entire thing as a text tone.
To help us here, iTunes allows you to set time parameters for songs — this gives you control over what portion of a song is able to play. While iOS supports tones as long as 40 seconds, for text tones, you might want to keep this parameter down to as little as one second. This is totally up to you, and you can repeat the process to experiment with as many time frames as you’d like.
With your song in hand, highlight the track, then press Command-I (Control-I on Windows) to access the Song Info window (Get Info in previous versions of iTunes). Alternatively, you can select «Song Info» after right-clicking the song, clicking the ellipsis (•••), or clicking the «Edit» option in the menu bar.
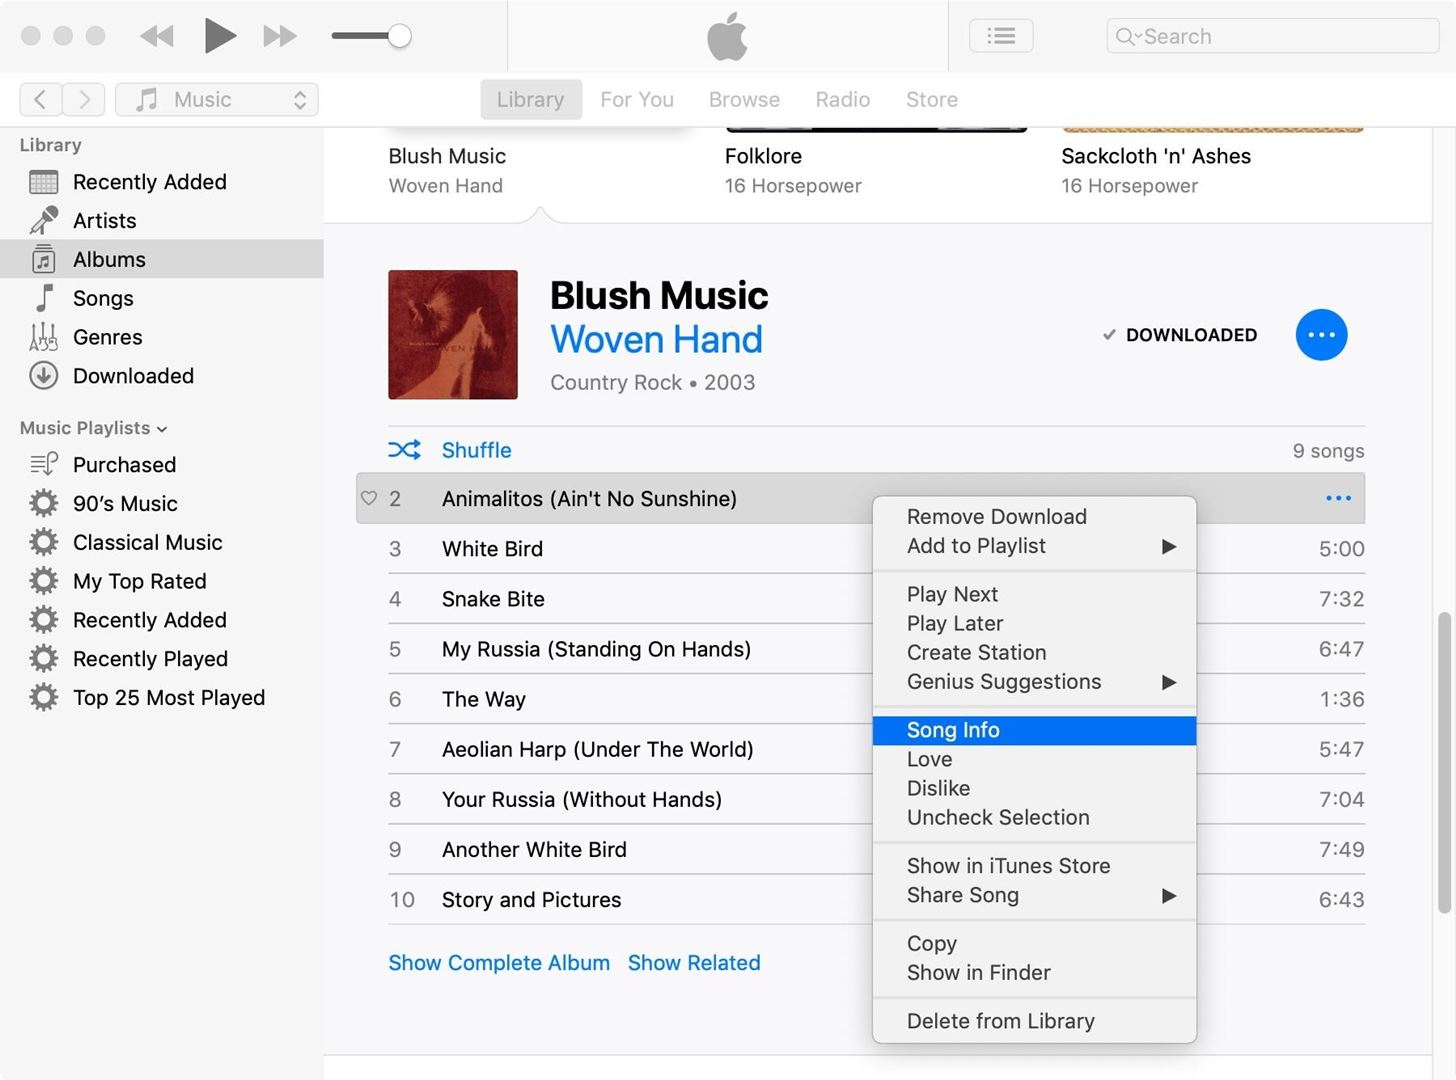
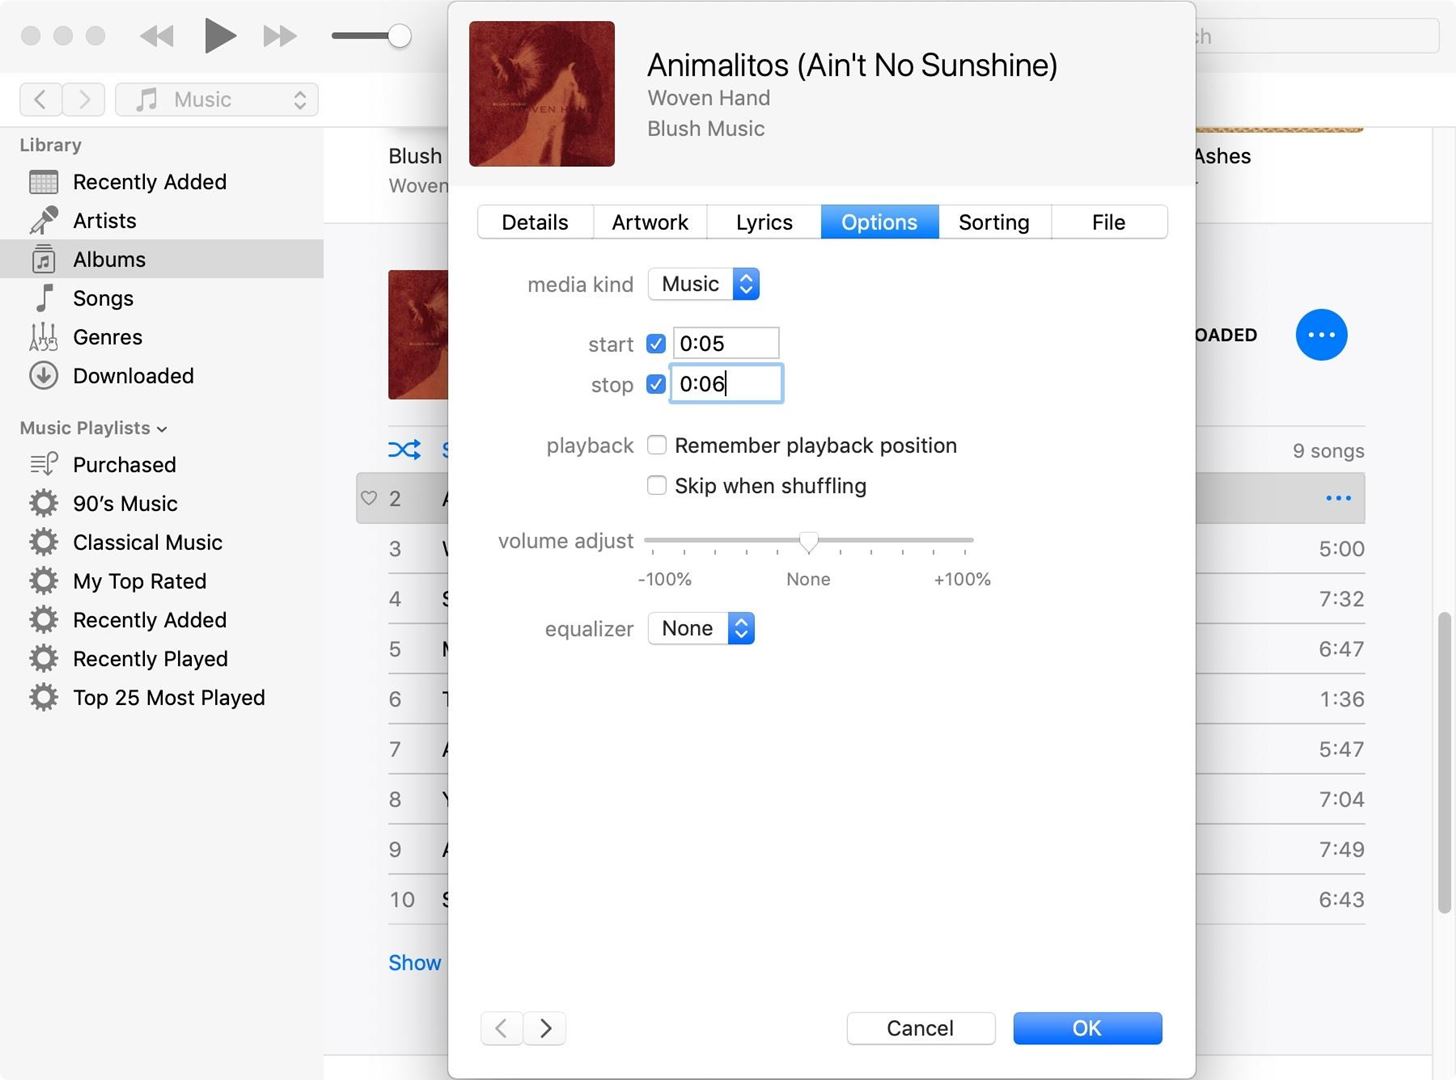
On this info page, click «Options.» Take a look at the «start» and «stop» boxes. Here, you can enter the start time for your text tone, as well as the end time. If you’re choosing any start or stop time other than the beginning or end of the song, make sure both checkboxes are marked. Leaving the start box unchecked will start the song at the beginning, and the stop box will let the song continue to the end, regardless of the time you’ve entered here.
Step 3: Convert Your File to AAC
Once your song or sound file is just the way you’d like it to be, you’ll need to convert it to AAC, a file type with a higher-quality compression than MP3 but at the same bit rate. In short, it’s a better file type and the kind you need in order to make a tone.
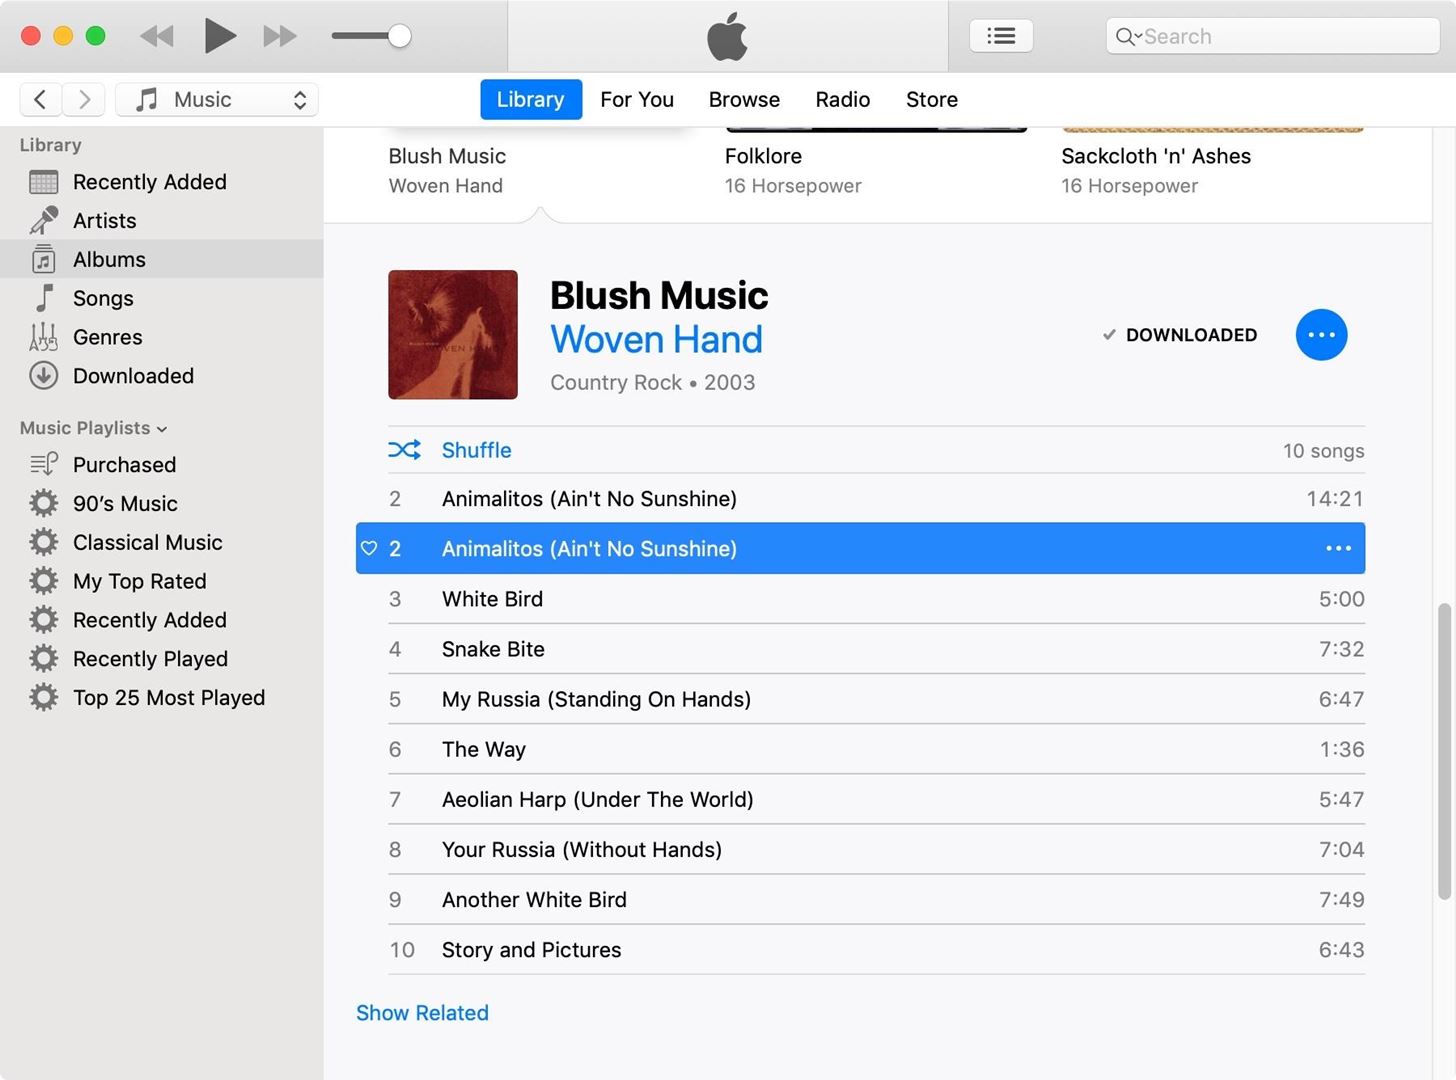
However, you won’t just be converting your file to AAC, you’ll be making a copy, so you’ll see two files in iTunes. If you’re using a song with time parameters, your new copy will only be as long as your time limits. Instead of the full-length song, you’ll see a new track listed at only one or two seconds (or however long you set the track to be).
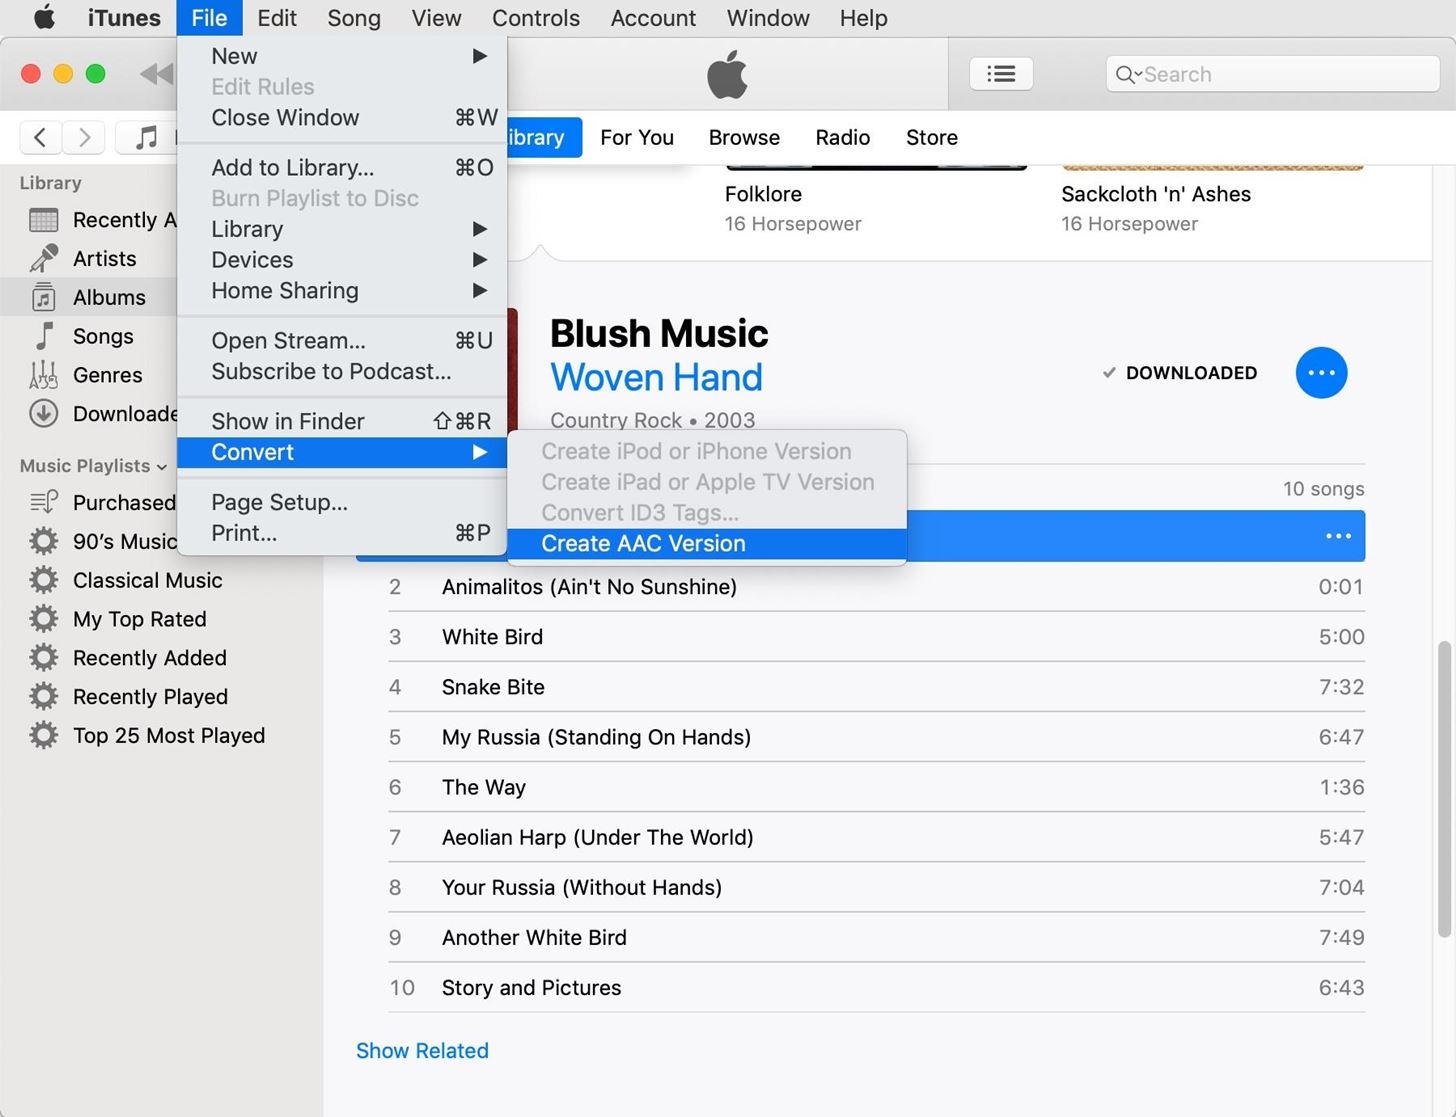
To begin converting, click «File» on the menu bar, then «Convert.» Finally, select «Create AAC Version.» Your file will be converted, spawning a new copy in AAC. Don’t worry, the original file will remain untouched. You can delete that one from iTunes if you want or remove the start and stop times.
If «Create AAC Version» doesn’t show up as an option for you, your conversion settings are probably set differently than what they need to be. To change the settings, click «Preferences» in the menu bar, then click «Import Settings» in «General.» Now, click «AAC Encoder» from the drop-down menu, click «OK,» then «OK» once more to finish. Try converting the song now. Just make sure you have the option to convert to AAC.
When «Create AAC Version» is greyed-out, however, that means your song is DRM-protected and cannot be used as a text tone.
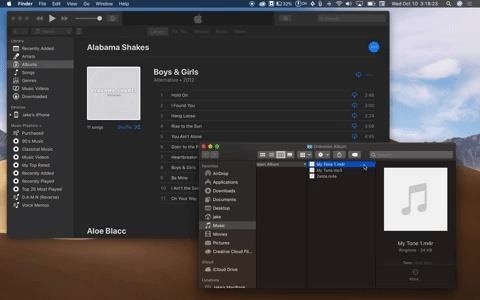
If using a song connected to an album, your AAC file should nestle itself directly underneath the original song. Random sound files, however, might make a duplicate outside of the original album. Just click «Recently Added» to make sure you’re looking at the copied file.
Before wrapping up here, make sure to go back to your original song file and reset the time parameters. Otherwise, you’ll essentially hear your text tone every time you try to play the full song.
Step 4: Change Your File Type from M4A to M4R
AAC isn’t enough for iOS to register your file as a tone. Your text tone, which now reads as a .m4a file, needs to be converted further to .m4r. This file type is the standard for iOS tones.
To convert your file to .m4r, drag and drop it to your desktop or right-click on the file in iTunes and select «Show in Finder.» Either way, click the name of your file to access the name editor, then change its extension from .m4a or .m4r. While you’re at it, change the song name to whatever you want your text tone to be called. Confirm the change on the popup, if one appears.

Step 5: Sync Your Text Tone to Your iPhone
This step only works if you’re running iTunes 12.7 or higher. Unfortunately, adding your new tone to your iPhone is trickier in older versions of iTunes. Skip to the next step if that applies to you. Check which version you’re using by selecting «iTunes» in the menu bar, then clicking «About iTunes.»
On iTunes 12.7 or higher, plug your iPhone into your computer using a Lightning to USB or Lightning to USB-C cable, or, if syncing wirelessly, ensure your iPhone is on the same Wi-Fi network as your computer. You should find your iPhone in the sidebar on iTunes under «Devices.»
Finally, pick up the .m4r tone file you made and drop it onto your iPhone in iTunes. Your tone will then automatically sync with your iPhone and, when finished, will be accessible from your iPhone’s settings. Skip to Step 9 to learn what you can do with it.
Step 6: Add the File to Tones (iTunes 12.6 & Under)
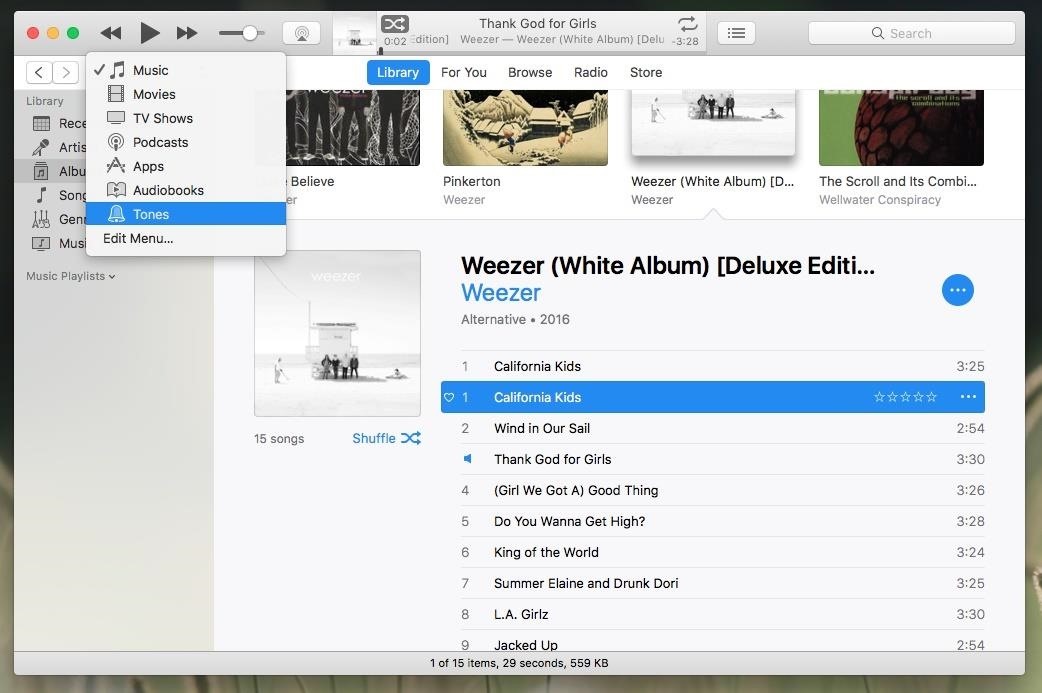
As said above, if you’re using iTunes 12.6 and under, this endeavor is a little more intensive. You won’t be able to simply add your file directly to your iPhone, as these versions of iTunes have an individual «Tones» section. You have to place your tone here. Select «Music» in the top-left corner of the display, then click «Tones.» If Tones doesn’t appear, select «Edit Menu» then add it.
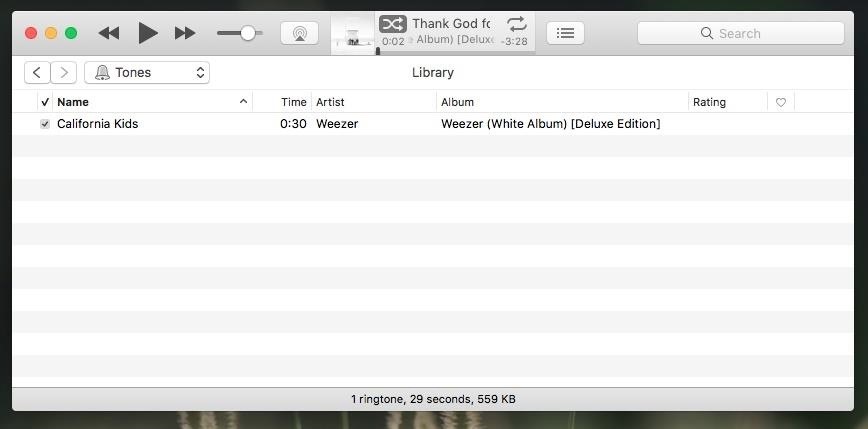
If your tone is on your Desktop, just pick it up and place it back in the Tones section in iTunes. If you found it using «Show in Finder,» just right-click on your tone, then select «Duplicate.» Finally, drag and drop your file back to Tones.
Step 7: Clean Up Your iTunes
You don’t want to leave behind the small mess you made in order to set yourself up for text tones. So, delete the duplicated shortened clip in the Music section, then go back to the original song and delete the start and stop times. If you already did this, you’re all set.
Step 8: Sync Tones with Your iPhone (iTunes 12.6 & Under)
If you want to skip the cables and wirelessly sync your iPhone with iTunes, make sure the connection is set up ahead of time. Otherwise, plug your iPhone into your computer. If you don’t see your iPhone right away, click the «iPhone» button in the top-left corner of the display to head to the Summary screen.
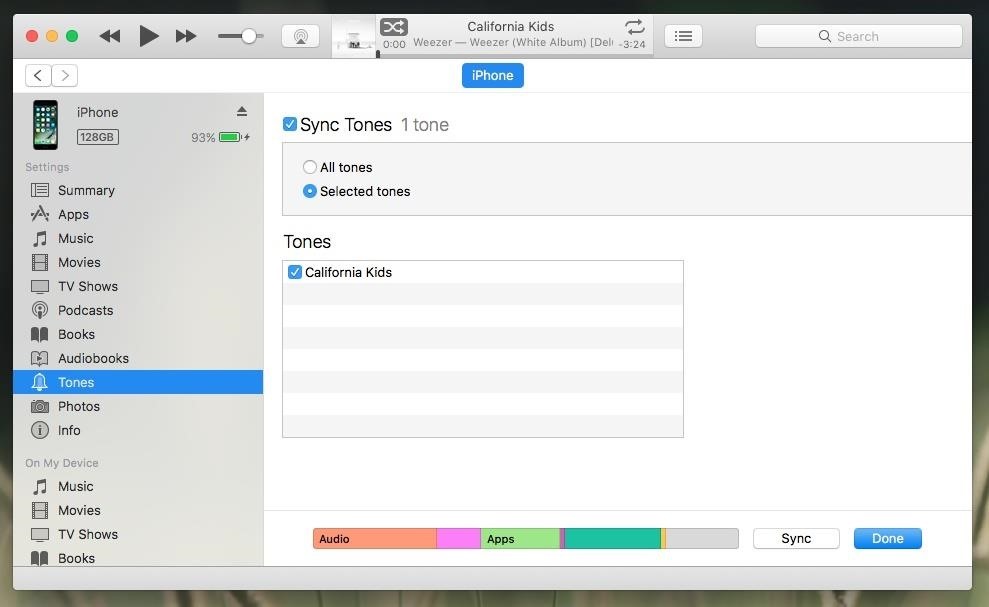
Now, select «Tones» in the left-hand sidebar. If this is the first time you’ve synced ringtones or text tones to your iPhone, you need to check «Sync Tones,» then «All tones» or «Selected tones» from the options. If you choose the second option, make sure the tones you need are checked. Finally, click «Sync.»
You can unplug your iPhone once syncing has finished.
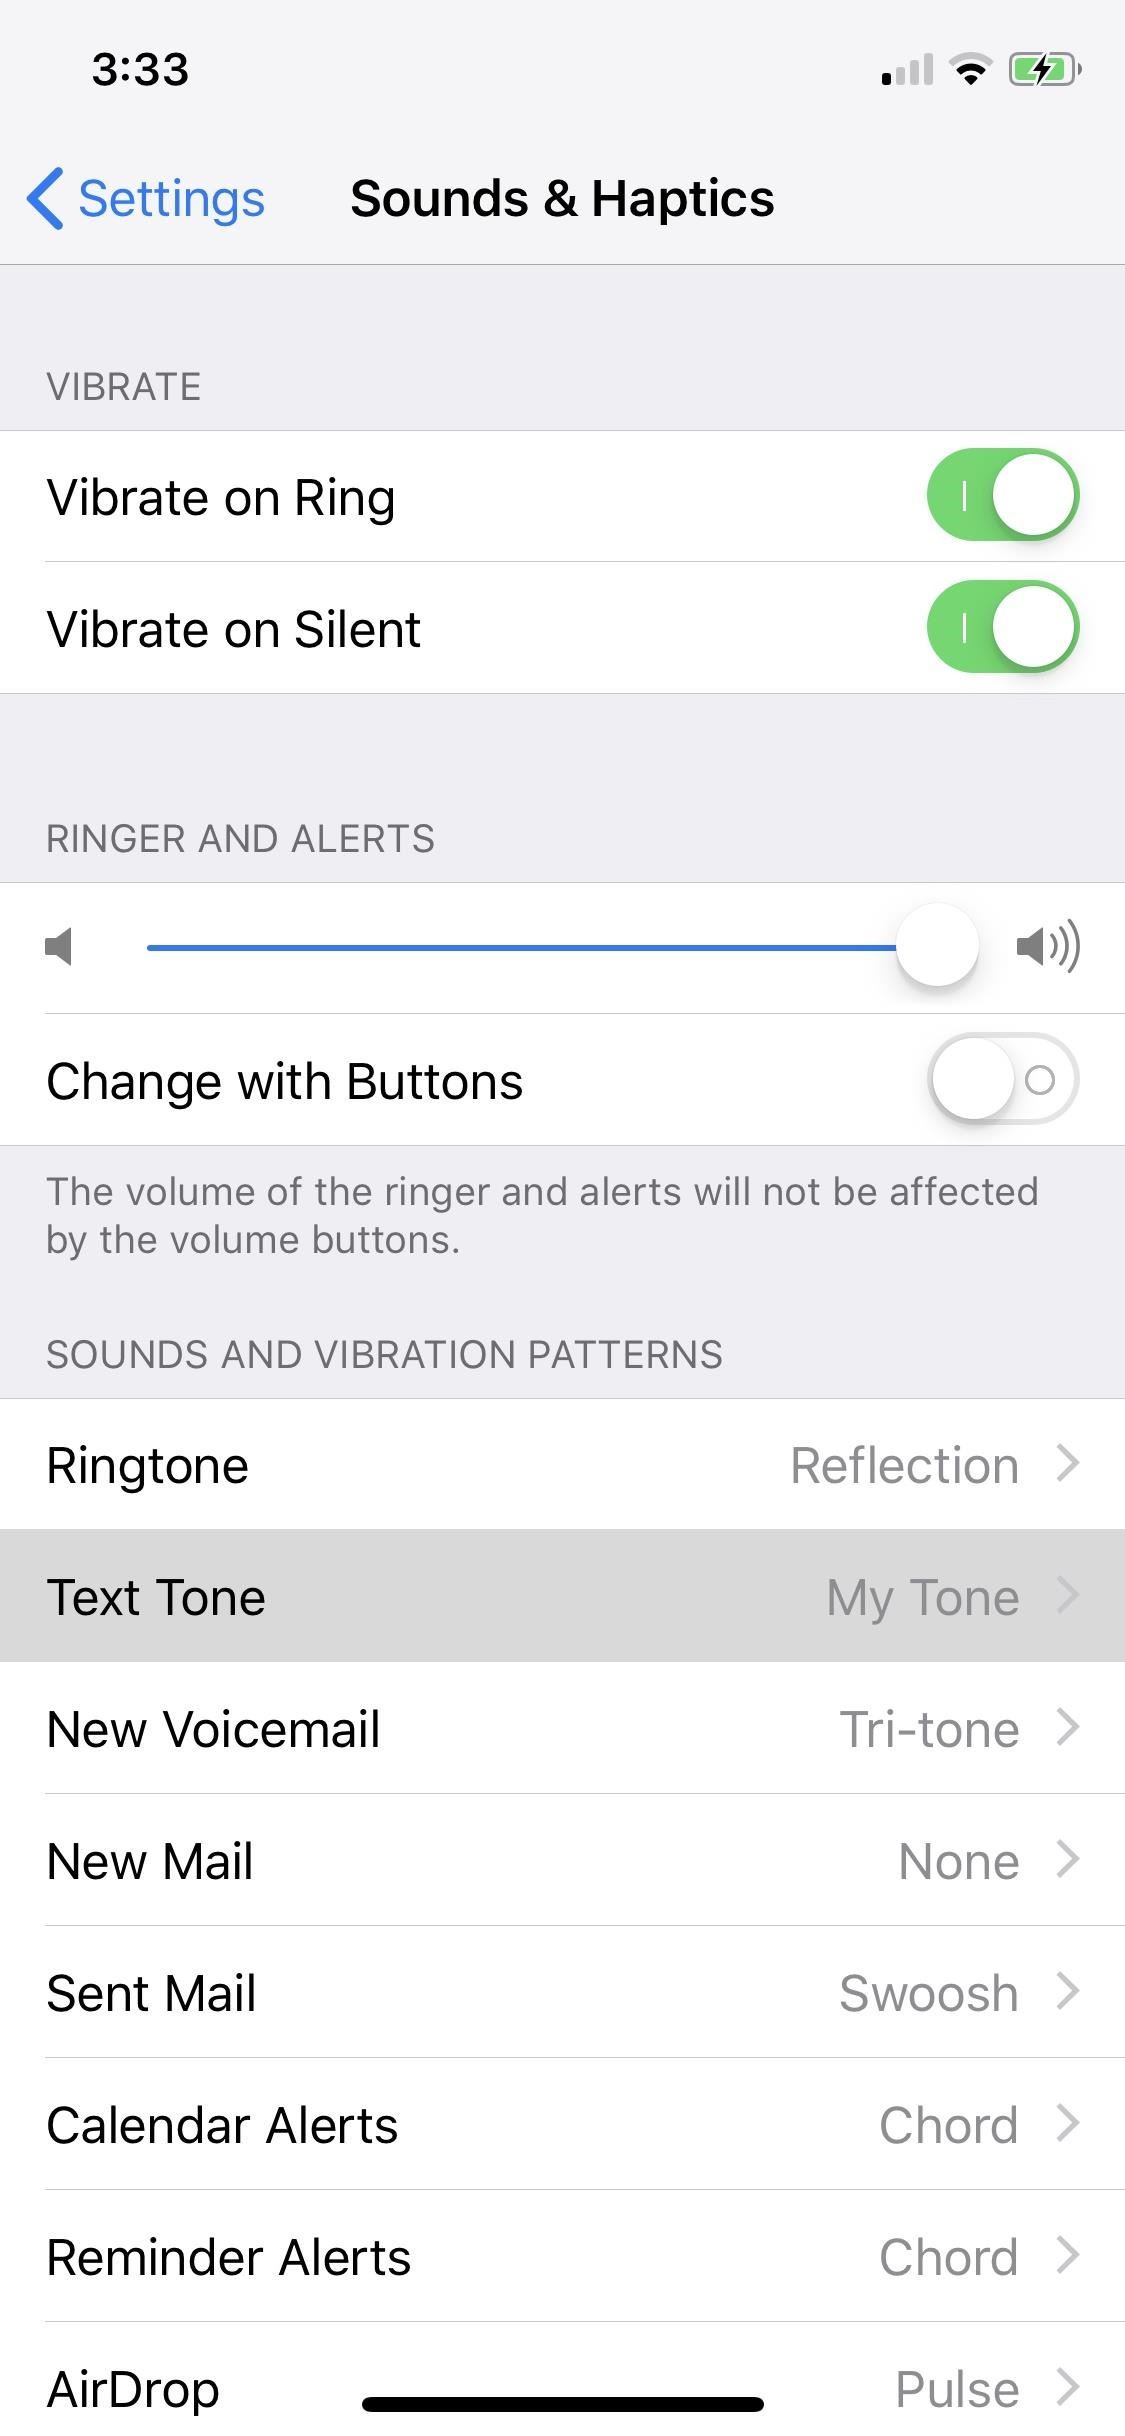
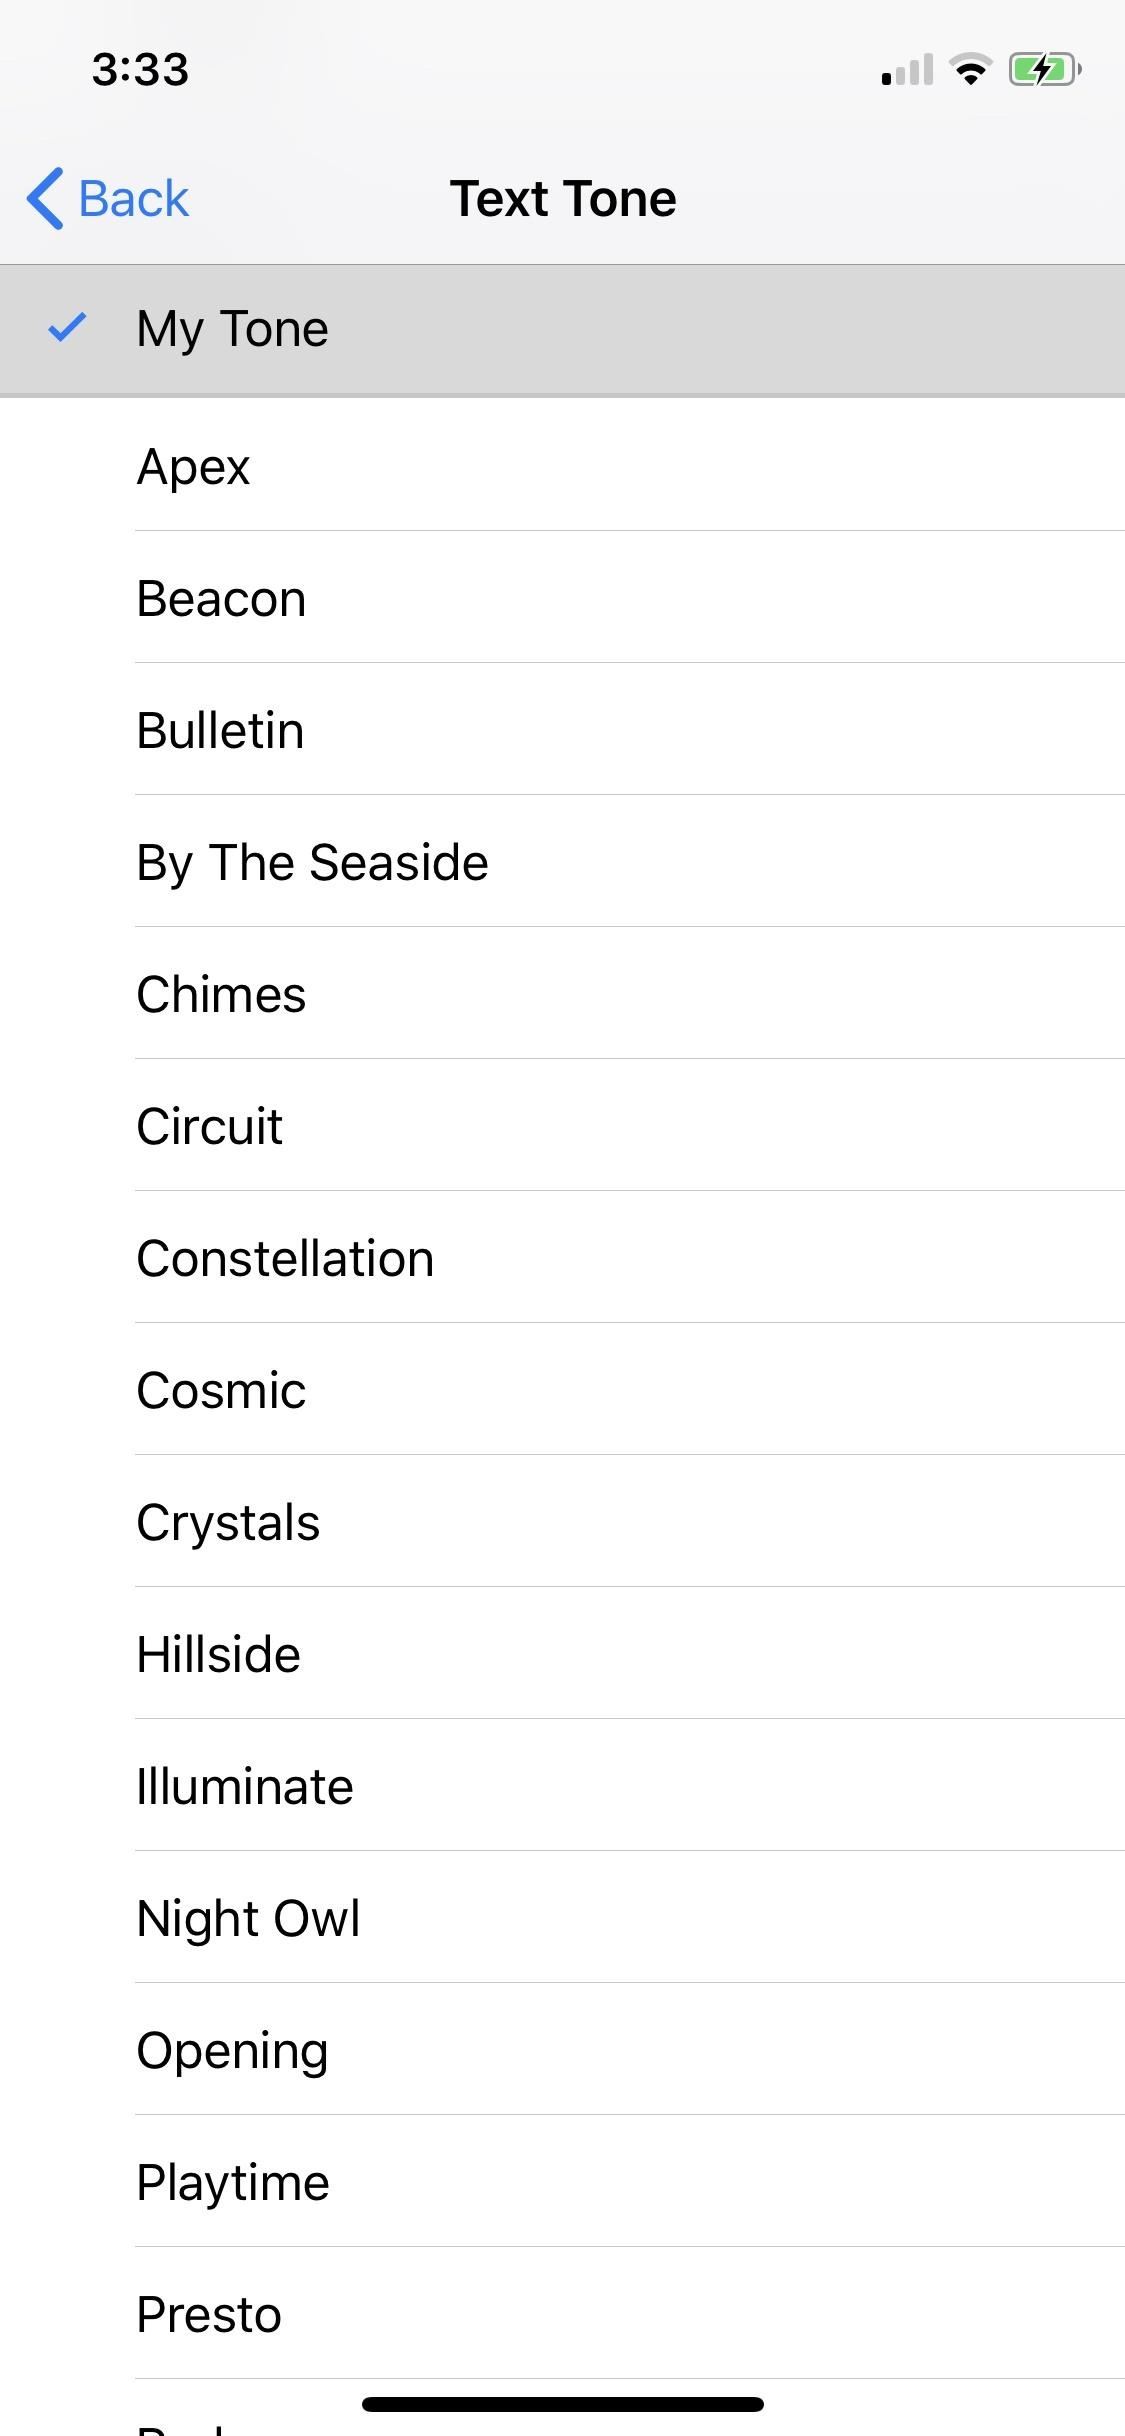
Step 9: Set Your Text Tone on Your iPhone
If everything went well, you should find your tone on your iPhone. Jump over to Settings –> Sounds (Sounds & Haptics on recent models) –> Text Tone. Unfortunately, since you cannot differentiate between custom ringtones and text tones, your tones will be listed under the Ringtones section at the bottom. Your custom sounds will appear above the stock ringtones.
You can even assign this custom text tone to specific contacts. Open each contact page, tap «Edit,» select «Alert Tone,» and select your custom sound.
Keep Your Connection Secure Without a Monthly Bill. Get a lifetime subscription to VPN Unlimited for all your devices with a one-time purchase from the new Gadget Hacks Shop, and watch Hulu or Netflix without regional restrictions, increase security when browsing on public networks, and more.
Источник


