- Custom navigation bar android
- About
- Custom navigation bar android
- Navigation Drawer в стиле Material Design за 5 минут
- Создание проекта
- Android Support Library
- Подключение библиотеки MaterialDrawer
- Подготовка разметки для Navigation Drawer
- Инициализация Navigation Drawer
- Улучшения Navigation Drawer
- [APP][7.0+] Custom Navigation Bar — Customize your own navigation bar
- Breadcrumb
- paphonb
- paphonb
- Yasharkhan
- teostar
- Attachments
- MishaalRahman
- paphonb
- teostar
- Attachments
- paphonb
- teostar
- dachewster99
- MishaalRahman
- doubleho
- Attachments
- MishaalRahman
- doubleho
- Toruk.Makto
- Attachments
- MishaalRahman
- paphonb
- sourbear
- MishaalRahman
- paphonb
- Similar threads
- Breadcrumb
- Top Liked Posts
Custom navigation bar android
Tested on Android 4.4.2
NOTE THAT Changes in these files tagged with «[ADD]»
Adding Key Buttons
- Add buttons(com.android.systemui.statusbar.policy.KeyButtonView) into navigation_bar.xml files contained in;
- res/layout/
- res/layout-ldrtl/
- res/layout-sw600dp/
- res/layout-sw720dp/
- Don’t forget to define «systemui::keyCode» value.
- Consider different rotations (FrameLayouts in navigation_bar.xml with id rot90 and rot0 )
- Sample: Brightness buttons ( kbBrightnessDown , kbBrightnessUp ) in navigation_bar.xml
Adding Custom Buttons
- Add buttons into navigation_bar.xml files
- Create a touch listener for the button in PhoneStatusBar.java
- Use action MotionEvent.ACTION_UP in the listener
- Sample: mStandByOnTouchListener in PhoneStatusBar.java
Handling Buttons in Application Level
- Create a touch listener for the button
- Broadcast an special intent
- Then in user-level application, register an intent receiver for this action
- Sample: mStandByOnTouchListener in PhoneStatusBar.java
Hiding/Showing Navigation Bar or Enable/Disable Buttons
- Register a broadcast intent receiver in PhoneStatusBar.java
- Then process received intent data
- Sample: mNavBarReceiver in PhoneStatusBar.java
About
Customizing android navigation bar — System UI
Источник
Custom navigation bar android
Краткое описание:
Автоматическое скрытие панели с выбором времени, включение панели свайпом, возможность менять темы.
Описание:
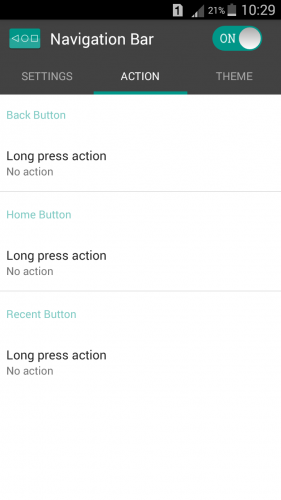
Навигационная панель с множеством настроек.
Требуется Android: 4.4.х и выше
Русский интерфейс: Есть
— Able to set hiding duration of nav-bar when inactivity.
— Pro version available for in-app purchase.
Pro version features:
— Remove Ads
— Unlock all themes
— Unlock all long press actions such as launch selected application, take screenshot(Android 5.0+) and etc.
— Switch on/off via notification and quick settings tile.
— Limit area of minimized navigation bar to prevent accidentally click.
*WRITE_EXTERNAL_STORAGE permission is required for saving screenshot by long press action only.
Скачать:
Версия: 2.2.8 Pro by youarefinished (Valikovrepikov)
Версия: 2.2.5 Navigation Bar (Back, Home, Recent Button) (GP) (MISSHANYA)
Версия: 2.1.5 Navigation Bar (GP) (MISSHANYA)
Версия: 1.9.5 GP+Pro Unlocked (vitaxa978)
версия: 1.8.1  Navigation Bar_1.8.1.apk ( 4.2 МБ )
Источник
Navigation Drawer в стиле Material Design за 5 минут
 В данной статье я расскажу, как быстро добавить в ваше приложение для Android боковое меню (aka Navigation Drawer) в стиле Material Design. Для этого мы воспользуемся библиотекой, любезно предоставленной Mike Penz.
У вас получится Navigation Drawer, который:
- Соответствует последним рекомендациям по дизайну (Google Material Design Guidelines);
- Поддерживает использование нескольких Drawer (можно выдвигать второй справа);
- Поддерживает использование бейджей;
- Имеет простой и понятный интерфейс (API);
- Может выползать как под, так и поверх Status Bar;
- Позволяет менять иконки, цвета, бейджи во время выполнения;
- Использует AppCompat support library;
- Работает, начиная с API 14.
Помимо этого, новички обучатся интеграции сторонних библиотек в свой проект, что крайне полезно, учитывая их грандиозное разнообразие на Github.
Создание проекта
В примере будет использоваться интегрированная среда разработки Android Studio от компании Google, основанная на IntelliJ IDEA, которую сама корпорация активно продвигает. Все действия можно воспроизвести используя и другие среды, например, Eclipse. Однако статья ориентирована на новичков, а они будут в большинстве своем использовать именно Android Studio, так как именно его Google теперь и предлагает при скачивании Android SDK с developer.android.com (ранее можно было скачать Eclipse).
Итак, выбираем в меню «File» -> «New Project. »:
Заполняем имя приложения, пакета, выбираем SDK.
Создавать проект мы будем с поддержкой минимального API Level равного 14, что соответствует Android 4.0 Ice Cream Sandwich, поскольку всё, что ниже, составляет менее 8% аудитории и привносит несоизмеримо большее количество головной боли:
В последних двух окнах оставляем все по умолчанию, жмем «Finish».
Android Support Library
Для того, чтобы красивый Navigation Drawer работал на версиях Android ниже 5.0 и выглядел в стиле Material Design, необходимо включить в проект библиотеку поддержки от Google, которая носит название v7 appcompat library. В текущей версии Android Studio (1.0.2) библиотека подключается по умолчанию при создании проекта. Проверьте это в файле проекта \app\build.gradle, в разделе dependencies должна быть строка (цифры могут быть не обязательно «21.0.3»):
а класс MainActivity должен наследоваться от ActionBarActivity
Также проверьте в \res\values\styles.xml, чтобы тема приложения наследовалась от Theme.AppCompat или ее вариаций без ActionBar (мы заменим ActionBar на ToolBar), например:
Подключение библиотеки MaterialDrawer
Добавьте в раздел dependencies файла \app\build.gradle строки
и нажмите появившуюся в верхней части окна кнопку «Sync Now» для синхронизации вашего проекта.
Подготовка разметки для Navigation Drawer
В главный layout приложения нужно добавить ToolBar. Приведите activity_main.xml к такому виду:
Создайте в папке layout файл drawer_header.xml со следующим содержанием
этот файл — разметка для верхней части Drawer’a, в которой находится картинка. Теперь положите в папку \res\drawable\ любую картинку с именем header.jpg, которая будет отображаться в верхней части Drawer’a, например эту: 
Файл \res\strings.xml, содержащий строковые ресурсы, приведите к следующему виду
Инициализация Navigation Drawer
В методе onCreate вашей MainActivity мы инициализируем ToolBar, добавьте после setContentView следующий код:
Затем инициализируем и сам Navigation Drawer, добавьте ниже:
В случае появления ошибок, убедитесь, что ваша секция импортов в MainActivity выглядит так:
Теперь можно запустить приложение и оценить результат:
Улучшения Navigation Drawer
Чтобы Navigation Drawer еще точнее соответствовал рекомендациям от Google, можно сделать следующие улучшения (см. полный листинг MainActivity в конце статьи):
- Скрывать клавиатуру при открытии NavigationDrawer:
Закрывать NavigationDrawer по нажатию системной кнопки «Назад»:
Реализацию всех этих улучшений вы можете посмотреть в полном листинге MainActivity:
Источник
[APP][7.0+] Custom Navigation Bar — Customize your own navigation bar
Breadcrumb

paphonb
Senior Member

Introduction
So the Android O preview brings navbar customizations to SystemUI Tuner. I had an idea to make it better and also available for Android N!
Today I’ll be introducing navbar customization for Android N, WITHOUT ROOT.
Features
— Add custom buttons to your navigation bar
— Customizable navbar layout
— Tasker integration for contextual navbar
— Easy to setup
— No root or xposed required
Compatibility
— Not working on ResurrectionRemix, Beanstalk, AospExtended or anything that uses DirtyUnicorns smartbar (Need testers)
— Not working on Touchwiz (S8 is partially supported), EMUI, LG UX
— Working on Android 7, 7.1, O preview
— Working on LinageOS
— Working on Nexus devices
— Working on Sony Xperia devices
Google Play and the Google Play logo are trademarks of Google Inc.
Translations
— Chinese
— English
— Thai
Want to help translating the app to your language? Read here
XDA:DevDB Information
Custom Navigation Bar, App for all devices (see above for details)
Version Information
Status: Stable
Current Stable Version: 0.3.2
Stable Release Date: 2017-04-18
Created 2017-04-17
Last Updated 2017-05-14
paphonb
Senior Member
Changelog
0.5.8 — May 6, 2017
— App Shortcuts for Android 7.1
— Fixed immersive mode
— Theming support
— New button actions (Tasker event, Toggle profile, Launch application, Expand notification drawer)
0.4.3 — Apr 24, 2017
— Added an option to normalize button size
— Added more button overrides
— Added immersive mode control
— Fixed icons disappearing after restart
0.3.5 — Apr 19, 2017
— Improved key code selection by moving frequently used keys to the top
— Added more icons to choose from
0.3.4 — Apr 19, 2017
— Added an experimental feature which allows replacing back, home, recent keys
— Better intro screen to help users set up the app
0.3.1 — Apr 18, 2017
— Will automatically grant permission if su access is given
— Attempt to fix icons disappearing after reboot
0.3.0 — Apr 18, 2017
— Initial release

Yasharkhan
Senior Member

teostar
Senior Member
Attachments


MishaalRahman
Retired Editor in Chief
I’m guessing it’s this:
adb shell pm grant xyz.paphonb.systemuituner android.permission.WRITE_SECURE_SETTINGS
Thanks for making this app, OP. Check out my series of tutorials for potential uses of this: https://www.xda-developers.com/tag/android-o/
As for how to add custom icons, I figured it out here: https://www.xda-developers.com/how-to-add-custom-icons-to-the-navigation-bar-in-android-o/ and OP implemented it in his app
paphonb
Senior Member
What’s the error you’re getting?
teostar
Senior Member
Attachments

paphonb
Senior Member
Where do you live? I’ll recheck again.
Sent from my F8332 using Tapatalk
teostar
Senior Member

dachewster99
Senior Member
MishaalRahman
Retired Editor in Chief
Prepare to get a lot of attention towards your app in the morning when the blog mill starts rolling

doubleho
Senior Member
Attachments

MishaalRahman
Retired Editor in Chief
Don’t enter «adb shell» in your command. Type «su» then «pm grant xyz.paphonb.systemuituner android.permission.WRITE_SECURE_SETTINGS».
OP’s app works perfectly. It’s actually incredible how well-polished it is for an alpha app. Tasker support right out of the gate? Hell yes.
doubleho
Senior Member
Don’t enter «adb shell» in your command. Type «su» then «pm grant xyz.paphonb.systemuituner android.permission.WRITE_SECURE_SETTINGS».
OP’s app works perfectly. It’s actually incredible how well-polished it is for an alpha app. Tasker support right out of the gate? Hell yes.
so I just type «su pm grant xyz.paphonb.systemuituner android.permission.WRITE_SECURE_SETTINGS» ?
I figured it out
su ,enter
then the rest ,enter
thanks

Toruk.Makto
Senior Member
For those who are facing «sh adb command not found».
, Use as per screenshot
Basically u need to remove «adb shell»
Attachments

MishaalRahman
Retired Editor in Chief
so I just type «su pm grant xyz.paphonb.systemuituner android.permission.WRITE_SECURE_SETTINGS» ?
I figured it out
su ,enter
then the rest ,enter
thanks
paphonb
Senior Member
Is it a part of UK?
Sent from my F8332 using Tapatalk

sourbear
Senior Member
I’m rooted running Lineage OS 14.1 on a ZTE Axon 7. I installed this app from the Play Store and followed the instructions to copy the command and paste it into Terminal Emulator. When I pasted and ran it in TE, it says /system/bin/sh: adb: not found
Ideas? Does TE need root permission and if so, how to make it ask? It didn’t when I opened it or when I ran the command.
MishaalRahman
Retired Editor in Chief
I’m rooted running Lineage OS 14.1 on a ZTE Axon 7. I installed this app from the Play Store and followed the instructions to copy the command and paste it into Terminal Emulator. When I pasted and ran it in TE, it says /system/bin/sh: adb: not found
Ideas? Does TE need root permission and if so, how to make it ask? It didn’t when I opened it or when I ran the command.
paphonb
Senior Member
Prepare to get a lot of attention towards your app in the morning when the blog mill starts rolling
Sent from my F8332 using Tapatalk
Similar threads


Breadcrumb
Top Liked Posts
Introduction
So the Android O preview brings navbar customizations to SystemUI Tuner. I had an idea to make it better and also available for Android N!
Today I’ll be introducing navbar customization for Android N, WITHOUT ROOT.
Features
— Add custom buttons to your navigation bar
— Customizable navbar layout
— Tasker integration for contextual navbar
— Easy to setup
— No root or xposed required
Compatibility
— Not working on ResurrectionRemix, Beanstalk, AospExtended or anything that uses DirtyUnicorns smartbar (Need testers)
— Not working on Touchwiz (S8 is partially supported), EMUI, LG UX
— Working on Android 7, 7.1, O preview
— Working on LinageOS
— Working on Nexus devices
— Working on Sony Xperia devices
Google Play and the Google Play logo are trademarks of Google Inc.
Translations
— Chinese
— English
— Thai
Want to help translating the app to your language? Read here
XDA:DevDB Information
Custom Navigation Bar, App for all devices (see above for details)
Version Information
Status: Stable
Current Stable Version: 0.3.2
Stable Release Date: 2017-04-18
Created 2017-04-17
Last Updated 2017-05-14
Changelog
0.5.8 — May 6, 2017
— App Shortcuts for Android 7.1
— Fixed immersive mode
— Theming support
— New button actions (Tasker event, Toggle profile, Launch application, Expand notification drawer)
0.4.3 — Apr 24, 2017
— Added an option to normalize button size
— Added more button overrides
— Added immersive mode control
— Fixed icons disappearing after restart
0.3.5 — Apr 19, 2017
— Improved key code selection by moving frequently used keys to the top
— Added more icons to choose from
0.3.4 — Apr 19, 2017
— Added an experimental feature which allows replacing back, home, recent keys
— Better intro screen to help users set up the app
0.3.1 — Apr 18, 2017
— Will automatically grant permission if su access is given
— Attempt to fix icons disappearing after reboot
0.3.0 — Apr 18, 2017
— Initial release
1. Configure a custom button as you would, but this time, set button type to «Tasker event» instead of «Keycode».
2. Open tasker and press add in profiles tab
3. Select «Event»
4. Select Plugin -> Custom Navigation Bar
5. Click on pencil icon to edit event
6. Select the profile you have the button set up. If you set up the button you want in «Navigation bar» section of the app, select «None»
7. Select the button that you have set up. If the option is greyed out, check if you done step 1 correctly
8. Save the event and add an action for that tasker profile.
Note:
When pressing the button first time, if a dialog pops up, select «Custom Navigation Bar» and press «Always»
Источник


