- Create and manage ringtones
- Use tones and ringtones with your iPhone, iPad, or iPod touch
- How to change your ringtone
- Set a ringtone or text tone for a contact
- Buy ringtones from the iTunes Store
- Redownload ringtones purchased with your Apple ID
- Use a custom ringtone
- How to Create Custom Ringtone for iPhone with and without iTunes
- Part 1. The Difficulty of Customizing Music as Ringtone for iPhone
- Ringtone Maker — Custom Ringtone for iPhone without iTunes
- Part 2. How to Custom Ringtone for iPhone without iTunes?
- Video Tutorial: How to Make iPhone Ringtone
- Part 3. How to Create Custom Ringtone for iPhone with iTunes?
Create and manage ringtones
Create a ringtone
- Select a track to use as the source. You cannot use an Apple Music item, or anything that is in the cloud.
- On the Get Info > Options tab set start and stop times no more than 30 seconds apart. ***
- Under Edit (Win) or iTunes/Music (Mac) > Preferences > General tab > Import Settings choose AAC Encoder > High Quality 128k. **
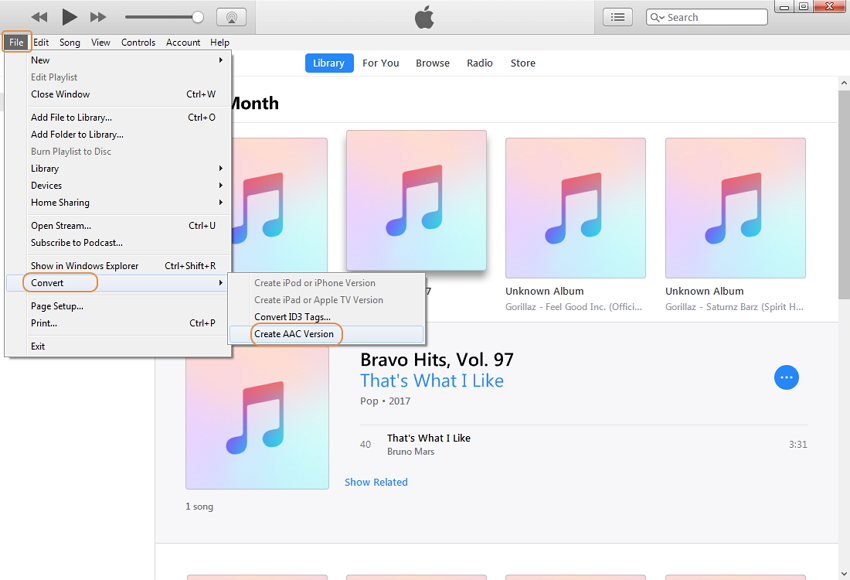
- Use File > Convert > Create AAC version.
- Reset the start and stop times on the original track.
- Right-click on the new copy and click Show in Windows Explorer or Finder.
- Delete the new entry from the library without sending to the recycle bin/trash. *
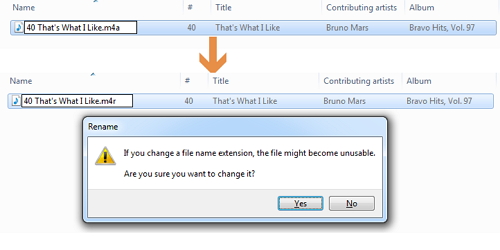
- Change the file extension from .m4a to .m4r. (You may need to adjust folder options to see the extensions.)
- If running iTunes 12.7 or later you should move the file into \Tones.
* If you omit this step on a Mac iTunes/Music will remain connected to the renamed file as if it was a regular music track, and it may then ignore any attempt to manually add it to your device.
** In Music for Catalina or later the Import Settings option is found under Music > Preferences > Files.
*** It used to be possible to create ringtones up to 40 seconds long, but they don’t appear to transfer correctly in Catalina or Big Sur.
Add ringtone to device, macOS 10.5 Catalina or later
- Connect your device to your Mac with a cable, and open the general tab for it in Finder.
- Drag and drop your .m4r file from another open Finder window to the General tab for your device.
Add ringtone to device, iTunes 12.7 or later
- Connect device to computer.
- Enable the sidebar in iTunes if hidden.
- Drag & drop * or copy & paste the ringtone from Windows Explorer or Finder onto the device where it appears in the iTunes sidebar (drop) or to the Music or Tones sections of the device when expanded (paste). Which method works seems to vary.
- From iTunes 12.7 there is no longer a dedicated Tones section within the iTunes library.
- Tones created with earlier versions of iTunes or purchased on and transferred from a device will normally be found in the Tones folder inside the media folder. Alternatively there may be a Ringtones folder in the media folder or the main iTunes folder.
- Tones shared as a ringtone to iTunes with GarageBand for Mac or Logic may be in a folder called Import inside the media folder.
* Some Windows users have noted that this method fails if they are running iTunes as the administrator. In some cases it may be necessary to exit the BTTray.exe utility, if present, before iTunes can be launched in non-admin mode. Mac users may find that omitting step 7 from the steps in Create a ringtone means that iTunes/Music is still attached to the ringtone file as an entry in the music library, if so it will be blocked from copying to a device.
Add ringtone to device, iTunes 12.6.5 or earlier
- Move the file into the Automatically Add to iTunes folder inside your media folder, it will be added to the Tones section of the library and move into the Tones folder inside the media folder.
- If you don’t see Tones in the drop down media selection menu click Edit Menu at the bottom and add it.
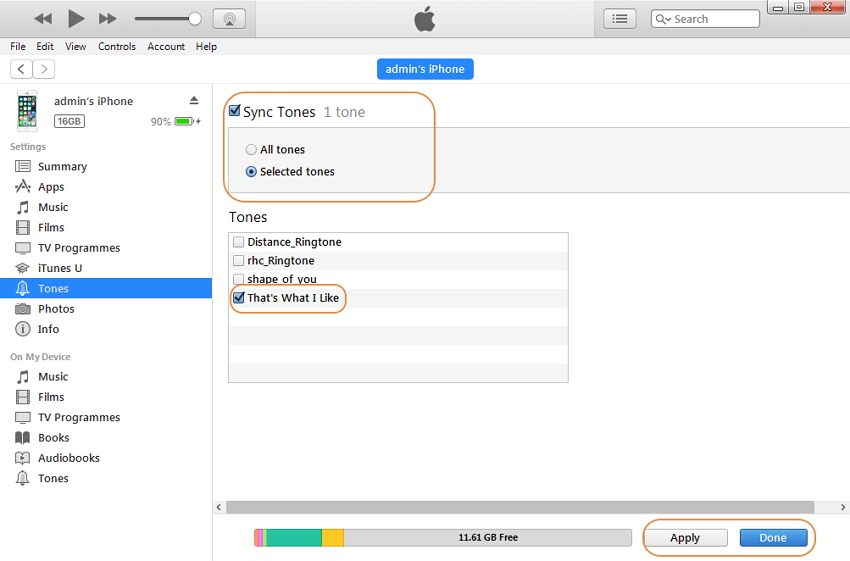
- Connect the device, select its icon next to the media selection menu, then the device’s Tones tab, and set the sync options.
- Sync the device.
Issues after updating iOS
Some users have reported that existing tones will no longer play after an iOS update, or that they cannot add new tones. If this happens you may need to remove all existing tones from the device, reboot, and then reimport your ringtones.
Remove tones using iTunes 12.7 or later
- Connect your iOS device to iTunes.
- Select it using the icon that appears next to the media selection drop down tool.
- Change to manual management if necessary on the Summary tab.
- Select and delete unwanted tones from On My Device > Tones.
- Switch back to syncing with selected content if desired.
N.b. It should be possible to switch a synced device to manual management and back to syncing with selected content without existing content being removed or replaced, despite the warnings iTunes may give, as long as you are using the library previously used to sync content to the device.
Removing hidden tones
Some users have found that custom tones that are on their device don’t show in iTunes so cannot be removed using the method above. In such cases you could try iFunBox * or a similar third party utility to make changes in the raw file system of the device. In iFunBox try My Device > Toolbox > User File System (Win) or Raw File System (Mac) then iTunes_Control > Ringtones to locate the relevant folder. Any custom tones on your device show up there with random 4 letter file names and a .m4r extension. Deleting all the .m4r files in this folder should clear all custom tones from the list on the device, and you can then add back what you want using iTunes. You may also need to delete the .plist file found in this folder. Copy off the .m4r files first if you don’t have original copies of them on your computer.
Источник
Use tones and ringtones with your iPhone, iPad, or iPod touch
Learn how to change the sound that you hear when you get a call, text, email, or other notification on your iPhone, iPad, or iPod touch. Choose from a variety of built-in sounds or buy ringtones from the iTunes Store.
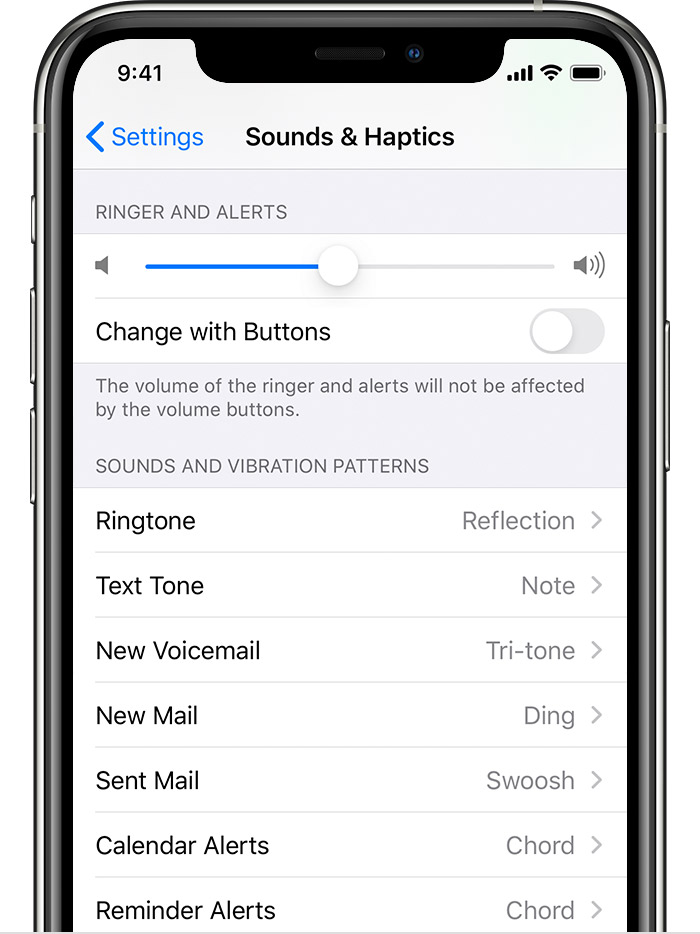
How to change your ringtone
- Go to Settings > Sounds & Haptics.
- Under Sounds and Vibrations Patterns, tap the sound that you want to change.

- Tap a ringtone or alert tone to hear and set it as the new sound.
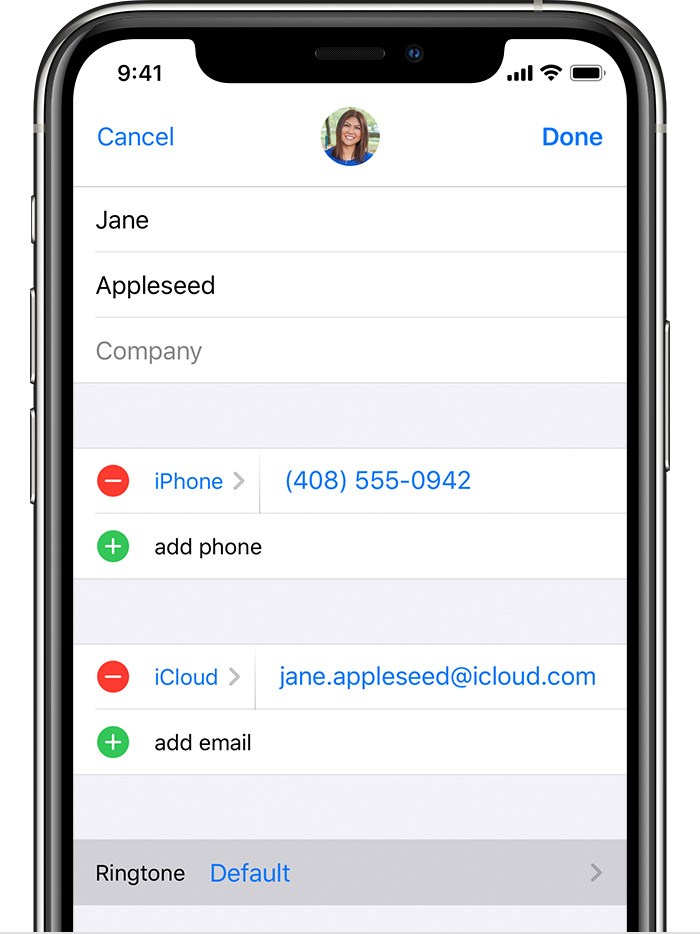
Set a ringtone or text tone for a contact
- Open the Contacts app and tap a person’s name.
- In the upper-right corner of the person’s contact card, tap Edit.
- Tap Ringtone or Text Tone, then choose a new sound.
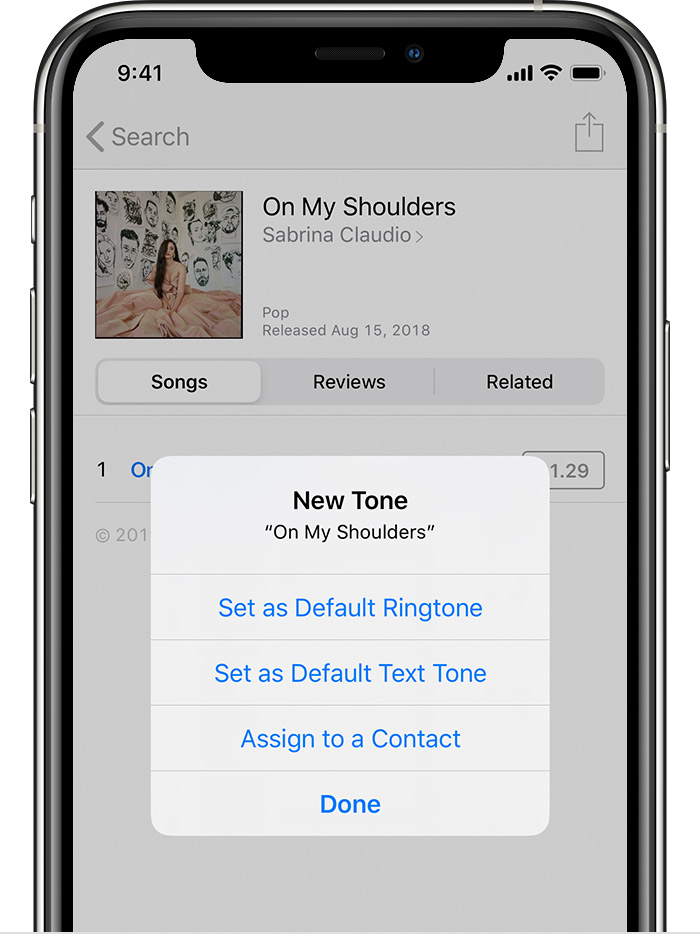
Buy ringtones from the iTunes Store
- Open the iTunes Store app.
- Tap More.
- Tap Tones.
- Find a ringtone that you want to buy, then tap the price.
- Choose an option to automatically set the ringtone. Or tap Done to decide later.
- You might need to enter your Apple ID password to complete your purchase.
Store availability and features might vary by country or region. Learn what’s available in your country or region.
Redownload ringtones purchased with your Apple ID
- Go to Settings > Sounds & Haptics.
- Under Sounds and Vibration Patterns, tap any sound.
- Tap Download All Purchased Tones. You might not see this option if you already downloaded all the tones that you purchased or if you haven’t purchased any tones.
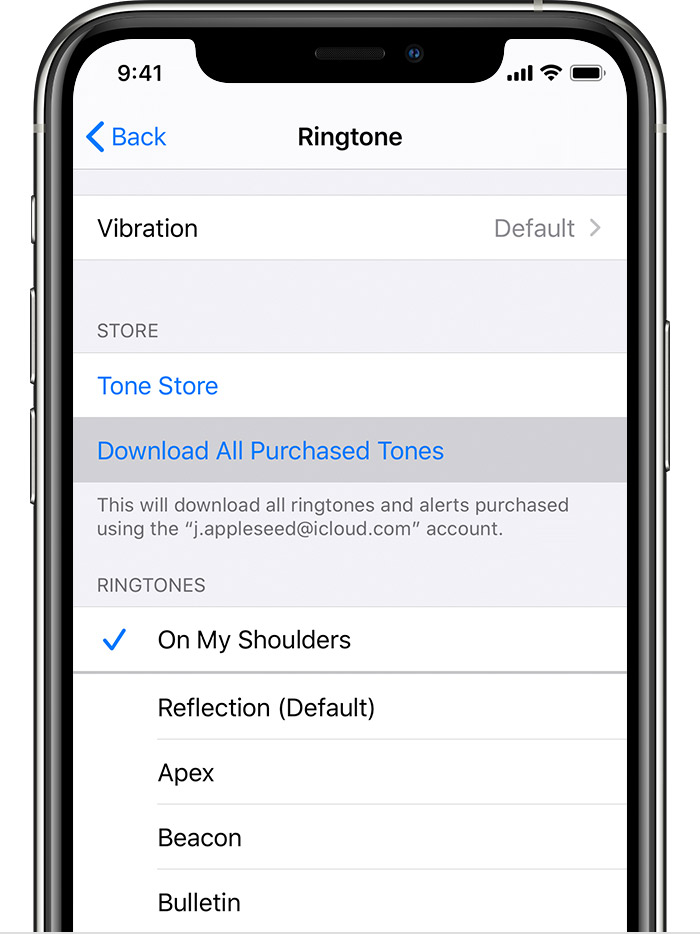
You might not be able to redownload some previously purchased tones.
Use a custom ringtone
- Connect your iPhone, iPad, or iPod touch to your computer.
- On a PC, open iTunes for Windows. On a Mac, open the Finder.
- Drag and drop the ringtone to your device.
Источник
How to Create Custom Ringtone for iPhone with and without iTunes
«How to Create Ringtones for iPhone without iTunes?»
It is not a challenge to set customized ringtones on an iPhone. However, it is complicated to create custom ringtone for iPhone. You have to either get them from Apple-approved sites or rely on the default ringtones that come with the device. But don’t worry, we will tell you how you can create custom ringtone for iPhone using several genious ways. Here you will see how you can use iTunes to create ringtonse and also how you can set it with alternative platforms. We will answer your query of how to create custom ringtone for iPhone with and without iTunes.

Part 1. The Difficulty of Customizing Music as Ringtone for iPhone
Creating a custom iPhone ringtone can be a frustratingly backward and complicated process. With an android phone, the user can just select an MP3 music and with a few simple clicks, set the song as a ringtone. However, for iPhone users, they have to go to iTunes for creating an AAC file, which needs more steps for renaming a file type and syncing your iPhone so that it can be recognized by your iPhone as a new ringtone. Well, this inconvinience has been compliant by iPhone users for a while, but there are alternatives in which you can easily create ringtones for your phone without going through this long process. We shall be looking at them in this article.
In addition, you will find selective sites that allow you to download ringtones for iPhones but the limitation comes in the selection of the music. However, the limitation will be fixed with our recommendation in the article.
Ringtone Maker — Custom Ringtone for iPhone without iTunes

- Transfer music, ringtones, photos without iTunes restrictions
- One-click backup iPhone/iPad/iPod and Android to PC
- Perfectly backup/restore iTunes library
- Transfer between iOS/Android devices directly
- Transfer audio/video from Device to iTunes and PC
- Make any photos or video PC to GIF images
- Delete photos/videos by batch with a single click
- De-duplicate the repeated contacts
- Fix & optimize ID3 tags,covers,song information
- Export & Backup contact, text messages, MMS
- Custom ringtones for iPhone, Android devices
- Fully compatible with iOS 10.3
TunesGo will be your solution to custom iPhone ringtones. By the help from it, you can set any music files and your favourite songs as your ringtones. Besides this function, it also provides you a one-stop solution to transfer the ringtones, contacts, photos and music between iPhones and PC.
Part 2. How to Custom Ringtone for iPhone without iTunes?
As mentioned earlier, the process of getting custom ringtone for iPhone with iTunes is long and complicated. You can also purchase ringtones from iTunes, but you may not get the parts that you want. TunesGo is a powerful tool that allows you to create these ringtones with a few simple steps. Here is how you go about it.
Step 1 Launch Wondershare TunesGo and then connecting your iPhone to your computer.
![]()
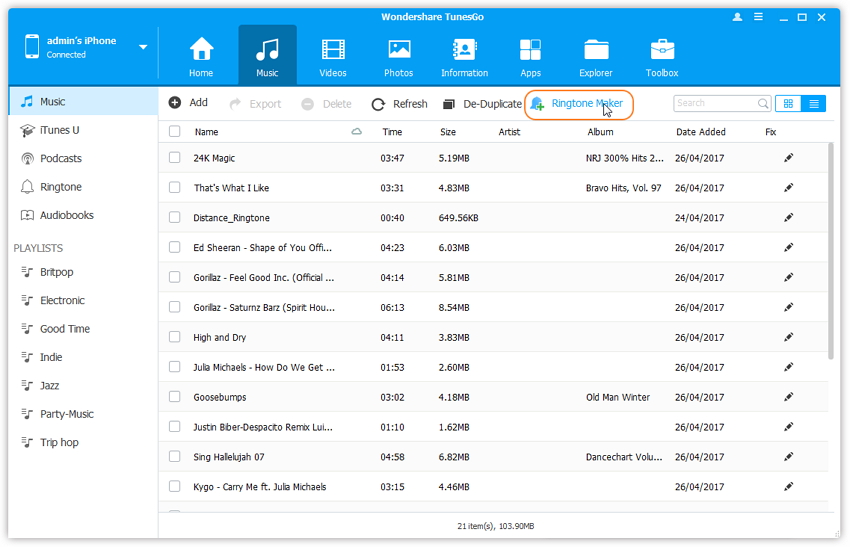
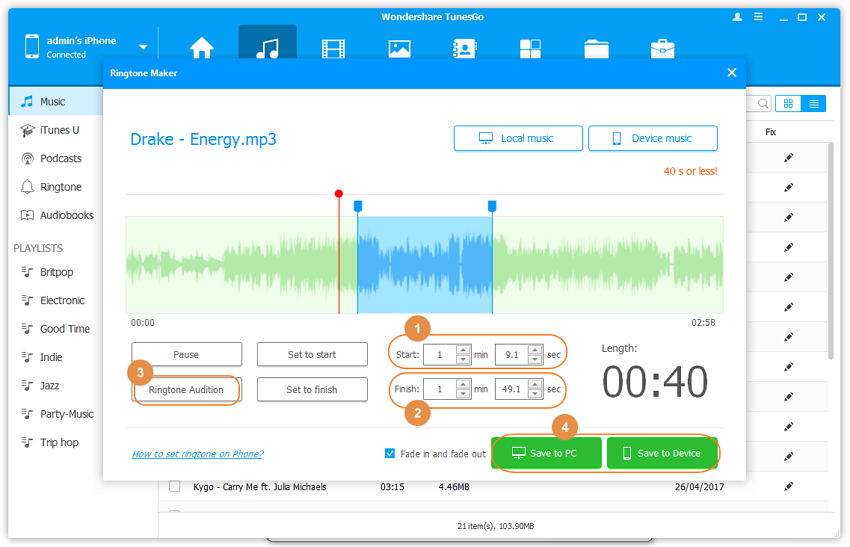
Step 2 At the top navigation bar, click on the music icon and you will go to the Music Window where you will find a list of music available. Then go to the top of the Music Window and click on the “Ringtone Maker” button, and you will get a pop-up window from whence you will choose the finer options, such as music on the device or on the computer. Make your selection depending on the source of the targeted music.
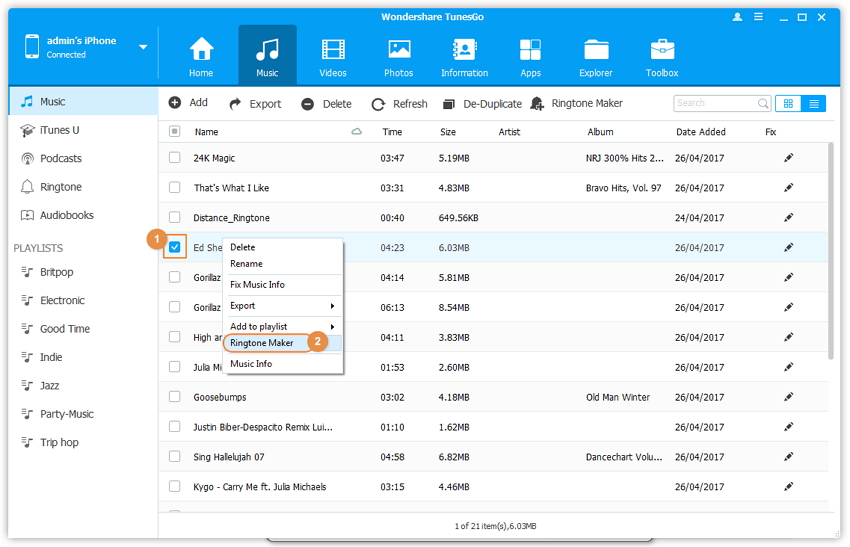
Alternatively, you can right-click on the music that you want and from the dropdown menu, select “Ringtone Maker”.
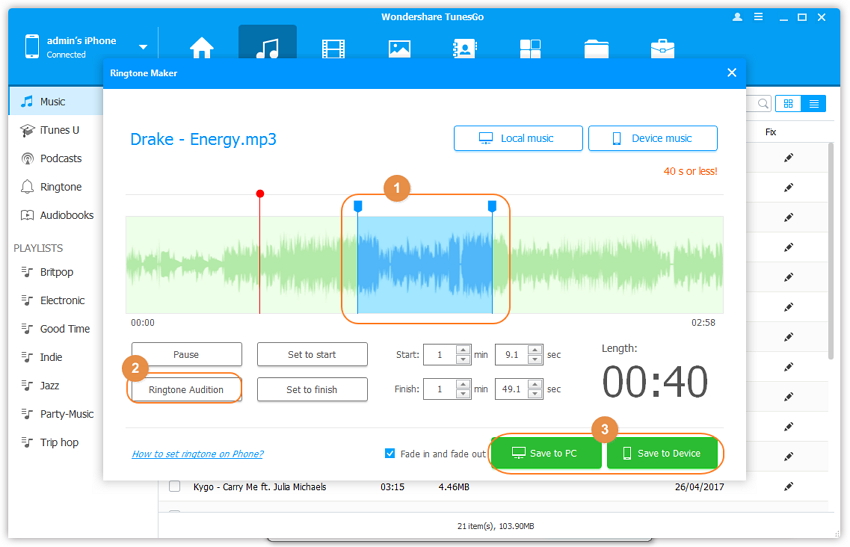
Step 3 Once you have selected the music of choice, Wondershare Tunes go will play it from start to end. You may decide to use the Play and Pause button to select the part that you want to set as your ringtone. The blue area shows you the region that will be added to your ringtone; you can manually control this by dragging on the markers at the ends of the region. The ringtone should be 40 seconds long and once you are satisfied with your selection, click on “Save to PC” or “Save to Device”. You can use the “Ringtone Audition” preview button to listen to the ringtone and ascertain that it is correct, before you save it as a ringtone.
If you know the specific time stamp of the region, you can manually input it by clicking on “Set to Start” and “Set to Finish” using the play head control, feature.
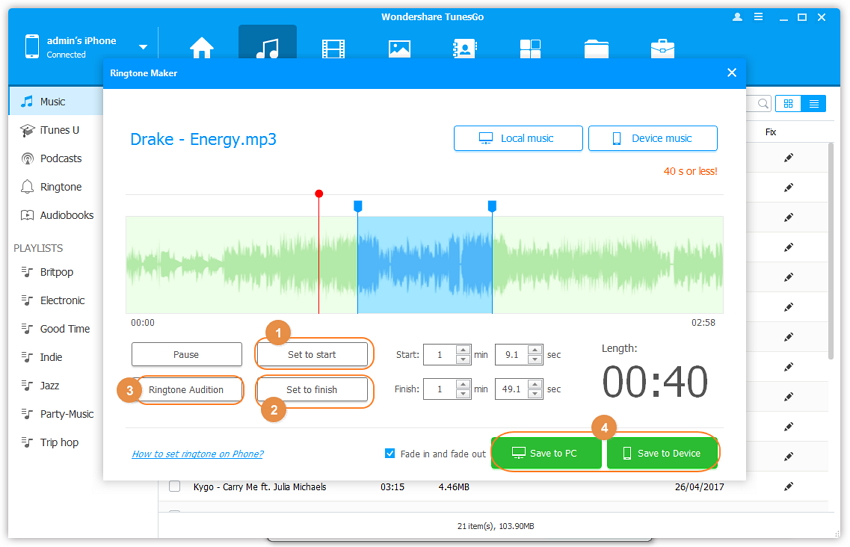
You can also input the time manually in the time region of the player.
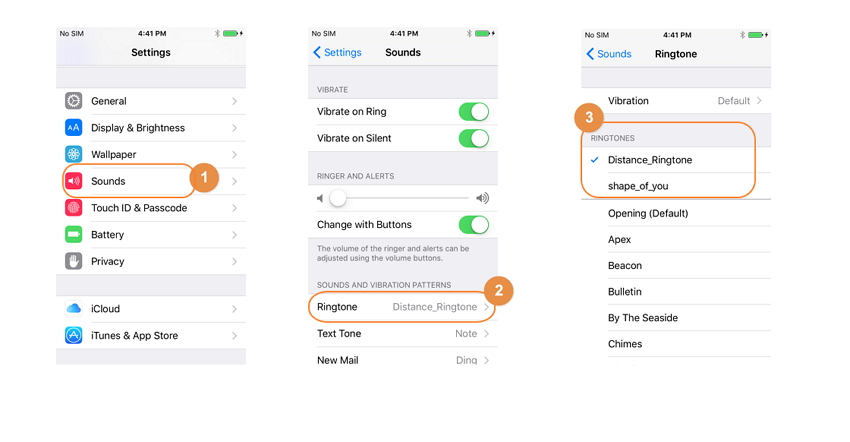
Step 4 Go to the settings tab on your iPhone and then choose the “Sounds” option. Select the “Ringtone” options and then choose the ringtone that you have just created. It will be set as your new custom ringtone.
NOTE: Wondershare TunesGo does not create custom ringtone for iPhone from Apple Music, since there is an encryption set; go to other sites which do not employ such encryption on their music. All ringtones should have a length of 40 seconds.
Video Tutorial: How to Make iPhone Ringtone
Part 3. How to Create Custom Ringtone for iPhone with iTunes?
On an iPhone, it is much easier to create a custom wallpaper than a ringtone. Even when you have a music file ready on your iPhone, you cannot just drag into the ringtone folder and let the OS locate it. In comparison, this step is very easy for Android users. The process for getting a custom ringtone for iPhone using iTunes is very tough. Here are the steps involved.
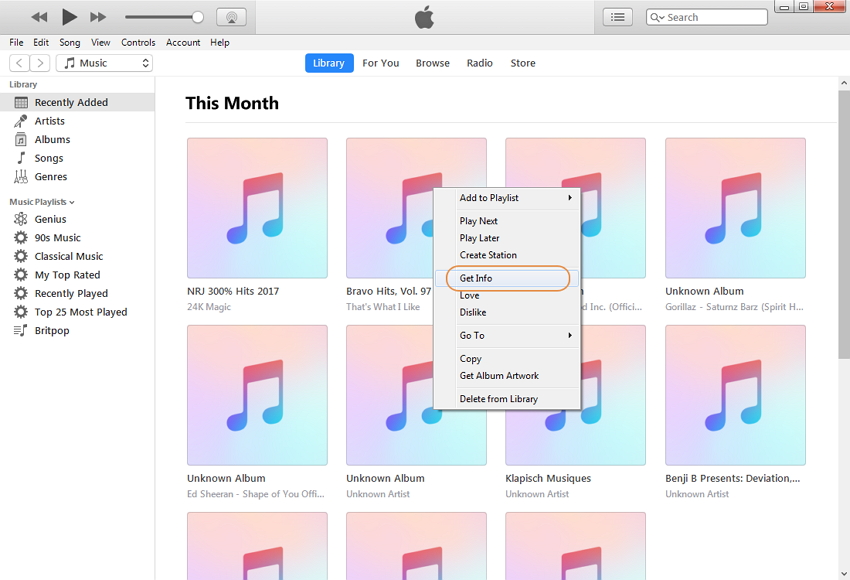
Step 1 Get the MP3 file to iTunes
Make sure that you have the MP3 file trimmed to the portion that you want as a ringtone and then drag it into your iTunes library. Right click on the music you want to custom ringtone for your iPhone and choose the «Get Info» tab.
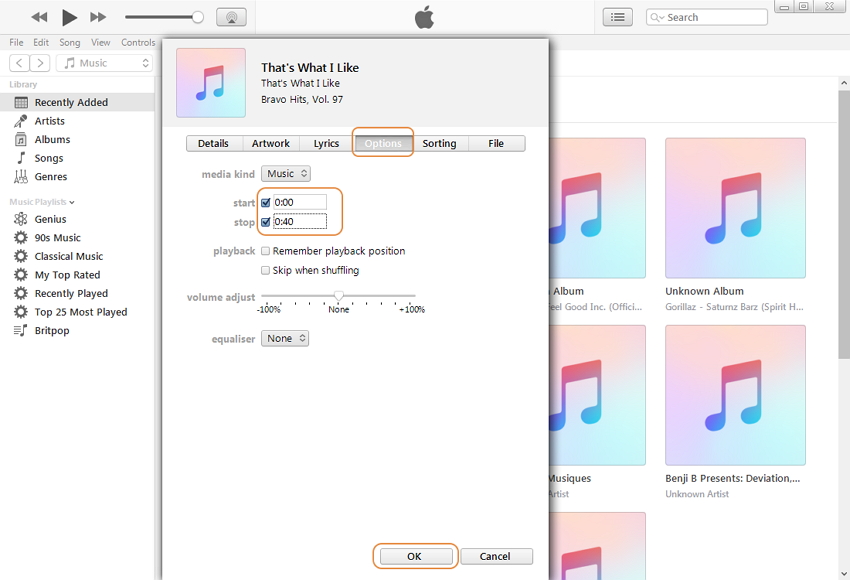
Step 2 Here you need to go to the «option» to set the start and the stop time, which Apple limits the ringtone to 40 seconds.
Step 3 After finishing the change of the time duration, go to the «file» tab on the top left bar. «Create AAC Version» from the «Convert» button should be selected.
Step 4 Now you should go to the file from the computer location and rename the file and change the «.m4a» extension used for AAC file to «m4r» extension which is the extension that the iOS system uses to recognise as ringtone files.
Step 5 Now go back to your iTunes library and delete the AAC file and original MP3 file to avoid confusing the operating system. Once you have done so, move the M4r file back into iTunes
Step 6 Now iTunes will sync the new ringtone to your iPhone and you will have added a custom ringtone to you device.
As you can see, there is a lot of movement to iTunes and back and a lot of renaming of files. This is what makes the process so tedious, especially if you want to add several new ringtones to your device.
When looking for custom ringtones for iPhone, you will have a tough time getting one that will suit your needs. There are websites that have these already created and all you have to do is download them, but you may not find the particular tunes that you want. You may also decide to go buy some from iTunes, but the same limitation applies. You may opt to create custom ringtones for iPhones using iTunes, but as you have seen, the process is very long. It may take you 10 to 15 minutes to create a single ringtone, so if you needed to add about 5 of them, you will be stuck at your computer for more than an hour. Wondershare TunesGo is a fabulous application that allows you to create custom ringtones for iPhone without any problem. The process is straight-forward and there is no movement of files back and forth. You can then edit your ringtone and then save it directly to your iPhone. Download Wondershare TunesGo and enjoy the benefits of adding ringtones to your device without having to break a sweat.
Be it backing up IOS data on your computer or transferring music files from your IOS to Android Device, TunesGo does everything. The app is light and does not hog on memory resources. The design and interface is simplistic yet appealing.
Because of the above factors, TunesGo is widely used all over the world. Try TunesGo for making ringtones in IPhone. The trial version allows you to use the software for limited time. With nominal pricing you will get lifetime license with access to newer updates which would help in improving the efficiency of the product.
In case of technical concern, you can always contact our customer representative. This service is available only to premium customers. We also offer a 30-day money back guarantee.
Источник


