- Tek Eye
- Simple Flip View Tutorial Using ViewPager for the Android Screen Swipe Effect
- Start a New Android App
- The Support Library
- Adding the ViewPager Widget to the App’s Layout
- Defining the Data to Show on Each ViewPager Page
- Create a Layout Used for the Swiped Pages
- Implement PagerAdapter in the Java Class
- Test the Swiping by Running the App
- See Also
- Archived Comments
- Do you have a question or comment about this article?
- Drag и Swipe в RecyclerView. Часть 1: ItemTouchHelper
- ItemTouchHelper
- Настройка
- Использование ItemTouchHelper и ItemTouchHelper.Callback
- Заключение
- Исходный код
- Custom swipe view android
Tek Eye
This introductory tutorial shows how to code a simple page swiping app with the ViewPager class. It is the basis for more complex view flipping examples, such as an image swiping gallery (to replace the Android Gallery widget that was deprecated in API 16). The ViewPager controls the swiping (flicking the screen left and right) between multiple screens or pages of data.
(This Android ViewPager swipe tutorial assumes that Android Studio is installed, a basic App can be created and run, and the code in this article can be correctly copied into Android Studio. The example code can be changed to meet your own requirements. When entering code in Studio add import statements when prompted by pressing Alt-Enter.)
Simple Flip View Tutorial Using ViewPager for the Android Screen Swipe Effect
The ViewPager is fed with the multiple screens by a PagerAdapter (or the sub-classes FragmentPagerAdapter and FragmentStatePagerAdapter ).
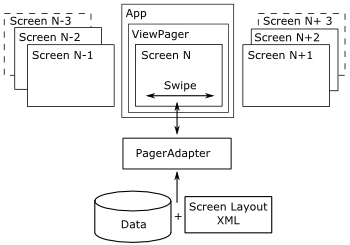
The implementation of the PagerAdapter will create (and destroy) the pages to be shown in the ViewPager. It will load the pages with the data (such as text or images) that must be displayed on the individual pages. This tutorial’s PagerAdapter allows swiping through a series of strings (text). The following steps are performed to complete the screen swiping demo:
- Start a new Android app in Android Studio.
- Add the ViewPager widget to the app’s screen.
- Define the data (text) to be displayed on each swiped page.
- Define the layout for the swiped pages.
- Implement PagerAdapter which will create each page and load it with data.
- Test the app.
Start a New Android App
Start this tutorial by generating a new project in Android Studio, here it is called it Swipe Demo. (Alternatively add the page swiping effect to an existing App.) Use an Empty Activity with other settings left at default values. Update: The minimum Android API required for the ViewPager Support Library is now API level 9 (Gingerbread), or API level 14 (Ice Cream Sandwhich) if developing apps using Google AdMob for advertising.
The Support Library
The ViewPager is part of the Support Library. If not installed use the SDK Manager to download it (scroll to the bottom of the list of items in SDK Manager to find the Android Support Repository). See also Support Library Setup on the Android Developers website.
Adding the ViewPager Widget to the App’s Layout
The ViewPager is referenced using it’s package name of android.support.v4.view.ViewPager. (The v4 stands for the first API version that the original Support Library could be used on, but now it requires API level 9 or later.)
Here’s the layout from this demo referencing the ViewPager. It is a RelativeLayout with a ViewPager below a TextView . Replace the activity_main.xml with code similar to this:
Defining the Data to Show on Each ViewPager Page
In this example some text is shown on each swiped page. Here the strings are stored in an array. The array could be defined in code but here they are in a resource file. Open the strings.xml file and add a string array. We are using the code names for Android version releases, all named after desserts. Here is the strings.xml for the Swipe Demo:
In the main class file, here called MainActivity.java, a string array is declared at the class level, String pageData[], and loaded from the resource in the onCreate method using pageData=getResources().getStringArray(R.array.desserts).
Create a Layout Used for the Swiped Pages
The swiped screen will display large text that has been centered. Using the Project explorer select the layout folder. Using the context menu (usually right-click) or the File menu select New. Then select Layout resource file. Enter the File name of page.xml. Enter RelativeLayout for the Root element, this will hold the centered text data. Click OK then add a TextView with the textAppearance attribute set to AppCompat.Large, give it an id of textMessage. The final layout XML for a page will be similar to this:
Implement PagerAdapter in the Java Class
The PagerAdapter will create and destroy the pages being swiped. In the MainActivity.java class, before the closing brace, create a new class, e.g. MyPagesAdapter, it needs to extend PagerAdapter and will require android.support.v4.view.PagerAdapter to be added to the imports. The new class implements four methods:
- getcount() – Returns the total number of pages and here it is simply the number of strings in the array so returns pageData.length.
- instantiateItem() – This is passed a reference to the ViewPager so the new page can be added to it, and the page number so that the correct data for the page can be loaded. In our implementation we use a class level LayoutInflater to create an instance of page.xml, and set the TextView to a string in the pageData array.
- isViewFromObject() – A method required by the ViewPager to check that a page matches the object from which it was created.
- destroyItem() – This is called when the ViewPager no longer requires the page (it is now several swipes away so can be cleared).
Here is the full MainActivity Java class with the PagerAdapter implemented:
The source code is also available in the text_swiper.zip file ready to import into Android Studio (also available from the Android Example Projects page).
Test the Swiping by Running the App

This simple swiping App can be extended to support different types of data.
See Also
Archived Comments
Ahmad on September 4, 2014 at 3:04 am said: Very useful and detailed. Thank you very much!
Dewan on July 14, 2015 at 6:23 am said: It’s so perfect! Thank you. This is helping me a lot.
Aelafseged on August 11, 2015 at 11:25 am said: So neat and to the point. I salute you for your Javaness.
Raul on November 9, 2015 at 8:47 pm said: Thank you very much! This is the first example that is simple and actually works!
Muhammad Mubeen on February 14, 2016 at 9:45 am said: How to create multiple swipe view? Can anyone help me please?
Christopher Geel in January 2018 said: Thanks buddy! This worked 100%
Author: Daniel S. Fowler Published: 2013-06-03 Updated: 2017-04-24


Do you have a question or comment about this article?
(Alternatively, use the email address at the bottom of the web page.)
↓markdown↓ CMS is fast and simple. Build websites quickly and publish easily. For beginner to expert.
Free Android Projects and Samples:
Источник
Drag и Swipe в RecyclerView. Часть 1: ItemTouchHelper

Существует множество обучающих материалов, библиотек и примеров реализации drag & drop и swipe-to-dismiss в Android c использованием RecyclerView. В большинстве из них по-прежнему используются устаревший View.OnDragListener и подход SwipeToDismiss, разработанный Романом Нуриком. Хотя уже доступны новые и более эффективные методы. Совсем немногие используют новейшие API, зачастую полагаясь на GestureDetectors и onInterceptTouchEvent или же на другие более сложные имплементации. На самом деле существует очень простой способ добавить эти функции в RecyclerView . Для этого требуется всего лишь один класс, который к тому же является частью Android Support Library.
ItemTouchHelper
ItemTouchHelper — это мощная утилита, которая позаботится обо всём, что необходимо сделать, чтобы добавить функции drag & drop и swipe-to-dismiss в RecyclerView . Эта утилита является подклассом RecyclerView.ItemDecoration, благодаря чему её легко добавить практически к любому существующему LayoutManager и адаптеру. Она также работает с анимацией элементов и предоставляет возможность перетаскивать элементы одного типа на другое место в списке и многое другое. В этой статье я продемонстрирую простую реализацию ItemTouchHelper . Позже, в рамках этой серии статей, мы расширим рамки и рассмотрим остальные возможности.
Примечание. Хотите сразу увидеть результат? Загляните на Github: Android-ItemTouchHelper-Demo. Первый коммит относится к этой статье. Демо .apk -файл можно скачать здесь.

Настройка
Сперва нам нужно настроить RecyclerView . Если вы ещё этого не сделали, добавьте зависимость RecyclerView в свой файл build.gradle .
ItemTouchHelper будет работать практически с любыми RecyclerView.Adapter и LayoutManager , но эта статья базируется на примерах, использующих эти файлы.
Использование ItemTouchHelper и ItemTouchHelper.Callback
Чтобы использовать ItemTouchHelper , вам необходимо создать ItemTouchHelper.Callback. Это интерфейс, который позволяет отслеживать действия перемещения (англ. move) и смахивания (англ. swipe). Кроме того, здесь вы можете контролировать состояние выделенного view -компонента и переопределять анимацию по умолчанию. Существует вспомогательный класс, который вы можете использовать, если хотите использовать базовую имплементацию, — SimpleCallback. Но для того, чтобы понять, как это работает на практике, сделаем всё самостоятельно.
Основные функции интерфейса, которые мы должны переопределить, чтобы включить базовый функционал drag & drop и swipe-to-dismiss:
Мы также будем использовать несколько вспомогательных методов:
Рассмотрим их поочередно.
ItemTouchHelper позволяет легко определить направление события. Вам нужно переопределить метод getMovementFlags() , чтобы указать, какие направления для перетаскивания будут поддерживаться. Для создания возвращаемых флагов используйте вспомогательный метод ItemTouchHelper.makeMovementFlags(int, int) . В этом примере мы разрешаем перетаскивание и смахивание в обоих направлениях.
ItemTouchHelper можно использовать только для перетаскивания без функционала смахивания (или наоборот), поэтому вы должны точно указать, какие функции должны поддерживаться. Метод isLongPressDragEnabled() должен возвращать значение true , чтобы поддерживалось перетаскивание после длительного нажатия на элемент RecyclerView . В качестве альтернативы можно вызвать метод ItemTouchHelper.startDrag(RecyclerView.ViewHolder) , чтобы начать перетаскивание вручную. Рассмотрим этот вариант позже.
Чтобы разрешить смахивание после касания где угодно в рамках view -компонента, просто верните значение true из метода isItemViewSwipeEnabled() . В качестве альтернативы можно вызвать метод ItemTouchHelper.startSwipe(RecyclerView.ViewHolder) , чтобы начать смахивание вручную.
Следующие два метода, onMove() и onSwiped() , необходимы для того, чтобы уведомить об обновлении данных. Итак, сначала мы создадим интерфейс, который позволит передать эти события по цепочке вызовов.
Самый простой способ сделать это — сделать так, чтобы RecyclerListAdapter имплементировал слушателя.
Очень важно вызвать методы notifyItemRemoved() и notifyItemMoved() , чтобы адаптер увидел изменения. Также нужно отметить, что мы меняем позицию элемента каждый раз, когда view -компонент смещается на новый индекс, а не в самом конце перемещения (событие «drop»).
Теперь мы можем вернуться к созданию SimpleItemTouchHelperCallback , поскольку нам всё ещё необходимо переопределить методы onMove() и onSwiped() . Сначала добавьте конструктор и поле для адаптера:
Затем переопределите оставшиеся события и сообщите об этом адаптеру:
В результате класс Callback должен выглядеть примерно так:
Когда Callback готов, мы можем создать ItemTouchHelper и вызвать метод attachToRecyclerView(RecyclerView) (например, в MainFragment.java):
После запуска должно получиться приблизительно следующее:
Заключение
Это максимально упрощённая реализация ItemTouchHelper . Тем не менее, вы можете заметить, что вам не обязательно использовать стороннюю библиотеку для реализации стандартных действий drag & drop и swipe-to-dismiss в RecyclerView . В следующей части мы уделим больше внимания внешнему виду элементов в момент перетаскивания или смахивания.
Исходный код
Я создал проект на GitHub для демонстрации того, о чём рассказывается в этой серии статей: Android-ItemTouchHelper-Demo. Первый коммит в основном относится к этой части и немного ко второй.
Источник
Custom swipe view android
Swipe Action View


![]()
![]()
SwipeActionView is a swipe-able view, which allows users to perform actions by swiping it to the left or right side.
Table of contents

Add the JitPack repository to your root build.gradle :
And add the dependency in your module’s build.gradle :
Replace VERISION_HERE with the version you want to use. See the tags on the top of this file to see the latest available version.
Adding SwipeActionView to your projects requires only adding it to XML and setting up SwipeGestureListener . Below example will create TextView that can be swiped both to the left or right side with two icons behind.
For an example implementation of SwipeActionView see the included sample project.
You can manually compile the apk using source code or download from the releases page of this repository.
The main idea behind this library is a concept of container and background views. It allows for complete control over the look of the created views.
In the quick example section you can see that the SwipeActionView has three child views. The first two are background views, and the last one is the container. To create working version of SwipeActionView , you are only required to specify single background view and container. Second background view can be added when you want to be able to swipe in both directions.
The container is a view which is drawn above other views. In the default state, this is the only visible view, and it is what gets moved when users perform swipe gestures. It can be either a simple TextView , custom view or even some sort of view group like LinearLayout . There is no limit for that, which allows you to gain complete control over the look of your views.
Background views are the mostly invisible part of SwipeActionView . They get revealed only when users start performing swipe gestures. (Unless your container view has transparent background)
You can specify for which swipe direction each of them corresponds by setting their layout_gravity attribute. Default value or setting it to either left and/or start means that it will start appearing when users perform right swipe gesture. On the other hand setting it to end and/or right will result in the view to start appearing when users swipe to the left. This doesn’t mean that you aren’t allowed to use other layout_gravity options like center . They will still control the view as usual and will be ignored by SwipeActionView .
This behavior allows you to add single background and by specifying its layout_gravity determine whether SwipeActionView should be possible to be swiped only to the left or right side.
Note: There can be only one view for each direction. This means that if one of them is placed on the left side, the second one must be put on the right side to avoid errors.
In order to be able to perform actions when users swipe the SwipeActionView you have to setup the listener with the setSwipeGestureListener(SwipeGestureListener) method. It takes SwipeGestureListener as a parameter.
SwipeGestureListener consists of two methods. One for performing an action when the view is swiped to the left and one when it is swiped to the right side.
Each of these methods returns Boolean as a result. Most of the time you’ll want to return true here. Returning false is designed for advanced usage. By doing so, the view won’t be automatically animated to the original position but will stay at the full translation. This allows you to manipulate the content of the visible background view. One great example of this is displaying progress wheel and manually returning the view to the original position once some long action finishes execution.
To return the view to its original position you can call the animateToOriginalPosition() method at any time.
If you want to dynamically enable or disable gesture in a specific direction you can use the setDirectionEnabled(SwipeDirection, Boolean) method.
Note: The gesture enabling part is controlled by presence and visibility of background views. This method is only provided for convenience since it can also be changed by switching visibility of background views. It was coded like this so the specific swipe directions can be disabled by default from XML using visibility attribute on views corresponding to these directions.
SwipeActionView comes with optional support for displaying ripple animations when gestures are performed. All you have to do to enable them is to give them a color from XML or code. To do so from the code, you can use the setRippleColor(SwipeDirection, Int) method.
To disable ripple animations you can enter -1 as value for color.
SwipeActionView makes sure that any click listeners will work correctly. You can use setClickListener(View.OnClickListener) as usual and they should work, including views located in the container.
The only exception is that you shouldn’t add click listeners for background views. This library wasn’t designed to add support for this behavior. If it’s possible then, that’s only a positive side effect. You are better of with using libraries such as AndroidSwipeLayout instead.
When needed you can manually animate the view to desired position from code by using one of the dedicated methods.
Method animateInDirection(swipeDirection: SwipeDirection, animateBack: Boolean, delayBeforeAnimatingBack: Long) animates the view in the specified direction and optionally animates it back after a delay.
Method animateToOriginalPosition(startDelay: Long) animates the view to its original position with optional start delay.
You can customize the siwpe distance required for callbacks to be executed by using the activationDistanceRatio property. It receives a value in range from 0.0f to 1.0f , which means the percentage of background view that has to be revealed. For example if set to 0.5f the user has to reveal at least half of the background view before releasing their finger in order for the gesture callbacks to be executed.
If you want ripple effect to take padding together with container view you can set this attribute to true.
Sets color for ripple displayed when users swipe left.
Sets color for ripple displayed when users swipe right.
SwipeActionView has special attributes used only in the editor mode. They make it possible to preview ripples or contents of background views without worrying about side effects. They are entirely ignored when running on the device.
Shows background view for swipe left or right gesture.
Shows ripple for swipe left or right gesture.
SwipeActionView also comes with support for custom animations. There are two listeners that you can set in your code. They will be called with current swipe progress while users perform swipe gesture.
By default, there is only one animator included which scales the background views. You can use it as an example of how to implement custom animations or use it directly if it’s good enough for you.
This library wouldn’t be created without help and work of Brian Robles.
His KarmaMachine Reddit application was my direct inspiration when I was creating it for my application. He also created SwipeRippleDrawable and allowed me to reimplement it for purposes of this library. Huge thanks!
Источник


