- Обработка нажатия на отдельный View в элементе списка
- Buttons
- Responding to Click Events
- Kotlin
- Using an OnClickListener
- Kotlin
- Styling Your Button
- Borderless button
- Custom background
- Custom View, скроллинг и жесты в Android на примере простого вьювера картинок
- Creating custom and compound views in Android — Tutorial
- 1. Custom Views
- 1.1. Default views
- 1.2. How Android draws the view hierarchy
- 1.3. Using new views in layout files
- 1.4. Create screenshots of views
- 2. Compound Views
- 3. Creating custom views
- 3.1. Creating custom views
- 3.2. Measurement
- 3.3. Defining custom layout managers
- 4. Life cycle of a Andoid view
- 4.1. Life cycle events related to the window
- 4.2. Traversal life cycle events
- 4.3. Activity life cycle
- 5. Define additional attributes for your custom Views
Обработка нажатия на отдельный View в элементе списка
В этой статье я опишу способ обработки нажатия на отдельную часть элемента списка. Кого заинтересовало, прошу под кат.
ПРЕДИСТОРИЯ
Недавно передо мной встала задача: реализовать возможность нажатия на отдельный View в элементе списка. Сложность заключалась в том, что метод onListItemClick() вызывается при нажатии на любую часть элемента списка (неважно, какой View находится под пальцем). Поискав решение, я ничего полезного не нашёл. Проведя несколько экспериментов, я всё-таки достиг цели.
СОЗДАНИЕ ПРОЕКТА
Создадим проект. Имя, пакет, версия ANDROID – на ваше усмотрение. Сначала разметка для элемента списка и Activity:
Я специально использую ListActivity, чтоб сократить урок. Использовать мы будем, разумеется, свой кастомный адаптер. Чтобы не морочиться с SimpleAdapter и его ArrayList > или BaseAdapter с его обязательными методами, я наследую свой адаптер от ArrayAdapter. Я не стал добавлять ViewHolder – он нам сейчас не нужен. Ну и наконец-то, сам код адаптера:
Давайте разбираться, что мы здесь накодили. В методе getView(int position, View convertView, ViewGroup parent) мы создаём вьюху для каждого элемента списка и там же находим кнопку и присваиеваем ей обработчик нажатия. Когда кнопку нажимают, появляется тост с позицией этого элемента. Как видите, всё очень просто! Правда, при этом почему-то перестаёт работать onListItemClick(ListView l, View v, int position, long id) (по крайней мере у меня). Поэтому придётся кодить обработку нажатия на нужную кнопку и на все остальные View в самом адаптере :(. Но можно сделать, как я написал выше — присвоить всем элементам OnClickListener, а потом смотреть — если наша кнопка, то одно действие, иначе — другое. А ещё лучше вынести все другие вьюхи в отдельный LinearLayout или RelativeLayout и присваивать слушатель только ему.
Ну вот в общем-то и всё. Буду рад, если этот пост поможет кому-нибудь.
Источник
Buttons
A button consists of text or an icon (or both text and an icon) that communicates what action occurs when the user touches it.
Depending on whether you want a button with text, an icon, or both, you can create the button in your layout in three ways:
- With text, using the Button class:
- With an icon, using the ImageButton class:
- With text and an icon, using the Button class with the android:drawableLeft attribute:
Key classes are the following:
Responding to Click Events
When the user clicks a button, the Button object receives an on-click event.
To define the click event handler for a button, add the android:onClick attribute to the element in your XML layout. The value for this attribute must be the name of the method you want to call in response to a click event. The Activity hosting the layout must then implement the corresponding method.
For example, here’s a layout with a button using android:onClick :
Within the Activity that hosts this layout, the following method handles the click event:
Kotlin
The method you declare in the android:onClick attribute must have a signature exactly as shown above. Specifically, the method must:
- Be public
- Return void
- Define a View as its only parameter (this will be the View that was clicked)
Using an OnClickListener
You can also declare the click event handler programmatically rather than in an XML layout. This might be necessary if you instantiate the Button at runtime or you need to declare the click behavior in a Fragment subclass.
To declare the event handler programmatically, create an View.OnClickListener object and assign it to the button by calling setOnClickListener(View.OnClickListener) . For example:
Kotlin
Styling Your Button
The appearance of your button (background image and font) may vary from one device to another, because devices by different manufacturers often have different default styles for input controls.
You can control exactly how your controls are styled using a theme that you apply to your entire application. For instance, to ensure that all devices running Android 4.0 and higher use the Holo theme in your app, declare android:theme=»@android:style/Theme.Holo» in your manifest’s element. Also read the blog post, Holo Everywhere for information about using the Holo theme while supporting older devices.
To customize individual buttons with a different background, specify the android:background attribute with a drawable or color resource. Alternatively, you can apply a style for the button, which works in a manner similar to HTML styles to define multiple style properties such as the background, font, size, and others. For more information about applying styles, see Styles and Themes.
Borderless button
One design that can be useful is a «borderless» button. Borderless buttons resemble basic buttons except that they have no borders or background but still change appearance during different states, such as when clicked.
To create a borderless button, apply the borderlessButtonStyle style to the button. For example:
Custom background
If you want to truly redefine the appearance of your button, you can specify a custom background. Instead of supplying a simple bitmap or color, however, your background should be a state list resource that changes appearance depending on the button’s current state.
You can define the state list in an XML file that defines three different images or colors to use for the different button states.
To create a state list drawable for your button background:
- Create three bitmaps for the button background that represent the default, pressed, and focused button states.
To ensure that your images fit buttons of various sizes, create the bitmaps as Nine-patch bitmaps.
Источник
Custom View, скроллинг и жесты в Android на примере простого вьювера картинок
В статье описываются детали реализации простого вьювера картинок и показываются некоторые тонкости имплементации скроллинга и обработки жестов.
И так, начнем. Ми будем разрабатывать приложения для просмотра картинок. Готовое приложение выглядит так (хотя скриншоты, конечно, слабо передают функционал): 
Установить приложение можно либо из Маркета, либо установив вручную отсюда. Исходный код доступен здесь.
Главным элементом нашего приложения является класс ImageViewer который мы и будем разрабатывать. Но нужно также отметить, что для выбора файла для просмотра я не стал изобретать велосипед и взял готовый «компонент» здесь.
Компонент представляет собой activity, который вызывается при старте из главного activity. После выбора файла, мы его загружаем и показываем на экране с помощью класса ImageViewer. Рассмотрим класс более подробно.
Класс является наследником класса View и переопределяет только один его метод onDraw. Также класс содержит конструктор и метод загрузки изображения:
Если мы загрузим картинку по размерам больше чем экран смартфона, то отобразится только часть ее и у нас не будет способа ее подвинуть или уменьшить.
Добавим теперь возможность скроллинга. Скроллинг по своей сути представляет собой жест, при котором пользователь дотрагивается пальцем к экрану, передвигает его не отрывая, и отпускает. Для того чтоб иметь возможность обрабатывать события связанные с тач-скрином, нужно переопределить метод onTouchEvent. Метод принимает один параметр типа MotionEvent и должен возвратить true в случае обработки события. Через этот метод можно реализовать поддержку любого жеста, включая скроллинг.
Для распознавания скроллинга нам нужно зафиксировать момент дотрагивания, перемещения и отпускания. К счастью нету необходимости делать это вручную так как в Android SDK есть класс делающий всю работу за нас. Таким образом для того чтоб распознать жест скроллинга, нужно добавить в наш класс поле типа GestureDetector которое инициализируется объектом реализующим интерфейс OnGestureListener (именно этот объект будет получать события скроллинга). Также нужно переопределить метод onTouchEvent в классе ImageViewer и передавать обработку событий из него в наш объект типа OnGestureListener. Измененный класс ImageViewer (без неизмененных методов) представлен ниже:
Как видно на самом деле ми наследуем MyGestureListener не от OnGestureListener, а от SimpleOnGestureListener. Последний класс просто реализует интерфейс OnGestureListener с помощью пустых методов. Этим мы избавляем себя от реализации всех методов, выбирая только те, что нужно.
Теперь если загрузить большую картинку, мы, по крайней мере, сможем скролить ее. Но: во первых мы можем проскроллить за рамки картинки, во вторых нету скроллбаров, которые бы подсказали нам где мы находимся и сколько еще осталось до краев.
Решим для начала вторую проблему. Поиск в Интернет приводит нас к тому, что нужно переопределить методы computeHorizontalScrollRange и computeVerticalScrollRange. Эти методы должны возвратить реальные размеры картинки (на самом деле есть еще методы которые имеют отношение к скроллбарам – это методы computeHorizontalScrollExtent, computeHorizontalScrollOffset и такая же пара для вертикального скроллбара. Если переопределить и их, то тогда возвращать можно более произвольные значения). Но этого оказывается недостаточно – скроллбары в первых нужно включить, во вторых проинициализировать. Включаются они методами setHorizontalScrollBarEnabled и setVerticalScrollBarEnabled, инициализируются методом initializeScrollbars. Но вот незадача – последний метод принимает немного непонятный параметр типа TypedArray. Этот параметр должен содержать в себе набор стандартных для View атрибутов. Список можно увидеть здесь в таблице «XML Attributes». Если бы мы создавали наш view из XML, Android runtime бы автоматически составил такой список. Но так как мы создаем класс программно, нужно также создать этот список программно. Для этого нужно создать файл attrs.xml в каталоге res\values с таким содержимым:
В файле просто перечислены все атрибуты, которые были указаны в таблице, упомянутой выше (кроме некоторых на которые указывает компилятор как на ошибку – видимо в документации список приведен самый последний). Измененный класс ImageViewer (кроме неизменных методов):
Не хотелось бы на этом останавливаться, поэтому давайте добавим поддержку жеста «бросок» (fling). Этот жест есть просто дополнение к жесту скроллинга, но учитывается скорость перемещения пальца в последние моменты (перед отпусканием), и если она не нулевая, скроллинг продолжается с постепенным затуханием. Поддержка этого жеста уже заложена в GestureDetector – поэтому нам нужно всего лишь переопределить метод onFling в классе MyGestureListener. Отловив это событие нам нужно еще некоторое время изменять положение скроллинга. Конечно, это можно сделать «вручную» с помощью таймеров или еще как, но опять же в Android SDK уже есть класс, реализующий нужный функционал. Поэтому нужно добавить в класс ImageViewer еще одно поле типа Scroller, которое и будет заниматься «остаточным» скроллингом – для старта скроллинга нужно вызвать его метод fling. Также нужно показать скроллбары (они ведь прячутся когда не нужны) вызовом метода awakenScrollBars. И последнее что нужно сделать – это переопределить метод computeScroll, который должен непосредственно делать скроллинг с помощью метода scrollTo (класс Scroller сам не занимается скроллингом – он просто работает с координатами). Код измененного класса ImageViewer представлен ниже:
В завершения разговора о жесте fling надо сделать одну мелочь – при прикосновении пальцем во время скроллинга от броска, нужно остановить скроллинг. На этот раз мы это сделаем «вручную» в методе onTouchEvent. Измененный метод представлен ниже:
Уже можно любоваться достаточно интересной физикой, но можно увидеть некоторые «глюки» при скроллинге за пределы картинки. Это происходит из-за того, что fling работает только в пределах картинки, а скроллинг без броска работает везде. Т.е. мы сможем выйти за рамки картинки только если очень плавно скролить (чтоб не срабатывал fling). Исправить этот «косяк» можно путем введения ограничение на обработку в метод onFling и обрабатывать бросок только если он не выходит за границы картинки. Измененный метод представлен ниже:
Теперь мы опять можем беспрепятственно скролить за рамки картинки. Кажется, эту проблему мы уже вспоминали… У нее есть элегантное решение, лежащее в том, что при отпускании пальца (при завершении скроллинга за рамками картинки) нужно картинку плавно вернуть в «положенное» место. И опять мы это сделаем «вручную» в методе onTouchEvent:
Вот теперь с уверенностью можно сказать что со скроллингом мы разобрались. Можем переходить к последнему жесту который хотелось бы реализовать – это жест pinch zoom.
Со стороны жест выглядит как растягивание или сжатие чего-то воображаемого на экране смартфона двумя пальцами. Пошагово жест происходит так: нажатие одним пальцем, нажатие вторым пальцем, изменение положения одного или двух пальцев не отпуская, отпускание второго пальца. Для определения величины масштабирования нужно вычислить соотношение между расстояниями между пальцами в момент начала жеста и в момент окончания жеста. Расстояние между пальцами находится по формуле sqrt(pow(x2 – x1, 2) + pow(y2 – y1, 2)). Также нужно отметить некоторое положение скроллинга которое нужно сохранять – ведь если жестом увеличить картинку, то положение скроллинга изменится (из-за измененного размера картинки). Это положение – а точнее точка, положение которой нужно сохранить, в терминологии Android SDK называется фокальной точкой, и находиться она посередине между двумя пальцами.
Реализовать жест как всегда можно самому, но и это к счастью уже реализовано в Android SDK (правда, только начиная с версии 2.2). Поможет в этом класс ScaleGestureDetector, инстанс которого добавим в наш класс. ScaleGestureDetector инициализируется обьектом, поддерживающим интерфейс OnScaleGestureListener, поэтому создадим также внутренний класс MyScaleGestureListener, который реализует методы onScaleBegin, onScale и onScaleEnd. Не забываем передать управление ScaleGestureDetector из метода onTouchEvent. Ну и самое главное – нужно как-то использовать данные масштабирования: их нужно учитывать во всех местах, где раньше фигурировали ширина и высота картинки (т.е. фактически нужно умножить эти параметры на коэффициент масштабирования). Финальный код класса ImageViewer можно посмотреть в исходниках.
На этом все. Надеюсь статься окажется полезной.
Источник
Creating custom and compound views in Android — Tutorial
This tutorials describes how to create custom and combound views with Android.
1. Custom Views
1.1. Default views
The Android framework provides several default views. The base class a view is the View . Views are responsible for measuring, layouting and drawing themselves and their child elements (in case of a ViewGroup ). Views are also responsible for saving their UI state and handling touch events. Developers can also create custom views and use them in their application.
It is possible to create custom views by:
Compound views — combining views with a default wiring
Custom views — creating your own views
by extending an existing view, e.g. Button
by extending the View class
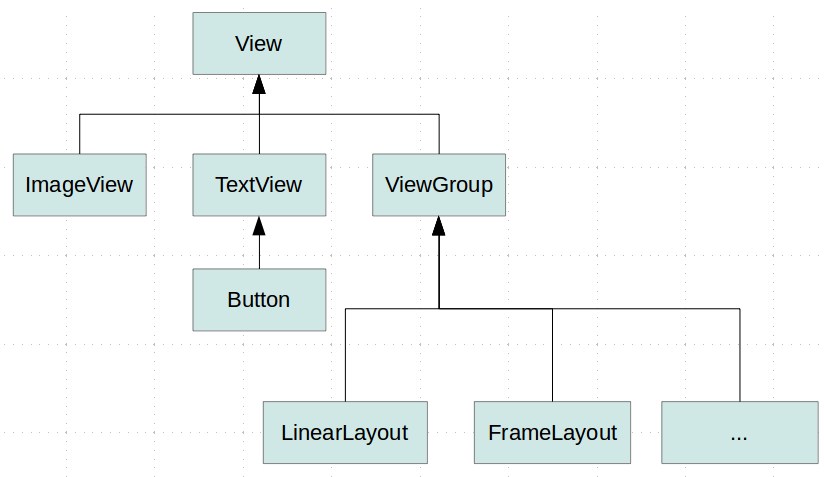
The following image shows the default view hierarchy of Android.
View are typically created to provide a user interface experience with is not possible with the default views. Using custom view allows the developer allow to do certain performance optimization, i.e., in case of a custom layout the development can optimize the layout manager for his use case.
1.2. How Android draws the view hierarchy
Once an activity receives the focus, it must provide the root node of its layout hierarchy to the Android system. Afterwards the Android system starts the drawing procedure.
Drawing begins with the root node of the layout. The layout hierarchy is traversed in the order of declaration, i.e., parents are drawn before their children and children are drawn in the order of declaration.
Drawing the layout is a two pass process:
measuring pass — implemented in the`measure(int, int)` method. This happens as a top-down traversal of the view hierarchy. Every view stores its measurements.
layout pass — implemented in the layout(int, int, int, int) method. This is also a top-down traversal of the view hierarchy. During this phase each layout manager is responsible for positioning all of its children. It uses the sizes computed in the measure pass.
| The measure and layout step always happen together. |
Layout managers can run the measure pass several times. For example, LinearLayout supports the weight attribute which distributes the remaining empty space among views and RelativeLayout measures child views several times to solve constraints given in the layout file.
A view or activity can trigger the measure and layout pass with a call to the requestLayout() method.
After the measure and layout calculation, the views draw themselves. This operation can be triggered with the invalidate() method from the View class.
For a detailed introduction into the deeper layer of Android see http://source.android.com/devices/graphics/architecture.html.
1.3. Using new views in layout files
Custom and compound views can be used in layout files. For this you need to use the full qualified name in the layout file, e.g. using the package and class name.
Alternatively you can also declare you name space in the layout file, similar to the Android name space.
1.4. Create screenshots of views
Every View class support the creating of an image of its current display. The following coding shows an example for that.
2. Compound Views
Compound views (also known as Compound Components ) are pre-configured ViewGroups based on existing views with some predefined view interaction.
Combound views also allow you to add custom API to update and query the state of the combound view.
For such a control you define a layout file and assign it to your compound view. In the implementation of your compound view you predefine the view interaction. You would define a layout file and extend the corresponding ViewGroup class. In this class you inflate the layout file and implement the View connection logic
For performance reasons you may want to rewrite your combound view to a custom view which extends View . This may you can typically flatten your view hierarchy. Drawing the view requires in this case less traversals and this can be significantly faster if implemented correctly.
3. Creating custom views
3.1. Creating custom views
By extending the View class or one of its subclasses you can create your custom view.
For drawing view use the onDraw() method. In this method you receive a Canvas object which allows you to perform drawing operations on it, e.g. draw lines, circle, text or bitmaps. If the view should be re-drawn you call the invalidate() method which triggers a call to the onDraw() method of this view.
If you define own views, ensure you review the ViewConfiguration class, as it contains several constants for defining views.
To draw your Views you typically use the 2D Canvas API.
3.2. Measurement
The layout manager calls the onMeasure() method of the view. The view receives the layout parameter from the layout manager. A layout manager is responsible to determine the size of all its children.
The view must call the setMeasuredDimenstion(int, int) method with the result.
3.3. Defining custom layout managers
You can implement your custom layout manager by extending the ViewGroup class. This allows you to implement more efficient layout managers or to implement effects which are currently missing in the Android platform.
A custom layout manager can override the onMeasure() and onLayout() method and specialize the calculation of its children. For example it can leave out the time consuming support of layout_weight of the LinearLayout class.
To calculate the size of the child you can use the measureChildWithMargins() method of the ViewGroup class.
It is good practice to store any additional layout parameters in an inner class of your ViewGroup implementation. For example ViewGroup.LayoutParams ` implements command layout parameters, and `LinearLayout.LayoutParams implements additional parameters specific to LinearLayout, as for example the layout_weight parameter.
4. Life cycle of a Andoid view
4.1. Life cycle events related to the window
A view is displayed if it is attached to a layout hierarchy which is attached to a window. A view has several life cycle hooks.
The onAttachedToWindow() is called once the window is available.
The onDetachedFromWindow() is used when the view is removed from its parent (and if the parent is attached to a window). This happens for example if the activity is recycled (e.g. via the finished() method call) or if the view is recycled.
The onDetachedFromWindow() method can be used to stop animations and to clean up resources used by the view.
4.2. Traversal life cycle events
Traversals life cycle events consists of Animate, Measure, Layout and Draw.

All views must know how to measure and layout themselves. The requestLayout() method call tells the view to measure and layout itself. As this operation may influence the layout of other views it calls also requestLayout() of its parent.
This recursive call is the reason why you should not nestle layout to deeply. The measure and layout operation might be expensive if a lot of hierarchies are re-calculated.
The onMeasure() method determines the size for the view and its children. It must set the dimension via the setMeasuredDimension() method in this method call before returning.
The onLayout() positions the views based on the result of the onMeasure() method call. This call happens typically once, while onMeasure() can happen more than once.
4.3. Activity life cycle
Views don’t have access to the life cycle events of the activities. If views want to get informed about these events, you should create an interface in the view which you call in the life cycle methods of the activity.
5. Define additional attributes for your custom Views
You can define additional attributes for your compound or custom views. To define additional attributes create an attrs.xml file in your res/values folder. The following shows an example of attributes defined for a new view called ColorOptionsView .
To use these attributes in your layout file you have to declare them in the XML header. In the following listing this is done via the xmlns:custom part of the code. These attributes are also assigned to the view.
The following example shows how you components can access these attributes.
Источник


