- Применение SQLiteOpenHelper и Database Inspector в Android-разработке
- Что такое SQLite?
- Класс SQLiteOpenHelper
- ▍Метод onCreate()
- ▍Метод onUpgrade()
- ▍Пример
- Database Inspector в Android Studio
- Database Inspector
- A live database tool we’ve been waiting for!
- Get started
- Query your databases
- Modify and debug your database
- Android SQLite Database in Kotlin
- What are we going to build in this article?
- Step By Step Implementation
Применение SQLiteOpenHelper и Database Inspector в Android-разработке
Автор статьи, перевод которой мы публикуем сегодня, хочет рассказать об использовании баз данных SQLite в Android-разработке. В частности — он коснётся тут двух вопросов. Во-первых — речь пойдёт о классе SQLiteOpenHelper , который применяется для работы с базами данных в коде приложений. Во-вторых — он уделит определённое внимание инструменту Database Inspector, инспектору баз данных, встроенному в Android Studio.

Что такое SQLite?
SQLite — это опенсорсная реляционная СУБД, похожая на MySQL. SQLite входит в состав стандартной библиотеки Android, где реализован движок базы данных, не нуждающийся в применении клиент-серверной архитектуры, не требующий особой настройки, поддерживающий транзакции. Для работы SQLite не нужен сервер баз данных. Всё, что нужно, хранится в обычных файлах. Полноценная БД SQLite, в которой имеется множество таблиц, триггеров, индексов и представлений, содержится в единственном, самом обыкновенном файле. Стандартная поддержка СУБД SQLite имеется во всех мобильных телефонах и в большинстве компьютеров. При этом работа с SQLite не требует решения задач по администрированию или настройке баз данных.
Android-разработчик, для выполнения CRUD-операций из своего приложения, может пользоваться пакетом android.database.sqlite.SQLiteDatabase , в котором реализованы все необходимые API.
Класс SQLiteOpenHelper
SQLiteOpenHelper — это класс, встроенный в пакет android.database.sqlite.SQLiteDatabase . Это — вспомогательный класс, который отвечает за создание баз данных SQLite и за управление их версиями. Для того чтобы воспользоваться возможностями этого класса, нужно создать его подкласс, в котором надо переопределить два метода — onCreate() и onUpgrade() . Этот класс позволяет открывать существующие базы данных, создавать новые базы данных и обновлять версии баз данных.
▍Метод onCreate()
Метод onCreate() вызывается при создании базы данных. Он, в процессе жизненного цикла приложения, вызывается лишь один раз. А именно, его вызов производится при первом обращении к методу getReadableDatabase() или getWritableDatabase() . Эти методы принадлежат классу SQLiteOpenHelper .
В следующем примере показано создание экземпляра класса DatabaseHelper , являющегося наследником SQLiteOpenHelper :
Вот код конструктора DatabaseHelper :
Класс SQLiteOpenHelper вызывает метод onCreate() после создания базы данных и создания экземпляра класса SQLiteDatabase . Этот метод, напомним, вызывается лишь один раз, при создании базы данных:
▍Метод onUpgrade()
Метод onUpgrade() вызывается в тех случаях, когда нужно обновить версию существующей базы данных:
▍Пример
Создадим простое Android-приложение и разберём практический пример работы с классом SQLiteOpenHelper . Это приложение, применяя данный класс, позволит нам добавлять записи о работниках некоей компании в таблицу Empdata базы данных Company.db .
Приложение имеет весьма простой интерфейс, описанный в файле activity_main.xml .

Вот содержимое файла MainActivity.java :
Вот содержимое Employee.java :
Вот файл DatabaseHelper.java :
В коде DatabaseHelper.java видно, что класс DatabaseHelper является наследником класса SQLiteOpenHelper .
После того, как база данных создана, можно приступать к работе с ней. В частности — создавать и обновлять поля её таблиц. При решении этих задач можно пользоваться объектом типа ContentValues , который позволяет хранить пары ключ-значение. Именно такие объекты используются для добавления новых записей в таблицы базы данных (с помощью метода insert() объекта SQLiteDatabase ) и для обновления существующих записей (с помощью метода update() ).
Database Inspector в Android Studio
Инструмент Database Inspector позволяет исследовать базы данных, используемые в приложениях, выполнять запросы к ним, модифицировать их, делая всё это во время работы приложений. Database Inspector имеется в Android Studio начиная с версии 4.1. Этот инструмент особенно полезен при отладке механизмов программ, ответственных за работу с базами данных. Database Inspector работает и с обычной реализацией SQLite, и с библиотеками, построенными на её основе, вроде Room. Database Inspector работает лишь с библиотекой SQLite, входящей в состав операционных систем Android, уровень API которых не ниже 26.
Для того чтобы открыть базу данных в Database Inspector нужно выполнить следующие действия:
- Запустите приложение в эмуляторе или на устройстве, подключённом к компьютеру. На эмуляторе или на устройстве должно присутствовать API не ниже 26 уровня.
- Выполните команду меню View > Tool Windows > Database Inspector .
- Выберите процесс выполняющегося приложения из выпадающего меню.
- В панели Databases появятся записи о базах данных, которые имеются в выбранном приложении. Теперь можно работать с этими базами данных.

Исследование базы данных с помощью Database Inspector
Обратите внимание на то, что есть одна проблема, связанная с аварийным завершением работы программ на эмуляторе Android 11 при подключении к Database Inspector. Если вы с этой проблемой столкнётесь — здесь вы можете найти сведения о том, как с ней справиться.
Применяете ли вы SQLite в Android-разработке?
Источник
Database Inspector
A live database tool we’ve been waiting for!

Creating and managing local databases is a core component of most mobile apps. But whether you’re using SQLite directly or through the Room persistence library, Android developers have been asking for a better way to inspect and debug databases in their running app. To learn more watch the video or read the blog below.
The latest version of Android Studio 4.1 (currently available in Canary) comes with a new tool called Database Inspector, which helps you inspect, query, and modify databases in your running app.
With Database Inspector, modifying the data in your database is not much harder than editing a spreadsheet; if you are using Room and observing the query results, the changes will be reflected instantly in your app!
In this post, we will use the Database Inspector with the Sunflower app to test some edge cases. Sunflower is a gardening app that illustrates Android development best practices with Android Jetpack. I encourage you to clone the repo and follow along as you read this post.
Get started
The UI of the Sunflower app includes two tabs. To add some plants to my garden, let’s take a look at the Plant List tab, which lists available plants for my garden. On the top right, there is a filter button. When I press this button, the following list of plants is displayed:
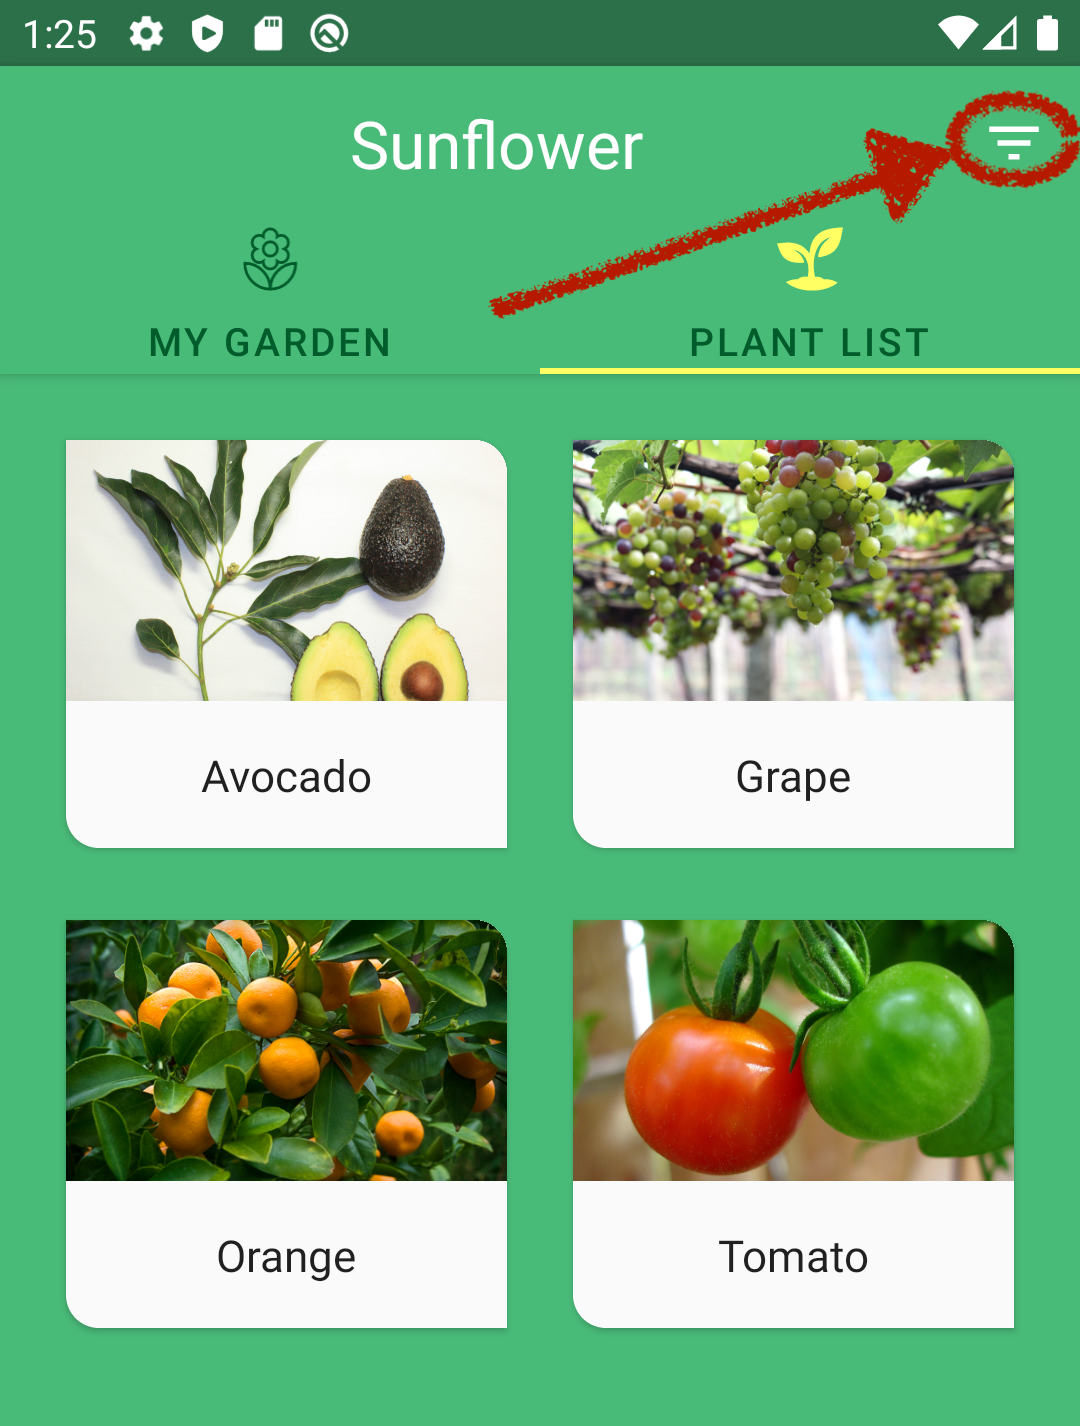
Clearly, this button filters the plants based on some criteria. But let’s imagine I am not super familiar with this project and I want to figure out how the filtering works by using the Database Inspector.
To open the Database Inspector in Android Studio, I need to select View > Tool Windows > Database Inspector from the menu bar.
This brings up the Database Inspector.

Now, I need to run the app to a device running API level 26 or higher and then select the app process from the dropdown menu.

After I select the app process I want to inspect, the database schemas appear in the panel below. To see Sunflower database tables, I need to expand the …/databases/sunflower-db schema.

Let’s go back to the app and take a look at the filtered plant list. The list contains Avocado, Grape, Orange and Tomato. If I could sort the plant table by the plant name, it wouldn’t be hard to find Avocado. Let’s see if the Database Inspector can do that!
First, I double-click on the plants table to display its data. The data is displayed with a default page size of 50, but you can reduce this number and page between a shorter list of results instead. Clicking on the name column sorts the plant table on the name of the entries. As expected, Avocado is not far down the list and I find it in the second row of the table.
Query your databases
Looking at the data entry of Avocado, the growZoneNumber is most likely the property which the app uses for filtering. To verify that, let’s run a query on the growZoneNumber, which is 9 for Avocado. Actually, this query already exists in PlantDao.kt and I can run the query directly from Room’s @Query annotations. Every @Query annotation has a small run icon next to its line number.
When I click the run icon for the query of getPlantsWithGrowZoneNumber() and select the correct database, a popup appears asking me the value for :growZoneNumber.
I can enter a value of 9 and click Run to see the query results.
Alternatively, I can type my own query and run it inside the tool window. This gives me more freedom, as I am not limited to the queries defined in DAO interfaces. To run my own query, I click Run SQL and select the plants database from the newly opened tab on the right.

Next, I type the following query into the box next to the database selection dropdown and click Run.
“ Select * from plants where growZoneNumber=9”

Here it is! We have the exact same list of plants as is shown when the filter is on.
Modify and debug your database
The Database Inspector makes debugging your app a breeze by allowing you to modify values in your app’s databases while it’s running on a device.
First, I want to test the app UI for really long plant names. Instead of changing the data source and refreshing the database with the new data, I’ll edit the values directly on the database using the Database Inspector.
Now that the cell is editable, I change the name from Apple to A really special type of Apple and press enter. If you are following along, you can type anything you like with the length you want to test in the app UI.
Now let’s go back to the app. Notice that without us doing anything, the app is displaying the updated data! If your app uses Room and observes the query results (using LiveData/Flow) you do not need to trigger a database query to refresh the data. Otherwise, depending on how your app triggers a query, you may need to relaunch the app or just navigate to the related activity/fragment again. In order to use the full potential of the Database Inspector this might be a good excuse to migrate your app to use LiveData or Flow.
Looking back at our app, it looks like the card view is not designed to handle such long plant names. I’ll fix this later, but let’s move on to the next test.
Each plant has a different watering interval and I want to see what happens when watering day is past due. To do this, I need to add some plants to my garden; but first, I select the Live updates checkbox in the Database Inspector. When Live updates is checked, the Database Inspector automatically displays any changes your app makes to its database.

I go back to the My Garden tab and add some plants such as Avocado and Eggplant; but first, I go back to the Database Inspector and double click on garden_plantings to observe the table. Notice how the data in garden_plantings table is updated automatically as I add new plants.
Both these plants have a watering interval of 3 days. I don’t really want to wait 3 days to see what happens so I’ll edit the database and change the last_watering_day. Once again I go back to the Database Inspector and double click on garden_plantings. The last_watering_date is the last column of the table. I’ll change the values of both records to something smaller to reflect sometime before today’s date.

Ok, it looks like I went a little too far back in time, but that should still work for my test. The app UI seems fine displaying the due date. For future development, maybe we can suggest adding a warning for the user when watering day is passed.
Go ahead and give the new Database Inspector a try! Let us know what you think; and if you come across any issues, please don’t forget to file bugs!
Источник
Android SQLite Database in Kotlin
Android comes with an inbuilt implementation of a database package, which is SQLite, an open-source SQL database that stores data in form of text in devices. In this article, we will look at the implementation of Android SQLite in Kotlin.
SQLite is a self-contained, high-reliability, embedded, full-featured, public-domain, SQL database engine. It is the most used database engine in the world. It is an in-process library and its code is publicly available. It is free for use for any purpose, commercial or private. It is basically an embedded SQL database engine. Ordinary disk files can be easily read and write by SQLite because it does not have any separate server like SQL. The SQLite database file format is cross-platform so that anyone can easily copy a database between 32-bit and 64-bit systems. Due to all these features, it is a popular choice as an Application File Format.
What are we going to build in this article?
We will be building a simple application that will be storing data using SQLite and we will also implement methods to retrieve the data. Below is a sample video to show what we will be doing.
Step By Step Implementation
Step 1: Create a New Project
To create a new project in Android Studio please refer to How to Create/Start a New Project in Android Studio. Note that select Kotlin as the programming language.
Источник


