- DatePicker в Котлине
- Android DatePicker с режимом календаря
- Android DatePicker с режимом Spinner
- Различные атрибуты элемента управления DatePicker —
- Чтобы использовать Calender DatePicker в activity_main.xml
- Android Date Picker Kotlin Tutorial
- What the app will look like?
- What will you learn?
- Getting started on your Android date picker
- Setting a minimum and maximum date on your Android date picker
- Where to go next?
- Android Date Picker Dialog with Example in Kotlin
- In this tutorial, you will learn the following:
- Let’s Build Android Android Date Picker Dialog example in kotlin:
- Output screenshot Android Date Picker Dialog :
- Download source code Android DatePickerDialog in kotlin
- Tutorialwing
- Output
- Getting Started
- Creating New Project
- Setup ViewBinding
- Using DatePicker in Kotlin
- Different Attributes of DatePicker in XML
- Set Id of DatePicker
- Set Width of DatePicker
- Set Height of DatePicker
- Set Padding of DatePicker
- Set Margin of DatePicker
- Set Background of DatePicker
- Set Visibility of DatePicker
- Different Attributes of Android DatePicker Widget
DatePicker в Котлине
Android DatePicker — это элемент управления пользовательского интерфейса, который используется для выбора даты по дню, месяцу и году в нашем приложении для Android. DatePicker используется, чтобы гарантировать, что пользователи выберут правильную дату.
В Android DatePicker есть два режима: первый для отображения полного календаря, а второй — для отображения дат в виде счетчика.
Мы можем создать элемент управления DatePicker двумя способами: либо вручную в XML-файле, либо программным путем создать его в файле Activity.
Сначала мы создаем новый проект , выполнив следующие шаги:
- Нажмите Файл, затем Новый =>Новый проект .
- После этого включите поддержку Kotlin и нажмите «Далее».
- Выберите минимальный SDK для удобства и нажмите кнопку « Далее» .
- Затем выберите Пустое занятие =>Далее =>Готово .
Android DatePicker с режимом календаря
Мы можем использовать android: datePickerMode, чтобы показывать только представление календаря. В приведенном ниже примере мы используем DatePicker в режиме календаря.
Приведенный выше код DatePicker можно увидеть в приложении для Android, как это

Android DatePicker с режимом Spinner
Мы также можем отобразить DatePicker в формате счетчика, например, выбрав день, месяц и год отдельно, используя атрибут android: datePickerMode и установив android: calendarViewShown = ”false” , в противном случае счетчик и календарь можно увидеть одновременно.
Приведенный выше код DatePicker можно увидеть в приложении для Android, как это

Различные атрибуты элемента управления DatePicker —
| XML Attributes | Description |
|---|---|
| android:id | Used to uniquely identify the control. |
| android:datePickerMode | Used to specify the mode of datepicker(spinner or calendar) |
| android:calendarTextColor | Used to specify the color of the text. |
| android:calendarViewShown | Used to specify whether view of the calendar is shown or not. |
| android:background | Used to set background color of the Text View. |
| android:padding | Used to set the padding from left, right, top and bottom. |
Чтобы использовать Calender DatePicker в activity_main.xml
В этом файле мы добавим виджет DatePicker и Button и установим их атрибуты так, чтобы к ним можно было получить доступ в файле kotlin.
Источник
Android Date Picker Kotlin Tutorial
by Dody Prasetya · Published January 11, 2020 · Updated January 13, 2020
Android Date Picker is one of the important components of Android development. If you need something like selecting a date to input, so you’re gonna need a Date Picker dialog. In this post, you’ll also learn about using a Calendar instance from Android that is needed for the DatePickerDialog class.
What the app will look like?
The app will look like this after you finish this tutorial:

So we’re gonna learn to create two types of date picker here. The first one on the left picture is a Material calendar type and the other is a spinner type date picker. My purpose here is to give you the preferences of calendar types, depending on what you want to use on your app.
What will you learn?
- Creating a simple Android Date Picker app extending DatePickerDialog class using Kotlin.
- Learn about how to use Calendar instance
Note: In this post, I used Android Studio 3.5.3, make sure you use the latest Android Studio, or if you already install it, be sure to check the latest update. The Kotlin version that I used is Kotlin 1.3.61.
Getting started on your Android date picker
Open your Android Studio and choose to Start a new Android Studio Project. Then set the Application Name SimpleDatePicker and select Kotlin as the language. Give the Activity Name MainActivity and wait until the Android Studio finishes preparing your project.
Open activity_main.xml inside res/layout directory and replace the code given below:
When you run your app it will display like the picture below:

Create a new Kotlin class named DatePickerHelper.kt beside MainActivity.kt here:

After that, write this code given below inside DatePickerHelper.kt:
This class has some functions to simplify our works like:
- showDialog() function is for showing the picker dialog.
- onDateSelected() callback function will be triggered after a user selects a specific date from the dialog.
- isSpinnerType parameter is my custom parameter for this class to give it condition whether you want to use Spinner type picker or material calendar picker.
- setMinDate() and seMaxDate() are for giving a boundary of date which can be selected.
Open file styles.xml inside res/values directory. The XML code is given below:
The spinner type android date picker must use a custom style like the code above for the easiest way while the material type doesn’t need a specific custom style.
For the last thing, open MainActivity.kt file and put this code given below:
Simple right? Try to run your app and select the date by pressing the “Select Date” button.

If you want to change it to a Spinner type, just add additional parameter on DatePickerHelper like this:
The calendar will display as a spinner type like this:

Setting a minimum and maximum date on your Android date picker
As I already mentioned before, if you want to give the picker a boundary, just simply add this code inside showDatePickerDialog() function like this:
For example, here I set the minimum date is today at zero o’clock and max date to seven days from today. The result will be like this:

Where to go next?
You can download this full code here. Be sure to check my other post here about creating a simple Time Picker application and how to create a custom navigation drawer application. I hope you like my post, comment and share it with love!
Источник
Android Date Picker Dialog with Example in Kotlin
Android Date Picker Dialog allows users to select the date consisting of day, month, and year in-app date picker dialog user interface. Android provides DatePicker and DatePickerDialog components to get done in your app very easily. Some of the examples of the app are date picker use in Railway ticket booking app or flight booking or hotel, holidays, etc (MakeMyTrip, Booking.com, Trivago, etc).
In this tutorial, you will learn the following:
- Overview Android Date Picker Dialog
- Complete example and code of Android DatePickerDialog in kotlin
Let’s Build Android Android Date Picker Dialog example in kotlin:
In the kotlin showing, DatePickerDialog is very easy, in this example see how much easy. In the example, the selected data will show in Toast. You can Show it in the TextView label or elsewhere your want to use it. Let’s see the steps to how to do it.
Step 1. Create a new project “ Build Your First Android App in Kotlin “
Step 2. Add following code in “activity_main.xml” layout file
Where button have method to perform a onClick action.
Step 3. Open the “MainActivity.kt” and add following code
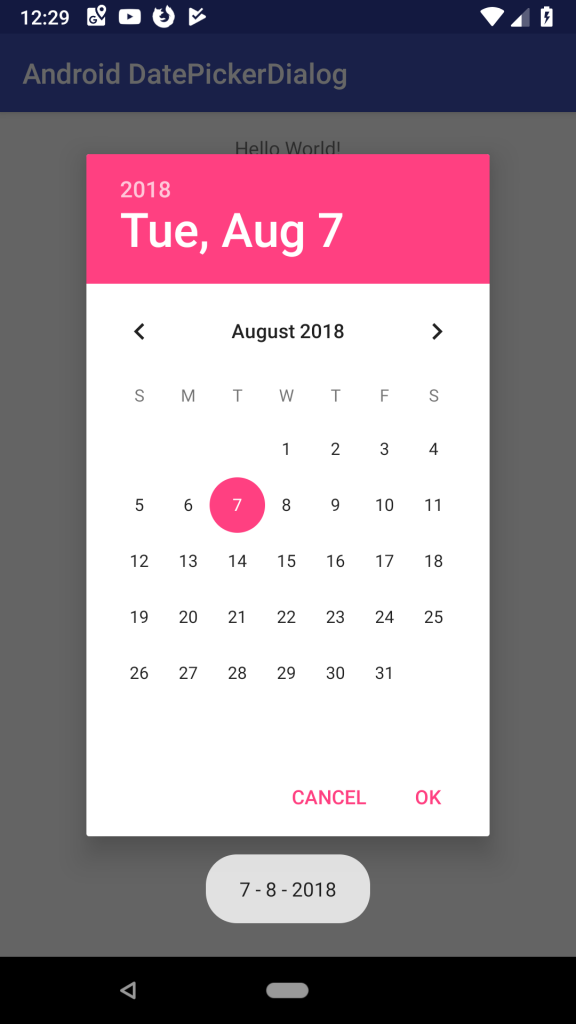
On clicking button – Creates a new date picker dialog for the current date using the parent context’s default date picker dialog theme. Context is requires the application context.
- var year : It shows the the current year that’s visible when the dialog pops up
- var month : It shows the the current month that’s visible when the dialog pops up
- var dat : It shows the the current day that’s visible when the dialog pops up
Step 4. Now Run the application, in emulator or On you android device
Output screenshot Android Date Picker Dialog :
Download source code Android DatePickerDialog in kotlin
Note: This example (Project) is developed in Android Studio 3.1.3. Tested on Android 9 ( Android-P), compile SDK version API 27: Android 8.0 (Oreo)

Degree in Computer Science and Engineer: App Developer and has multiple Programming languages experience. Enthusiasm for technology & like learning technical.
Источник
Tutorialwing
In this article, we will learn about android DatePicker using Kotlin. We will go through various example that demonstrates how to use different attributes of DatePicker. For example,
In this article, we will get answer to questions like –
- What is DatePicker?
- Why should we consider DatePicker while designing ui for any app?
- What are possibilities using DatePicker while designing ui? etc.
Let’s have a quick demo of things we want to cover in this tutorial –
Output
Tutorialwing Kotlin DatePicker Output
Tutorialwing Kotlin DatePicker Output
Getting Started
We can define android DatePicker widget as below –
DatePicker is a widget that display view to select any date.
Now, how do we use DatePicker in android application ?
Creating New Project
At first, we will create an application.
So, follow steps below to create any android project in Kotlin –
| Step | Description |
|---|---|
| 1. | Open Android Studio (Ignore if already done). |
| 2. | Go to File => New => New Project. This will open a new window. Then, under Phone and Tablet section, select Empty Activity. Then, click Next. |
| 3. | In next screen, select project name as DatePicker. Then, fill other required details. |
| 4. | Then, clicking on Finish button creates new project. |
Some very important concepts (Recommended to learn before you move ahead)
Before we move ahead, we need to setup for viewBinding to access Android DatePicker Using Kotlin file without using findViewById() method.
Setup ViewBinding
Add viewBinding true in app/build.gradle file.
Now, set content in activity using view binding.
Open MainActivity.kt file and write below code in it.
Now, we can access view in Kotlin file without using findViewById() method.
Using DatePicker in Kotlin
Follow steps below to use DatePicker in newly created project –
- Open res/values/strings.xml file. Then, add below code into it.
- Open res/layout/activity_main.xml file. Then, add below code in it –
In activity_main.xml file, we have defined textView and datePicker widgets. Now, we will access these widgets in kotlin file to perform some operations on it.
We can also access it in Kotlin File, MainActivity.kt, as below –
We have accessed textView and datePicker using kotlin file (i.e. MainActivity.kt file) in the application. Then, we have set a listener to show selected date in the textView.
Now, run the application. We will get output as below –
Tutorialwing Kotlin DatePicker Output
Tutorialwing Kotlin DatePicker Output
Different Attributes of DatePicker in XML
Now, we will see how to use different attributes of Android DatePicker using Kotlin to customise it –
Set Id of DatePicker
Many a time, we need id of View to access it in kotlin file or create ui relative to that view in xml file. So, we can set id of DatePicker using android:id attribute like below –
Here, we have set id of DatePicker as datePicker_ID using android:id=”” attribute. So, if we need to reference this DatePicker, we need to use this id – datePicker_ID.
Learn to Set ID of DatePicker Dynamically
Set Width of DatePicker
We use android:layout_width=”” attribute to set width of DatePicker.
We can do it as below –
Width can be either “MATCH_PARENT” or “WRAP_CONTENT” or any fixed value (like 20dp, 30dp etc.).
Learn to Set Width of DatePicker Dynamically
Set Height of DatePicker
We use android:layout_height=”” attribute to set height of DatePicker.
We can do it as below –
Height can be either “MATCH_PARENT” or “WRAP_CONTENT” or any fixed value.
Learn to Set Height of DatePicker Dynamically
Set Padding of DatePicker
We use android:padding=”” attribute to set padding of DatePicker.
We can do it as below –
Here, we have set padding of 10dp in DatePicker using android:padding=”” attribute.
Learn to Set Padding of DatePicker Dynamically
Set Margin of DatePicker
We use android:layout_margin=”” attribute to set margin of DatePicker.
We can do it as below –
Here, we have set margin of 10dp in DatePicker using android:layout_margin=”” attribute.
Learn to Set Margin of DatePicker Dynamically
Set Background of DatePicker
We use android:background=”” attribute to set background of DatePicker.
We can do it as below –
Here, we have set background of color #ff0000 in DatePicker using android:background=”” attribute.
Learn to Set Background of DatePicker Dynamically
Set Visibility of DatePicker
We use android:visibility=”” attribute to set visibility of DatePicker.
We can do it as below –
Here, we have set visibility of DatePicker using android:visiblity=”” attribute. Visibility can be of three types – gone, visible and invisible
Learn to Set Visibility of DatePicker Dynamically
Till now, we have see how to use android DatePicker using Kotlin. We have also gone through different attributes of DatePicker to perform certain task. Let’s have a look at list of such attributes and it’s related task.
Different Attributes of Android DatePicker Widget
Below are the various attributes that are used to customise android DatePicker Widget. However, you can check the complete list of attributes of DatePicker in it’s official documentation site. Here, we are going to list some of the important attributes of this widget –
Some of the popular attributes of android datePicker widget are –
| Sr. | XML Attributes | Description |
|---|---|---|
| 1 | android:calendarTextColor | Specifies text color of the calendar |
| 2 | android:calendarViewShown | Checks whether calendar view is shown or not |
| 3 | android:datePickerMode | Specifies the look of the widget |
| 4 | android:dayOfWeekBackground | Specifies the background color for the header’s day of week |
| 5 | android:endYear | Specifies the last year (inclusive) of the calendar |
| 6 | android:firstDayOfWeek | Specifies the first day of the week according to Calendar |
| 7 | android:headerBackground | Specifies background for the selected date header |
| 8 | android:maxDate | Specifies the maximal date shown by the calendar in mm/dd/yyyy format |
| 9 | android:minDate | Specifies the minimal date shown by the calendar in mm/dd/yyyy format |
| 10 | android:spinnersShown | Specifies whether spinners are shown or not |
| 11 | android:startYear | Specifies the first year (inclusive) of the calendar |
Some of the popular attributes of DatePicker inherited from FrameLayout are –
| Sr. | XML Attributes | Description |
|---|---|---|
| 1 | android:foregroundGravity | Specifies the gravity of the foreground drawable |
| 2 | android:measureAllChildren | When measuring, It specifies whether to measure all children or only those that are in visible or invisible state |
Some of the popular attributes of android datePicker inherited from ViewGroup are –
| Sr. | XML Attributes | Description |
|---|---|---|
| 1 | android:animationCache | Specifies whether layout animations should create a drawing cache for their children |
| 2 | android:layoutAnimation | Specifies the layout animation to use the first time the ViewGroup is laid out |
| 3 | android:layoutMode | Specifies the layout mode |
Some of the popular attributes of datePicker inherited from View are –
| Sr. | XML Attributes | Description |
|---|---|---|
| 1 | android:fadeScrollbars | Specifies whether scrollbar should fade out when not in use or not |
| 2 | android:fitsSystemWindows | Specifies whether to adjust view layout according to system windows |
| 3 | android:id | Specifies id of the view |
| 4 | android:minHeight | Specifies minimum height |
| 5 | android:minWidth | Specifies minimum width |
| 6 | android:padding | Specifies padding of the view |
| 7 | android:visibility | Specifies visibility of the view |
We have seen different attributes of DatePicker and how to use it. If you wish to visit post to learn more about it
Thus, we have seen what is DatePicker, how can we use android DatePicker using Kotlin ? etc. We also went through different attributes of android DatePicker.
Источник


