- Playing with proxy on Android🛡
- How to inspect all HTTP & HTTPS requests from any app?
- 1. Proxy Installation
- 2. Device Configuration
- 3. HTTPS Reading
- Remote debug Android devices
- # Step 1: Discover your Android device
- # Troubleshooting: DevTools is not detecting the Android device
- # Step 2: Debug content on your Android device from your development machine
- # More actions: pause, focus, reload, or close a tab
- # Inspect elements
- # Screencast your Android screen to your development machine
- How to debug Android Chrome from Windows, Linux, or Mac
- How to debug Android Chrome
- Setting up
- Phone settings
- Computer setup (using Android USB debugging)
- Driver installation
- Install Android Debug Bridge (ADB)
- Making the connection
- Debug websites running in Chrome on your device
- Debugging tips
- Conclusion
- More on debugging Android
- Performance Matters
- Further Reading
Playing with proxy on Android🛡
How to inspect all HTTP & HTTPS requests from any app?


When you’re developing an Android app, it’s sometimes necessary to exactly debugging what’s going on behind the scenes, especially for network requests (HTTP & HTTPS).
Some powerful debugging tools already exist and they do amazing work, like Stetho, Retrofit’s Interceptors, or Android Studio Network Profiler. Also, they can be added/configured to your project pretty easily 👌.
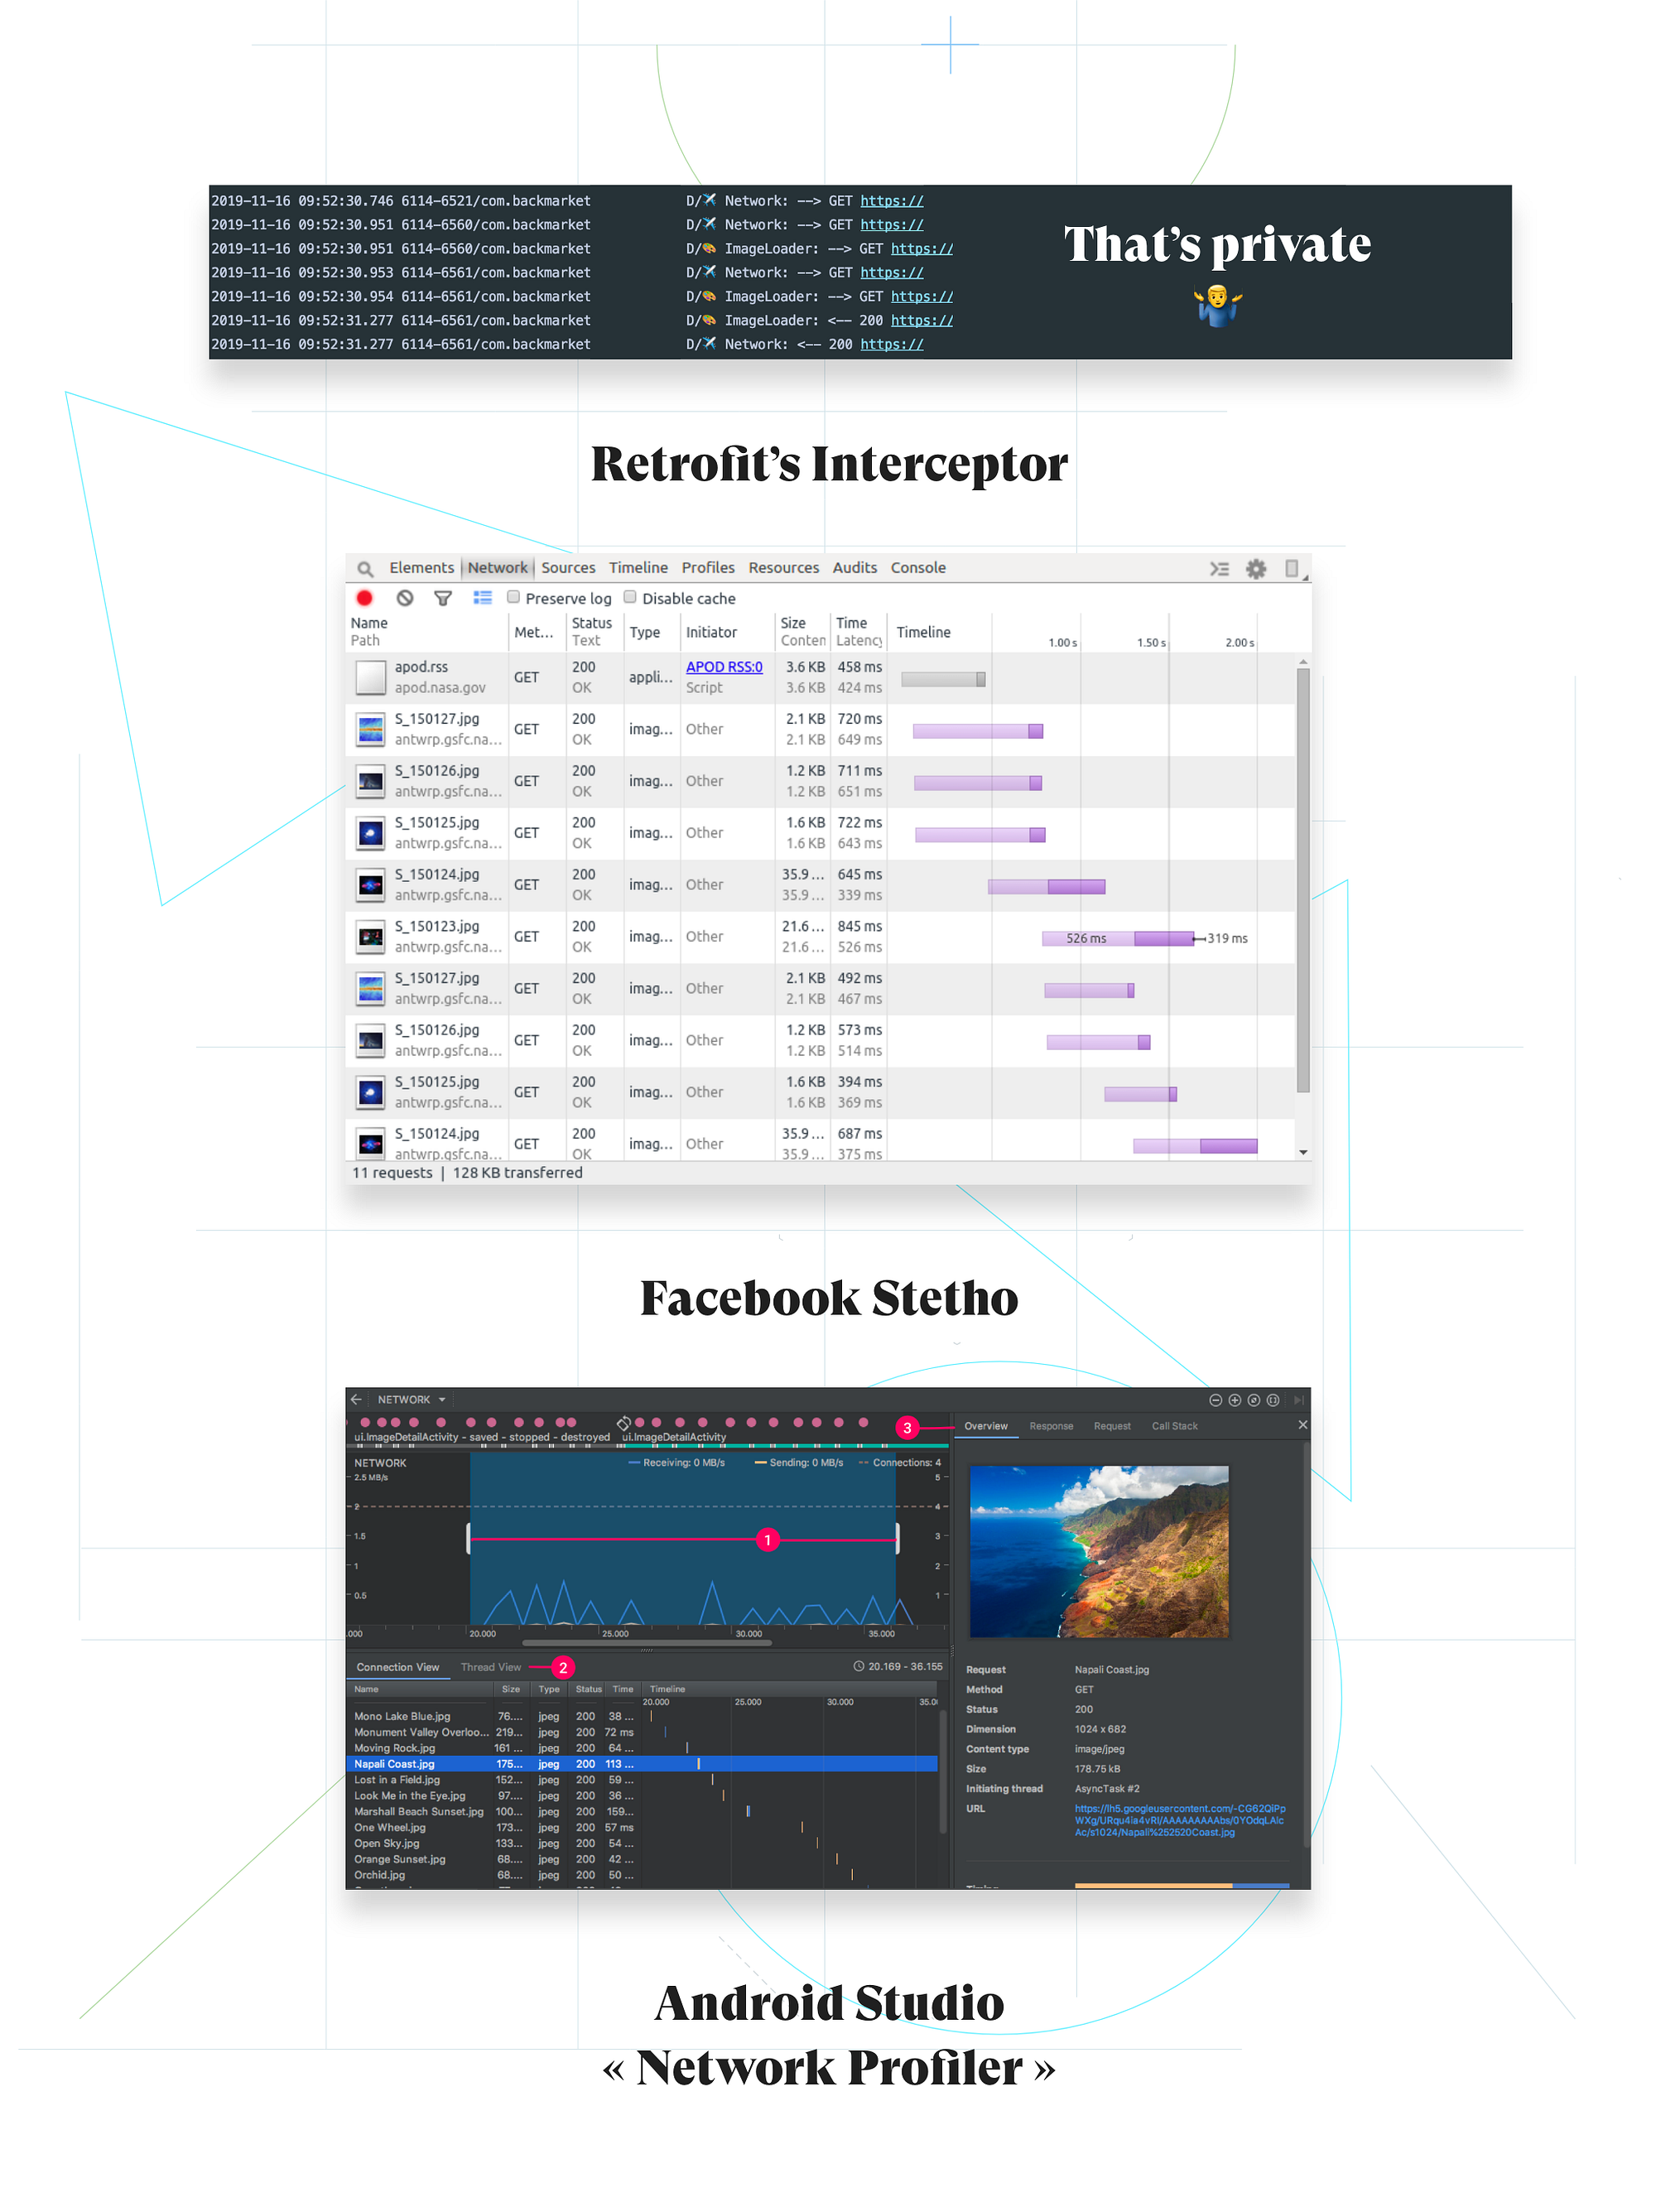
What if you want to inspect or debug other network requests, requests sent not directly by your app, but from an SDK you have been installed (Google Analytics, Facebook Ads, etc…)? 🧐
1. Proxy Installation
For our need, I choose to use mitmproxy (but others exists, like Charles for example). Installation steps can be found here.
If you have a Mac, you’ll just have to install it with brew…
$ brew install mitmproxy
…and launch the proxy with:

2. Device Configuration
Then, find out what is the local IP address of your computer (because the proxy is running on it). I used ifconfig to get it on my Mac:

Finally, tell your device which proxy to use. With an AVD emulator, this is actually pretty simple:

Now, mitmproxy should be able to intercept and read any HTTP request from your device 👍.

🤓 Sounds cool, but why HTTPS requests are not intercepted?
Actually, they are! But mitmproxy can not read them, because those requests are encrypted (actually that’s all the point of HTTPS!).
3. HTTPS Reading
In order to be able to read those HTTPS requests, we will have to perform a kind of man in the middle attack.
⚠️ Perform this attack only with an application you own. Seriously. ⚠️
Basically, you will have to tell Android that mitmproxy is a trusted certification authority that is able to provide dummy certificates for each of the SSL sites that your device visits. In this way, mitmproxy will be able to decrypt encrypted traffic on the fly 👌.
In order to install the mitmproxy CA certificate, we will need to do some configuration. I choose to show you the way that will work in most cases, without a rooted device.
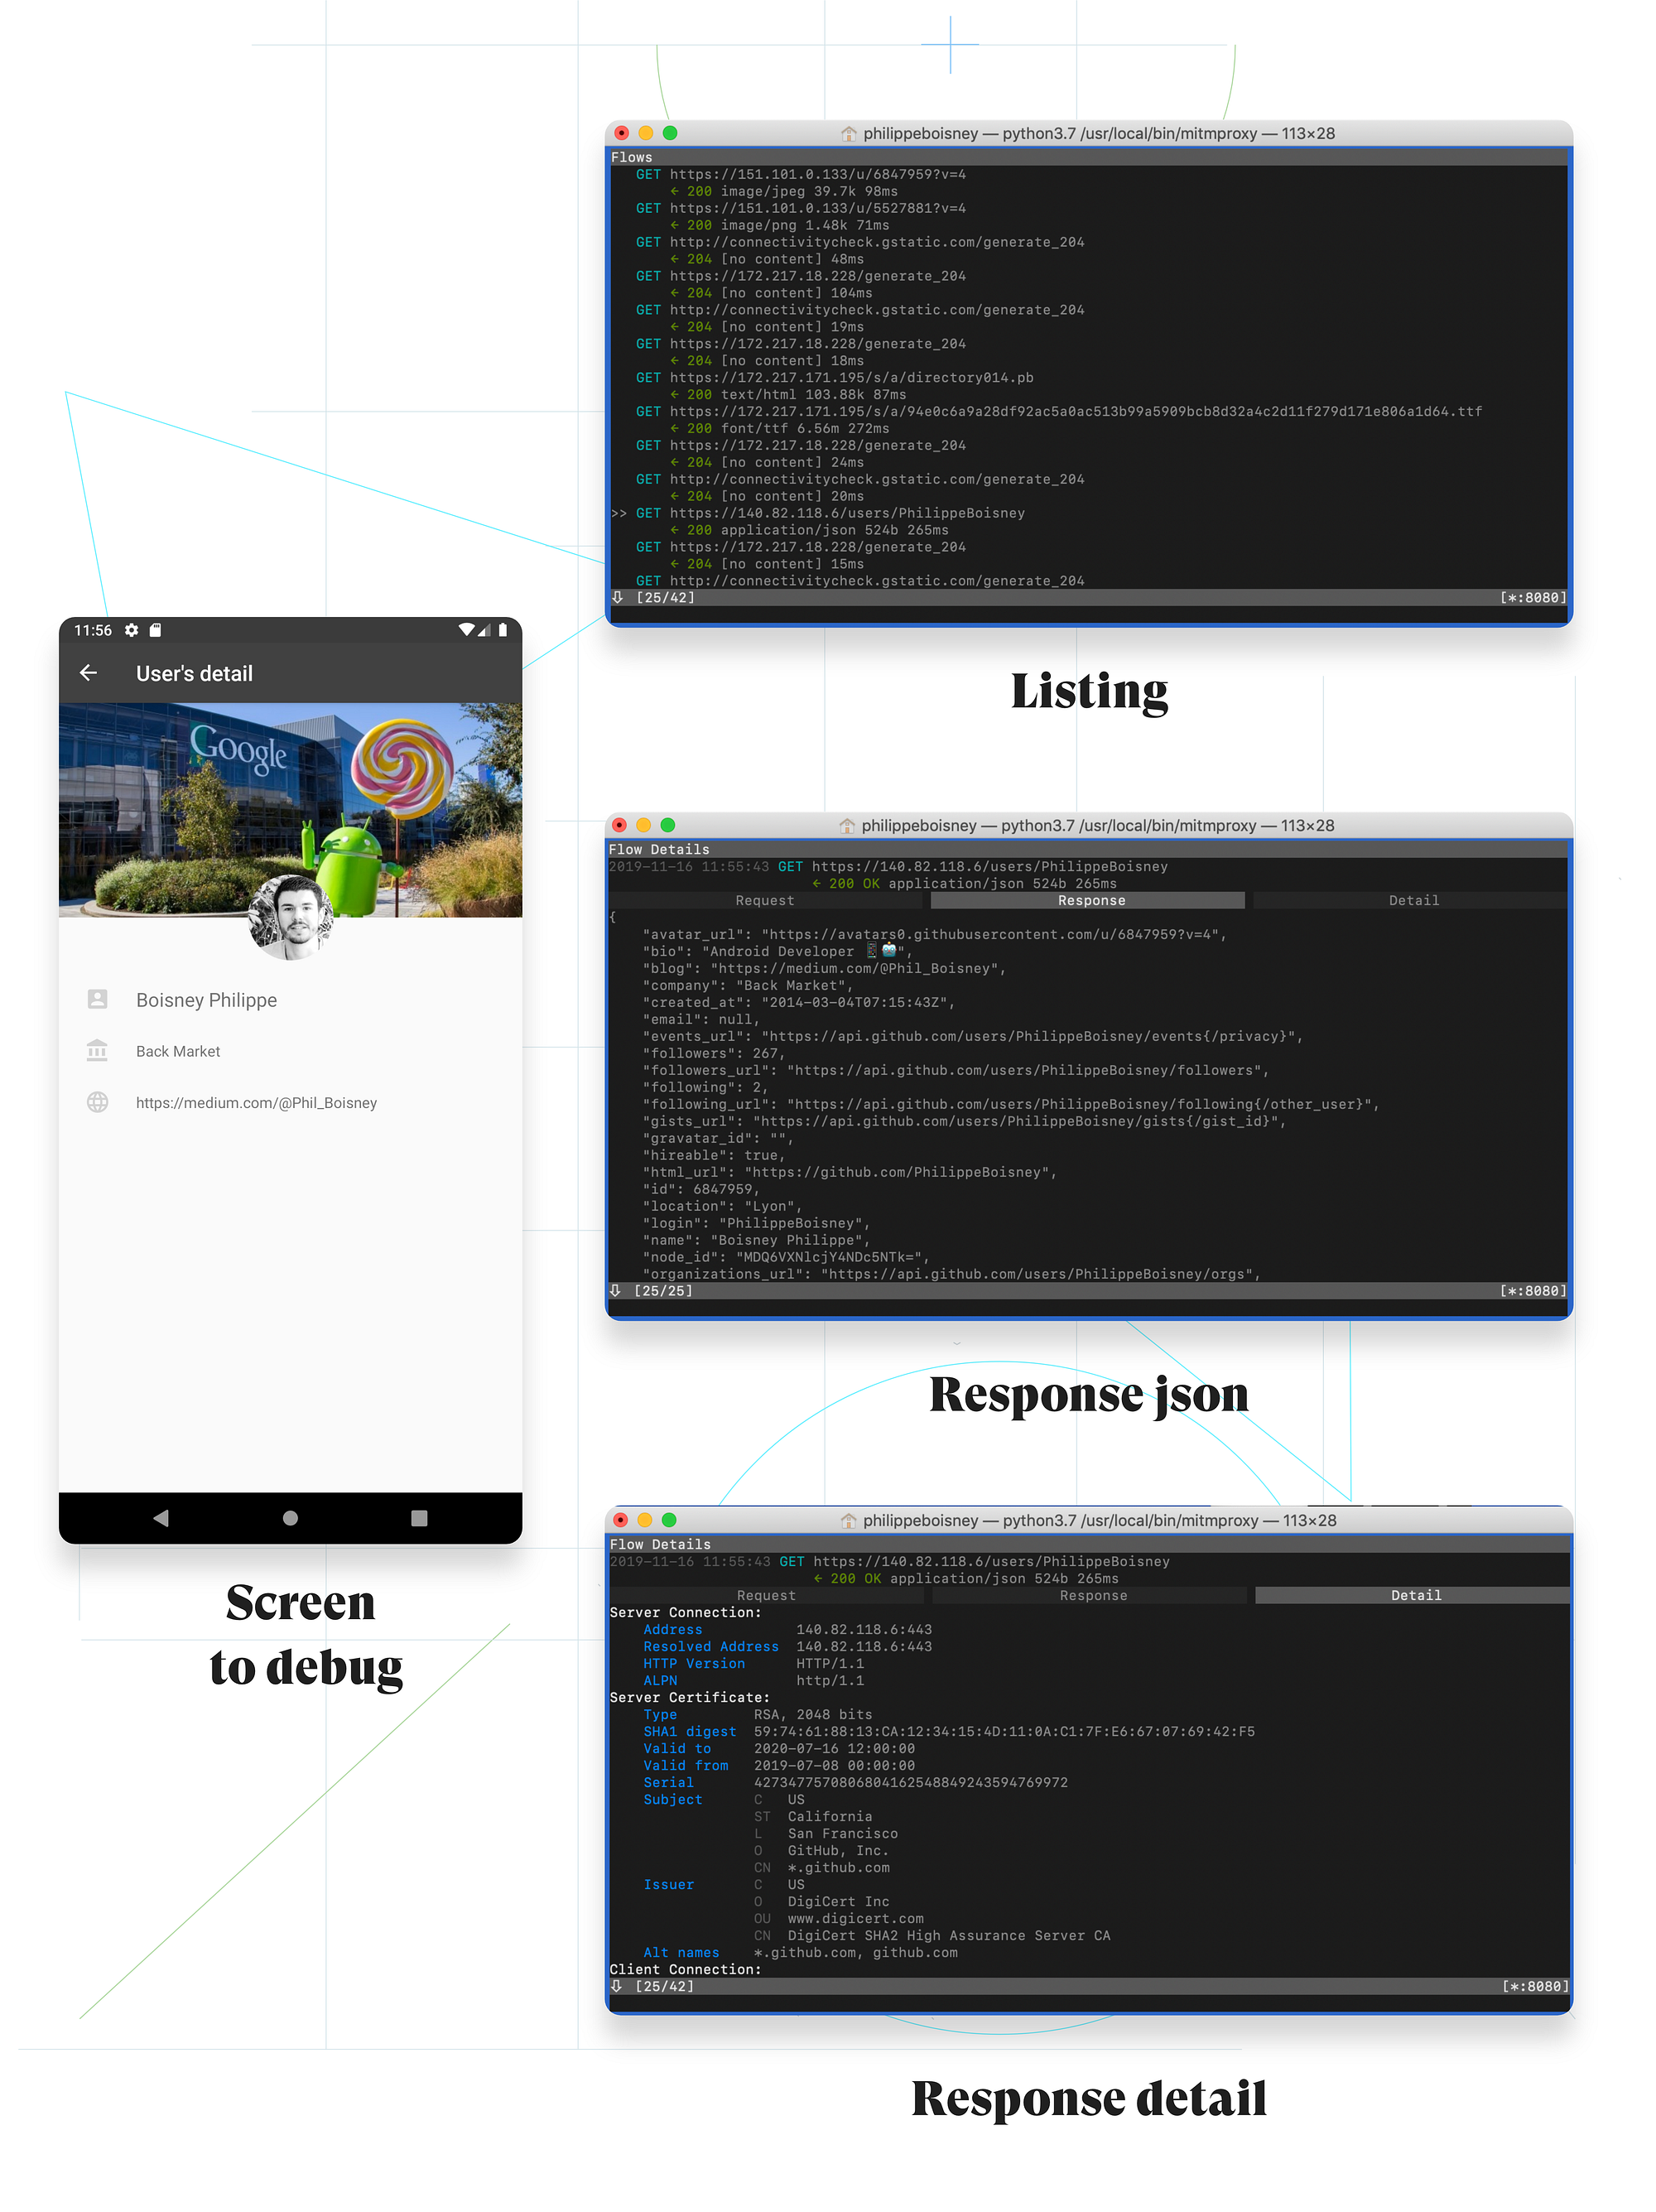
Now, you should be able to decrypt and analyze all the HTTPS requests of your Android applications 🎉 ( except if your application implements Certificate Pinning security).
Here is what it looks like with one of my demo Github project:
As you can see, mitmproxy is a very powerful tool. In this post, I only show you the way to debug HTTP & HTTPS requests but mitmproxy has more useful features that could help you to debug complex scenarios or just secure a bit more your application.
Always use it with caution and on applications you own ⚠️.
If you want to join our Bureau of Technology or any other Back Market department, take a look here, we’re hiring ! 🦄
Источник
Remote debug Android devices
Published on Monday, April 13, 2015

Technically, I’m a writer
Remote debug live content on an Android device from your Windows, Mac, or Linux computer. This tutorial teaches you how to:
- Set up your Android device for remote debugging, and discover it from your development machine.
- Inspect and debug live content on your Android device from your development machine.
- Screencast content from your Android device onto a DevTools instance on your development machine.

Figure 1. Remote Debugging lets you inspect a page running on an Android device from your development machine.
# Step 1: Discover your Android device
The workflow below works for most users. See Troubleshooting: DevTools is not detecting the Android device for more help.
Open the Developer Options screen on your Android. See Configure On-Device Developer Options.
Select Enable USB Debugging.
On your development machine, open Chrome.
Go to chrome://inspect#devices .
Make sure that the Discover USB devices checkbox is enabled.

Figure 2. The Discover USB Devices checkbox is enabled
Connect your Android device directly to your development machine using a USB cable. The first time you do this, you usually see that DevTools has detected an offline device. If you see the model name of your Android device, then DevTools has successfully established the connection to your device. Continue to Step 2.

Figure 3. The Remote Target has successfully detected an offline device that is pending authorization
If your device is showing up as Offline, accept the Allow USB Debugging permission prompt on your Android device.
# Troubleshooting: DevTools is not detecting the Android device
Make sure that your hardware is set up correctly:
- If you’re using a USB hub, try connecting your Android device directly to your development machine instead.
- Try unplugging the USB cable between your Android device and development machine, and then plugging it back in. Do it while your Android and development machine screens are unlocked.
- Make sure that your USB cable works. You should be able to inspect files on your Android device from your development machine.
Make sure that your software is set up correctly:
- If your development machine is running Windows, try manually installing the USB drivers for your Android device. See Install OEM USB Drivers.
- Some combinations of Windows and Android devices (especially Samsung) require extra set up. See Chrome DevTools Devices does not detect device when plugged in.
If you don’t see the Allow USB Debugging prompt on your Android device try:
- Disconnecting and then re-connecting the USB cable while DevTools is in focus on your development machine and your Android homescreen is showing. In other words, sometimes the prompt doesn’t show up when your Android or development machine screens are locked.
- Updating the display settings for your Android device and development machine so that they never go to sleep.
- Setting Android’s USB mode to PTP. See Galaxy S4 does not show Authorize USB debugging dialog box.
- Select Revoke USB Debugging Authorizations from the Developer Options screen on your Android device to reset it to a fresh state.
If you find a solution that is not mentioned in this section or in Chrome DevTools Devices does not detect device when plugged in, please add an answer to that Stack Overflow question, or open an issue in the webfundamentals repository!
# Step 2: Debug content on your Android device from your development machine
Open Chrome on your Android device.
In the chrome://inspect/#devices , you see your Android device’s model name, followed by its serial number. Below that, you can see the version of Chrome that’s running on the device, with the version number in parentheses. Each open Chrome tab gets its own section. You can interact with that tab from this section. If there are any apps using WebView, you see a section for each of those apps, too. In Figure 5 there are no tabs or WebViews open.

Figure 4. A connected remote device
In the Open tab with url text box, enter a URL and then click Open. The page opens in a new tab on your Android device.
Click Inspect next to the URL that you just opened. A new DevTools instance opens. The version of Chrome running on your Android device determines the version of DevTools that opens on your development machine. So, if your Android device is running a very old version of Chrome, the DevTools instance may look very different than what you’re used to.
# More actions: pause, focus, reload, or close a tab
Below the URL you can find a menu to pause, focus, reload or close a tab.

Figure 5. The menu for pausing, reloading, focusing, or closing a tab
# Inspect elements
Go to the Elements panel of your DevTools instance, and hover over an element to highlight it in the viewport of your Android device.
You can also tap an element on your Android device screen to select it in the Elements panel. Click Select Element  on your DevTools instance, and then tap the element on your Android device screen. Note that Select Element is disabled after the first touch, so you need to re-enable it every time you want to use this feature.
# Screencast your Android screen to your development machine
Click Toggle Screencast  to view the content of your Android device in your DevTools instance.
You can interact with the screencast in multiple ways:
- Clicks are translated into taps, firing proper touch events on the device.
- Keystrokes on your computer are sent to the device.
- To simulate a pinch gesture, hold Shift while dragging.
- To scroll, use your trackpad or mouse wheel, or fling with your mouse pointer.
Some notes on screencasts:
- Screencasts only display page content. Transparent portions of the screencast represent device interfaces, such as the Chrome address bar, the Android status bar, or the Android keyboard.
- Screencasts negatively affect frame rates. Disable screencasting while measuring scrolls or animations to get a more accurate picture of your page’s performance.
- If your Android device screen locks, the content of your screencast disappears. Unlock your Android device screen to automatically resume the screencast.
Last updated: Monday, April 13, 2015 • Improve article
Источник
How to debug Android Chrome from Windows, Linux, or Mac
Testing and debugging websites and web apps on mobile devices can be challenging. Browsers on phones and tablets often don’t have built-in debuggers, and emulating mobile devices is never as accurate as you’d like. To debug mobile websites on Android, the desktop version of Chrome provides a solution with remote debugging.
This article will show you how to use remote debugging with Chrome from your computer. You can use one of the common desktop operating systems like Windows, macOS, or Linux.
How to debug Android Chrome
If you think you might have a bug in a mobile website or a native app on Android but can’t quite pin it down, Raygun supports JavaScript crash reporting as well as Android crash reporting. You can take a free 14-day trial here.
Setting up
Before you can do any remote debugging, you need to set up your computer to be able to recognize your Android device. This means to allow Chrome’s debugger to recognize and attach to the phone. You will start by setting some options on the phone.
Phone settings
Open up the Settings app on your phone. You’ll need to enable Developer options if you haven’t already. To do this, go to the “About Phone” menu, which is located inside the System menu on modern Android devices. Once you’re in there, scroll to the bottom and tap on “Build Number” seven times. Now, go back to the previous screen or into the “System” menu in the Settings app. There, you’ll now find a new menu item named “Developer options” near the bottom.
Once you’re inside Developer options, enable them on your phone by clicking the toggle at the top of the page. When the toggle says “On”, scroll down a bit and enable “USB debugging” as well. This will allow you to debug your device via a USB cable connection.

Computer setup (using Android USB debugging)
Driver installation
That’s all we can do on the phone, for now, so let’s get our computer ready. The steps to undertake are slightly different on each of the big operating systems.
If you’re using Windows the first thing you’ll need to do is install the USB drivers for your device. The Android Studio website has a list of places to find the drivers along with some instructions on how to install the drivers on your computer. Some manufacturers provide links to a driver file. Others just lead you to a support website, in which case you’ll need to do a bit of searching to find the drivers for your device.
In case your computer runs macOS or Linux you won’t need to install drivers. Mac users are in fact ready to go. If your machine runs Linux, there are some more setup steps required. You need to make sure your user account belongs to a certain group and you’ll need to install a package with so called “udev rules”. They are configurations that make certain USB devices known to your Linux computer. If you’re interested in more details, I’ve written a dedicated article on the Linux setup for ADB a while ago.
Install Android Debug Bridge (ADB)
Once you’ve got the drivers or udev rules installed, you’ll also need ADB, which provides an interface to talk to your mobile device. ADB and other Android platform tools come with Android Studio, but you can also download them separately.
Either using Android Studio’s embedded Android SDK or the official platform tools package from Google are the preferred ways to go. The platform tools packages are just .zip-files containing a folder platform-tools . After extracting the files you’ll find binaries such as adb.exe (Windows) or adb (macOS and Linux) in there. You can then execute them as necessary from a shell or terminal window of your choice.
If you are on Windows and want the most minimal version of ADB without any fluff, have a look at the XDA Forums; scroll down to Downloads heading and click the first link in that section.
After it’s downloaded, run it to install ADB. Once it’s installed, you’ll need to navigate to the folder where it was installed ( C:\Program Files(x86)\Minimal ADB and Fastboot by default) and double-click cmd-here.exe . This will open a command prompt window in that folder.
Using either of the techniques, in your shell window, type in adb start-server to start the ADB server.
Note: The ADB server will need to be running anytime you wish to debug. If you restart your computer, the server will not be running automatically. It’s not recommended to run ADB as a permanent background service.
The last thing we need to do to set up the computer is to enable remote debugging in the Chrome developer tools. To do this, open up Chrome on your computer and go to the DevTools settings at chrome://inspect/#devices
To debug websites in Android from here, make sure “Discover USB devices” is checked. I’d also suggest to keep this section of the developer tools open in a tab because we’ll need it again soon.

Making the connection
That’s as far as you can get with either device on its own. To debug websites in Android on the device, we’ll need to hook them up together. If you haven’t already, plug your phone into your computer via USB. If you didn’t do this as part of the driver installation, you might see a notification on your taskbar letting you know your computer is setting up your new device. Make sure your phone is on and unlocked. If it is and the ADB server is running, you should see a popup titled “Allow USB debugging?”.

If it doesn’t show up, look in your notification area on your Android device. If it says “Connected as a media device”, something like that, or something about “MTP”, click on it. That should bring you to a screen that allows you to choose a different connection type. For our purpose “Camera (PTP)” is the appropriate connection type. Once you’ve selected PTP, the “Allow USB debugging?” popup should come up.
To avoid having to deal with this popup every time you connect your device, check the “Always allow from this computer” option. Either way, you’ll want to click “OK”, which will let your mobile device be visible to your computer for debugging. At this point, go back to the DevTools tab we looked at earlier. If everything went well, you should see your phone and all its Chrome tabs listed on there now.
Debug websites running in Chrome on your device
Now it’s time to stop getting set up and start debugging! Finally! Chrome on your computer should show you a list of tabs open in the Chrome browser on your remote device. If the tab you want to debug isn’t the active tab, you can click on “focus tab” to make it the active tab on the device. Then click the “inspect” link.
This will bring up the inspector for that tab. From here, you can use Chrome’s developer tools pretty much like you would if you were debugging a web page in your desktop browser. You’re even able to see your device’s screen within the developer tools. If it isn’t already showing, or if you’d like to toggle it off, click the icon right next to the inspector icon in the top left corner of the developer tools.

Debugging tips
You can also control your device from your developer tools. Use your mouse cursor on the screen cast as if your cursor was a finger on the device itself.
- Click to tap
- Click and drag to swipe
- Use your scroll wheel to scroll
- Hold Shift while dragging up to zoom in
- Hold Shift while dragging down to zoom out
You may notice that there are some transparent spots in the screen cast. These are UI elements from the Chrome app or from your device’s system UI. They are hidden because the remote debugging protocol only allows you to interact with the web page itself.
On older and less powerful devices the screen cast uses a lot of your mobile device’s processing power. You might notice the performance seems slow while you are screen casting. Thus, if you’re trying to measure performance, disable the screen cast and interact directly with the mobile device.
Finally, if you run into issues where nothing happens when you interact with your device, try closing the Chrome app and reopening it. You’ll need to re-connect to the remote device via the DevTools screen in the developer tools. If that doesn’t help, go through this quick checklist:
- Unplug the device and plug it back in
- Lock your phone and wake it back up
- Close the developer tools window and reopen it again.
Conclusion
Debugging mobile websites in Android Chrome doesn’t have to be difficult. It may take a bit more setup than most of us would like. But, once that’s taken care of, debugging a mobile web page on the device becomes much simpler. You can now debug Android mobile websites on a real physical device.
Did you spend too much time discovering your bug in the first place? Raygun helps you detect, diagnose, and destroy errors in your JavaScript or Android code. Smart alerts and error grouping means you never miss a bug in your app again. Read more about Android crash reporting and JavaScript crash reporting.
More on debugging Android
Performance Matters
The best software performance articles from around the web delivered to your inbox each week.
Your information is safe with us. Read our privacy policy.
Further Reading

Debug JavaScript in Google Chrome’s Dev Tools in 7 easy steps

Announcing: Code-level insights with Azure Repos

Alerting has landed: Never miss another mission-critical issue again
Time is of the essence when identifying and resolving issues in your software. The longer it takes …
Источник


