- Creating Custom Views in Android
- Defining Important Terms
- What is Android View?
- What is a ViewGroup?
- What is a Custom View?
- Implementation Methods
- How Android Draws Views
- The Measuring & Layout Stage
- Drawing Stage
- Creating a Custom View
- The Pros & Cons of Implementing Custom Views
- The Pros
- The Cons
- Final Words
- Creating custom and compound views in Android — Tutorial
- 1. Custom Views
- 1.1. Default views
- 1.2. How Android draws the view hierarchy
- 1.3. Using new views in layout files
- 1.4. Create screenshots of views
- 2. Compound Views
- 3. Creating custom views
- 3.1. Creating custom views
- 3.2. Measurement
- 3.3. Defining custom layout managers
- 4. Life cycle of a Andoid view
- 4.1. Life cycle events related to the window
- 4.2. Traversal life cycle events
- 4.3. Activity life cycle
- 5. Define additional attributes for your custom Views
Creating Custom Views in Android
The Android platform offers a large range of user interface widgets that are sufficient for the needs of most applications. These widgets are great and certainly provide us with functional and appealing end products, but sometimes us software developers like to think outside of the box and develop our own custom interfaces. What is the best way to approach this type of creativity? By building a custom View!
Defining Important Terms
To begin, we’ll define some basic terminology for a better understanding.
What is Android View?
Android View is the base class for building a user interface giving developers the opportunity to create complex designs. The View occupies a rectangular area on the screen, where it’s responsible for measuring, laying out and drawing itself along with its child elements. In addition, a View handles all user event inputs.
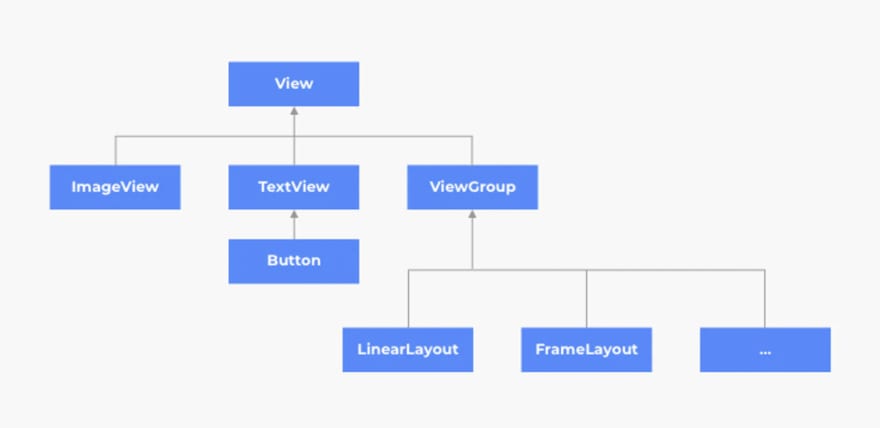
What is a ViewGroup?
A ViewGroup is a special view that is able to contain other Views (children) and define its own layout properties. It is also a place where each subview can draw itself.
What is a Custom View?
Any View created outside of the Android base widget set can be referred to as a Custom View. This will be the main focus of the blog post.
Implementation Methods
There are a lot of different ways to implement custom Views and the approach that is chosen depends on your needs. Let’s check out some methods:
Extending the existing Android widget — This method is useful when a large amount of setup code is required for your View and you want to reuse it in multiple locations. To avoid all of the messy code inside of your activity/fragments, you can extend the base widget and do all of the setup inside the constructor, therefore, it can be easily reused. This method is arguably the simplest approach to implementing custom Views.
Extending the Android base View — If you want to get innovative and do everything from scratch, this method is ideal. You will be drawing, measuring and planning all of the behaviour logic on your own.
Grouping existing Views together — Sometimes you have a set of widgets that you want to group together to create a whole new View. For instance, you have the Textview and the Button and you want to group them inside the LinearLayout. This is usually referred to as the Compound View. The benefits of doing this are:
An encapsulated and centralized logic
Ability to avoid code duplication
Reusability and modularity
How Android Draws Views
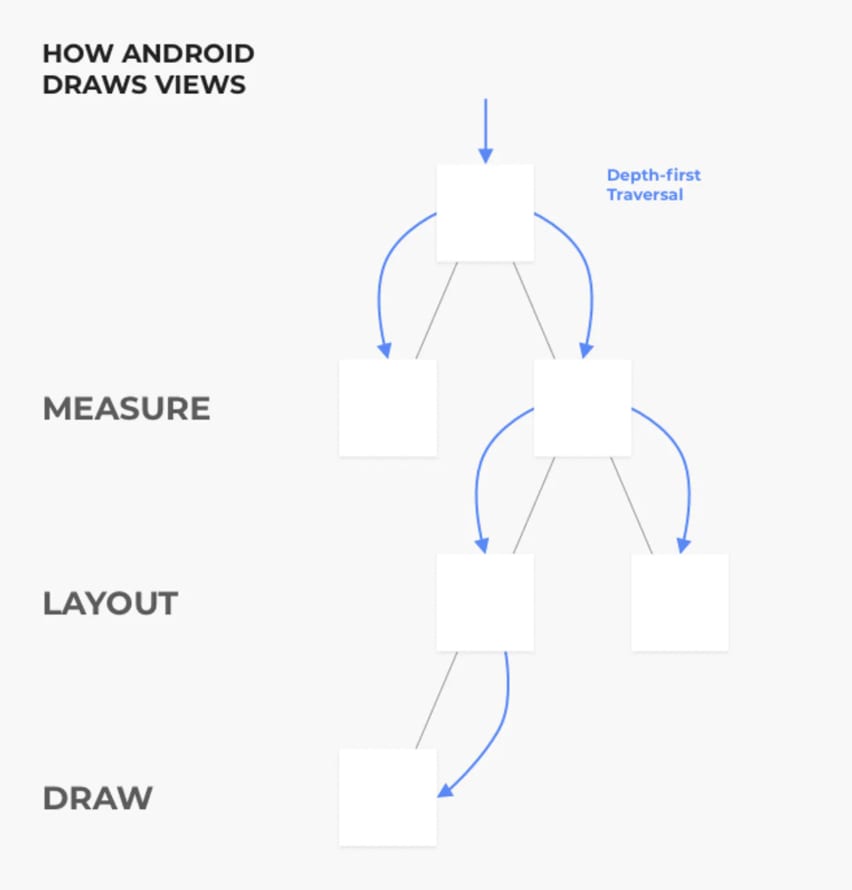
Let’s talk about how Android draws the Views. To begin, there are three phases that have to happen before the View ends up on the screen. These three phases are measure, layout, and draw. Each of these phases is the depth-first traversal of the View hierarchy going from parent to children. For each phase, there is a method that we can override and change, depending on our needs. The methods are onMeasure(), onLayout() and onDraw().
This process can be divided into two stages:
- The Measuring & Layout Stage
- The Drawing stage
The Measuring & Layout Stage
In this stage, we have the opportunity to tell the Android system the size we’d like our custom View to be, depending on the constraints provided by the parent.
The following numbered diagram displays how each View is measured by showing each step:
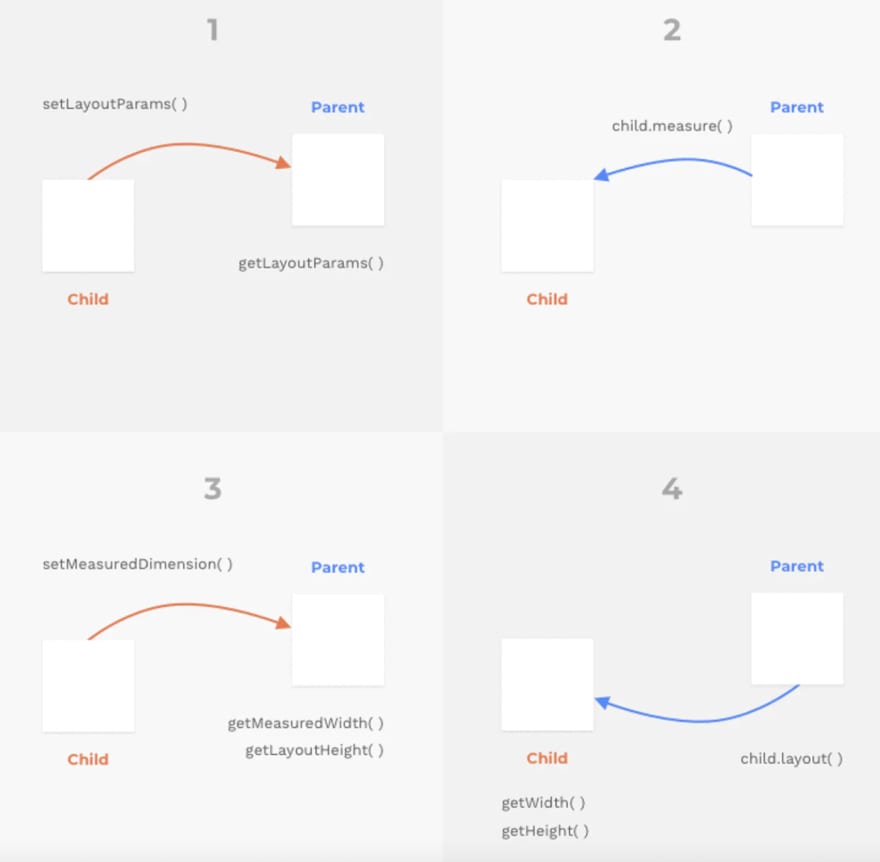
- The child View defines the LayoutParams programmatically or in the XML and the parent retrieves these values using the getLayoutParams().
- The parent calculates the MeasureSpecs and passes it down using the child.measure(). The Measurespecs contain the mode and the value. The three modes of measurement are: EXACTLY
- A precise size such as setting the width/height to 50dp or match_parent. AT_MOST
- The parent gives maximum size and the child adapts to it. This is the case for setting the width/height to the wrap_content. UNSPECIFIED
- There is no clear size, the child is free to play.
- The onMeasure() method is called with the MeasureSpecs parameters. In this method, the View calculates its desired width/height and sets it using the setMeasuredDimension. Keep in mind that the setMeasuredDimension method must be called inside measure otherwise it will cause a runtime exception.
- The next and final phase is the layout phase. In this phase, the parent calls the child.layout() and sets the final size and position of the child. When implementing your custom View, you should only override the onLayout() method if your View has other subviews.
To conclude, the measuring process is like a negotiation between a parent and child. The child calculates its desired width & height, but the parent is the one who makes the final call setting the position and size of its child.

Drawing Stage
The last and most important step in drawing a custom View is to override the onDraw() method. The Canvas is a base class that defines many methods for drawing text, bitmaps, lines and other graphic primitives.
Each parent will draw itself and then will request that each child do the same. An interesting side effect is when the parent draws itself first and it ends up on the bottom as its children are drawn on the top covering it.
Creating a Custom View

Now for the part that we’ve all been waiting for: the code. Let’s take a look at how to create a custom View using Kotlin. For this demonstration, we’ll be creating a Battery Meter to show the current status of a battery. The following diagram displays the three different statuses of a battery:

We can follow these steps in order to create a BatteryMeterView:
Create a new Android Studio project and add a new class called the BatteryMeterView.
Extend it with the View class and add constructors matching super.
Exit fullscreen mode
To prepare our drawing, we will declare some paint objects, colours and shapes.
Just like a basic widget, we want our View to have as little setup needed to initialize all of the properties with some default value.
Let’s create a companion object inside BatteryMeterView and add some constants to it.
Exit fullscreen mode
Before drawing the battery on the screen, we have to update its size and position. The best place to handle any size changes is inside the onSizeChanged method. We can follow these steps:
- Set the width and height of the content.
- Set the text size of battery value to half of the content height.
- Set the width of the battery head to 1/12 of the total width.
- Set the background rect position.
- Set the battery head rect position
- Set the battery level rect position.
Note: For the purpose of this example, we will use some hardcoded values for the padding and content offset.
Exit fullscreen mode
Now to draw the BatteryMeter we’ll start by overriding the onDraw() method.
- Draw the background of the View.
- Draw the battery head.
- Draw the container where our battery level will be placed.
Now if the battery is charging, we will draw a charging logo, otherwise, we will draw the text of the current battery value.
Keep in mind that the onDraw method is called 60 times per second (60fps) and putting any heavy operations and object creation inside it can cause bad performance in your app. To avoid this, we can create all of the objects inside constructors and if needed we can change the properties later on.
Exit fullscreen mode
Now to give our battery the ability to change at runtime we need to call the invalidate() method every time we update the View state. What invalidate does is it lets Android know that the view is dirty and that it needs to be redrawn. It is important to note that you need to be careful since calling the invalidate() too many times can cause problems.
Exit fullscreen mode
The final step is to add the battery View to your layout like this:
Exit fullscreen mode
All done. There you have it, a Battery Meter that you’ve created yourself.
For the project source code, you can check out my Github.
Now that we’ve walked through creating the Battery Meter, I encourage you to try creating your own custom View. It will definitely be fun!
The Pros & Cons of Implementing Custom Views
Before concluding, I’d like to share both the pros and cons of implementing custom Views. Just like any other implementation process, there are always both pros and cons but this shouldn’t discourage you from giving it a try.
The Pros
Custom view = Customization. The Android platform is vast but there are specific scenarios where the features or Views of Android don’t meet your needs, therefore, Custom View gives you the opportunity to build something of your own. When it comes to design and interaction, you have complete control since custom View provides endless options.
When developing large scale applications, code reusability is always welcome. Once you create a custom View, it can easily be reused in multiple locations across the application.
In specific scenarios, building custom view can squeeze some performance.
The Cons
Custom views are time-consuming and they can definitely be difficult to use until you get the hang of them.
There are a number of things you need to be aware of when implementing custom Views. Firstly, you have to ensure that you handle the font, text size, colour, shadows, highlight and style properly.
You also need to make sure that it works properly on all screen densities because Android canvas class draws in pixels not DP. Lastly, if you’re working with images, you’ll have to keep in mind the aspect ratio, zoom, scaling, etc.
You’ll also have to handle all kinds of click listeners and user interactions — single click, double click, long press, swipe and fling.
Final Words
I hope this tutorial has encouraged you to get creative with Android and make your own custom UI. If you have any questions or would like to discuss this topic, I’d be happy to do so.
Источник
Creating custom and compound views in Android — Tutorial
This tutorials describes how to create custom and combound views with Android.
1. Custom Views
1.1. Default views
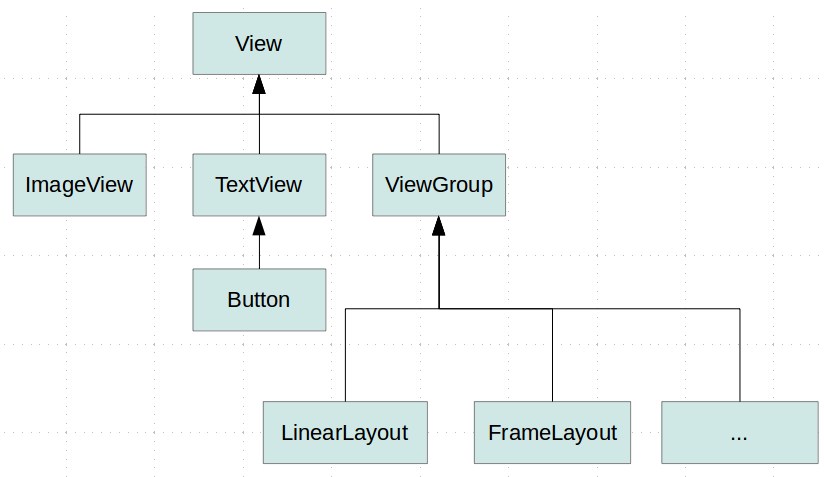
The Android framework provides several default views. The base class a view is the View . Views are responsible for measuring, layouting and drawing themselves and their child elements (in case of a ViewGroup ). Views are also responsible for saving their UI state and handling touch events. Developers can also create custom views and use them in their application.
It is possible to create custom views by:
Compound views — combining views with a default wiring
Custom views — creating your own views
by extending an existing view, e.g. Button
by extending the View class
The following image shows the default view hierarchy of Android.
View are typically created to provide a user interface experience with is not possible with the default views. Using custom view allows the developer allow to do certain performance optimization, i.e., in case of a custom layout the development can optimize the layout manager for his use case.
1.2. How Android draws the view hierarchy
Once an activity receives the focus, it must provide the root node of its layout hierarchy to the Android system. Afterwards the Android system starts the drawing procedure.
Drawing begins with the root node of the layout. The layout hierarchy is traversed in the order of declaration, i.e., parents are drawn before their children and children are drawn in the order of declaration.
Drawing the layout is a two pass process:
measuring pass — implemented in the`measure(int, int)` method. This happens as a top-down traversal of the view hierarchy. Every view stores its measurements.
layout pass — implemented in the layout(int, int, int, int) method. This is also a top-down traversal of the view hierarchy. During this phase each layout manager is responsible for positioning all of its children. It uses the sizes computed in the measure pass.
| The measure and layout step always happen together. |
Layout managers can run the measure pass several times. For example, LinearLayout supports the weight attribute which distributes the remaining empty space among views and RelativeLayout measures child views several times to solve constraints given in the layout file.
A view or activity can trigger the measure and layout pass with a call to the requestLayout() method.
After the measure and layout calculation, the views draw themselves. This operation can be triggered with the invalidate() method from the View class.
For a detailed introduction into the deeper layer of Android see http://source.android.com/devices/graphics/architecture.html.
1.3. Using new views in layout files
Custom and compound views can be used in layout files. For this you need to use the full qualified name in the layout file, e.g. using the package and class name.
Alternatively you can also declare you name space in the layout file, similar to the Android name space.
1.4. Create screenshots of views
Every View class support the creating of an image of its current display. The following coding shows an example for that.
2. Compound Views
Compound views (also known as Compound Components ) are pre-configured ViewGroups based on existing views with some predefined view interaction.
Combound views also allow you to add custom API to update and query the state of the combound view.
For such a control you define a layout file and assign it to your compound view. In the implementation of your compound view you predefine the view interaction. You would define a layout file and extend the corresponding ViewGroup class. In this class you inflate the layout file and implement the View connection logic
For performance reasons you may want to rewrite your combound view to a custom view which extends View . This may you can typically flatten your view hierarchy. Drawing the view requires in this case less traversals and this can be significantly faster if implemented correctly.
3. Creating custom views
3.1. Creating custom views
By extending the View class or one of its subclasses you can create your custom view.
For drawing view use the onDraw() method. In this method you receive a Canvas object which allows you to perform drawing operations on it, e.g. draw lines, circle, text or bitmaps. If the view should be re-drawn you call the invalidate() method which triggers a call to the onDraw() method of this view.
If you define own views, ensure you review the ViewConfiguration class, as it contains several constants for defining views.
To draw your Views you typically use the 2D Canvas API.
3.2. Measurement
The layout manager calls the onMeasure() method of the view. The view receives the layout parameter from the layout manager. A layout manager is responsible to determine the size of all its children.
The view must call the setMeasuredDimenstion(int, int) method with the result.
3.3. Defining custom layout managers
You can implement your custom layout manager by extending the ViewGroup class. This allows you to implement more efficient layout managers or to implement effects which are currently missing in the Android platform.
A custom layout manager can override the onMeasure() and onLayout() method and specialize the calculation of its children. For example it can leave out the time consuming support of layout_weight of the LinearLayout class.
To calculate the size of the child you can use the measureChildWithMargins() method of the ViewGroup class.
It is good practice to store any additional layout parameters in an inner class of your ViewGroup implementation. For example ViewGroup.LayoutParams ` implements command layout parameters, and `LinearLayout.LayoutParams implements additional parameters specific to LinearLayout, as for example the layout_weight parameter.
4. Life cycle of a Andoid view
4.1. Life cycle events related to the window
A view is displayed if it is attached to a layout hierarchy which is attached to a window. A view has several life cycle hooks.
The onAttachedToWindow() is called once the window is available.
The onDetachedFromWindow() is used when the view is removed from its parent (and if the parent is attached to a window). This happens for example if the activity is recycled (e.g. via the finished() method call) or if the view is recycled.
The onDetachedFromWindow() method can be used to stop animations and to clean up resources used by the view.
4.2. Traversal life cycle events
Traversals life cycle events consists of Animate, Measure, Layout and Draw.

All views must know how to measure and layout themselves. The requestLayout() method call tells the view to measure and layout itself. As this operation may influence the layout of other views it calls also requestLayout() of its parent.
This recursive call is the reason why you should not nestle layout to deeply. The measure and layout operation might be expensive if a lot of hierarchies are re-calculated.
The onMeasure() method determines the size for the view and its children. It must set the dimension via the setMeasuredDimension() method in this method call before returning.
The onLayout() positions the views based on the result of the onMeasure() method call. This call happens typically once, while onMeasure() can happen more than once.
4.3. Activity life cycle
Views don’t have access to the life cycle events of the activities. If views want to get informed about these events, you should create an interface in the view which you call in the life cycle methods of the activity.
5. Define additional attributes for your custom Views
You can define additional attributes for your compound or custom views. To define additional attributes create an attrs.xml file in your res/values folder. The following shows an example of attributes defined for a new view called ColorOptionsView .
To use these attributes in your layout file you have to declare them in the XML header. In the following listing this is done via the xmlns:custom part of the code. These attributes are also assigned to the view.
The following example shows how you components can access these attributes.
Источник


