- The Easiest Tutorial to Delete Folder on Android
- Part 1. How to Delete Folder on Android With Ease
- Part 2. The Best Solution to Restore Lost Folder on Android
- dr.fone — Data Recovery (Android)
- Android Trash: How to Empty Trash and Remove Junk Files on Android
- Do you want to free up space on Android and make your phone faster than before? Read this guide on Android trash and remove junk files from your phone in few steps.
- Some Basic Information About Recycle Bin/Trash in Andriod
- 1. Is There A Recycle Bin/Trash on Android?
- 2. How to Access Trash on Android?
- 1. Google Photos
- 2. Gmail
- 3. Dropbox
- 4. Recycle Bin App
- 8 Methods to Remove Junk Files on Android for More Storage
- 1. Clear Cached Data
- Clear Cache for an App
- Clear All Cache Data
- 2. Delete Downloaded Files
- 3. Delete Duplicate Photos
- 4. Manage Downloaded Music
- 5. Unload the Least-Used Apps
- 6. Use Smart Storage
- 7. Use an SD Card
- 8. Backup Files to Another Location
- How to Recover Deleted Files from Android SD Card?
- Recoverit — The Best Word File Recovery Software
- Step1. Select the Location
- Step 2. Scan the Location
- Step 3. Preview and Recover Files
- Video Tutorial on Android Phone Files Recovery/Repair
The Easiest Tutorial to Delete Folder on Android
This tutorial will help you to quick delete folder on Android without risk.
• Filed to: Android Recovery • Proven solutions
Folders are very important for storing personal data in an android device like Whatsapp, photos, videos and documents. Folders can eat up a lot of space more so when they are used for storing very heavy data. In other times, some folders are created but never used to store data thus remain idle. Such folders should only be deleted to free up space so as to accommodate the crucial data that you want to store.
With more space, you will have your device working at increased speeds and you will not have problems storing your data. This article is going to teach you how to delete folder on Android. Let’s get started!
Part 1. How to Delete Folder on Android With Ease
Unlike with the older versions, it is possible today to delete folders from android devices very easily. This is a major breakthrough for the android because it can now offer users more options apart from creating and moving folders. Before deciding to delete, it’s important to note that the folder will go with all its contents. Therefore, choosing to delete should be an alternative only when you are not going to use the content in the folder.
Note: Before delete any files on Android, you’d better to make a full backup of Android device to avoid mistakenly deletion.
Step 1. Launch your android device and go to the «File Manager» or «My Files» where you can access all the folders you have created «Internal Storage» or «SD Memory Card».
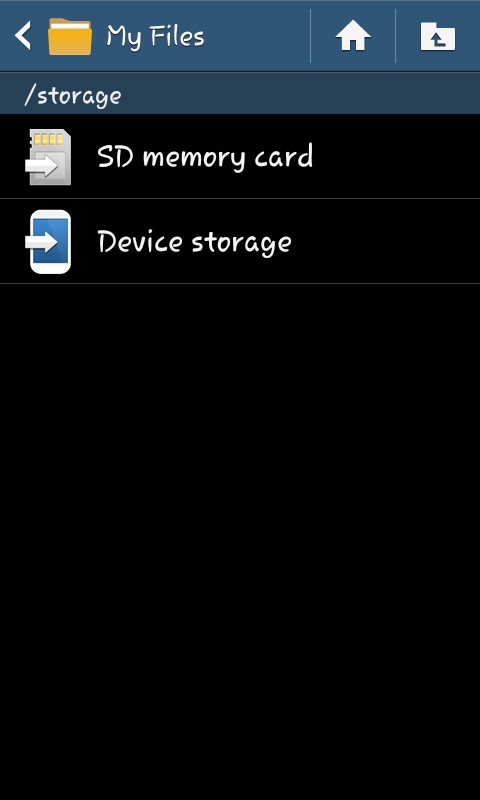
Step 2. From the many choices, you can select one or multiple folder that you will be deleting. Once selected you need to tap on «Delete» button on the top right side on your phone screen.
Step 3. When you finish deleting the folders you can then click on the «home» button to exit.
Now that you have deleted the unnecessary folders and left with the important ones, it will be time to organize them properly for better use. You can organize the folders as per color, workflow, category and any other way as long as it does not make your use of the android device hectic.
Before you delete any app from your android device, it’s good that you do some research to know their uses. Some of the apps you will be deleting might be the main support point for the operation of your device and deleting them will kill your device. Make sure you don’t delete an app then make your android device useless. Furthermore, some of the pre-loaded apps are equally difficult to delete and it will be good you know about that well in advance.
When you delete folder on Android mobile phone, you might realize that the folder you have deleted was not meant to be deleted long after the damage is done. Does it mean you have kissed goodbye to your folder and its content completely? Many people think so but it’s not that way. There is a way you can reverse that process to recover your lost folder in its original state. You need to install a reputable software program for data recovery and you will have your folder back with all its data intact. Do not gamble with that but be precise in your decisions.
Part 2. The Best Solution to Restore Lost Folder on Android
Have you been looking for a software program to use with your PC for data recovery? Well, dr.fone — Data Recovery (Android) fits into that. Having it will ensure your data will not be lost permanently whenever you lose it accidentally. It will recover your data regardless of the way in which you lost it and that is how dr.fone — Data Recovery (Android) stands out from the rest in the market. The program comes in both paid and free versions so it will be upon you to choose that which will be well suited for your data recovery.
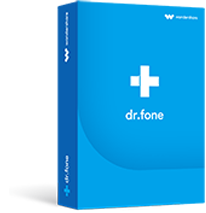
dr.fone — Data Recovery (Android)
Key features of dr.fone — Data Recovery (Android)
- It can help you recover data files including photo, videos, files, music, contacts, messages, etc.
- It has a friendly user interface. It supports more than 6000 Android devices.
- The working speed of dr.fone — Android Data Recovery is very high to make data recovery efficient.
- There are no risks associated with this program. You will have your personal information well secured all the time.
How to recover desired folder on Android using dr.fone — Data Recovery (Android)
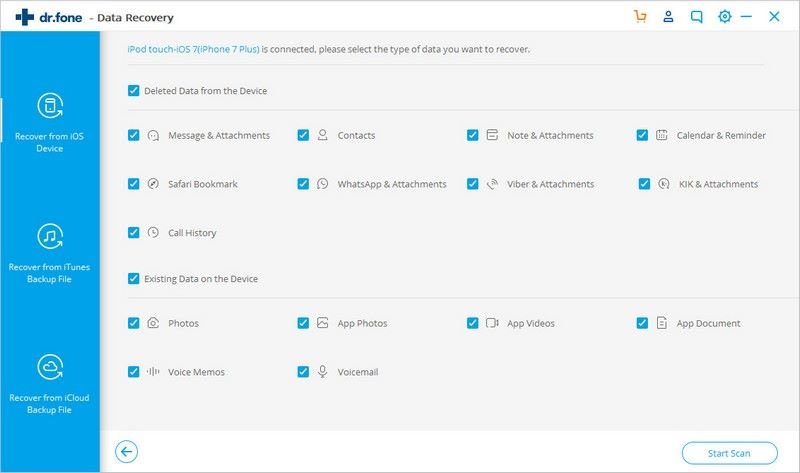
Step 1. Download and install the dr.fone application on your computer. On the homepage of application below, click the «Recover» option. Then, use a workable USB cable to connect your device to the computer.

Step 2. Choose the file types that you need to recover from Android device. Then, tap on «Start» to move ahead.
Step 3. When the process is ended, you can check the scanning results. Lastly, hit «Recover» button that is at bottom right side.
Источник
Android Trash: How to Empty Trash and Remove Junk Files on Android
Do you want to free up space on Android and make your phone faster than before? Read this guide on Android trash and remove junk files from your phone in few steps.

David Darlington
Sep 14, 2021 • Filed to: SD Card Solutions • Proven solutions
This is a query of one of the Android users from our community about the Android trash folder that we have got recently. Though, a lot of other Android users also ask similar questions quite frequently. If you are using your Android phone for a while now, then you might be suffering from the lack of free space on it and could be looking for the Android trash bin. Unlike Windows or Mac, there is no one location in Android to collect all the trash. Therefore, users need to take some extra effort to clear junk files on their phone. In this guide, we will teach you how to access trash on Android and delete miscellaneous files easily.
Video Tutorial on How to Empty Trash on Android Phone to Free Up Storage
Before we go on, you can first watch the video tutorial below. It’s quite easy to get all the specific solutions to free up your Android phone storage. You can explore more from Wondershare Video Community.
Recent Videos from Recoverit
Or if you want more information to free up space on your Android phone, then please read the scripts to find out the details.
Some Basic Information About Recycle Bin/Trash in Andriod
1. Is There A Recycle Bin/Trash on Android?
No – unlike a Windows or Mac system, there is no Recycle Bin or Trash folder in an Android device. This is because most smartphones have a limited storage capacity that might range from as little as 8 GB to 256 GB. Therefore, it isn’t feasible to maintain a dedicated folder just to collect trash from everywhere. Nevertheless, some apps (like Photos) have a separate folder (for Recently Deleted Photos) to store the deleted items for a particular duration.
Therefore, if you wish to remove junk files from Android, then you need to look for unwanted data on different apps and remove them one by one.
![]()
2. How to Access Trash on Android?
As you know, there is not a dedicated trash folder like Recycle Bin in Android for us to delete junk files in one go. Though, if you want, you can visit certain apps and clear junk files associated with them to free up space on Android.
1. Google Photos
Google Photos is a native application developed by Google for Android devices. With it, you can take a backup of your photos and manage them in different ways. When we delete something from Google Photos, it is moved to a Trash folder. If you want to get rid of these deleted pictures, then you need to visit its trash folder in Android.
- Firstly, launch the Google Photos app on your device and visit its options by tapping on the hamburger icon on the top.
- From the list of the available folders, tap on the «Trash» option. This will display all the deleted pictures on Google Photos.
- Select the photos that you wish to get rid of permanently and tap on the trash/delete icon to remove them.
![]()
2. Gmail
Just like Google Photos, Gmail can also accumulate a lot of trash. When we delete an email, it isn’t erased right away. Instead, it is moved to the Trash folder where it stays for the next 30 days. To get more space on your Gmail, you can visit the Trash folder and empty trash emails from there.
- Launch the Gmail application on your phone and tap on the hamburger icon on the top left corner.
- This will display a list of various categories and folders on Gmail. From here, visit the «Trash» folder.
![]()
Now, you can just select the emails that you wish to get rid of and tap on the delete icon on the toolbar.
![]()
Furthermore, you can select all emails from the Trash folder in one to go as well and tap on the «Empty Trash Now» button to delete all the junk files from the trash folder.
![]()
3. Dropbox
Dropbox is a freely available cloud-based app that helps us take a backup of our data and manage it at the same time. Since the free version only supports 2 GB of space, it is recommended to clear junk files on your Android’s Dropbox application every once in a while
- Open the Dropbox application and from its home, visit the Trash folder. Simply tap on the trash icon on the toolbox.
![]()
![]()
4. Recycle Bin App
To help you clear Android trash and delete miscellaneous files from your device, there are tons of third-party apps as well. For instance, the Recycle Bin app will let you access the deleted content on your phone and manage it as well. You can download the Recycle Bin app from right website and follow these steps to access the Android trash folder.
- Install the Recycle Bin app on your Android device and agree to the terms and conditions while granting it the needed permissions.
- Once it is installed, you can access the local file system or the connected SD card. Simply visit any option to explore the storage.
- Here, you can view all the deleted content on your Android trash. Make the needed selections and tap on the trash button to clear junk files.
![]()
8 Methods to Remove Junk Files on Android for More Storage
One of the major reasons for finding the trash folder on the Android phone is to empty it and get more free space on the device. If you also want to free up space on Android as well, then you can consider these expert suggestions too.
1. Clear Cached Data
Cache data consists of intermediate data stored by apps for a faster and more customized experience. While it would enhance your app experience, it might also take a toll on the device storage as well. Thus, you should get rid of your phone’s cache every once in a while to make more available space on its storage.
Clear Cache for an App
To clear the cache data for a specific app, go to your device Settings > Apps and select any app from the list. Visit its storage settings and clear cache data for the particular app. You can follow the same drill to clear cache for other apps as well.
![]()
Clear All Cache Data
If you want, you can clear the entire cache data in one go as well. Simply go to your device’s storage settings and tap on the cache data option. From here, choose the option to clear the entire cache data and confirm your choice.
![]()
2. Delete Downloaded Files
Too many times, we download a lot of content from the web that isn’t needed afterward. Therefore, when you try to remove junk files, consider visiting the Downloads folder on your device as well. Just go to its File Manager and visit the Downloads folder or the Download History. Access the downloaded content here and delete the files you no longer want.
![]()
3. Delete Duplicate Photos
We all use our smartphone cameras to click numerous pictures on the go. Though, sometimes it can accumulate a lot of storage and might take unwanted space on our device. To avoid this, you can try to find duplicate photos and remove the ones you no longer need. If you want, you can do it manually by visiting the Gallery on your phone.
There are also readily available third-party apps that can help you do the same as well. For instance, Duplicate File Fixer is a popular solution that would scan your device storage and look for any duplicate content like photos, videos, files, etc. This will help you get rid of duplicate photos automatically in less time.
![]()
4. Manage Downloaded Music
Music can be the lifeline of your device and chances are that you might have downloaded a lot of songs. If you want to free up space on Android, then consider visiting the Music app on your phone and check your playlist. From here, you can simply erase songs that you no longer want. Also, if you use a music streaming app like Spotify or Google Music, then try not to save songs offline as it would accumulate more space on your device storage.
![]()
5. Unload the Least-Used Apps
Our apps can sometimes accumulate a lot of space on our devices. If you want to get rid of some unwanted data, then delete the apps that you no longer use. There are numerous ways to delete apps on Android. You can do it from your home by long-pressing an app icon and tapping on the delete button. Also, you can visit its Settings > Apps and select the app you wish to delete. As you open the app settings, tap on the «Uninstall» button, and confirm your choice.
![]()
6. Use Smart Storage
Smart Storage is the latest feature that was introduced in Android 8 at first. It helps us get rid of any unwanted and duplicate data from the phone storage that has already been backed up on the cloud. You can just go to your phone’s Settings > Storage and turn on the Smart Storage Manager. It will keep running in the background and would automatically delete miscellaneous files and unwanted content.
![]()
7. Use an SD Card
If the internal storage of your device is limited, then you can consider using an SD card to expand its storage. Since almost all the Android devices have an SD card slot, it makes it easier for us to manage our data. After connecting an SD card, you can simply move your photos, music, videos, contacts, etc. from the phone’s internal storage to the card. Not just that, you can even go to the app settings and move the app data to an SD card as well. This feature is supported by some if not all the apps.
![]()
8. Backup Files to Another Location
Lastly, you can just backup your phone’s data to another safe location and delete it from your device afterward. For instance, you can connect your phone to your computer and use it to perform data transfer. Access its saved content and move it to your system’s storage to take its backup. In the end, you can remove junk files and duplicate content from your phone to free up space on Android.
![]()
How to Recover Deleted Files from Android SD Card?
While managing your Android device storage, chances are that you can end up deleting something unintentionally. In this case, you can take the assistance of the Recoverit Data Recovery tool. A highly advanced tool, it can help you get back the lost, deleted, or inaccessible content from your SD card under different scenarios. This includes the formatting of the SD card, accidental deletion, virus attack, and so on. The application is known for its high data recovery rate and a user-friendly interface.
Recoverit — The Best Word File Recovery Software
- Recover Word documents from all storage devices like Mac.
- Recover 1000+ types and formats of files in different situations.
- Scan and preview the files before you recover them from MacBook hard drive.
Step1. Select the Location
Once the application would detect the connected SD card, it will display a list of the available locations to scan (including your SD card). From here, select your SD card’s location and start the scanning of data.

Step 2. Scan the Location
Recoverit will start an all-around scan. Once it is completed, you will be able to preview some files. During the scanning, you can already make some filterings and selections, including searching for your lost files using the File Path or File Type. You can also pause or stop the scanning process if you find your data at any time.

Step 3. Preview and Recover Files
Once the scan is complete, you can preview the recovered emails one by one. And then, select the desired ones you want to recover, and hit the «Recover» button.

Recoverit provides two different scanning modes – normal and deep. In case if the initial scan is not able to fulfill your needs, then you can perform a deep scan as well. Click on the «All-around Recovery» option to do this. It is a more time-consuming and extensive scan that will certainly help you get back all kinds of data from your SD card.
Video Tutorial on Android Phone Files Recovery/Repair
Recent Videos from Recoverit
I’m sure that the guide would have helped you answer questions like «is there a trash folder on Android» or «how to check trash on Android phone». We have come up with different options to delete Android trash and free up space on Android as well. Feel free to try these techniques to empty trash from your device in seconds. Also, you can share the guide with your friends too to teach them how to find trash on Android phones and clear junk files in no time.
Источник


