- How to Delete Files on Android
- Part 1. The Best Way to Delete Files on Android
- Step 1 Install dr.fone — Data Eraser (Android) on PC
- Step 2 Connect Android to PC
- Step 3 Confirm to Delete Files on Android
- Part 2. Delete Files with Built-in Storage Tool
- Step-by-Step Guide on How to Delete Files on Android:
- Part 3. Delete Files on Android with SD Card
- Step-by-Step Guide on How to Delete Files on Android:
- Part 4. Upload Photos to Dropbox and Delete Them on Android
- Step-by-Step Guide on How to Delete Files on Android:
- Part 5. How to Delete Data from Lost Android Phone
- How to Reset Android Studio?
- Steps to Reset Android Studio
- Как удалить «неудаляемые» приложения со смартфона
- На правах рекламы
How to Delete Files on Android
• Filed to: Erase Android • Proven solutions
Android smartphones and tablets can fill up very fast with the number of apps, media files and cached data in them. What’s more, some of the lower end devices come with just a few GB of storage space. The lesser the space left on your smartphone, the more time you are going to have to spend on micromanaging your storage. If you are constantly running out of space and need help managing it, or meet some emergency like you should send Samsung Note7 back for its battery failure, you could consider that you could try to delete files on Android.
Part 1. The Best Way to Delete Files on Android
dr.fone – Data Eraser (Android) is an easy and convenient way to use Android (including Samsung Galaxy Note7) data eraser which helps wipe out all of your Android phone data and erase backups and deleted data too in order to ensure the data cannot be recovered in any way. This tool has a number of stylish and incredible features which don’t just make everything easier but also help improve the performance of your smart phone.
Key Features of dr.fone — Data Eraser (Android):
- Powerful scanning ability.
- Removes all of the unnecessary junk files and background processes for Android users.
- Erases your device completely.
- Erases backup and deleted data completely as well.
- Frees space up and speeds your smart phone up.
Step-By-Step Guide on How to Dlete Files on Android
Step 1 Install dr.fone — Data Eraser (Android) on PC
Download the software and install it on your PC. After you complete the install, launch the application.
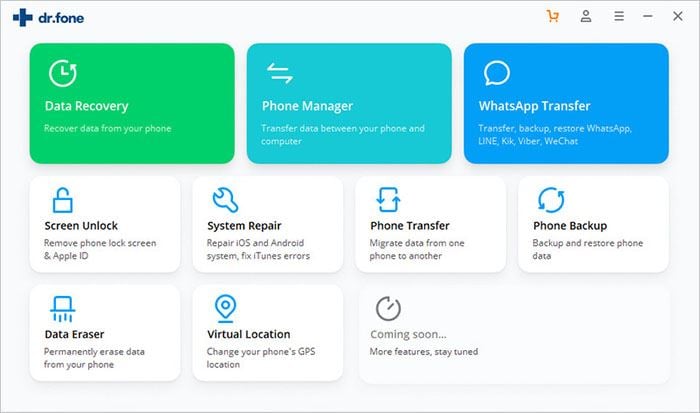
Step 2 Connect Android to PC
Connect your Android smartphone to your PC through a data cable. Once connected, click of the «Erase All Data» option from the menu on the extreme left of the interface.
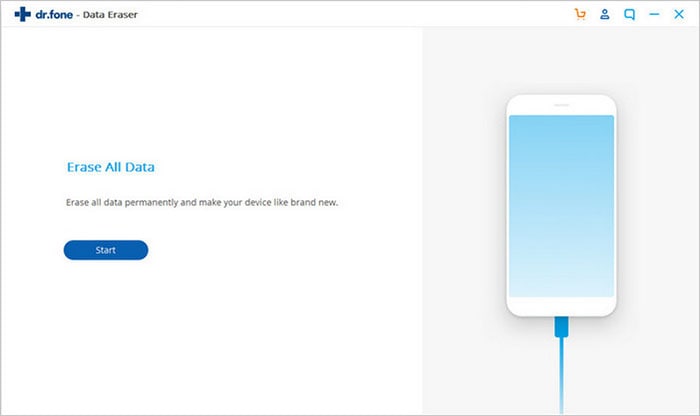
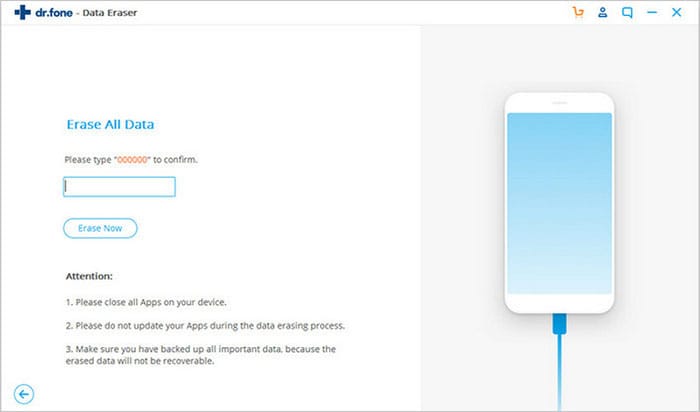
Step 3 Confirm to Delete Files on Android
You can click the «Erase all Data» button. Then a pop-up window will ask you to confirm your selection. Type «delete» in the dialogue box then click «Erase Now» button to permanently delete data from your Android smartphone.
Part 2. Delete Files with Built-in Storage Tool
Modern Android smartphones come with a storage pane where you can see exactly what’s taking up all the space on your smart phone. Here are the steps on how you can use it to delete files.
Step-by-Step Guide on How to Delete Files on Android:
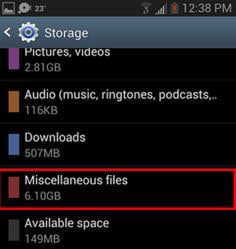
Step 1. Simply visit the settings menu and click on storage. You will be able to see the amount of space that is used by apps, pictures, audio files, cached data, etc.
Step 2. You can delete anything you don’t want from this screen. For example, visit the downloads page to remove files and clear cached data for all your installed apps.
Step 3. Once you’ve removed all the files you don’t want, you should have a lot of free space on your smartphone.
One more thing you should understand is the apps, data and cache all contribute to the amount of space used by an app. For example, if you’ve installed Spotify and have saved a lot of music offline, Spotify might just be using a couple of GB of storage space. All apps which cached data for offline use work like this. Removing cached data for apps is another terrific way of freeing up space on your smartphone.
Part 3. Delete Files on Android with SD Card
Most Android devices today have microSD card slots too. Even though they might not be common with the high end devices, most mid and low range devices do have them. If your phone has one, all you require to do is buy a microSD card and use it to free up space on your smartphone. This additional storage can’t be used to install apps or to save system files but it can be used for storing music, pictures, videos, etc. Some apps will also let you shift their cache locations to the memory card.
Step-by-Step Guide on How to Delete Files on Android:
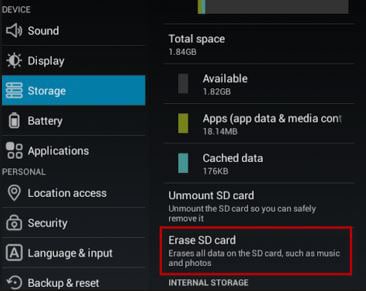
Step 1. Once you’ve installed the SD card, connect your smartphone with your computer.
Step 2. Move all of your media, music and other files to the card. You can even erase all data on your SD card directly from there is you want.
Even if you are using an SD card already, you could simply replace it with one that has more storage. They aren’t too expensive. There’s no cheaper way of getting additional storage on your smartphone than this.
Part 4. Upload Photos to Dropbox and Delete Them on Android
Photos can take up lots of space on your smartphone. You can free up a lot of space by storing them on Dropbox instead of on your phone.
Step-by-Step Guide on How to Delete Files on Android:
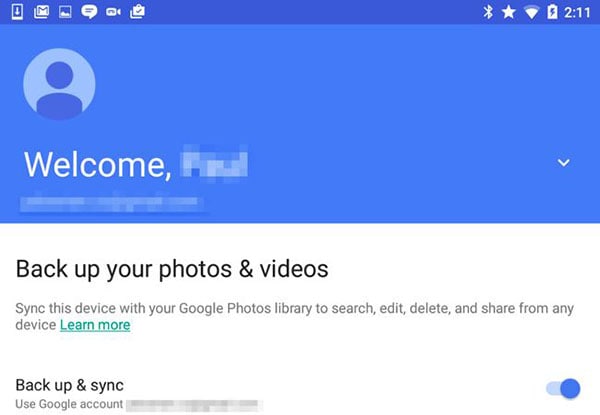
Step 1. Download the Dropbox and install it on your smartphone.
Step 2. You can backup the photos or videos to your Dropbox account and then remove it from your phone.
Step 3. You can then access these photos using the Dropbox app on your smartphone or on the internet through Dropbox.com. As long as you have internet access, you will be able to instantly access your photos no matter where you are.
If you don’t like the idea of your photos being uploaded to the internet, you can simply copy them to your computer and then delete them from your smartphone.
So what are you waiting for? You no longer have to suffer with a smartphone that has no storage space and runs really slow. Just choose any one of these options or all of them and get rid of your problems once and for all.
Part 5. How to Delete Data from Lost Android Phone
To be able to remotely manage and secure delete Android devices with Android Device Manager, you must have enabled Android Device Manager before it was stolen, lost or misplaced, using the following steps.
Step-By-Step Guide to Enable Android Device Manager
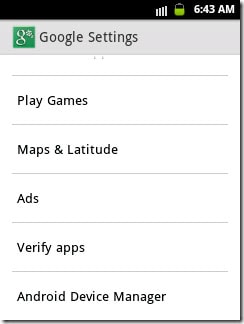
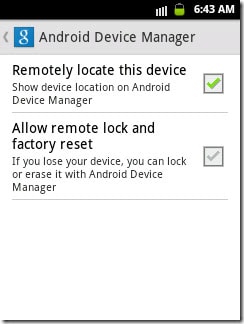
Step 1. Launch «Google Settings» app on your Android phone and tap «Android Device Manager».
Step 2. Enable «Allow remote lock and factory reset». The box for «Remotely locate this device» is always checked by default, but you will just verify if it’s enabled.
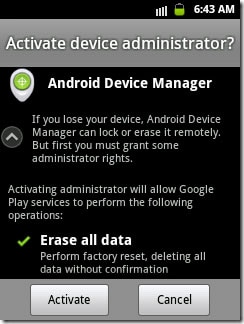
Step 3. You will then be asked to activate device administrator for Android Device Manager. Just tap the «Activate» button to grant ADM the administration rights to erase all your data, lock screen or ring it when it’s lost, stolen or misplaced.
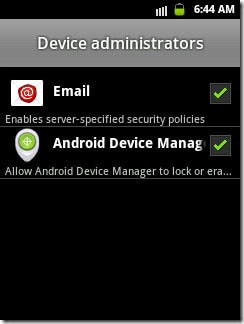
Step 4. To verify if Android Device Manager has been granted access to your device successfully, tap Settings> Security> Device Administrators and then check whether Android Device Manager is enabled.
Step-By-Step Guide on How to Delete Data from Lost Android Phone
Step 1. Go to this webside and log in with the Google account you use on your lost device. The online tool displays all the devices that are attached to your Google account. Select the lost Android phone.
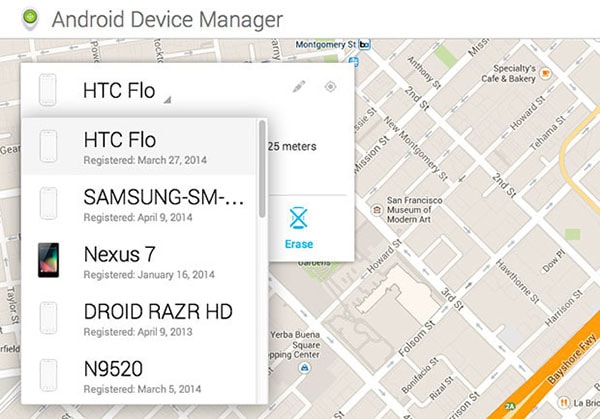
Step 2. You will be able to see the location of your phone, as well as the Ring, Lock and Erase buttons. Click on the «Erase» button to delete all the data from your lost Android phone remotely.
Источник
How to Reset Android Studio?
Android Studio Reset, means to reset all the settings to factory(default) settings. The reset will remove all of your android studio settings, projects, and also all the Gradle files. This will make your android studio looks like a newly fresh installed software. It is recommended to make a backup of your android studio settings and projects before reset.
Steps to Reset Android Studio
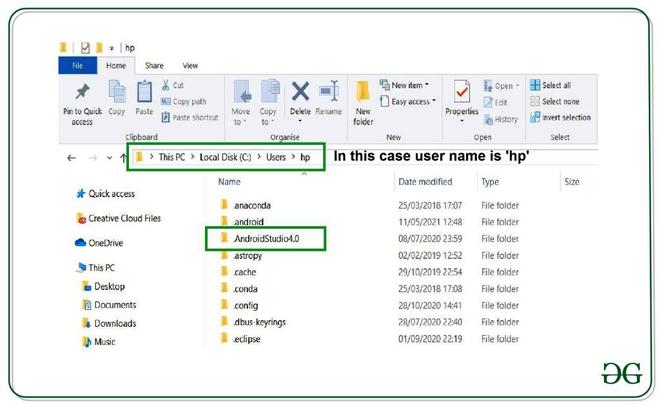
Step 1: Got to users directory in system drive
First-of-all you need to go to your user’s directory in system drive, which is generally ‘C-drive’. Go to “C:\Users\your-user-name”. Here you will find a directory with the name .AndroidStudio, make sure that it must be starting with a dot(.). This directory name is followed by the version of the android studio. For example- In the below pictures, you can see the version of the Android Studio as 4.0 and its name is “.AndroidStudio4.0”.
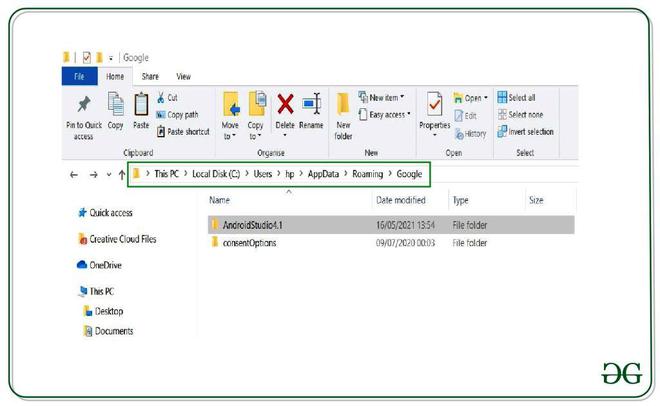
If you are not able to locate the directory in the above address, you can also check it at “C:\User\you_user_name\AppData\Roaming\Google”.
Step 2: Delete .AndroidStudio directory
You need to delete .AndroidStudio directory in order to reset your Android Studio. Make sure that you have closed all of your android studio applications and delete them. Once you delete the directory open your Android Studio.
Step 3: Setting up the Android Studio
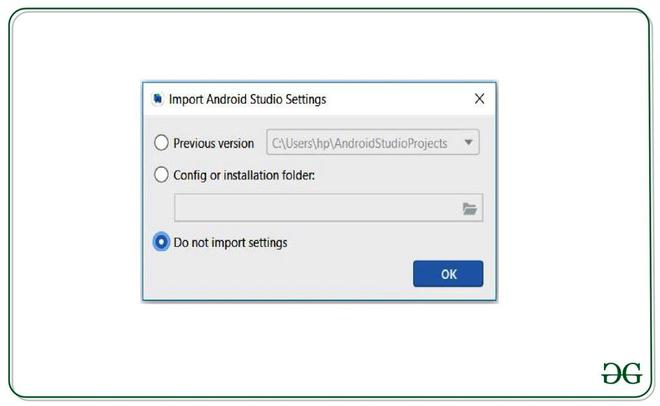
After deleting .AndroidStudio directory and re-opening the Android Studio, it will pop up few dialog boxes to set up. You need to follow the below steps to set up your android studio. When you open your Android Studio it will ask you to import your previous version. If you have the backup you can import it. Otherwise, you need to choose the second option “Do no import settings” and click ok.
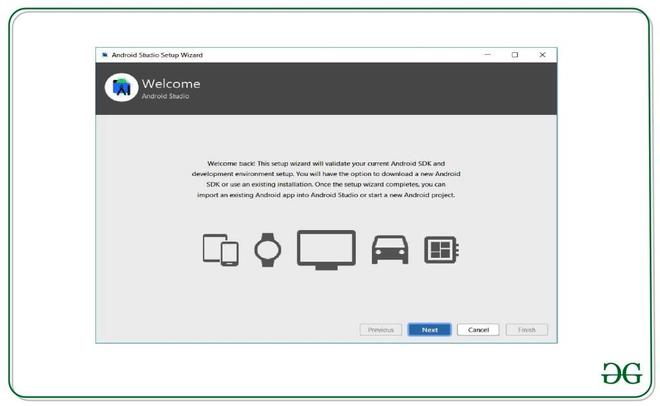
After that you will come to “Welcome Screen“, click next.
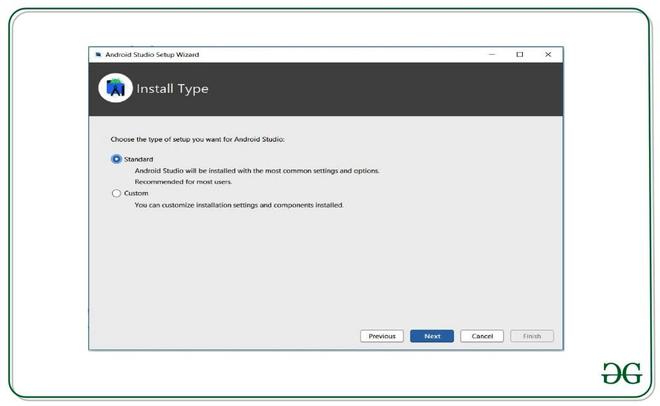
Now, it will ask you the choosing the installation type. You can either choose Standard or Custom(if you want to customize your installation settings).
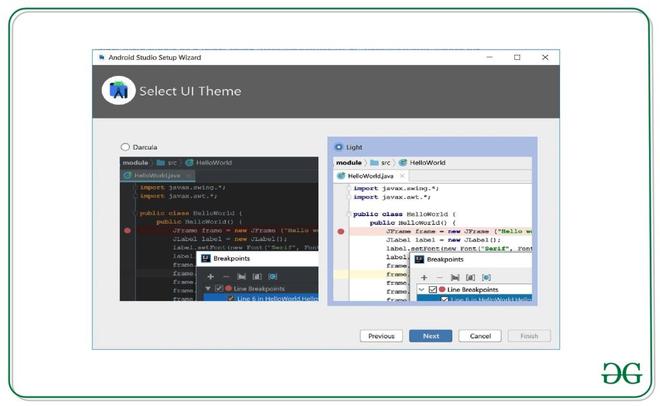
On the next screen, you will be asked to choose the UI Theme. You can choose either one. Here I’m choosing the Light theme.
Now, it will ask you to verify your settings. After that click on the Finish button.
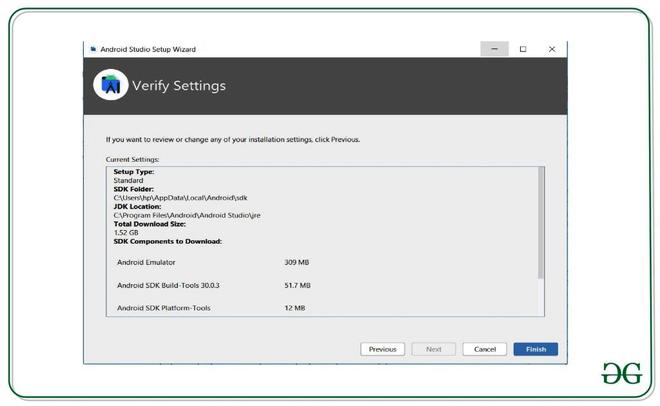
It will start downloading the settings.

Once android studio completes downloading its setting, you are done. Your Android Studio is reset. You can start your project.
Источник
Как удалить «неудаляемые» приложения со смартфона

Чтобы увеличить привлекательность смартфонов, производители ставят на них как можно больше разных программ. Это понятно. Просто берём и удаляем ненужное… Стоп.
Оказывается, некоторые программы невозможно удалить. Например, на отдельных моделях Samsung невозможно удалить Facebook (есть только опция ‘disable’). Говорят, на Samsung S9 вдобавок предустановлены «неудаляемые» приложения Microsoft.
Эти смартфоны приведены для примера. Такая же проблема и на других моделях. На многих есть неудаляемые программы от самого производителя.
Всё это надо зачистить.
Очень редко встречаются примеры моделей, на которых нет лишних программ. Например, когда вышел первый iPhone, то компания Apple жёстко зафиксировала пакет установленных приложений, поэтому оператор AT&T не смог добавить туда свой привычный мусор.
Есть ещё пример смартфонов от Google начиная с Google Phone G1 в 2008 году, затем линейки Nexus и вплоть до текущих Pixel (Pixel 1, 2 и 3). На них тоже нет почти никакого мусора, если не считать слишком большого количества приложений Google, которые тоже считаются якобы системными и не удаляются полностью. Ну и небольшого количества сторонних неудаляемых приложений. Например, на Nexus5 намертво вшит HP Cloud Print. Но об этом позже.
В принципе, по такой логике и многочисленные приложения от Apple на iPhone можно считать ненужным мусором. Если быть точным, на iPhone предустановлены 42 приложения, не все из которых легко удалить: App Store, Calculator, Calendar, Camera, Clock, Compass, Contacts, FaceTime, Files, Find My Friends, Find My iPhone, Game Center, Health, Home, iBooks, iCloud Drive, iMovie, iTunes Store, iTunes U, Keynote, Mail, Maps, Messages, Music, News, Notes, Numbers, Pages, Passbook, Phone, Photos, Podcasts, Reminders, Safari, Settings, Stocks, Tips, TV, Videos, Voice Memos, Wallet, Watch, Weather.
На Android предустановлено 29 приложений, и тоже некоторые из них не удаляются стандартными средствами: Android Pay, Calculator, Calendar, Camera, Chrome, Clock, Contacts, Docs, Downloads, Drive, Duo, Gmail, Google, Google+, Keep, Maps, Messages, News & Weather, Phone, Photos, Play Books, Play Games, Play Movies & TV, Play Music, Play Store, Settings, Sheets, Slides, YouTube.
Примечание: описанный ниже способ позволяет удалить любое из этих приложений.
Впрочем, мы говорим в первую очередь не о мусоре в дефолтной операционной системе, а о других ситуациях, когда сторонний производитель вроде Samsung заполняет свой смартфон огромной кучей неудаляемых программ, начиная с собственных фирменных приложений, и заканчивая программами Facebook и Microsoft. Так же поступают и другие производители.
Зачем они это делают? Ну очевидно, что из-за денег. По партнёрским соглашениям установить программы партнёра стоит одних денег. А установить те же самые программы в виде неудаляемых — уже совершенно других денег. Это просто предположение.
Хотя это просто удивительно. Мы платим за телефон Samsung сотни долларов! И они ещё хотят урвать пару баксов на партнёрских соглашениях!
Возможность удалить приложение отсутствует
Facebook всегда заявлял, что «отключение» (disable) приложения — то же самое, что и удаление. Хотя оно (приложение) потом и занимает немного места в памяти, но не должно проявлять никакой активности или собирать данные. Но в последнее время люди настолько потеряли доверие к Facebook, что не верят даже в это. Мол, а почему оно тогда полностью не удаляется из системы?
Facebook и Microsoft годами заключает соглашения c производителями телефонов и операторами связи по всему миру. Финансовые условия не разглашаются. Facebook также отказывается говорить, с какими конкретно партнёрами у него сделки на неудаляемые приложения.
Впрочем, «неудаляемые» они только теоретически. На практике достаточно открыть ADB (Android Debug Bridge) и запустить пару команд.
На телефоне должна быть разрешена отладка по USB, а на компьютере установлен USB-драйвер устройства.
Скачать ADB для разных операционных систем можно по следующим ссылкам:
- Windows
- macOS
- Linux
Извлекаем содержимое zip-архива в любое удобное место, и уже там запускаем окно консоли.
выводит список установленных пакетов.
pm list packages | grep ‘oneplus’
package:com.oneplus.calculator
package:net.oneplus.weather
package:com.oneplus.skin
package:com.oneplus.soundrecorder
package:com.oneplus.opsocialnetworkhub
package:cn.oneplus.photos
package:com.oneplus.screenshot
package:com.oneplus.deskclock
package:com.oneplus.setupwizard
package:com.oneplus.sdcardservice
package:com.oneplus.security
package:cn.oneplus.nvbackup
package:com.oneplus.wifiapsettings
Как вариант, можно установить на телефоне бесплатную программу Инспектор приложений. Она покажет подробную информацию обо всех установленных приложениях, их разрешения. Вдобавок она может извлекать (скачивать) APK-файлы для любого установленного приложения.
Для удаления конкретного пакета запускаем такую команду:
Это работает без рутования.
Для упомянутых в начале статьи «неудаляемых» программ это выглядит так:
Facebook App Installer
Кстати, приложения от Facebook действительно лучше удалить, потому что они собирают и отправляют в компанию огромный объём персональных данных обо всех аспектах вашей деятельности. Чтобы оценить объём собираемых данных, взгляните на эту диаграмму. Она сравнивает, какие данные о вас собирают разные мессенджеры: Signal, iMessage, WhatsApp и Facebook Messenger.
Источник: 9to5Mac
Facebook Messenger высасывает буквально всё, что может. А вот Signal относится к пользователям гораздо более уважительно. Оно и понятно: это криптомессенджер, ориентированный на приватность.
Понятно, почему в Android нельзя удалить системные приложения штатными средствами. Но список «системных» приложений тоже неоднозначный. Например, перечисленные пакеты трудно назвать системными. Но штатными средствами удалить их тоже нельзя, только отключить (disable):
- Google Play Музыка
- Google Play Фильмы
- Google Play Книги
- Chrome
- YouTube
- и др.
Однако описанный выше метод позволяет полностью удалить их тоже.
Google Play Музыка
Google Play Фильмы
Более того, метод подходит вообще для любого системного компонента.
… и мы навсегда избавляемся от встроенного лаунчера.
Примечание с форума xda-developers. Что касается системных приложений, то они снова появятся после сброса настроек. Это означает, что они всё-таки по-настоящему не удаляются с устройства, а просто удаляются для текущего пользователя (user 0). Вот почему без ‘user 0’ команда adb не работает, а эта часть команда как раз и указывает произвести удаление только для текущего пользователя, но кэш/данные системного приложения всё равно останутся в системе. И это хорошо, потому что даже после удаления системного приложения телефон всё равно сможет получать официальные обновления OTA.
Кстати, с 1 апреля 2021 года в России начнут принудительно устанавливать российский софт на все новые смартфоны. Список из 16 приложений уже утверждён, вот некоторые из них:
- ICQ (для обмена сообщениями);
- Новости Mail.ru;
- OK Live;
- MirPay (платёжная система, только на Android);
- Applist.ru (программа-агрегатор для доступа к социально значимым интернет ресурсам).
Будем надеяться, что этот хлам будет удаляться стандартными средствами, а лучше одним нажатием кнопки — сразу все программы. Если же нет, то мы знаем, что делать.
На правах рекламы
Нужен сервер с Android? У нас возможно даже это! VDSina предлагает недорогие серверы с посуточной оплатой, установка любых операционных систем с собственного ISO.
Источник


