- Delete photos on your iPhone, iPad, and iPod touch
- Before you delete
- Delete photos or videos
- How to delete a single photo
- How to delete multiple photos
- Recover deleted photos or videos
- Delete photos permanently
- iPhone storage full? How to free space by removing “Documents & Data”
- Have you backed up your iPhone yet?
- Documents and Data
- What is Documents and Data?
- Can I delete apps to get rid of the Documents and Data?
- General storage saving tips
- Removing and offloading unused apps
- What is Other storage and how do I delete it?
- What about Deleting Documents and Data on iCloud?
- Why doesn’t the storage shown on my iPhone add up?
- Clear your Safari cache.
- Streamline your email storage.
- 🚨 Caution: Don’t remove your email account from your iPhone if you use POP
- Backup and restore your iPhone.
- How to reduce space used by your Photo Library
- Delete duplicate photos
- Is Instagram Duplicating your Photos?
- Use iCloud to free iPhone storage
- Empty your Deleted Photos folder
- Make sure you’ve enabled files to be stored as High Efficiency
- Store your photos on your computer
- Disable live photos
- How to reduce space used by Messages
- Delete attachments
- Should I auto-delete old conversations?
- How to reduce space used by WhatsApp
- How to reduce space used by Films and TV shows: Netflix, Prime Video and Apple TV
- Review Downloaded Videos
- Netflix
- Apple TV
- How to reduce space used by Music and Podcasts: Spotify, Apple Music & Podcasts
- Apple Music
- Spotify
- Podcasts and Audiobooks
Delete photos on your iPhone, iPad, and iPod touch
Learn how to delete photos and videos that you don’t want, or get them back if you accidentally delete them.
Before you delete
Make sure that you back up the photos and videos that you still want. When you use iCloud Photos and delete a photo or video on one device, it gets deleted on all other devices where you’re signed in with the same Apple ID. Learn how to delete photos and videos in iCloud Photos.
To see how much storage you have left on your device, go to Settings > General > [Device] Storage. Learn more about managing your device photo storage.

Delete photos or videos
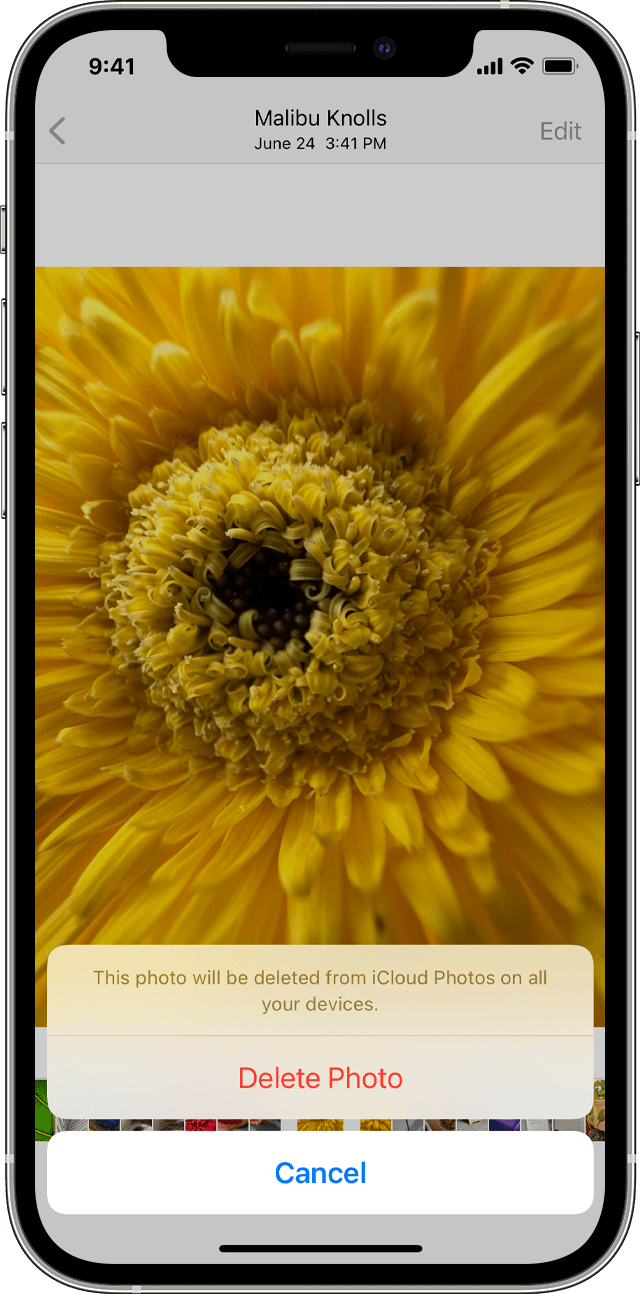
When you delete photos and videos, they go to your Recently Deleted album for 30 days. After 30 days, they’ll be permanently deleted.
If you use iCloud Photos, and delete photos and videos from one device, the photos and videos will be deleted on your other devices.
If you add photos to your iPhone, iPad, or iPod touch by connecting your device to your computer, you can’t delete them directly from your device in the Photos app. If you see the gray Trash button when you try to delete a photo from your iPhone, iPad, or iPod touch, you might need to stop syncing photos from your computer. Learn how to stop syncing photos from your computer.
How to delete a single photo
- Open Photos.
- From the Library tab, tap All Photos and select the photo or video that you want to delete.
- Tap the Trash button , then tap Delete Photo.
How to delete multiple photos

- Open Photos.
- From the Library tab, tap All Photos, then tap Select.
- Tap multiple photos, or slide your finger across multiple photos to select more than one.
- Tap the Trash button , then confirm to delete the items.
Recover deleted photos or videos
If you accidentally delete a photo or video, you have 30 days to get it back from your Recently Deleted album. When you recover photos and videos, they go back to your All Photos album. Here’s how to recover deleted photos or videos:
- Open Photos and tap the Albums tab.
- Scroll down, tap the Recently Deleted album, then tap Select.
- Tap the photo or video that you want to keep or tap Recover All.
- Tap Recover again to confirm.
Delete photos permanently
If you want to permanently delete your photos or videos, you can remove them from the Recently Deleted album. When you delete a photo from this album, you can’t get it back. Here’s how to delete photos permanently:
- Open Photos and tap the Albums tab.
- Tap the Recently Deleted album, then tap Select.
- Tap the photos or videos that you want to delete or tap Delete All.
- Tap Delete again to confirm.
Источник
iPhone storage full? How to free space by removing “Documents & Data”
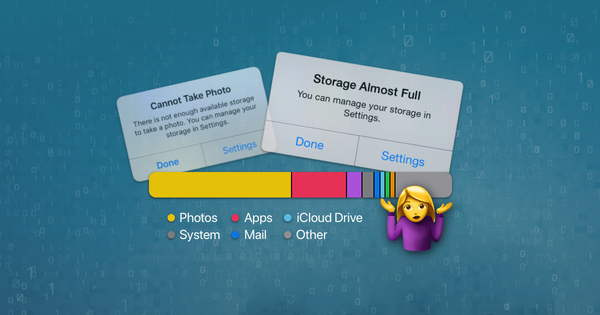
Seen this popup on your iPhone recently?
It can be frustrating to find that you’re running low on storage, particularly if it comes at a time when you’re trying to update your iPhone, or save more content to your phone. Whether you’re downloading music on Spotify or Apple Music, saving TV shows and films from Netflix or Prime Video, or simply trying to take and share more pictures, we’ve got you covered with our definitive guide to freeing up space on your iPhone.
Unfortunately, the only way to free up space is by removing content. Obviously, you don’t want to delete any meaningful photos, messages, videos or music, but what about other data, that you might not be able to see? We’re going to look at the various ways you can increase storage space on your iPhone — and they’re all free.
Have you backed up your iPhone yet?
If you want to free up space on your iPhone, you’re going to need to delete content. Make sure to take a backup of your iPhone before you start delete anything, in case you accidentally remove something that you need. Find out how to make a backup here.
Click the links below to move to a specific section, or read through the article as a whole for maximum storage-saving.
Documents and Data
The first step in freeing up space on your iPhone is to take a look at the breakdown of your current storage. To do this:
- Go to Settings on your iPhone
- Scroll down to General
- Select iPhone Storage
This will show you how much of your iPhone’s storage you’re currently using, and how much of each type of data you’re currently storing.

The examples above show the difference in free space on an iPhone that stores Photos in iCloud versus an iPhone that stores photos directly on the device
Below the breakdown of your storage, you can see how much storage each of your apps is using, ordered from largest to smallest. You may also see a number of storage-saving recommendations from Apple. Don’t enable these just yet, as we’ll explain the pros and cons of doing so in this guide (spoiler alert: you could end up removing data you want to keep hold of). If you click on a couple of the apps on this screen, you’ll notice that some of the data these apps use is dedicated to something called ‘Documents and Data’.
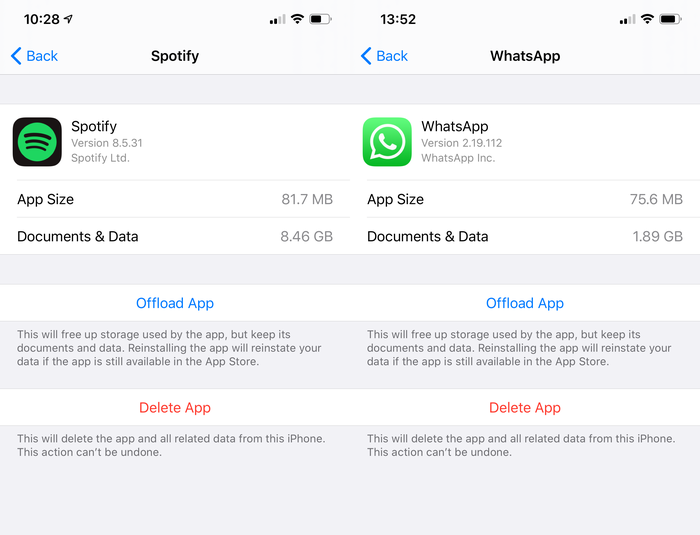
Documents and Data in Spotify and WhatsApp
What is Documents and Data?
Documents and Data is the term used for a collection of data stored on your device by an app. This may not account for all of the data used by this app (for instance, some data may be stored on iCloud), but it will likely account for the largest amount of data stored on your phone by the app. Documents and Data is not the app itself. If you were to click Offload App in the screenshot above, this would not free up the storage used by the app’s Documents and Data.
The Documents and Data section of an app’s storage will often account for the largest amount of data, so reducing this is an effective way to free up storage on your iPhone. To reduce the amount of storage each app’s Documents and Data uses, you can use a variety of methods. The most direct way to do this is to delete the app and reinstall it, as this will remove all data that isn’t essential for the app to run. Of course, you’ll most likely want to keep some of the content stored by this app (such as any pre-downloaded audio in Spotify), so this may not be the best approach for the apps you use most often. This method won’t work for default apps on your iPhone, such as Photos and Messages, as these apps cannot be deleted.
Can I delete apps to get rid of the Documents and Data?
Yes, but you might not want to. Deleting the entire app will delete all of that app’s data that isn’t stored separately on the cloud. In some cases, this will fit your purposes, but it’s also likely to result in irretrievably losing data. Deleting Instagram or Twitter won’t get rid of your posts, for example, but it will erase any drafts you’ve saved. We recommend you only delete apps that you don’t use, and don’t want to retain data from.
General storage saving tips
Removing and offloading unused apps
If you’ve got a lot of apps on your iPhone that you don’t use, you can offload them to free up space. You may have noticed that your iPhone does this automatically. To check this, go to Settings → iTunes & App Stores and scroll down to Offload Unused Apps . If this is toggled on, your iPhone will automatically remove apps that you don’t use, but it will keep documents and data for these apps, which uses a little more storage, but allows you to download the apps again without losing data.
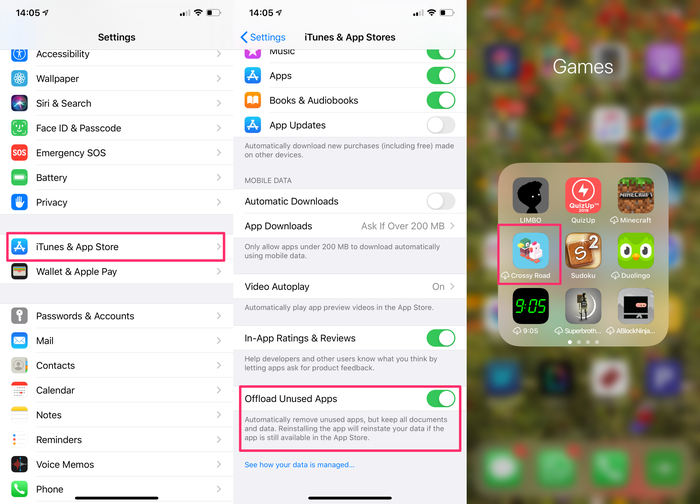
Offloaded apps can be identified by the iCloud download image
You can also delete apps yourself to free more data. Deleting apps from your iPhone will remove the app’s documents and data, so you’ll free up more space, but you’ll also lose the data stored on the app. As such, you should only delete apps that you’re unlikely to need data from in the future.
To delete apps, press and hold the app you want to delete, then click Delete App .
What is Other storage and how do I delete it?
If you’re looking to reduce the size of storage used by the vaguely named Other category in your iPhone, it can be difficult to know where to begin.
The Other storage section is used as a bit of a catch-all for anything that doesn’t fit into the other categories. It includes things like system files, your Safari cache and reading list, your downloaded Siri voices, notes, and voice memos, alongside many other things.
Other data can also appear when your iPhone reorganises itself after applying a change, which can cause data such as Music or Photos to temporarily appear as Other data. For example, if you take your iPhone’s Photo Library out of Optimise Photos mode (see the Photos section of this guide for more info on this), you’ll see it allocates storage for all of your images as Other or System . In the sequence of 3 screenshots below, we disabled Optimise Photos and saw our device briefly fill up with Other before the phone recategorised that storage as Photos a few minutes later.
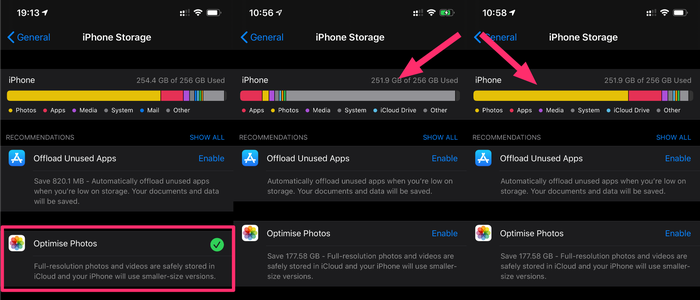
An iPhone allocating Photos storage as Other
What about Deleting Documents and Data on iCloud?
You can delete Documents and Data directly from your iCloud account, however, this will only delete documents and data stored on your iCloud, and therefore won’t free up space on your iPhone or iPad. Read more about iCloud storage here to find out how to delete Documents and Data from your iCloud, alongside other methods about freeing up space on your iCloud account.
Why doesn’t the storage shown on my iPhone add up?
You may have noticed that after implementing some of the storage-saving methods in this guide, your iPhone storage doesn’t seem to reflect what you think it should be.
When offloading images, if you look at the breakdown of your storage on your iPhone, this will show you how much potential storage you have, though in reality, some of your Photos may be temporarily stored in data marked as free. You can use apps such as Diskspace 3 to see how much free storage you actually have at any one time. Be aware, however, that sometimes third-party apps show a different number for free space to the iPhone’s own indicator. This is because in some cases, the iPhone won’t delete data until it has to. It may keep old files hanging around until the device is short of space. This is fine: it’s safe to rely on the iPhone’s indication of free space: it knows what it’s doing, and it’ll free that space if it needs to!
One way to make sure you’re not storing any unnecessary data is to back up and restore your iPhone, as this can remove excessive data logs and caches.
Here are three ways to reduce the size of your Other storage:
Clear your Safari cache.
Your Safari cache might be the culprit responsible for your large amount of Other iPhone data. You can either clear your website data with your search history, or clear only your website data (retaining your search history in case you need it). Even if you delete both, your AutoFill information will remain.
To clear your History and Website Data: Go to Settings → Safari → Clear History and Website Data .
To clear only your website data: Go to Settings → Safari → Advanced → Website Data → Remove All Website Data .
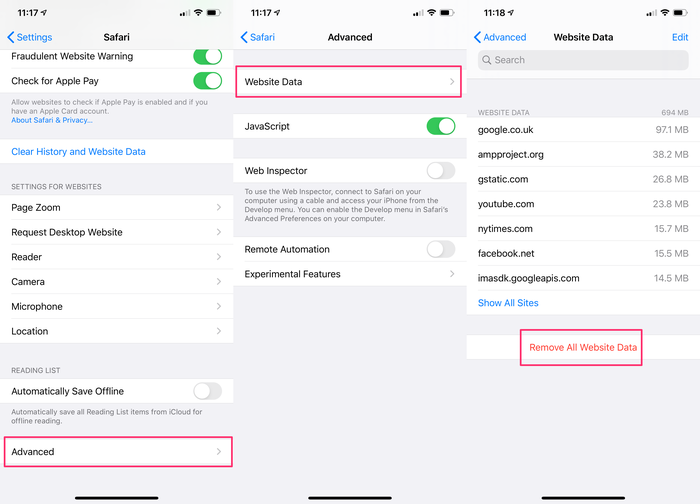
Removing Website Data while keeping history
Streamline your email storage.
Your email can store a considerable amount of data on your iPhone, both in cached emails and attachments, so it’s worth exploring options to reduce the space your email takes up.
The easiest way to save space is to consolidate your emails. If you have a Gmail account, it’s possible that you’re using both Apple’s Mail app and the Gmail app for one account. If this is the case, you can delete one app and use only the other one, potentially halving the amount of storage used!
Another way to cut down on your email data is by removing and then re-adding your email. This can help you to free up storage by clearing this data from your iPhone (though not from your email account).
🚨 Caution: Don’t remove your email account from your iPhone if you use POP
Email accounts that use POP3 (“Post Office Protocol”) are downloaded directly to your iPhone and won’t stay on the server. POP is no longer very commonly used, but deleting the account from their phone would be disastrous, as emails aren’t stored in backups.
You should only delete your email from your iPhone if you use Gmail or another web-based service that uses IMAP. The easiest way to test this is to log in to your webmail from a computer, or via Safari on your iPhone: if the emails are still available over the web, then they clearly haven’t been downloaded to your phone and removed from the web.
Once you’ve verified that you connect to your email account using IMAP, rather than POP, you can continue to delete your email account, safe in the knowledge that your data will be protected.
To remove your email from your iPhone, go to Settings → Passwords & Accounts → [your email provider → Delete Account .
To reinstall your account, go back into Passwords & Accounts and select Add Account .
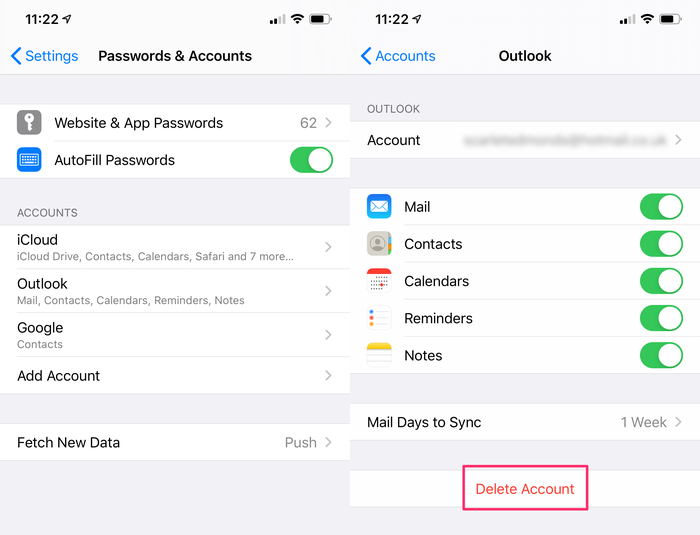
Removing and re-adding your email account to save data
Backup and restore your iPhone.
If you’ve tried the two steps above, but still have a large amount of storage space being consumed by Other storage, you can backup and restore your iPhone to reduce the size of your Other data. Be aware that doing so will also cause your Apple Watch to backup and restore, too. Find out how to create a backup and restore your iPhone here.
How to reduce space used by your Photo Library
Blame your iPhone’s fantastic camera for your ever-increasing photo library. We’re beginning the app-specific portion of this guide with Photos, as it often uses up more of iPhone storage than all other apps and programs combined.
If you find your iPhone storage is being held at the mercy of your holiday photos, here are some steps you can implement to increase storage on your iPhone by reducing the amount of storage dedicated to Photos:
Delete duplicate photos
Because we store a considerable number of photos on our phones, many of us unknowingly store multiple copies of the same photo on one device, or store multiple versions of similar pictures, where we only need one. Deleting duplicate photos can free up a significant amount of space.
Is Instagram Duplicating your Photos?
As a default setting, Instagram saves a copy of each image you post. If you don’t need an additional copy of these photos after editing, you can turn this feature off by going to Settings → Instagram → Photos and selecting Never
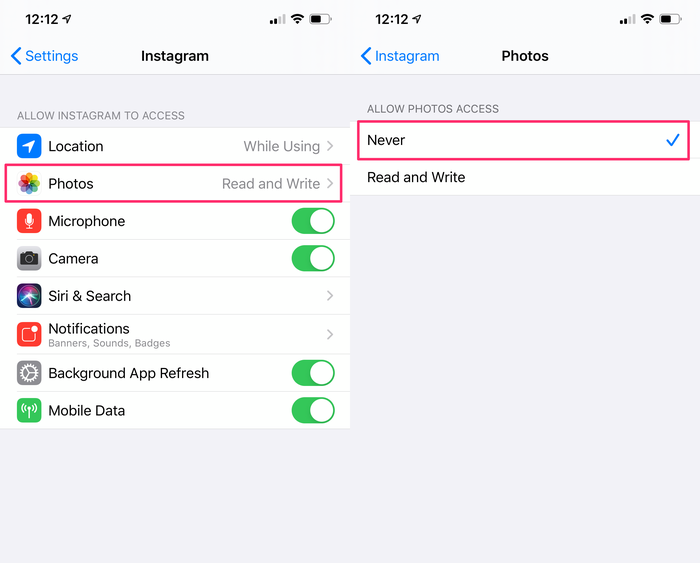
Select ‘Never’ to prevent photos stacking up in your storage
Photos can be deleted manually, one by one, or as a group, but both of these methods are significantly time-consuming.
Speed things up by using one of the many free apps available, such as Remo Duplicate Photos Remover, which can not only find and delete duplicates, but also allows you to delete similar photos.
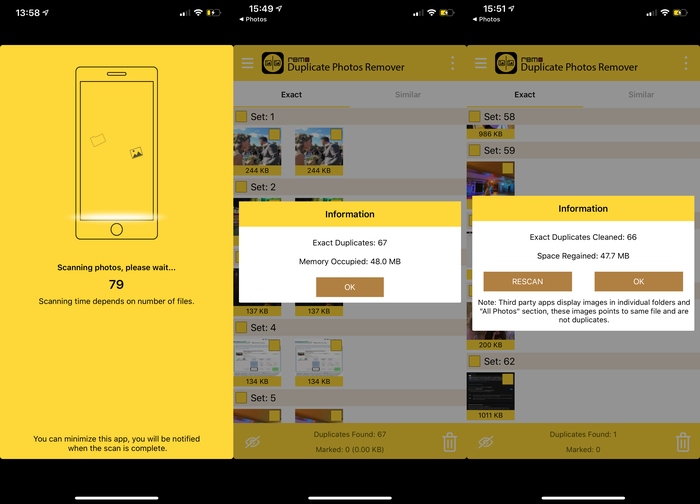
Removing duplicate photos with Remo
Use iCloud to free iPhone storage
This is by far the most effective way to free up significant storage (if you don’t believe us, scroll back up to the first set of images in this guide to see how much storage you can free up by offloading some of your images). Using iCloud, you can optimise photo storage, by moving full-resolution versions of most of your photos to iCloud, with lower-resolution versions still available to browse on your iPhone.
For each iCloud account, the first 5 GB of iCloud storage are free, but you’ll likely have more than 5 GB of photos stored on your iPhone, which means you’ll need to pay to implement this step. Luckily it’s pretty cheap, and you can also share the storage across your family. See our iCloud storage guide for more information about iCloud.
Here’s how to increase your iCloud Storage on your iPhone: go to Settings → [Your Name] → iCloud → Manage Storage and tap Buy More Storage or Change Storage Plan to choose your plan and follow payment instructions.
Once you have enough iCloud storage for your photos, you can move the majority of your photos to iCloud by following these steps:
- Go to Settings → Photos
- Toggle iCloud Photos on to store photos on iCloud
- Select Optimise iPhone Storage to ensure storage is saved on your iPhone
This is a great way to manage your Photo storage long-term, but it’s important to note that when you enable Optimise Storage , the full resolution versions of images will be kept on your device until the storage space is needed by something else. This space will become available (with the images offloaded) as you begin downloading films, apps and music. And in the meantime, you can continue to view, share and edit your images in full resolution without waiting for them to download.
There are a couple of drawbacks to this method, however. Offloading images will reduce the quality of temporary images, meaning you won’t be able to access the full resolution photos offline, and when you’re online, they will take a little time to download before you can view them. Another drawback is that your iPhone may not be able to recognize who is in each photo, so your albums of people may not record all the photos you have of each person, although any photos that have already been sorted into these albums will not be removed after they have been offloaded.
Empty your Deleted Photos folder
This is an easy way to free up some additional space in your Photo Library. When you delete photos on your phone, they move to a folder of recently deleted photos. Your iPhone will permanently delete these photos after 40 days, but in the meantime, those photos are still using up storage on your iPhone. If you’re trying to free up your iPhone storage by deleting photos, make sure to empty your deleted photos once you’ve done so with the following steps:
- Open the Photos app on your iPhone
- Scroll all the way down to Recently Deleted
- Open this folder, and make sure all the photos within can be permanently removed (you can recover photos you’d prefer to keep)
- Click Select in the top right
- Click Delete All in the bottom left
![]()
Free up storage by emptying your Deleted Photos folder
Make sure you’ve enabled files to be stored as High Efficiency
Since iPhone 7, Apple have stored images as HEIF files and videos as HEVC files by default. Storing images and videos in this format can reduce a significant amount of space, with some tests estimating that JPEG files (the traditional image format) are 80% larger than HEIF files.
HEIF/HEVC files are enabled as a default on most recent iPhones, but if it is disabled, your photos will use much more storage. To make sure this function is enabled on your iPhone:
- Go to Settings on your iPhone
- Scroll down to Camera
- Select Formats
- Tap High Efficiency
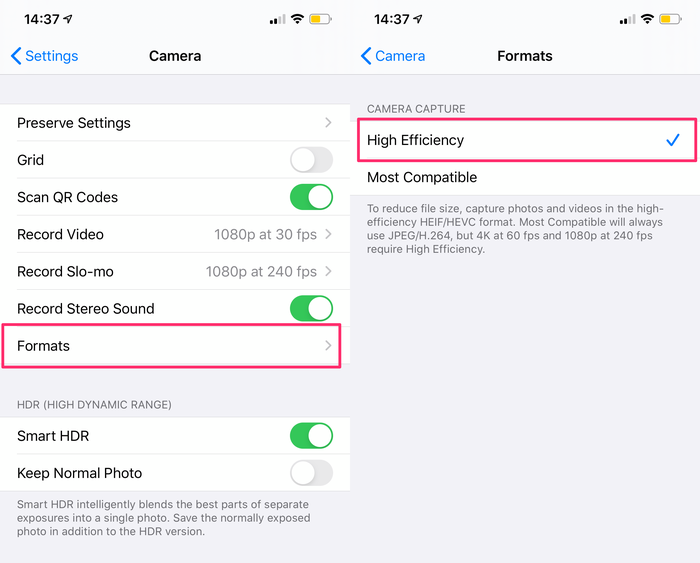
Store images in High Efficiency to save space
Store your photos on your computer
If you decide you don’t actually need to have access to the photos on your iPhone regularly, you might want to store them on your computer, instead.
To do this, you can either AirDrop your photos in groups to your Mac, or create a backup of your iPhone and pull the photos from the backup using iPhone Backup Extractor. Find out how here.
Disable live photos
Live photos, which record a short video rather than a static image, take up more space on your iPhone than regular images. To disable this function, open your Camera, then tap the second icon from the left at the top of the screen until Live Off appears.

Avoid taking live photos to save space
To make sure these settings don’t change in the future, go to Settings → Camera → Preserve Settings and toggle Live Photo on.
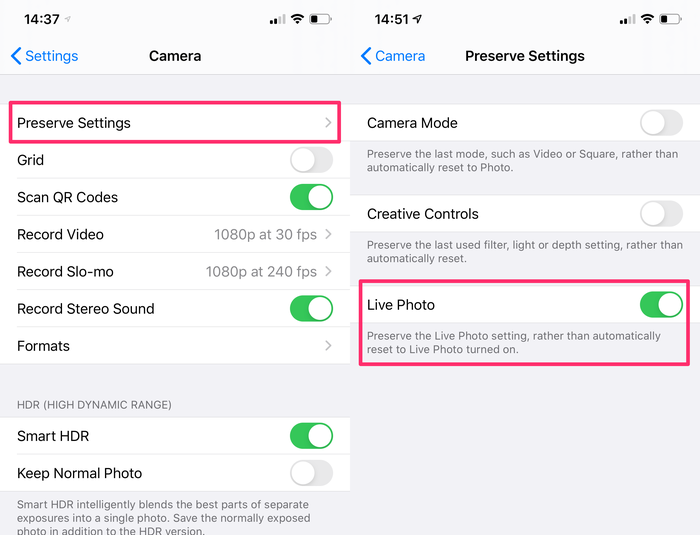
Preserve camera settings to avoid these reverting
How to reduce space used by Messages
Messages are another area of storage that can seriously add up, especially if you tend to send images, GIFs or Memojis in your chats.
Delete attachments
As the images you send and receive take up the largest amount of space in your messages, you should start by clearing any attachments from your messages that you don’t need. To do this:
- On your iPhone, go to Messages and click on a chat with lots of attachments
- Tap on the recipient’s name in the top centre, then tap info
- Scroll down to photos and select See all Photos
- Tap Select in the top right, then select all the photos you want to delete, and tap Delete in the bottom right
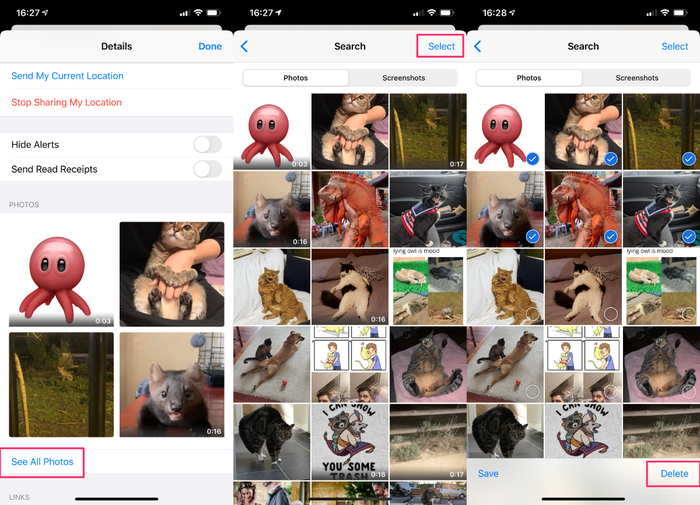
Free space by deleting iMessage photo attachments
Should I auto-delete old conversations?
You may have received a recommendation from Apple to “Auto Delete Old Conversations”, and be wondering, should you do it? While auto-delete does offer a way to free up storage, it will also delete any messages you have sent or received that are over 1 year old, so if you store any significant or meaningful messages on your iPhone, you will want to avoid this step!
How to reduce space used by WhatsApp
WhatsApp chat groups can rack up serious amounts of data, with images, gifs and voice messages being thrown around by multiple people. Luckily, you can remove all these types of data from your WhatsApp chats to free up space directly on the app.
Here’s how to reduce WhatsApp storage on your iPhone:
- Open WhatsApp on your iPhone
- Tap the Settings cog in the bottom right, then tap Data and Storage Usage
- Tap Storage Usage to see how much data is being used by each of your chats
- Select the chat you want to remove data from, then click Manage
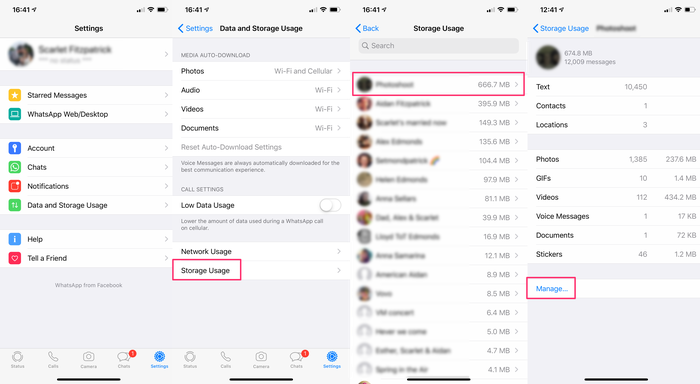
Your WhatsApp chats will be sorted from largest to smallest
This will tick all of the different types of data in your chat, if you only want to remove certain types of data, untick everything other than the data you want to remove, then tap Clear . To prevent WhatsApp from using up as much of your storage in the future, you can stop it from auto-downloading photos and videos sent through WhatsApp to your Photo Stream. Here’s how:
- Open WhatsApp and go into Settings, then Data and Storage Usage
- Look at your settings for each item in the Media Auto-Download section
- To minimise the amount of data used by WhatsApp, each of these items should be set to Never
How to reduce space used by Films and TV shows: Netflix, Prime Video and Apple TV
Films and TV shows can take up vast amounts of storage on your device, so make sure Netflix, Prime Now, Apple TV and other video apps aren’t monopolising your data with the following steps.
Review Downloaded Videos
If you download films and TV shows to watch offline, you can quickly review and remove any you no longer need on your device by going into Settings → General → iPhone Storage . If you see Review Downloaded Videos under the recommendations section, tap it, and it will take you to your downloaded videos on Netflix, Amazon Prime and other apps (unfortunately, Apple TV downloads will not appear here). To delete any of these videos, swipe left and click Delete .
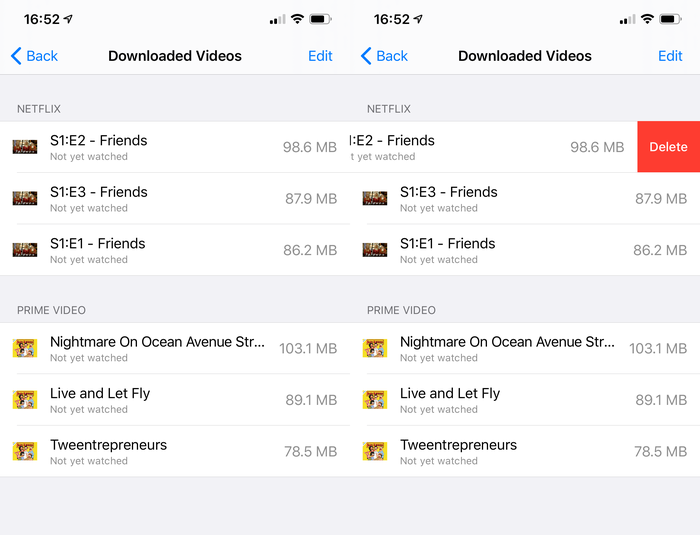
Remove downloaded videos to free up space
Netflix
To make sure Netflix isn’t using up storage at a later stage, make sure automatic downloads are not enabled:
- Open to Netflix on your iPhone and choose your profile
- Tap More in the bottom right, then App Settings
- Make sure Smart Downloads is toggled off
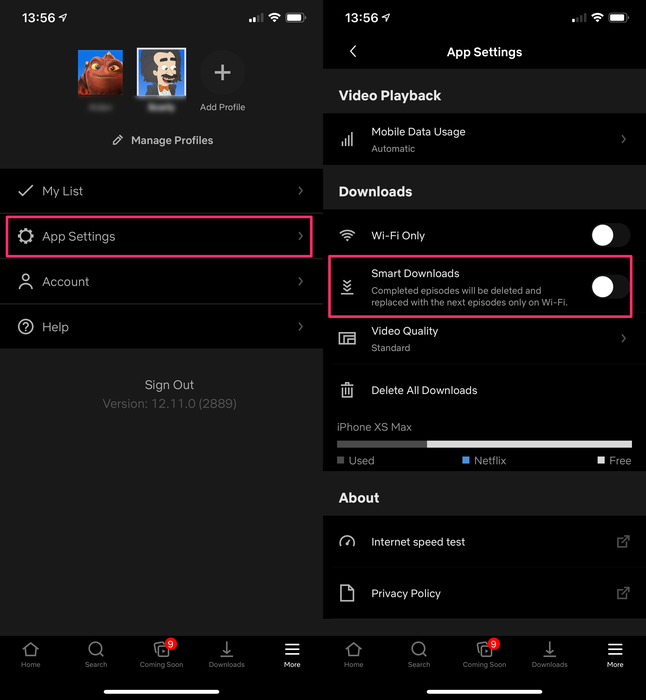
Toggle Smart Downloads off to prevent Netflix from using up your storage
You can also lower the video quality and delete all downloads from this screen to save even more space.
Unlike Netflix, Prime Video won’t auto-download videos to your iPhone, so you don’t need to update any of your settings in the Prime Video app; though you can delete Prime Video downloads in bulk from the app by going to Downloads → Edit → Select all → Delete .
Apple TV
Begin by reviewing your downloads for Apple TV on your iPhone. To do this, open the Apple TV app and tap Downloaded . You can remove downloads by swiping left.
If you want to keep Apple TV downloads on your phone, but also need more storage, you can store videos at a lower quality by going to Settings → TV → iTunes Videos and toggle Download HDR Videos off.
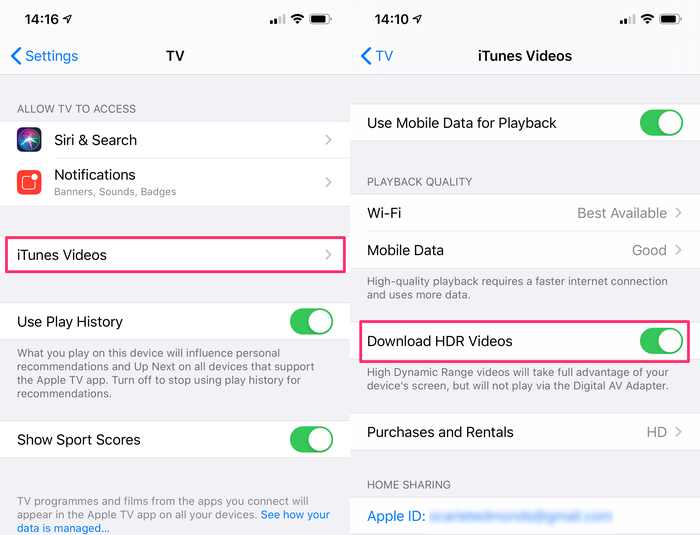
Avoid downloading HDR Videos to save iPhone storage
How to reduce space used by Music and Podcasts: Spotify, Apple Music & Podcasts
Having music and podcasts downloaded can be a lifesaver when commuting or at the gym, but keeping hold of albums you no longer listen to can clog up your iPhone’s storage.
Apple Music
If you use Apple Music, you can manage and delete downloaded music by going to Settings → Music → Downloaded Music . To delete music, tap edit then swipe left on artists you want to remove from your library.
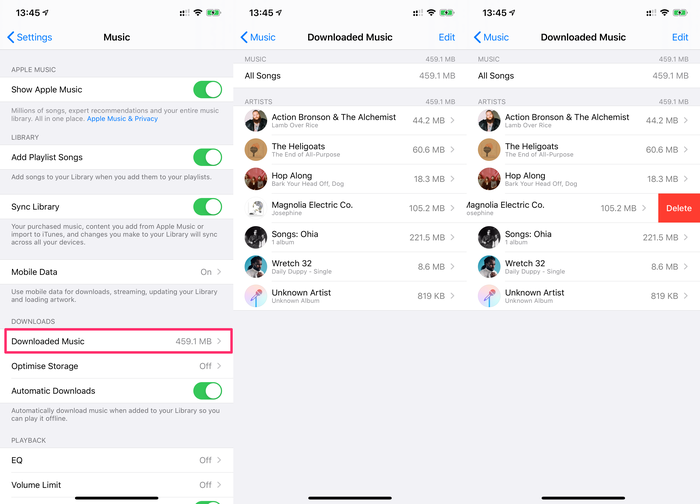
Delete music in settings to free space
You can also toggle Optimise Storage on (you can see this option in the Downloads section of the image above). Optimising storage in Apple Music will offload some of your downloaded content, removing the songs you listen to the least. However, you cannot control which songs are removed when you optimise storage, so you may prefer not to turn on this function.
Spotify
To free up space on Spotify, follow these steps:
Delete your cache: In Spotify, go to Settings → Storage → Delete Cache . This will not delete your downloaded music, but could free up around 500mb.
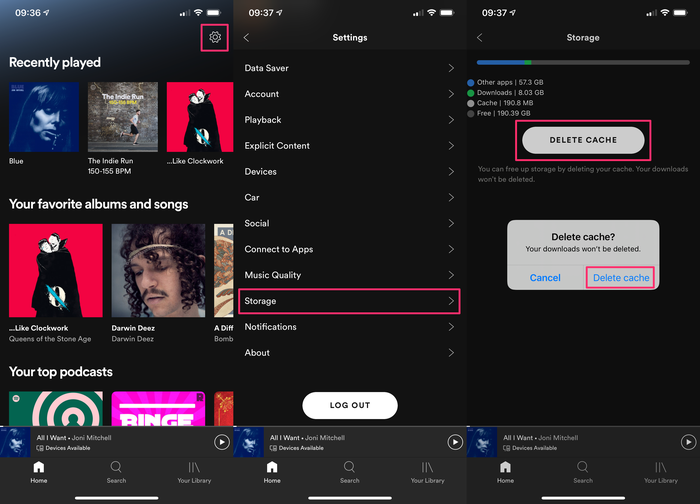
Delete your Spotify cache
Delete downloaded playlists. Go to your library. Playlists with a green arrow next to them are downloaded to your device. To remove a playlist from your downloads, tap it, then tap the three dots in the top right corner, and select Remove Download .
You can also change the quality of your downloads and disable Canvas (a feature that shows moving visuals for some tracks), to cut down on storage used by Spotify. To do so, tap the Settings cog in Spotify, tap Data Saver and toggle the button on.
Podcasts and Audiobooks
If you use Apple’s Podcasts app, you can prevent automatic podcast downloads by going to Settings → Podcasts , selecting Download Episodes and changing this to Off . If you’d like to continue downloading podcasts automatically, you can reduce the frequency with which content is downloaded in the Refresh Every section, and you can also toggle Delete Played Episodes on, to reduce the storage these files will take up.

Prevent Auto Downloads in Podcasts
For audiobooks downloaded with Audible, you can delete content from your device without removing it from your Audible account by going into the Audible app and swiping left on an audiobook to delete. Audiobooks not downloaded from your device will still be visible, and available to download again at a later stage.
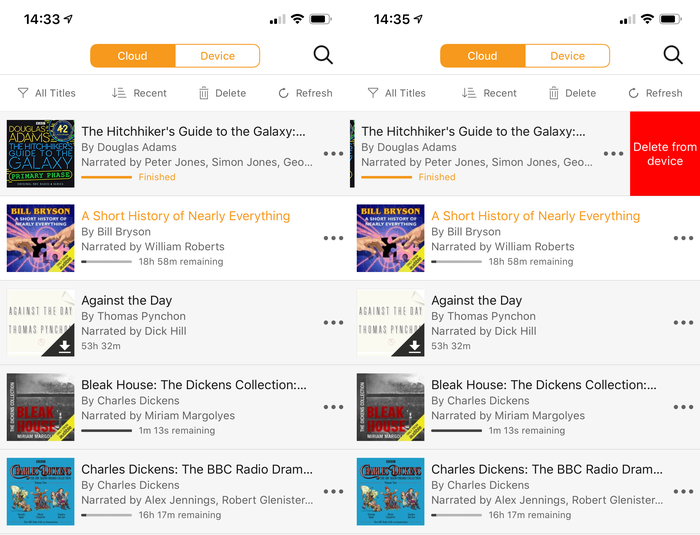
Delete completed audiobooks in Audible
Additionally, you can lower the quality of downloads in Audible by clicking Profile → Settings , and changing Download Quality to Standard , which will take up less space on your phone. You can also download your audiobook in sections, by selecting Download by Parts in the Settings menu and selecting Multiple-Parts , which will allow you to download only the sections you’re currently listening to.
Let us know how these tips work out for you in the comments section below.
Источник


