- How to Delete Files on Android
- Part 1. The Best Way to Delete Files on Android
- Step 1 Install dr.fone — Data Eraser (Android) on PC
- Step 2 Connect Android to PC
- Step 3 Confirm to Delete Files on Android
- Part 2. Delete Files with Built-in Storage Tool
- Step-by-Step Guide on How to Delete Files on Android:
- Part 3. Delete Files on Android with SD Card
- Step-by-Step Guide on How to Delete Files on Android:
- Part 4. Upload Photos to Dropbox and Delete Them on Android
- Step-by-Step Guide on How to Delete Files on Android:
- Part 5. How to Delete Data from Lost Android Phone
- Android File IO Tutorial with Internal and External Storage
- Android Internal File Storage Tutorial
- What is Internal Storage in Android?
- How to Create a Text File Programmatically in Internal Storage in Android
- How to Write Text to a File Programmatically in Internal Storage in Android
- How to Read Text from a File Programmatically in Internal Storage in Android
- How to Delete a Text File Programmatically from Internal Storage in Android
- How to View Files in Internal Storage using the Android Device File Explorer
- How to Remove Files from Internal Storage using the Android Storage Utility
- Android External File Storage Tutorial
- What is External Storage in Android?
- How to Store Persistent and Cache Files in External Storage in Android
- How to Store Media Files in External Storage in Android
- How to Store Documents in External Storage in Android
How to Delete Files on Android
• Filed to: Erase Android • Proven solutions
Android smartphones and tablets can fill up very fast with the number of apps, media files and cached data in them. What’s more, some of the lower end devices come with just a few GB of storage space. The lesser the space left on your smartphone, the more time you are going to have to spend on micromanaging your storage. If you are constantly running out of space and need help managing it, or meet some emergency like you should send Samsung Note7 back for its battery failure, you could consider that you could try to delete files on Android.
Part 1. The Best Way to Delete Files on Android
dr.fone – Data Eraser (Android) is an easy and convenient way to use Android (including Samsung Galaxy Note7) data eraser which helps wipe out all of your Android phone data and erase backups and deleted data too in order to ensure the data cannot be recovered in any way. This tool has a number of stylish and incredible features which don’t just make everything easier but also help improve the performance of your smart phone.
Key Features of dr.fone — Data Eraser (Android):
- Powerful scanning ability.
- Removes all of the unnecessary junk files and background processes for Android users.
- Erases your device completely.
- Erases backup and deleted data completely as well.
- Frees space up and speeds your smart phone up.
Step-By-Step Guide on How to Dlete Files on Android
Step 1 Install dr.fone — Data Eraser (Android) on PC
Download the software and install it on your PC. After you complete the install, launch the application.
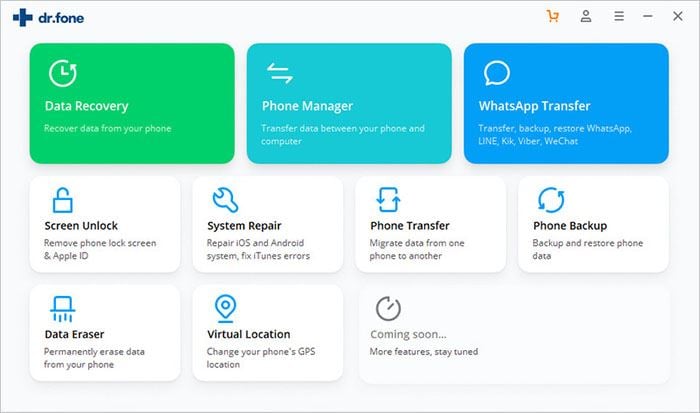
Step 2 Connect Android to PC
Connect your Android smartphone to your PC through a data cable. Once connected, click of the «Erase All Data» option from the menu on the extreme left of the interface.
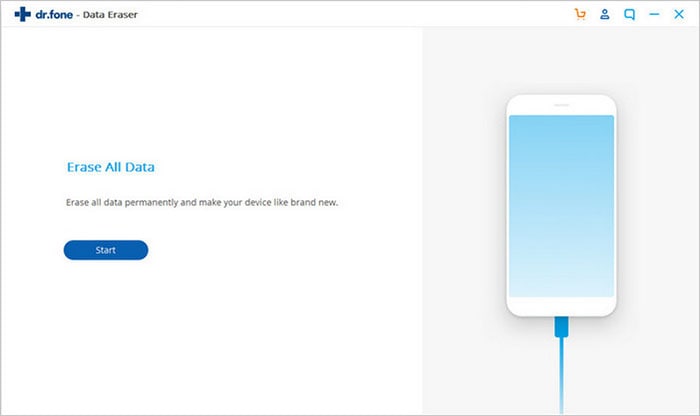
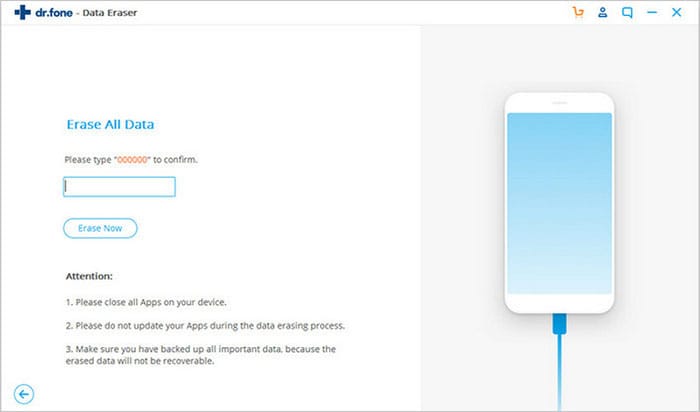
Step 3 Confirm to Delete Files on Android
You can click the «Erase all Data» button. Then a pop-up window will ask you to confirm your selection. Type «delete» in the dialogue box then click «Erase Now» button to permanently delete data from your Android smartphone.
Part 2. Delete Files with Built-in Storage Tool
Modern Android smartphones come with a storage pane where you can see exactly what’s taking up all the space on your smart phone. Here are the steps on how you can use it to delete files.
Step-by-Step Guide on How to Delete Files on Android:
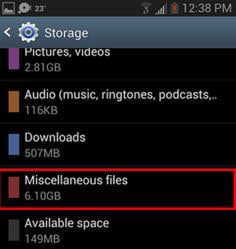
Step 1. Simply visit the settings menu and click on storage. You will be able to see the amount of space that is used by apps, pictures, audio files, cached data, etc.
Step 2. You can delete anything you don’t want from this screen. For example, visit the downloads page to remove files and clear cached data for all your installed apps.
Step 3. Once you’ve removed all the files you don’t want, you should have a lot of free space on your smartphone.
One more thing you should understand is the apps, data and cache all contribute to the amount of space used by an app. For example, if you’ve installed Spotify and have saved a lot of music offline, Spotify might just be using a couple of GB of storage space. All apps which cached data for offline use work like this. Removing cached data for apps is another terrific way of freeing up space on your smartphone.
Part 3. Delete Files on Android with SD Card
Most Android devices today have microSD card slots too. Even though they might not be common with the high end devices, most mid and low range devices do have them. If your phone has one, all you require to do is buy a microSD card and use it to free up space on your smartphone. This additional storage can’t be used to install apps or to save system files but it can be used for storing music, pictures, videos, etc. Some apps will also let you shift their cache locations to the memory card.
Step-by-Step Guide on How to Delete Files on Android:
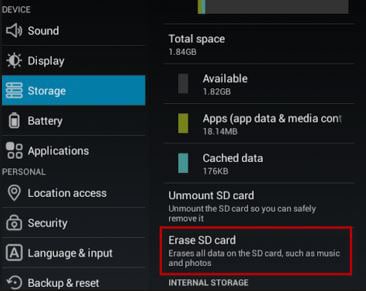
Step 1. Once you’ve installed the SD card, connect your smartphone with your computer.
Step 2. Move all of your media, music and other files to the card. You can even erase all data on your SD card directly from there is you want.
Even if you are using an SD card already, you could simply replace it with one that has more storage. They aren’t too expensive. There’s no cheaper way of getting additional storage on your smartphone than this.
Part 4. Upload Photos to Dropbox and Delete Them on Android
Photos can take up lots of space on your smartphone. You can free up a lot of space by storing them on Dropbox instead of on your phone.
Step-by-Step Guide on How to Delete Files on Android:
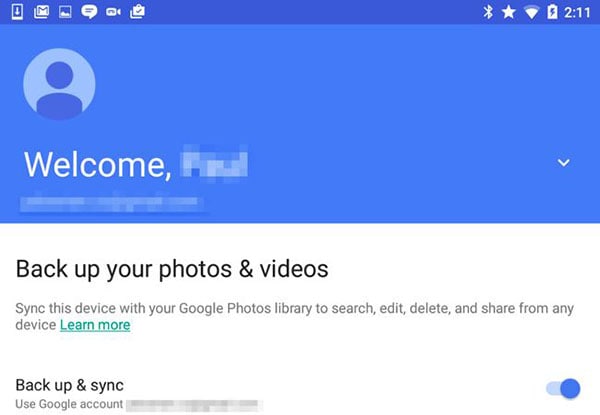
Step 1. Download the Dropbox and install it on your smartphone.
Step 2. You can backup the photos or videos to your Dropbox account and then remove it from your phone.
Step 3. You can then access these photos using the Dropbox app on your smartphone or on the internet through Dropbox.com. As long as you have internet access, you will be able to instantly access your photos no matter where you are.
If you don’t like the idea of your photos being uploaded to the internet, you can simply copy them to your computer and then delete them from your smartphone.
So what are you waiting for? You no longer have to suffer with a smartphone that has no storage space and runs really slow. Just choose any one of these options or all of them and get rid of your problems once and for all.
Part 5. How to Delete Data from Lost Android Phone
To be able to remotely manage and secure delete Android devices with Android Device Manager, you must have enabled Android Device Manager before it was stolen, lost or misplaced, using the following steps.
Step-By-Step Guide to Enable Android Device Manager
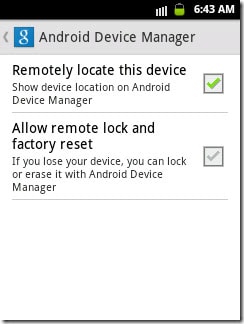
Step 1. Launch «Google Settings» app on your Android phone and tap «Android Device Manager».
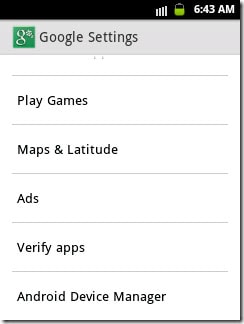
Step 2. Enable «Allow remote lock and factory reset». The box for «Remotely locate this device» is always checked by default, but you will just verify if it’s enabled.
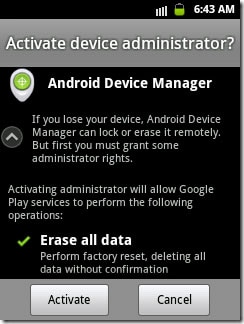
Step 3. You will then be asked to activate device administrator for Android Device Manager. Just tap the «Activate» button to grant ADM the administration rights to erase all your data, lock screen or ring it when it’s lost, stolen or misplaced.
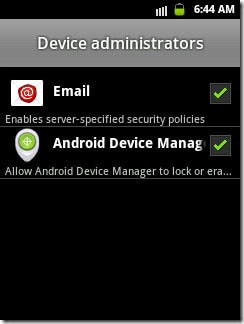
Step 4. To verify if Android Device Manager has been granted access to your device successfully, tap Settings> Security> Device Administrators and then check whether Android Device Manager is enabled.
Step-By-Step Guide on How to Delete Data from Lost Android Phone
Step 1. Go to this webside and log in with the Google account you use on your lost device. The online tool displays all the devices that are attached to your Google account. Select the lost Android phone.
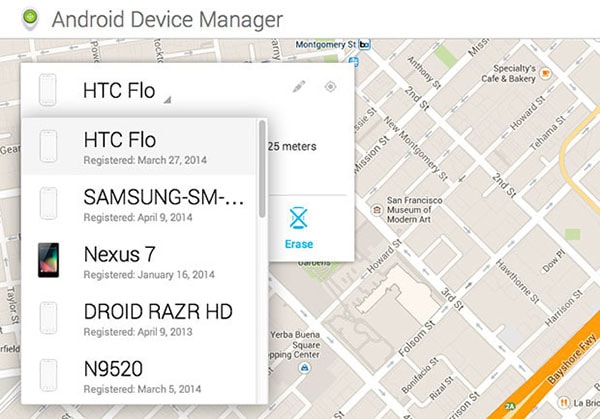
Step 2. You will be able to see the location of your phone, as well as the Ring, Lock and Erase buttons. Click on the «Erase» button to delete all the data from your lost Android phone remotely.
Источник
Android File IO Tutorial with Internal and External Storage
In this tutorial I will cover how to create files in various methods in Android such as Internal Storage, External Storage, the MediaStore API and the Storage Access Framework.
I will explain the differences between each of these file storage methods and provide some context on when to use each.
I will also cover some details on the Scoped Storage privacy feature released in Android 10 and enhanced in Android 11 for files created by your app in external storage.
I will share code samples in this tutorial and I have also published all the code from this tutorial in the GitHub repository in the link below.
Android Internal File Storage Tutorial
This section of the post contains a tutorial on how to use internal storage in Android. We will cover the following topics in our tutorial on the use of internal storage in Android.
- What is Internal Storage in Android?
- How to Create a Text File Programmatically in Internal Storage in Android
- How to Write Text to a File Programmatically in Internal Storage in Android
- How to Read Text from a File Programmatically in Internal Storage in Android
- How to Delete a Text File Programmatically from Internal Storage in Android
- How to View Files in Internal Storage using the Android Device File Explorer
- How to Remove Files from Internal Storage using the Android Storage Utility
Please see a screen capture below of the Android app of what we will be creating in this tutorial.

What is Internal Storage in Android?
Internal Storage in Android is used for storing files that are only visible to your app. No permissions are required to read or write files to internal storage for your app. If your app is uninstalled with files in internal storage, these files will be deleted as a part of the uninstallation process.
Files in internal storage in Android can either be persistent files or cache files.
Cache files are stored in internal storage as temporary files, they will get deleted when the user uninstalls the app but they can also be deleted before then by the Android system clearing space in storage or by deleting the cache file programmatically. Unlike cache files, persistent files in internal storage cannot be deleted by the Android system automatically.
How to Create a Text File Programmatically in Internal Storage in Android
To create a text file programmatically in internal storage in Android we will be using the File class from the java.io.File package.
In the code sample I have created, I am allowing the user to enter the name of the file inside an EditText as well as allowing them to use a ToggleButton to choose if they want a persistent file or a cache file to be created in internal storage.

We will use the File constructor and provide two parameters, the first is of the data type File which refers to the directory where the File we create will reside and the second parameter is of the data type String which will be the name of the file.
For persistent files in internal storage we need to use the “files” directory inside the internal storage directory. To obtain this directory use the getFilesDir() method on the application context which will return a File object pointing the “files” directory.
For cache files in internal storage we need to use the “cache” directory inside the internal storage directory. To obtain this directory use the getCacheDir() method on the application context which will return a File object pointing the “cache” directory.
Before we create the file, I will first check whether it already exists using the exists() method on the File object which will return true if the File already exists or false if it does not exist.
If the file doesn’t exist, I will proceed to create the file using the createNewFile() method on the File object.
Please see the code excerpt below for programmatically creating either a persistent or cache file in internal storage in Android.
How to Write Text to a File Programmatically in Internal Storage in Android
To write text to a file residing in the internal storage of our app programmatically we will be using the FileOutputStream class from the java.io.FileOutputStream package.
In our code sample, we will be writing the file name that has been entered in the EditText by the user and will determine if the file is a persistent file or a cache file based on the checked status of the ToggleButton.
Also in our code sample, the user will enter the text they wish to write into the file in an EditText and select the “Write File” button when they are ready to write the text to the file.
To set up the FileOutputStream for writing the text to the file, we will first check if the file is a persistent file or cache file in internal storage.
If it is a persistent file then we will set up the FileOutputStream using the openFileOutput(String, int) method on the application context passing the file name and the Context.MODE_PRIVATE flag as parameters. The Context.MODE_PRIVATE flag for the file creation mode means the created file can only be accessed by the calling application.
If the file is a cache file then we will set up the FileOutputStream by passing a File object pointing to the cache file as a parameter to the FileOutputStream constructor.
Then to write the text to the file using the FileOutputStream we will call the write(byte[]) method by passing a byte array as a parameter that consists of the text from the file contents EditText encoded using the UTF-8 format into a byte array.
Please see the code excerpt below for programmatically writing text to either a persistent or cache file in internal storage in Android.
How to Read Text from a File Programmatically in Internal Storage in Android
To read the text from a file residing in the internal storage of our app programmatically we will be using the FileInputStream class from the java.io.FileInputStream package.
In our code sample, we will overwrite the file contents EditText with the text read from the file entered into file name EditText when the user selects the “Read File” button.
To set up the FileInputStream for reading the text from the file, we will first check if the file is a persistent file or a cache file in internal storage.
If it is a persistent file then we will set up the FileInputStream using the openFileInput(String) method on the application context passing the file name as a parameter.
If the file is a cache file then we will set up the FileInputStream by passing a File object pointing to the cache file as a parameter to the FileInputStream constructor.
Then we create will an InputStreamReader from the FileInputStream and use that to create a BufferedReader which allows us to read from the file one line at a time. We will create an empty ArrayList of Strings to store each line of text from the file.
Next we will use the BufferedReader inside a while loop to extract each line of text one at a time until there is no more text. Each line of text read using the BufferedReader will be inserted into the ArrayList sequentially.
Once all of the lines of text have been read from the file we will use the join(…) method from the TextUtils class to create a single String of text by joining all of the lines of text in the ArrayList together with a new line character between all lines of text. This will allow the text to be formatted correctly when displayed in the EditText containing the file contents.
Please see the code excerpt below for programmatically reading text from a either a persistent or cache file in internal storage in Android.
How to Delete a Text File Programmatically from Internal Storage in Android
To delete a file residing in the internal storage of our app programmatically we will be using the File class from the java.io.File package.
First we will create File object pointing the File we want to delete by using the file name entered by the user and selecting the appropriate file directory based on whether the file is a persistent file or a cache file.
Then we will use the exists() method on the File object to confirm that it exists, and if it does exist we will proceed to delete using the delete() method on the File object.
Please see the code excerpt below for programmatically deleting either a persistent or cache file in internal storage in Android.
How to View Files in Internal Storage using the Android Device File Explorer
The Device File Explorer is a tool available in Android Studio that allows you to view all of the files on the Android device connected to Android Studio.
The Device File Explorer can be used to read both the persistent and cache files inside internal storage of your Android app.
To access the Device File Explorer in Android Studio select the “View” menu, hover over “Tool Windows” and select the “Device File Explorer” menu item.

The Device File Explorer will load on the right side of Android Studio and will display a file tree of all of the directories and files on the Android device.

To locate persistent files in internal storage of your app navigate through to the following directory.
data/data/ /files

To locate cache files in internal storage of your app navigate through to the following directory.
data/data/ /cache
You can also open any file to read inside Android Studio by double clicking on the file name.

How to Remove Files from Internal Storage using the Android Storage Utility
It is possible to use a storage utility an Android device to remove persistent and cache files from the internal storage of your app.
In the storage utility shown in the GIF below. The total amount of storage used by your Android app broken down by the App size, User data and Cache is shown along with a button to “Clear storage” and a button to “Clear cache”.
Selecting the “Clear storage” button will delete all persistent and cache files from the internal storage of your app.
Selecting the “Clear cache” button will delete only the cache files from the internal storage of your app leaving the persistent files in internal storage.

Android External File Storage Tutorial
What is External Storage in Android?
In Android External Storage is used for storing files that other apps are able to access. External storage is better for storing larger files that need to be shared with other apps.
Files in external storage can be app specific, meaning that when the app is uninstalled these files in external storage will be deleted. App specific files in external storage can be persistent files or cache files.
For Android 4.4 (API level 19) and higher, no storage related permissions are required to access app specific directories with external storage.
For apps the target Android 10 (API level 29) or higher, a new feature called scoped storage is applied by default to external storage which will prevent other apps from accessing your app specific files in external storage.
To learn more about scoped storage check out the YouTube video below.
Media files such as images, audio and video can be exposed to other apps in external storage through the use of the Android MediaStore API.
Other files you want to share to other apps in external storage such as documents can be shared using the Storage Access Framework.
How to Store Persistent and Cache Files in External Storage in Android
App specific persistent files in external storage reside in a directory accessible using the getExternalFileDirs() method.
App specific cache files in external storage reside in a directory accessible using the getExternalCacheDirs() method.
The code sample below contains code for writing a persistent file or a cache file into external storage in Android.
The code sample below contains code for reading a persistent file or a cache file from external storage in Android.
Below is a screenshot of an Android app creating a persistent file in app specific external storage.

Below is a screenshot of the Device File Explorer in Android Studio showing the persistent file created in app specific external storage.

Below is a screenshot of an Android app creating a cache file in app specific external storage.

Below is a screenshot of the Device File Explorer in Android Studio showing the cache file created in app specific external storage.

How to Store Media Files in External Storage in Android
Media files such as images, videos and audio can be shared in external storage with other apps using the Android Media Store API providing they have the READ_EXTERNAL_STORAGE permission. Media files shared using the Media Store API will not be deleted when the app is uninstalled.
On Android 10 (API level 29) or higher, READ_EXTERNAL_STORAGE or WRITE_EXTERNAL_STORAGE permissions are required to access media files created by other apps via the Media Store API. On Android 9 (API level 28) or lower permissions are required for accessing all media files via the Media Store API.
To demonstrate how to storage media files in external storage in Android using the MediaStore API, I created a sample app that loads an image from the internet using the Glide library then stores it into the Pictures directory in external storage using the MediaStore API for images.

The app also will display a RecyclerView in a grid layout of all images in the Pictures directory retrieved using the MediaStore API.

If you would like to learn more about how to set up and use Glide for image loading in your Android app including how to download the Glide using Gradle and how to set up the manifest to include internet permissions, check out the tutorial I wrote on how to use Glide at the link below.
For this section of the tutorial first we will be creating a class modelling an image retrieved from the Media Store API. See the code sample for the Image class below.
Next we will be creating a RecyclerViewHolder class for the Image to display the Image in the RecyclerView. See the code sample for the ImageViewHolder class below which sets the name of the Image in the TextView and loads the ImageView with Glide inside the bind(Image) method.
For the next step we will create a RecyclerViewAdapter for the RecyclerView. See the code sample for the GalleryRecyclerAdapter class below.
In the final step in this section of the tutorial we will create an Activity class that includes code for inserting an Image into the Media Store API and querying Images from the Media Store API into the RecyclerViewAdapter to be shown in the RecyclerView.
How to Store Documents in External Storage in Android
Documents and other files can be shared with other apps in external storage using the Storage Access Framework.
No permissions are required read or write files in external storage to the Storage Access Framework. Files created using your app via the Storage Access Framework will not automatically be deleted when you uninstall your app.
Please see the code sample for the activity class below that can read and write files to external storage using the Storage Access Framework.
See the screen capture below showing the user experience of creating and writing to a text document generating using the Storage Access Framework.
Источник


