- How to Recover Data from a Locked Android Phone
- If you are wondering whether it is possible to recover data from locked Android, worry no more because this article will show the best way to.
- Part 1: Is it Possible to Access and Retrieve Data from Locked Android
- Part 2: How to Unlock Android Device Without Loosing Data
- Solution 1: Unlock with Google Account
- Solution 2: Reset Phone to Factory Setting
- Solution 3: Use Android Lockscreen Removal Software
- Conclusion
- How to Delete Files on Android
- Part 1. The Best Way to Delete Files on Android
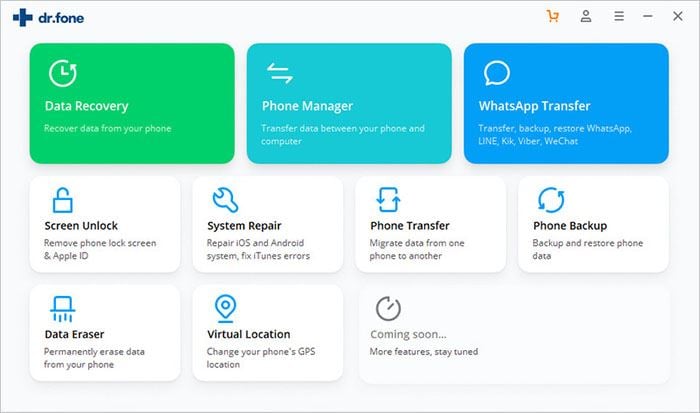
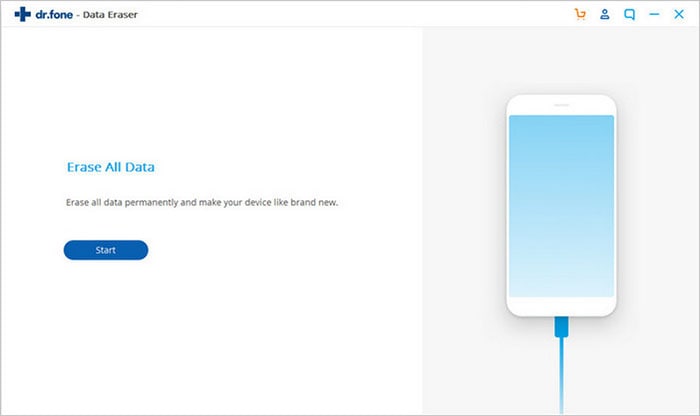
- Step 1 Install dr.fone — Data Eraser (Android) on PC
- Step 2 Connect Android to PC
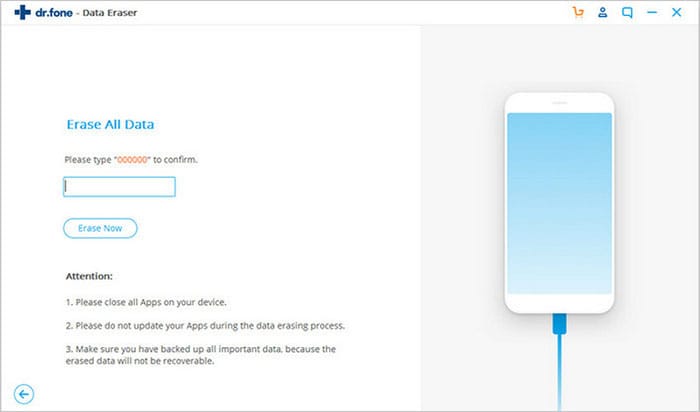
- Step 3 Confirm to Delete Files on Android
- Part 2. Delete Files with Built-in Storage Tool
- Step-by-Step Guide on How to Delete Files on Android:
- Part 3. Delete Files on Android with SD Card
- Step-by-Step Guide on How to Delete Files on Android:
- Part 4. Upload Photos to Dropbox and Delete Them on Android
- Step-by-Step Guide on How to Delete Files on Android:
- Part 5. How to Delete Data from Lost Android Phone
How to Recover Data from a Locked Android Phone
If you are wondering whether it is possible to recover data from locked Android, worry no more because this article will show the best way to.

David Darlington
Sep 14, 2021 • Filed to: SD Card Solutions • Proven solutions
Part 1: Is it Possible to Access and Retrieve Data from Locked Android
The answer to this question depends on different factors.
For instance:
- If the data you want is in the device internal storage or external storage
- Do you have a way to bypass the Android lock screen?
- Do you desire to unlock your device without data loss?
- Or you want to get data from locked Android with a broken screen
For any scenario, there is one crucial thing you need to understand:
Data in an Android phone with a screen lock is directly unuseable, let alone retrievable. You can’t even enable USB debugging on locked phones.
So if you’re aiming at recovering data from a locked smartphone, it will require you to unlock the Android screen first.
And there are three ways to unlock your Android device:
- Use your Google Account password (if you had initially signed in before the screen lock)
- Utilize an Android screen lock remover
- Execute a factory reset
The first two options will not touch even the tip of your data. You’ll get your files as they were.
However, the third option wipes Android’s storage clean.
And it is important to note that in case you lose data from Android’s internal storage, and not from the SD card, the recovery after a factory reset is difficult.
Not many programs can find a way around such an issue. And if you find such a program, it will require you to root your phone, which is another difficult task to execute.
Why is it hard to Recover Files from Android Phone Internal Memory?
It is difficult to access the internal memory of an Android device.
When you connect an Android to a computer, the system opens it through MTP (Media Transfer Protocol). The files in the phone storage are mounted as a separate disk, that a Data recovery tool has a difficult time to go around it.
If your data is on an SD card, and you factory-reset your device, data recovery is nearly guaranteed as a recovery software can readily access it and scan the lost files.
Part 2: How to Unlock Android Device Without Loosing Data
Plenty of ways can help you unlock the android device without touching even the tip of your data—methods like Unlocking with Google Account, or find my mobile.
But some of the fixes, like factory resetting, will cause data loss.
Solution 1: Unlock with Google Account
Unlike iPhone users, nearly all Android users don’t execute a regular backup.
So when Android screen locks, the best recommendation to unlock the phone without data loss is to use the Google Account password.
And to use Google account to unlock an Android device, you must have set and signed up before you locked the smartphone.
Here is a step-by-step procedure to unlock Android device without data loss:
Step 1. Navigate through your locked screen for the «forgot password?» function, and tap on it.
Step 2. Your android will ask you to answer the recovery question you used to set your Google Account. If you can remember it, key it in, and your Android will unlock. You can now access all your data and set a password you can remember.
Step 3. If you don’t remember the answer to your recovery question, input any password five times to invoke the «Forgotten the password» function.
Step 4. Your phone will ask you to input your Google Account and password and log in. This action unlocks your phone’s screen with no data loss.
If the above method doesn’t work for you, because you do not remember your password, try the next step. It should work for you.
Solution 2: Reset Phone to Factory Setting
Factory Resetting is another option to unlock Android devices.
The action undoes all the settings, wipe all the data, and return the phone to the manufacturer’s initial settings.
The only problem is that you might lose some of your data permanently.
Since your screen is locked, it is a pretty mess that you cannot factory reset from the Settings menu.
You can only factory reset it via Android’s Factory Reset in the Recovery Mode. To access the Recovery Mode, you’ll utilize the buttons of your phone.
This screen-unlocking method removes all your data from internal storage.
Step-by-Step Procedure to Factory Reset Android Device
Step 1. Turn your phone off.
Step 2. Press and hold the Volume down button and the Power button simultaneously until the phone turns on. This opens the Android boot screen.
Step 3. On the Boot screen, use the Volume down button to move down until you highlight the Recovery mode option.
Step 4. Once you’ve highlighted the Recovery Mode, press the power button to initiate the Recovery Mode. You should see an Android robot.
Step 5. After you’ve access the Recovery mode screen, press and hold the Power button, and while doing so, hit the Volume up button once, then let go of the power button.
Step 6. Use the Volume down button to move down until you highlight Wipe data/factory reset option. Select it using the Power button.
Step 7. Then hit the Power button to select the «Reboot system now.» Your phone will restore to the form it was when new.
Solution 3: Use Android Lockscreen Removal Software
A third party Android Lockscreen Removal software is a non-compromising solution to unlock Android screen. It doesn’t matter if the lock screen is password, fingerprints, pin, or pattern, an Android lock screen remover software mightily unlocks without data wiping.
Conclusion
Screen lock is designed to protect your Android phone from unauthorized access. But when you forget the password in any way, and you want access to your Android Phones, screen lock becomes a nightmare.
But the good news is, there are several methods to access a locked Android phone, retrieve lost data, and even to unlock Android device
Источник
How to Delete Files on Android
• Filed to: Erase Android • Proven solutions
Android smartphones and tablets can fill up very fast with the number of apps, media files and cached data in them. What’s more, some of the lower end devices come with just a few GB of storage space. The lesser the space left on your smartphone, the more time you are going to have to spend on micromanaging your storage. If you are constantly running out of space and need help managing it, or meet some emergency like you should send Samsung Note7 back for its battery failure, you could consider that you could try to delete files on Android.
Part 1. The Best Way to Delete Files on Android
dr.fone – Data Eraser (Android) is an easy and convenient way to use Android (including Samsung Galaxy Note7) data eraser which helps wipe out all of your Android phone data and erase backups and deleted data too in order to ensure the data cannot be recovered in any way. This tool has a number of stylish and incredible features which don’t just make everything easier but also help improve the performance of your smart phone.
Key Features of dr.fone — Data Eraser (Android):
- Powerful scanning ability.
- Removes all of the unnecessary junk files and background processes for Android users.
- Erases your device completely.
- Erases backup and deleted data completely as well.
- Frees space up and speeds your smart phone up.
Step-By-Step Guide on How to Dlete Files on Android
Step 1 Install dr.fone — Data Eraser (Android) on PC
Download the software and install it on your PC. After you complete the install, launch the application.
Step 2 Connect Android to PC
Connect your Android smartphone to your PC through a data cable. Once connected, click of the «Erase All Data» option from the menu on the extreme left of the interface.
Step 3 Confirm to Delete Files on Android
You can click the «Erase all Data» button. Then a pop-up window will ask you to confirm your selection. Type «delete» in the dialogue box then click «Erase Now» button to permanently delete data from your Android smartphone.
Part 2. Delete Files with Built-in Storage Tool
Modern Android smartphones come with a storage pane where you can see exactly what’s taking up all the space on your smart phone. Here are the steps on how you can use it to delete files.
Step-by-Step Guide on How to Delete Files on Android:
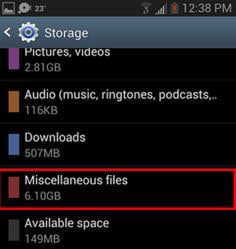
Step 1. Simply visit the settings menu and click on storage. You will be able to see the amount of space that is used by apps, pictures, audio files, cached data, etc.
Step 2. You can delete anything you don’t want from this screen. For example, visit the downloads page to remove files and clear cached data for all your installed apps.
Step 3. Once you’ve removed all the files you don’t want, you should have a lot of free space on your smartphone.
One more thing you should understand is the apps, data and cache all contribute to the amount of space used by an app. For example, if you’ve installed Spotify and have saved a lot of music offline, Spotify might just be using a couple of GB of storage space. All apps which cached data for offline use work like this. Removing cached data for apps is another terrific way of freeing up space on your smartphone.
Part 3. Delete Files on Android with SD Card
Most Android devices today have microSD card slots too. Even though they might not be common with the high end devices, most mid and low range devices do have them. If your phone has one, all you require to do is buy a microSD card and use it to free up space on your smartphone. This additional storage can’t be used to install apps or to save system files but it can be used for storing music, pictures, videos, etc. Some apps will also let you shift their cache locations to the memory card.
Step-by-Step Guide on How to Delete Files on Android:
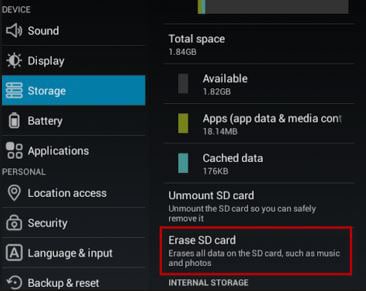
Step 1. Once you’ve installed the SD card, connect your smartphone with your computer.
Step 2. Move all of your media, music and other files to the card. You can even erase all data on your SD card directly from there is you want.
Even if you are using an SD card already, you could simply replace it with one that has more storage. They aren’t too expensive. There’s no cheaper way of getting additional storage on your smartphone than this.
Part 4. Upload Photos to Dropbox and Delete Them on Android
Photos can take up lots of space on your smartphone. You can free up a lot of space by storing them on Dropbox instead of on your phone.
Step-by-Step Guide on How to Delete Files on Android:
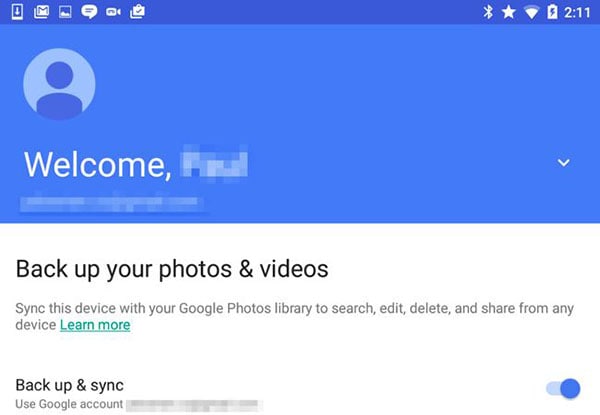
Step 1. Download the Dropbox and install it on your smartphone.
Step 2. You can backup the photos or videos to your Dropbox account and then remove it from your phone.
Step 3. You can then access these photos using the Dropbox app on your smartphone or on the internet through Dropbox.com. As long as you have internet access, you will be able to instantly access your photos no matter where you are.
If you don’t like the idea of your photos being uploaded to the internet, you can simply copy them to your computer and then delete them from your smartphone.
So what are you waiting for? You no longer have to suffer with a smartphone that has no storage space and runs really slow. Just choose any one of these options or all of them and get rid of your problems once and for all.
Part 5. How to Delete Data from Lost Android Phone
To be able to remotely manage and secure delete Android devices with Android Device Manager, you must have enabled Android Device Manager before it was stolen, lost or misplaced, using the following steps.
Step-By-Step Guide to Enable Android Device Manager
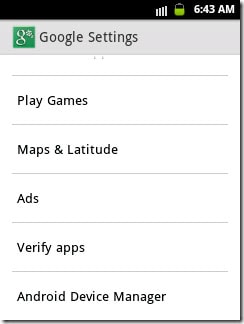
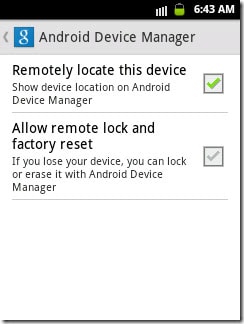
Step 1. Launch «Google Settings» app on your Android phone and tap «Android Device Manager».
Step 2. Enable «Allow remote lock and factory reset». The box for «Remotely locate this device» is always checked by default, but you will just verify if it’s enabled.
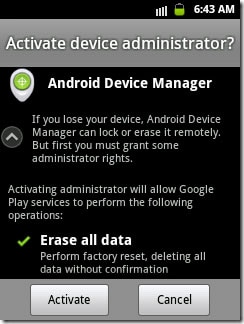
Step 3. You will then be asked to activate device administrator for Android Device Manager. Just tap the «Activate» button to grant ADM the administration rights to erase all your data, lock screen or ring it when it’s lost, stolen or misplaced.
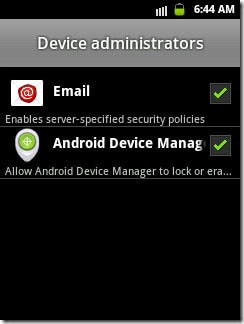
Step 4. To verify if Android Device Manager has been granted access to your device successfully, tap Settings> Security> Device Administrators and then check whether Android Device Manager is enabled.
Step-By-Step Guide on How to Delete Data from Lost Android Phone
Step 1. Go to this webside and log in with the Google account you use on your lost device. The online tool displays all the devices that are attached to your Google account. Select the lost Android phone.
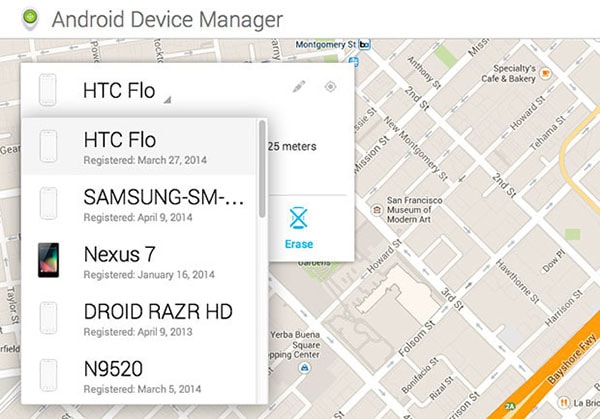
Step 2. You will be able to see the location of your phone, as well as the Ring, Lock and Erase buttons. Click on the «Erase» button to delete all the data from your lost Android phone remotely.
Источник


