- How to Remove a Gmail Account From Your Android Device
- Remove Gmail accounts you no longer need
- How to Remove a Gmail Account From an Android Device
- How to Keep Gmail But Stop Emails
- How to Turn Off Gmail Notifications
- Problems Removing a Google Account From an Android Phone
- Losing Access to Data Tied to the Gmail Account
- How to Delete Google Account from Android Phone without Password
- The Things You Need to Know Before You Delete Google Account
- How to Delete Google Account from Phone with Password
- How to Delete Google Account on Android Phone without Password
- Steps to Delete Google Account Permanently from Android Phone
- Step 1. Install Program & Connect Your Phone
- Step 2. Select Your Device Information
- Step 3. Install Data Package
- Step 4: Start to Remove
- How to Delete Email Accounts on Android
- Part 1: How to Delete Email Accounts on Android
- Part 2: How to Delete Calendars on Android
- dr.fone – Android Data Eraser
How to Remove a Gmail Account From Your Android Device
Remove Gmail accounts you no longer need
:max_bytes(150000):strip_icc()/JeremyLaukkonen-1bb154ef56254c2896eae37b5f535144.jpg)
When you remove a Gmail account from an Android device the right way, the account still exists, you can access it with a web browser, and you can even reconnect the account later if you change your mind.
Instructions apply to all Android versions and devices across all manufacturers, although menus and options might differ slightly.
How to Remove a Gmail Account From an Android Device
Here are the basic steps to remove a Gmail account from an Android device.
Open Settings > Accounts.
:max_bytes(150000):strip_icc()/googleremoveaccount-0b6ce02af192469b96bc65864e8cf868.jpg)
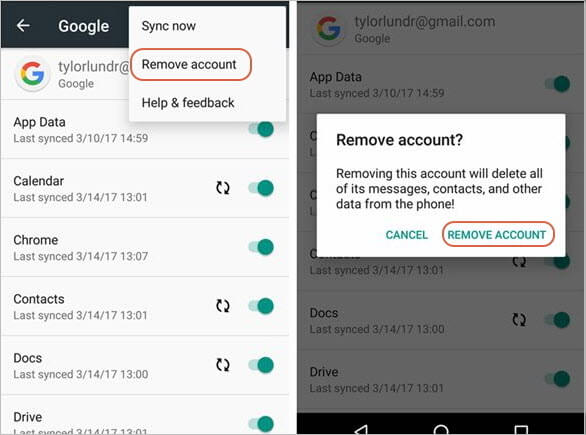
Select the Gmail account.
Tap Remove Account.
Confirm with a tap on Remove Account.
:max_bytes(150000):strip_icc()/gmailremoveaccount-ce22177f0afb408faa10aba2ef6ba0f8.jpg)
How to Keep Gmail But Stop Emails
If you use a different third-party email app, turn off syncing for Gmail or turn off Gmail notifications.
Open Settings and tap Accounts, or Users & Accounts on some phones.
Tap the Gmail account. You may need to tap Gmail first on some devices.
Tap Sync Account.
Scroll down to Gmail and tap the toggle next to it to disable Gmail from syncing to your phone. Some devices might call this setting Sync Gmail.
:max_bytes(150000):strip_icc()/keepgmailacct-e520cb85ee914131812a8340257a1e5a.jpg)
How to Turn Off Gmail Notifications
To keep the Google account on your phone and receive Gmail messages, but don’t receive new mail alerts, follow these steps:
In the Gmail app, tap the three-horizontal lines in the upper-left corner.
Scroll down and tap Settings.
Tap the relevant account.
:max_bytes(150000):strip_icc()/turnoffgmailnotifications-7c786f2d30d041c58ac2f99b17a1545d.jpg)
Select Notifications > None to turn off notifications.
:max_bytes(150000):strip_icc()/turnoffgmailnotific-02b1da4652124df8853e3e5d125d2f1b.jpg)
Problems Removing a Google Account From an Android Phone
Although these instructions work for most Android phones, you might run into problems:
- When you get to step four, you might need to tap the Overflow Menu icon (the three vertically stacked dots) to access the option to remove your account.
- If you have trouble removing the primary Gmail account—the one you used when you first set up your phone—try adding a new Gmail account, setting it as the primary account, and deleting the unwanted one. If that doesn’t work, perform a factory reset. This process will also remove all your data from the phone, so make sure to back up your phone first.
Losing Access to Data Tied to the Gmail Account
If you remove the Gmail account that’s tied to the Google Play Store, you will lose access to apps and content that you purchased from the Google Play Store. You’ll also lose access to emails, photos, calendars, and any other data tied to that Gmail account.
On some Android devices, you can’t remove a Gmail account. Instead, disable it at Apps > Gmail > Disable.
Источник
How to Delete Google Account from Android Phone without Password
home_icon Created with Sketch.
Home > Unlock Android > How to Delete Google Account from Android Phone without Password
![]()
May 22, 2019 (Updated: September 10, 2021)
Deleting Google account from your phone can be frustrating especially when you don’t have the password. Many people have complained about the difficulty they face when it comes to deleting a Google account. We have studied this complaint and came out with a solution and we are happy to share it with you.

The Things You Need to Know Before You Delete Google Account
Getting rid of Google account should be done with caution. Before you do it, it’s important to keep in mind there are related options that may be confusing:
- Delete Google Account from Android Phone: When it’s done, you can’t have access to Google Play anymore. The same goes for Google Music, YouTube, and other Google services. It will also affect Gmail syncing on your device, which means you’ll no longer receive Gmail notifications. But you can add the account back to your phone any time you want.
- Turn off Syncing for Gmail App: This leaves Google account on your phone, that means you can use it for Google Play, YouTube, etc. But you’ll no longer receive an email notification.
- Delete Account from Google: This is irreversible. The account will be deleted from Google service. You will lose your Gmail account and everything attached to it.
How to Delete Google Account from Phone with Password
If you know your Google account password, you can delete it from your phone. But keep in mind that, your phone should be connected to internet. The following steps can help:
Step 1: On your Android phone, open the Settings app.
Step 2: Scroll down and find Accounts option. (Or you may see Users & accounts, click on it.)
Step 3: Click on the Accounts again.
Step 4: Find the Google account you want to delete and click on it.
Step 5: Click Remove account.
Step 6: When asked, confirm the deletion with a click on Remove Account again. (If this is the only Google account on your phone, you’ll need to enter your phone’s password, PIN or pattern.)
How to Delete Google Account on Android Phone without Password
What if you don’t know the password or even the account, especially when you try to set up your device and it asks you to verify your Google account? You can still solve the issue without a password requirement and conveniently bypass “verify your account” page.
Welcome, iMyFone LockWiper (Android) – the only reliable software to use to delete Google account from Android phone or bypass Google account verification without password. It was developed to completely remove Google account whenever you wish.
LockWiper (Android) — Delete Google Account Completely
- Permanently delete Google account from Samsung phones.
- Easily bypass the Google “Verify your account” requirement.
- Gain total control over your android phone and enjoy all the features.
- Prevent your phone from being tracked or remotely blocked.
- Also work perfect to unlock your screen lock without password.
Steps to Delete Google Account Permanently from Android Phone
iMyFone LockWiper (Android) provides a free trial so that you can check whether your phone is supported or not.
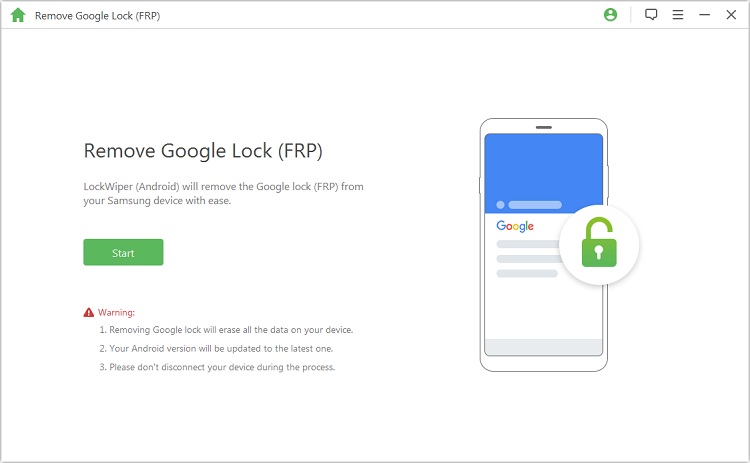
Step 1. Install Program & Connect Your Phone
Click the above link to download and install LockWiper (Android) on your computer. Click “Remove Google Lock” from the home interface and then “Start”. Connect your phone to computer with a USB cable.
Step 2. Select Your Device Information
Select your phone name and follow to put your device into recovery mode. In the next page, choose the PDA, country and carrier for your phone. Click «Download» to get a specific data package for your phone.

Step 3. Install Data Package
When the data package is downloaded, click “Start to Extract” to unpack it. When it’s done, put the device into downloading mode by following the steps shown. LockWiper (Android) will start installing the package into your phone, which will prepare the environment to unlock the Google lock.
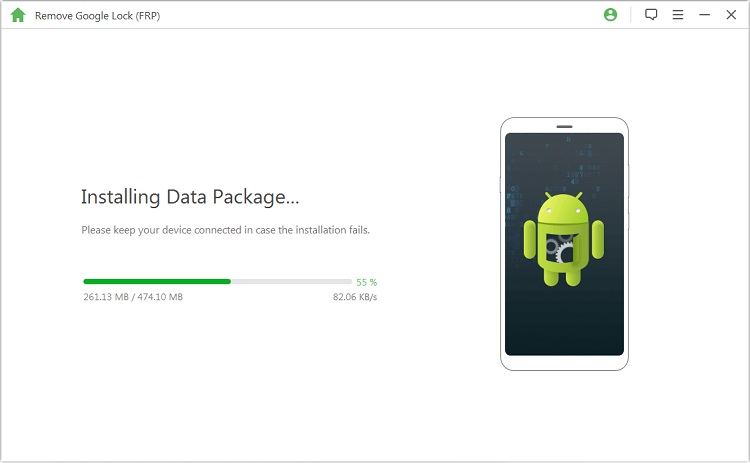
When installation completes, simply follow the onscreen instructions to enable “USB debugging” and “OEM unlocking” on your phone.
.jpg)
Step 4: Start to Remove
LockWiper will download a unlocking package for your device. When it’s done, click button to extract it. Then LockWiper (Android) will start removing the Google account from your phone.
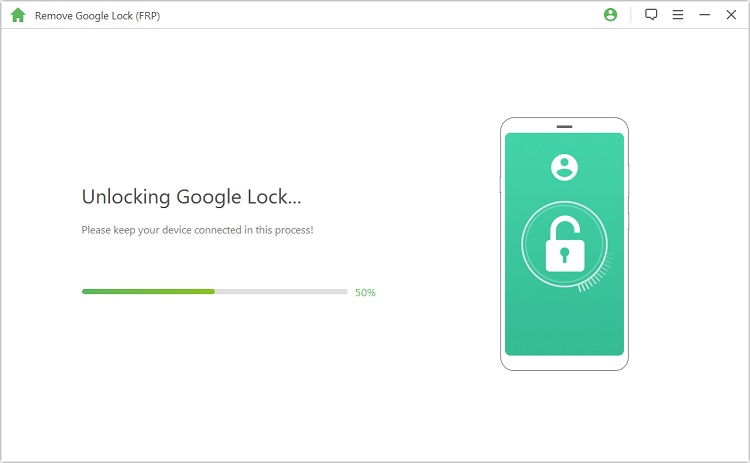
Kindly wait for it to finish. Your phone will looks like brand-new device. You now can set it up without verifying the Google account. Instead, you can set up a new account.
There is no doubt that removing Google account can be complicated especially if you forgot the password, but if you try out LockWiper, you’ll discover an easy way to delete it without even a password.
![]()

(Click to rate this post)
Generally rated 4.6 ( 256 participated)
You have already rated this article, please do not repeat scoring!
Источник
How to Delete Email Accounts on Android
Various email accounts may cause a lot of annoyance on your Android, here provides the way to delete email accounts on Android.
• Filed to: Erase Android • Proven solutions
Most of the time when we buy our new Android phones, we get so excited about using its innovative features that we end up setting up various email accounts that are mostly unwanted or more precisely junk. This can cause a lot of annoyance when your phone is continuously beeping due to unnecessary email notifications. To avoid such situations there is a way to effectively delete email accounts on Android as follows.
Part 1: How to Delete Email Accounts on Android
Guides on How to Delete Email Accounts on Android:
Step 1. Go to the home screen of your device and tap the App drawer and then click on «Settings» icon. Now under the Accounts option, tap the type of email account that you want to delete.
It will only delete those accounts that are currently configured on your device.
If you delete an Exchange email account and you have a corporate account, it will appear as Microsoft Exchange ActiveSync.
When you will select any of the POP, IMAP or corporate email account, the email address will be displayed.
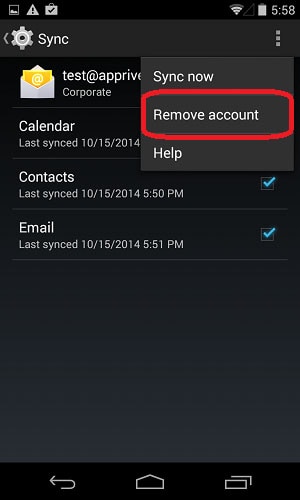
Step 2. Now there is a square menu on the right side of your device. This is same for most of the Samsung Galaxy, HTC and Motorola devices. Click this Menu icon.
Step 3. When you will tap the Menu icon, it will display three options. You can choose the second «Remove Account» option from here.
Step 4. When you will select this «Remove Account» option, a warning for the confirmation of your command will appear. Once you confirm the task by clicking «Remove account», your account is now deleted.
So, you can get rid of unwanted email accounts that are no longer in use now using these easy-to-follow instructions.
Part 2: How to Delete Calendars on Android
We all have calendars on our Android phones that display those appointments which we actually never made up to or other unnecessary appointments that completely do not belong to us. The in-built calendar app of Android is capable of displaying more than one Google calendar at a time by integrating all of them together. They may include the calendars either created by you or other people that cannot be changed. But thankfully there is a way out for deleting those particular calendars on your device.
Guides on How to Delete Calendars on Android:
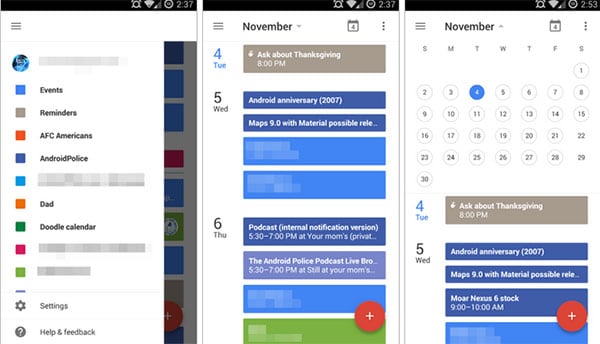
Step 1. Go to the Google calendar of your device and click the «Settings» option at the top right of your screen and after this Tap «Calendars». It will display all the created and existing Google calendars that are in your phone. For each calendar, you will see an icon that will comprehend its status. If you can clearly see this button’s eye that means the app can display all your appointments but if it is not visible or grayed out, your appointments will not appear.
Step 2. Now find the calendar you want to delete. There is an option at the bottom of the page permanently delete this calendar. Click this option for deleting your calendar.
You may face some problems relevant to the reappearing Google calendars which you have deleted but there is nothing to worry about it. This is because of a simple setting. Your Android is set to YES for «Keep old events» option. Once you re-do this option to NO, it will permanently delete your calendars.
Recommendation: The Best Way to Delete All Data on Android Device
If you were finding settings and other options of your Android device complicated or deleting an email account or calendar was difficult to you then dr.fone — Data Eraser (Android) will help you deal with all such problems. It support to delete all data on Android device . dr.fone — Data Eraser (Android) is the most ideal solution for deleting any kind of data on your Android device.
dr.fone – Android Data Eraser
Best Tool to Thoroughly Erase Data on Android
- Powerful scanning ability.
- This is a professional data eraser for safely erasing all types of data on your device.
- It can also help you to delete individual files which make the data management very easy.
- It also permanently deletes the incompletely erased files. dr.fone — Android Data Eraser
How to delete all data on Android?
Step 1. Launch the dr.fone, connect your Android device to PC, and then click on «Erase» section.

Step 2. Hit «Start»B button and begin to wipe your android device permanently
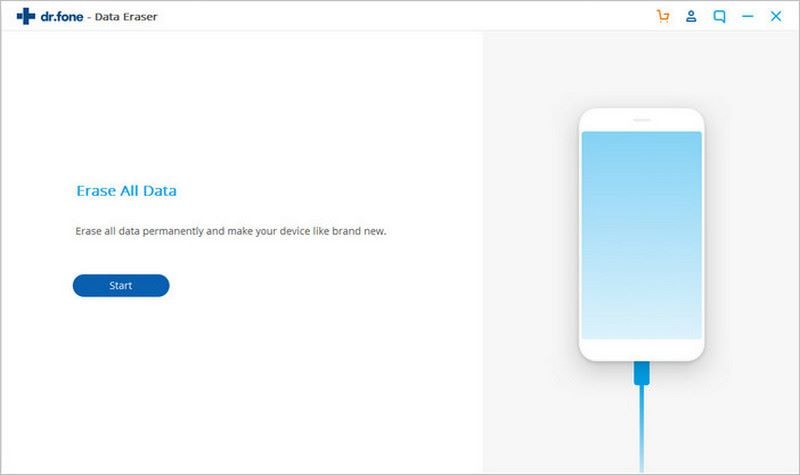
Next, you need to confirm the data delete action by typing in “000000” and then tap “Erase Now” to proceed with erasing data permanently.
Источник


