- ADB and testing Android apps
- Enable ADB debug
- Deploy from Chrome OS
- Deploy with Android Studio
- Deploy with Terminal
- Deploy from another device
- Connect to ADB over a network
- Troubleshooting ADB debugging over a network
- Connect to ADB over USB
- Recommended
- Overview
- GDC 2019 recap: Optimizing Android games for larger screens & foldables
- Testing
- Chrome OS developer news and updates straight to your inbox
- Qt Documentation
- Contents
- Packaging Applications
- Specifying Deployment Settings
- Specifying Settings for Packages
- Selecting API Level
- Building AABs
- Signing Android Packages
- Adding External Libraries
- Editing Manifest Files
- Package Names
- Styling
- Screen Orientation
- Icons and Splash Screens
- Android Manifest Editor
ADB and testing Android apps
Being able to run Android apps on a Chromebook is great, it gives users access to the vast Android ecosystem offerings and it gives Android developers the opportunity to reach Chrome OS users.
Developers should make a point to verify their apps on different form factors, since this will help improve users’ experiences. This is why Chrome OS provides Android developers with the tools to deploy and test their apps on Chromebooks.
Whether developers are deploying their Android app directly from Chrome OS (using Android Studio in your Chromebook) or from another device, developers can use ADB to deploy their apps and debug different interactions with Chromebooks. For more details checkout the steps below.
Enable ADB debug
Previously, using ADB on your Chromebook was only possible while in developer mode, which requires powerwashing (resetting) the device and can reduce security. Luckily since Chrome 81, developers can keep their devices out of developer mode and still deploy apps they develop directly in Chrome OS, with the flip of a switch. Here is how:
First, make sure the Chromebook is not in developer mode . Then go to settings and turn on Linux (if you haven’t done so before).
Turn on Linux on Chrome OS
Once Linux is available open the Linux settings and you’ll find a new option ‘Develop Android apps’, open that option.
Toggle enable ADB debugging and the computer will restart.
Enable Chrome OS’ ADB debug settings
Note: If the ADB toggle is not available after enabling Linux, or if it can’t be toggled, you may have to factory reset your device.
When the computer restarts you’ll see a message that lets you know that there may be applications that were not downloaded from the app store on the device.

ADB is now available to deploy apps to your Chromebook, run debugging commands and interact directly with the device.
To ensure that your Android app works well on a variety of Chromebook devices and available form factors, Google recommends that you test your app on the following devices:
- An ARM-based Chromebook
- An x86-based Chromebook
- A device with a touchscreen and one without one
- A convertible device; that is, one that can change between a laptop and a tablet
- A device with a stylus
Deploy from Chrome OS
After enabling ADB debugging, you can load an Android app directly onto your Chrome OS device using Android Studio or if you have an APK you can load it using the Terminal.
Deploy with Android Studio
After you have set up Android Studio and ADB as described above, you can push your apps to the Chromebook’s Android container directly from Android Studio.
The Chromebook will appear as an option in the device drop down:

Now you can push your app like any other Android device! The ADB authorization dialog appears the first time you try to push to a new device. After you authorize it, your application will launch in a new window.
Deploy your app directly into Chrome OS
That’s it, you can now deploy the app to the Chromebook, test and debug without the hassle of being in developer mode.
Deploy with Terminal
Install ADB if necessary:
Connect to the device:
An authorization popup for USB debugging appears the first time you try to deploy to the device, and you’ll need to allow it.

Install your app from the terminal:
Connect to the device through ADB in the terminal
Deploy from another device
If you can’t use the method described above and need to push your app from another device, you can connect the device to ADB using USB or a network address.
Connect to ADB over a network
Get the IP address of your Chromebook:
- Click the clock in the bottom-right area of the screen.
- Click the gear icon.
- Click the network type you are connected to (Wi-Fi or Mobile data) then the name of the network.
- Take note of the IP Address.
Tip: Another quick way to find your chromebook’s IP address is to click the clock in the bottom-right, click the wifi icon, and click the info button.
Connect to your Chromebook:
Return to your development machine and use ADB to connect to your Chromebook using its IP address:
On your Chromebook, click Allow when prompted whether you want to allow the debugger. Your ADB session is established.
Troubleshooting ADB debugging over a network
Note: If your network prohibits these kinds of connections, you can set up your own router or hotspot, or you can try ethernet via a port or dongle.
Sometimes the ADB device shows that it’s offline when everything is connected properly. In this case, complete the following steps to troubleshoot the issue:
- Deactivate ADB debugging in Developer options.
- In a terminal window, run adb kill-server .
- Re-activate the ADB debugging option.
- In a terminal window, attempt to run adb connect .
- Click Allow when prompted whether you want to allow debugging. Your ADB session is established.
Connect to ADB over USB
To push your APK from another device into the Chromebook via USB, you must start your Chrome OS in developer mode so that you can configure the Chromebook and push apps from the host machine. This is the only method that currently requires Developer Mode, and it only works on a small number of devices . Because of this, it’s recommended to use ADB over the network instead. If you’d still like to proceed, follow these steps to get into developer mode.
Caution: After switching your Chrome OS device to developer mode, it restarts and clears all existing data on the device. The security level of the device is also significantly reduced.
Press Control + Alt + T to start the Chrome OS terminal.
Type shell to get to the bash command shell:
Type the following commands to set up your device:
After rebooting, open the terminal again and run the following command to enable ADB on the Chromebook’s USB port:
Use this command each time you disconnect and reconnect a USB cable. To ensure your Chromebook is in UFP mode, you can run ectool usbpd
- Plug in a USB cable to a supported port on your device
- Run adb devices from the Android SDK platform tools on your host machine to see your Chromebook listed as an ADB supported device
- On your Chromebook, click Allow when prompted whether you want to allow the debugger. Your ADB session is established.
Recommended
Overview
An introduction to Linux on Chrome OS.
GDC 2019 recap: Optimizing Android games for larger screens & foldables
A recap of Google at the Game Developer Conference 2019 with some helpful coding tips and tricks.
Testing
This table outlines tests the Chrome OS team has used to evaluate Android apps for Chrome OS.
Chrome OS developer news and updates straight to your inbox
Find the latest news, tips, releases, updates, and more on Chrome OS.
Источник
Qt Documentation
Contents
On Android, applications are distributed in specially structured types of ZIP packages called Application Packages (APK) or Android App Bundles (AAB). APK files can be downloaded to and executed on a device, whereas AAB is intended to be interpreted by the Google Play store and is used to generate APK files.
Qt for Android has binaries for armv7a, arm64-v8a, x86, and x86-64. To support several different ABIs in your application, build an AAB that contains binaries for each of the ABIs. The Google Play store uses the AAB to generate optimized APK packages for the devices issuing the download request and automatically signs them with your publisher key.
Qt Creator supports the following methods of deployment for Android applications:
- As a stand-alone, distributable application package (APK).
- Since Qt 5.14.0, as an app bundle (AAB), intended for distribution in the Google Play store.
Note: Since Qt Creator 4.12, Ministro is not supported.
To specify settings for application packages, select Projects > Build > Build Android APK > Details.
For more information about options that you have for running applications, see Specifying Run Settings for Android Devices.
Packaging Applications
Because bundling applications as APK packages is not trivial, Qt 5 provides a deployment tool called androiddeployqt . When you deploy an application using a Qt for Android kit, Qt Creator uses the androiddeployqt tool to create the necessary files and to bundle them into an APK:
- Java files, which serve as the entry point into your application and that automatically load Qt and execute the native code in your application.
- AndroidManifest.xml, which provides meta-information about your application.
- Other XML files, which specify the dependencies of your application.
- Resource files.
- Libraries and QML files, which can be included in the project depending on the deployment method that you select.
- Gradle wrappers that are needed to download and use Gradle.
- Gradle script that is needed by Java IDEs, such as Android Studio. It allows the user to extend the Java part without copying our Java sources. It also allows the IDEs to provide code completion, syntax highlighting, and so on.
The Gradle wrappers and scripts are bundled only if you use Gradle to build the application packages. For more information, see Connecting Android Devices.
To view the packages that the androiddeployqt tool created, select the Open package location after build check box.
Specifying Deployment Settings
The available deployment settings are listed in the Method field. To add deployment methods for a project, select Add.
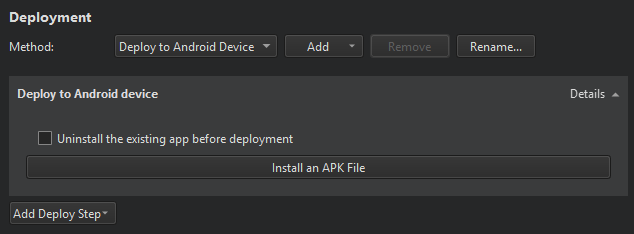
To rename the current deployment method, select Rename.
To remove the current deployment method, select Remove.
The packages are deployed on the Android device that you select in the kit selector. To add devices, select Manage.
For more information about specifying additional start options for applications, see Specifying Run Settings for Android Devices.
To remove previously installed files from the device, select Uninstall the existing app before deployment.
To install a pre-built APK, such as a 3rd-party application to a device, select Install an APK File.
Specifying Settings for Packages
To specify settings for the androiddeployqt tool, select Projects > Build > Build Android APK > Details.

The androiddeployqt tool uses the configuration information to create APKs. For more information about the available options, see androiddeployqt.
You can view information about what the androiddeployqt tool is doing in the Compile Output pane. To view additional information, select the Verbose output check box.
Select Add debug server to include the debug server binary into a package.
Selecting API Level
In the Android build platform SDK field, you can select the API level to use for building the application. Usually, you should select the highest API level available.
Note: For Qt 5.12.0 to 5.12.5 and Qt 5.13.0 to 5.13.1, Android build platform SDK 28 should be used. For more recent versions than Qt 5.13.1, build platform SDK 29 or the most recent one should be used.
This field does not specify the minimum supported API level nor the target API level, which you can specify in the Android manifest. See Editing Manifest Files. For more information about Android API levels, see What is API Level?.
Building AABs
For testing the application locally, use the APK format, because the package can be uploaded directly to the device and run. For distribution to the Google Play store, create an AAB by selecting the Build Android App Bundle (*.aab) check box.
When building with CMake, you can view the selected ABIs in the Initial CMake parameters field in the CMake section. You can set additional ABIs as values of the ANDROID_ABI key:

When building with qmake, you can select the ABIs in the ABIs field in the Build Steps:

Signing Android Packages
To publish your application, you must sign it by using a public-private key pair that consists of a certificate and a corresponding private key and is identified by an alias. The key pair is used to verify that the future versions of your application are actually created by you.
Warning: Keep the key pair in a safe place and take back up copies, because you cannot update the application if you lose the key pair.
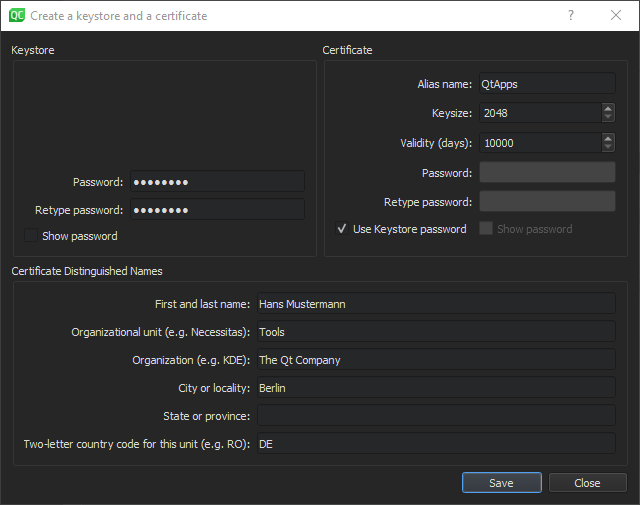
You can use Qt Creator to generate a keystore and a self-signed certificate. The generated certificate has the structure of an X.509 v3 digital certificate. It contains information about the version, serial number, and validity period of the certificate, the ID of the algorithm that is used to encrypt the data, the organization that issued the certificate, and the subject (owner) of the certificate. In case of a self-signed certificate, the issuer and owner of the certificate are the same. In addition, the certificate contains information about the algorithm that is used to sign the certificate, as well as the signature of the certificate.
The keystore is protected by a password. In addition, you can protect each alias with its individual password.
When you sign an Android application, you must select a keystore that contains certificates and a certificate alias from the keystore. The public key (certificate) for the alias is embedded into the APK during signing.
To create a keystore and a self-signed certificate:
- In the Keystore field, select Create to create a new keystore that contains one key pair in the Create a Keystore and a Certificate dialog:
To sign an Android package by using a key pair, set the Sign package group settings described in Specifying Settings for Packages:
- In the Keystore field, select Choose to select an existing keystore.
- In the Certificate alias field, select an alias from the list of key pairs that the keystore contains.
- Select the Sign package check box to use the alias to sign the Android package.
Adding External Libraries
Qt Creator automatically detects which Qt libraries the application uses and adds them as dependencies. If the application needs external libraries, specify them in Projects > Build > Build Android APK > Additional Libraries field. The libraries are copied into your application’s library folder and loaded on startup.
To add OpenSSL libraries, select Include prebuilt OpenSSL libraries in the Additional Libraries group. This will add the OpenSSL include project defined in device settings in Android OpenSSL group. This can be used for QMake and CMake projects.
Otherwise, you can manually add the paths to the required libssl.so and libcrypto.so libraries to the Additional Libraries field.
Editing Manifest Files
You can use the configuration options to specify all the settings you need for the androiddeployqt tool. You only need an Adroid manifest file to specify Android-specific settings, such as the application icon. However, the manifest file is needed when you want to publish the package in the Play Store.
Package Names
Android application packages are usually named by using a hierarchical pattern with the levels in the hierarchy separated by periods (.). In general, a package name begins with the top level domain name of the organization followed by the organization’s domain name and any subdomain names listed in reverse order. The organization can then choose a specific name for their package. Package names should be written in all lowercase characters whenever possible. For example, org.qtproject.example .
Complete conventions for disambiguating package names and rules for naming packages when the Internet domain name cannot be directly used as a package name are described in section 7.7 of the Java Language Specification.
For more information about package names, see Android Application Fundamentals.
Styling
Qt uses different methods to determine how Qt Widgets and Qt Quick Controls should be styled:
- Select Default or Full when using Qt Widgets or Qt Quick Controls 1 in your project.
Note: This method uses some Android non-SDK interfaces, that are being restricted by Google starting from Android 9.0 (API 28).
Screen Orientation
You can specify different options for determining screen orientation, depending on sensor readings or user preferences. The following table lists the options available.
| Orientation | Description |
|---|---|
| Unspecified | The system chooses the orientation. The policy it uses, and therefore the choices made in specific contexts, may differ from device to device. |
| Behind | Use the same orientation as the activity that’s immediately beneath it in the activity stack. |
| Landscape | Landscape orientation, where the display width is larger than its height. |
| Portrait | Portrait orientation, where the display height is larger than its width. |
| Reverse landscape | Landscape orientation in the opposite direction of normal landscape. |
| Reverse portrait | Portrait orientation in the opposite direction of normal portrait. |
| Sensor landscape | Landscape orientation, but it can be either normal or reverse landscape based on the device sensor. The sensor is used even if the user has locked sensor-based rotation. |
| Sensor portrait | Portrait orientation, but it can be either normal or reverse portrait based on the device sensor. The sensor is used even if the user has locked sensor-based rotation. |
| User landscape | Landscape orientation, but it can be either normal or reverse landscape based on the device sensor and the user’s preference. |
| User portrait | Portrait orientation, but it can be either normal or reverse portrait based on the device sensor and the user’s preference. |
| Sensor | The orientation is determined by the device orientation sensor. The orientation of the display depends on how the user is holding the device. It changes when the user rotates the device. Some devices, however, will not rotate to all four possible orientations by default. To allow all four orientations, select the full sensor option. The sensor is used even if the user locked sensor-based rotation. |
| Full sensor | The orientation is determined by the device orientation sensor for any of the four orientations. This is similar to the sensor option, except that it allows any of the four possible screen orientations, regardless of what the device will normally do. For example, some devices won’t normally use reverse portrait or reverse landscape, but this option enables them. |
| No sensor | The orientation is determined without reference to a physical orientation sensor. The sensor is ignored, so the display will not rotate based on how the user moves the device. |
| User | The user’s current preferred orientation. |
| Full user | If the user has locked sensor-based rotation, this option behaves in the same way as the user option. Otherwise, it behaves the same as the full sensor option, and allows any of the four possible screen orientations. |
| Locked | Locks the orientation to its current rotation, whatever that is. |
Icons and Splash Screens
You can set different images to be shown as application icons and splash screens on low, medium, high, and extra high DPI displays. The following list summarizes the DPI values typically associated with each category:
120dpi
Medium-density (MDPI):
160dpi
High-density (HDPI):
240dpi
Extra-high-density (XHDPI):
320dpi
Extra-extra-high-density (XXHDPI):
480dpi
Extra-extra-extra-high-density (XXXHDPI):
Specify settings for icons in the Application icon tab. Select the image with the highest resolution as the Master icon. Qt Creator resizes the icon and sets versions of it to be shown on low, medium, high, and extra high DPI displays, as needed. Alternatively, set the icons for each resolution separately.
Specify settings for splash screens in the Splash screen tab. Select images to display as splash screens depending on the device orientation and screen resolution.

By default, the splash screen is hidden automatically when an activity is drawn. To keep it visible until QNativeInterface::QAndroidApplication::hideSplashScreen() is called, select the Sticky splash screen check box.
In Image show mode, select whether to center the splash screen on the device display or scale it to fill the display.
Set a background color in Background color.
Select the images with the highest resolution as the Master image, Portrait master image, and Landscape master image.
Select Clear All to reset all settings or remove all images.
Android Manifest Editor
If you use qmake as the build system, you can create an Android manifest file and edit it in Qt Creator.
To create an Android manifest file and to open it in the Android Manifest Editor:
- Select Projects >Build >Build Android APK >Create Templates.
- In the Package name field, enter a valid package name for the application. For example, org.example.myapplication . The application is launched by an automatically generated Java launcher that is packaged with the application into an Android package (.apk).


In the Permissions field, you can specify the permissions that your application needs. Starting from Android 6.0 (API 23), permissions have to be requested at runtime (see QtAndroid::requestPermissionsSync() or QtAndroid::requestPermissions()). For lower Android API levels, users are asked to grant the permissions when they install the application. Android OS then grants the application access to the appropriate data and features.

On the top header, select the XML Source tab to edit the file in XML format.
В© 2021 The Qt Company Ltd. Documentation contributions included herein are the copyrights of their respective owners. The documentation provided herein is licensed under the terms of the GNU Free Documentation License version 1.3 as published by the Free Software Foundation. Qt and respective logos are trademarks of The Qt Company Ltd in Finland and/or other countries worldwide. All other trademarks are property of their respective owners.
Источник


