- Built by you. Powered by us. Experienced by billions.
- Power to scale
- Freedom to iterate
- Access to insight
- What’s new in Google Play
- Build a high-quality app or game
- Pre-launch reports
- Android vitals
- Release with confidence
- Store listings
- Releases overview
- Grow your audience
- Acquisition reporting
- Statistics
- Monetize with ease
- Subscription setup
- In-app products
- Drive engagement and user retention
- Reviews
- Ratings
- More resources
- Blog post
- What’s new in Google Play
- DEVELOPER STORIES
- Find success with Google Play
- Ваши идеи. Наши технологии. Для миллиардов пользователей
- Масштабирование
- Итерации
- Статистика
- Что нового в Google Play
- Создавайте качественные приложения и игры
- Отчеты о тестировании
- Android Vitals
- Будьте уверены в своем продукте
- Страница приложения
- Обзор выпусков
- Как работать с приложениями в Google Play Developers Console
- Что такое Google Play Developers Console
- 1. Раздел «Статистика»
- 2. Раздел «Источника трафика»
- 3. Раздел «Оценки и отзывы»
- 4. Раздел «Советы по оптимизации»
- 5. Раздел «Данные для Google Play»
- Выводы
- Getting Started
- Linking your account and project
- Creating a new project
- Using an existing project
- Configure OAuth and Service Accounts
- Using a service account
- Using OAuth clients
- Obtaining your Developer ID
- Specialized APIs
- Client Libraries
Built by you. Powered by us. Experienced by billions.
Power to scale
Use our platform to help grow your business globally
Freedom to iterate
Experiment and test to optimize what you need for launch and beyond
Access to insight
Tap into rich information and actionable insights to make better decisions
What’s new in Google Play
Get the latest updates from Android Dev Summit and discover new features and tools to help you succeed on our platform
Build a high-quality app or game
Drive long term success by improving key app quality components including content, user experience and technical performance
Pre-launch reports
Spot issues such as app stability and performance before they affect your users
Android vitals
Monitor and improve the technical quality of your app or game
Release with confidence
Make your app launch a success with tools and strategies to help you publish, manage, and distribute your app worldwide
Store listings
Make a great first impression on potential users with a strong Play store listing
Releases overview
Monitor your builds to manage your releases at every stage of the process
Grow your audience
Accelerate your user growth with our reporting and optimization tools, including unique market insights exclusive to Google Play
Acquisition reporting
Track acquisition trends and see which sources are driving the highest quality impressions
Statistics
Query, explore, and compare exclusive metrics about your app from across Play Console
Monetize with ease
Create a revenue stream by launching a paid app or offering digital content or subscriptions
Subscription setup
Grow your revenue with subscriptions and let Play take care of payment, notifications, and subscription management
In-app products
Grow your revenue by selling products within your app using Google Play Billing
Drive engagement and user retention
Keep users coming back for more with our engagement tools and insights
Reviews
Discover what users are saying about your app. Engage with users by responding directly to their feedback.
Ratings
Your app rating is a reflection of how users respond to your app. Learn what affects your rating and what you can do to influence it.
More resources
Blog post
What’s new in Google Play
Get the latest updates from Android Dev Summit and discover new features and tools to help you succeed on our platform
DEVELOPER STORIES
Find success with Google Play
Publish your apps and games to users around the world and grow your business on Google Play
Connect with us
Sign up for the Google Play developer newsletter
Источник
Ваши идеи. Наши технологии. Для миллиардов пользователей
Масштабирование
Развивайте свой бизнес по всему миру, используя нашу платформу.
Итерации
Проводите эксперименты и тестирования, чтобы подготовить приложение для запуска и дальнейшего использования.
Статистика
Используйте детальную информацию и данные, имеющие практическое значение, чтобы принимать правильные решения.
Что нового в Google Play
Рассказываем новости с Саммита для разработчиков Android. Узнайте о новых функциях и инструментах, которые помогут вам добиться успеха на нашей платформе.
Создавайте качественные приложения и игры
Хотите добиться долгосрочного успеха? Повышайте производительность приложения и качество контента, а также улучшайте интерфейс и функции.
Отчеты о тестировании
Выявляйте проблемы, например со стабильностью и производительностью приложения, до того, как они коснутся пользователей.
Android Vitals
Отслеживайте и повышайте производительность своего приложения или игры.
Будьте уверены в своем продукте
Выбирайте подходящую стратегию и пользуйтесь инструментами, которые позволяют публиковать приложения, управлять ими и успешно выводить их на международный рынок.
Страница приложения
Совершенствуйте страницу приложения в Google Play, чтобы завоевать внимание пользователей.
Обзор выпусков
Отслеживайте сборки и управляйте выпусками на всех этапах.
Источник
Как работать с приложениями в Google Play Developers Console

Если оценка эффективности контента на странице приложения в сторе для вас — темный лес, обратите внимание на Google Play Developers Console. Я расскажу, как работать с этим инструментом.
Что такое Google Play Developers Console

После того, как apk-файл вашего приложения готов, его необходимо добавить в магазин приложений Google Play.
- Регистрируете аккаунт, предварительно залогинившись в аккаунт Google под нужной почтой.
- Оплачиваете символическую сумму $25 за регистрацию.
- Добавляете приложение, категорию, описание, скриншоты и иконку, которые появятся на вашей странице в магазине.
- Отправляете приложение на модерацию.
- После одобрения отправляете приложение в свет.
В одной консоли может храниться несколько приложений. При входе в аккаунт вам необходимо выбрать то, с которым вы работаете.
Если у вас есть логин и пароль владельца кабинета, тогда проходите туда. Если нет, попросите предоставить пользовательский уровень доступа на ваш email с нужными вам полномочиями. Здесь — пошаговая инструкция о том, как это сделать.
После входа и выбора нужного приложения вы увидите следующие разделы:
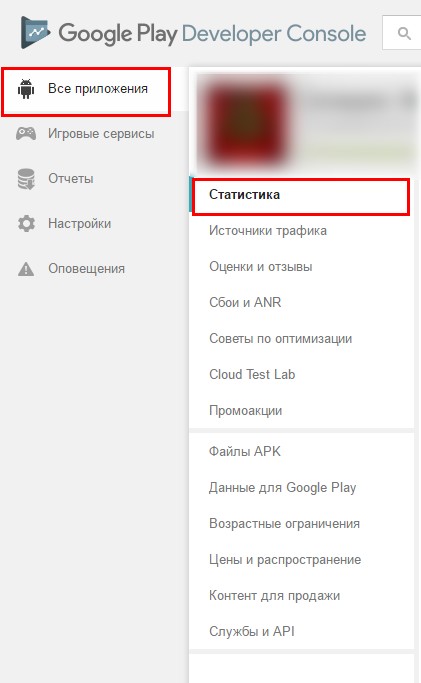
Расскажу о самых важных разделах для маркетинга и поддержки продукта.
1. Раздел «Статистика»
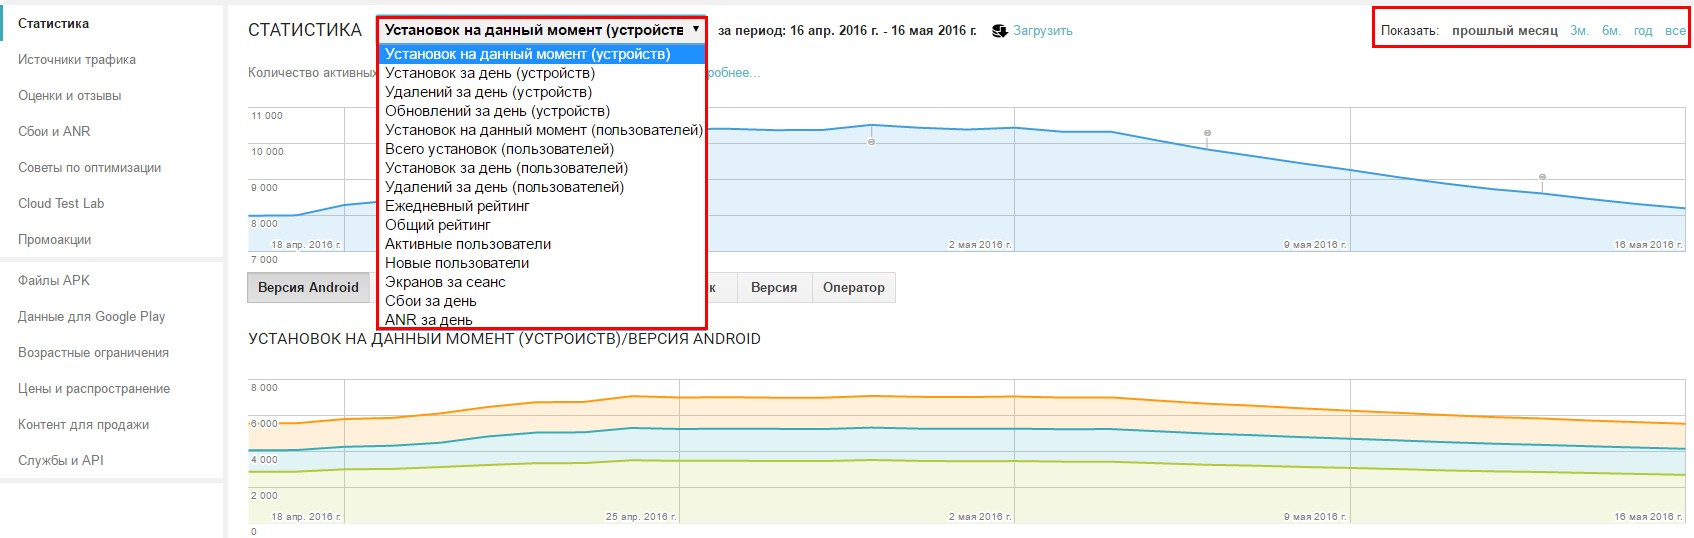
1.1. Установок на конкретный момент — количество устройств, на которое за весь период было установлено ваше приложение. Если взять дату за последний день, который вам доступен, то получите общее количество телефонов/планшетов, у которых установлено ваше приложение на данный момент. Параметр «Установок на данный момент (пользователей)» показывает аналогичную информацию, но по пользователям.
1.2. Установок за день (устройств) и установок за день (пользователей) — параметр показывает динамику ежедневных установок на устройства и уникальному пользователю. Стоит помнить, что один пользователь может иметь несколько девайсов с одной учетной записью и установить приложение сразу на два. Если сравнить между собой эти два параметра, то они будут отличаться.
1.3. Удалений за день — показатель количества пользователей, которые удалили ваше приложение за вчерашний день. Метрика очень полезная и по сути уникальная, так как в AppStore такого отчета нет, а трекинговые системы такие данные не предоставляют.
Следите за Uninstall rate — коэффициентом удалений приложения пользователями, так как это влияет на ваши позиции в магазине.
Как считать этот коэффициент?
Uninstall rate = количество удалений / количество установок
1.4. Ежедневный рейтинг и общий рейтинг — средняя оценка приложения пользователями за день и за весь период.
Ежедневный рейтинг в консоли — не то же, что позиция в сторе (Rank History), которую показывает AppAnnie. Хотя рейтинги прямо влияют на позицию в магазине приложений.
![]()
1.5. Отчет «Активные пользователи» показывает количество пользователей, которые открыли приложение хотя бы раз в сутки, там же можно посмотреть и на динамику. Эти данные доступны только тем, кто поставил в приложение SDK Google Analytics. Об этом и других отчетах, доступных в Google Analytics, мы писали ранее.
1.6. Новые пользователи — это те, которые запустили приложение впервые. Отчет доступен также после связки консоли разработчика с Google Analytics. Читайте подробно о том, как различные трекеры считают установки.
Количество новых пользователей не равно количеству установок за одинаковый период.
2. Раздел «Источника трафика»
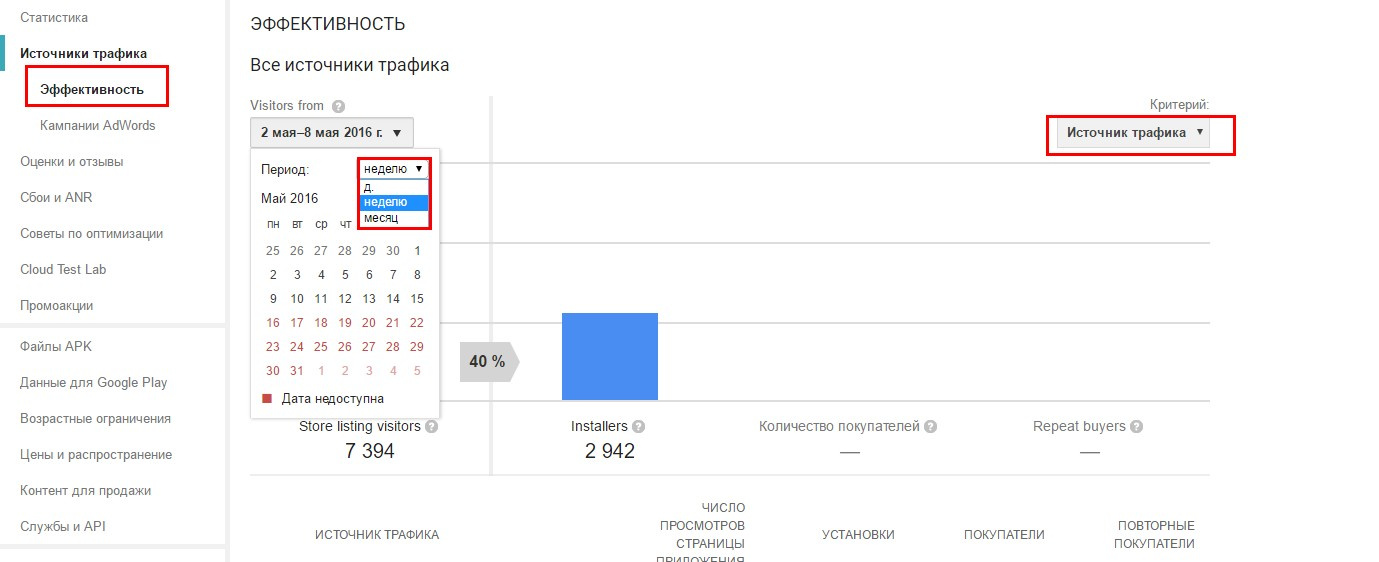
В отчете доступны два критерия: данные по источникам трафика и данные по странам. Сгенерировать отчет можно за день, неделю или месяц, выбрать период произвольно, к сожалению, нельзя.
Отчет представлен в виде воронки.
- Уникальные посетители страницы приложения в магазине.
- Количество пользователей, которые после просмотра установили приложение.
- Количество покупателей.
- Повторные покупатели.
Данные генерируются в виде когорты, то есть в отчет за выбранный диапазон времени попадут только те пользователи, которые за этот промежуток времени посетили страницу и установили приложение. О том, что такое когортный анализ и почему он важен для маркетинговых исследований, мы писали на примере Google Analytics.
Под графиком доступны данные в виде списка, где и расшифровываются источники трафика.
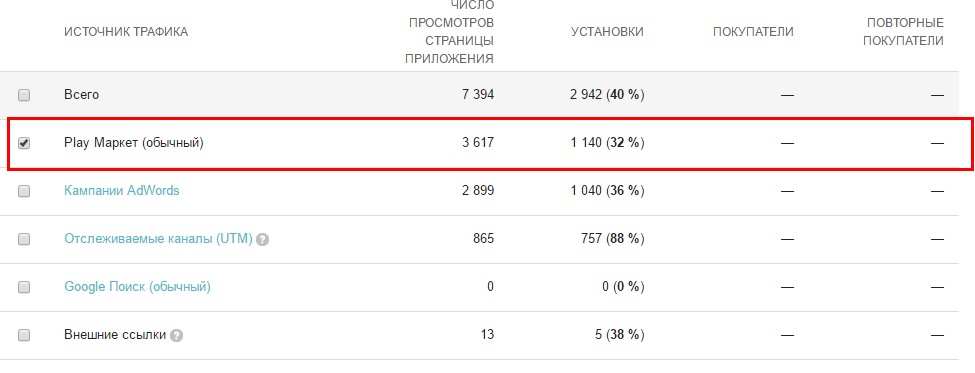
Показатель Play Маркет — это результаты вашего ASO, то есть результаты оптимизации страницы и ее индексации в магазине приложений.
По сути, это уникальные пользователи, которые перешли на страницу вашего приложения в результате поиска или просмотра приложений в Play Маркете.
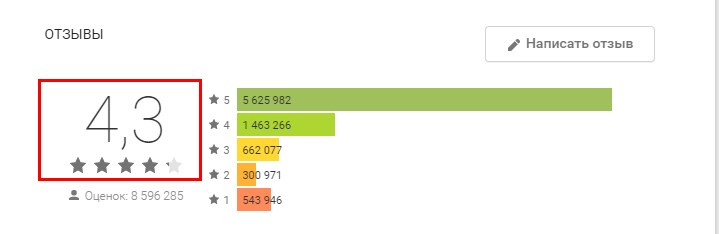
3. Раздел «Оценки и отзывы»
Подраздел «Оценки» — это отчет, который позволяет посмотреть динамику оценок по дням, неделям, месяцам и оценить, как пользователи восприняли внедрение новой фичи.
«Отзывы» — поле для деятельности вашего репутационного менеджера, SMM-специалиста или любого другого человека, который отвечает за коммуникации с пользователями, которые пишут вам просьбы/жалобы в отзывах в сторе.
4. Раздел «Советы по оптимизации»
В этом разделе система Google Play Developers Console добровольно-принудительно просит вас о чем-то и показывает, что вы уже сделали. Например, добавить скриншоты для планшетов, если ваше приложение поддерживает подобные устройства.
5. Раздел «Данные для Google Play»
Этот раздел дополняет предыдущий отчет, так как он показывает то, что отображается на странице магазина — язык, краткое описание, полное описание, иконка, графические материалы.
На страницу Google Play очень желательно добавить промо-ролик, так как это влияет на привлекательность вашей страницы для стора и пользователя.
Выводы
Google Play Developers Console — инструмент, который можно и нужно использовать при маркетинге мобильного приложения. Разобравшись в Google Play Developers Console, вы поймете:
- как стор воспринимает ваше приложение;
- как стор показывает эффективность вашего контента на странице приложения.
По сути, это важное связующее звено между разработчиком продукта и его пользователями.
Первая иллюстрация — фото Фредди Фабриса из проекта «The Renaissance Series».
Netpeak запустил новую услугу «ASO с оплатой за результат» — заказывай через форму:
Источник
Getting Started
To start making API calls, you’ll set up and manage the Google Play Developer API directly from the Google Play Console. The API can only be managed by the owner of your Google Play Developer Account. The following instructions explain how to:
- Set up a new or existing Google Cloud Project
- Manage OAuth clients
- Use a service account to access the Google Play Developer API
- Access specialized APIs for analyzing your app
Linking your account and project
Before you can access the Google Play Developer API, you must link your Google Play Developer Account to a Google Cloud Project. In most cases, we recommend that you create a new Google Cloud Project dedicated to your Google Play Developer Account, but you can link an existing project. Keep in mind that each Google Play Developer Account can only be linked to a single Google Cloud Project. If you have multiple apps in the same Google Play Developer Account, they all must share the same Google Cloud Project.
Creating a new project
- Go to the API access page on the Google Play Console.
- Accept the Terms of Service.
- Click Create new project.
The Google Cloud Project is automatically generated and linked to your Google Play Console.
Using an existing project
If you are already a user of the Google Play Developer API, you can link to your existing API project by following these steps:
- Go to the API access page on the Google Play Console.
- Accept the API Terms of Service.
Choose the project you’d like to link.
If your project isn’t listed, verify that
- your Google Play Console account is designated as an Owner
- Google Play Developer API is enabled for the project
Click Link existing project.
Configure OAuth and Service Accounts
You need to configure access to the Google Play Developer API with an OAuth client or a service account. In most cases, you should use a service account to access to the API.
Service accounts must be used in a secure environment, such as your server. The service account credentials need to be securely managed so they are not revealed to anyone that is not authorized to use the API.
The OAuth Client ID should be used if you need to access the API on behalf of an individual user. For example, if your website needs to access the Google Play Developer API from the web client on behalf of the user, you can use the Client ID. The user will be authenticated with their Google account instead of the service account. This allows you to make API calls on behalf of a user without compromising service account credentials.
- Service account: A secure software service will access the API (most common)
- OAuth clients: A user will access the API
Using a service account
You can create a service account from the Google Play Console.
- Go to the API access page on the Google Play Console.
- Under Service accounts, click Create new service account.
Follow the instructions on the page to create your service account.
During the process of account creation you need to grant your service account the role of Service Account User in order for it to appear in Google Play Console.
Once you’ve created the service account on the Google Play Console, click Done. The Service Accounts section of the API access page automatically refreshes, and your service account will be listed.
Click Grant Access to provide the service account the necessary rights to perform actions.
To use the Google Play Billing APIs, you must grant the following permissions:
- View financial data, orders, and cancellation survey responses
- Manage orders and subscriptions
At this point, you should be able to access the Google Play Developer API through the service account. For more information, see Using OAuth 2.0 for Server to Server Applications.
Using OAuth clients
You can allow users to perform actions via the API under their own credentials using an OAuth client. A user’s actions are limited to those permitted via the Users and permissions page on the Google Play Console.
Before creating OAuth clients you need to configure branding information for your product. Learn more
- Go to the API access page on the Google Play Console.
- Under OAuth Clients, click Configure OAuth consent screen.
- Configure your product’s branding information.
- Once you’ve finished, click Refresh OAuth consent. The section updates and you won’t see the message about branding information any more.
To create OAuth client via Google Play Console:
- Go to the API access page on the Google Play Console.
- Under OAuth Clients, click Create new OAuth client.
- Follow the instructions on the page to create your OAuth client.
Once you’ve created the OAuth client on the Google Play Console, click Done. The OAuth Clients section of the API access page automatically refreshes, and your OAuth client will be listed.
Sometimes the new OAuth client won’t appear on the page right away. In that case, click Refresh OAuth clients.
The details of your new OAuth client are displayed in a list on this page.
Obtaining your Developer ID
Some APIs require you to provide a Google Play Console Developer ID. This is a long number that was assigned when your Google Play Developer Account was created. Your Developer ID can be found in the URL of almost any page on the Google Play Console, such as the API access page.
For example, consider the Google Play Console URL:
In the URL above, the Developer ID would be 1234567890123456789 .
Note: If an app is transferred from one Google Play Developer Account to another, the Developer ID associated with that app will change. This means that after the transfer completes, you must use the Developer ID for the new Google Play Developer Account account in API calls for that app.
Specialized APIs
The Google Play Developer API contains several specialized APIs that allow you to perform specific types of analysis on your app:
Reply to Reviews API Allows you to view user feedback for your app and reply to this feedback. Voided Purchases API Allows you to revoke access to in-app products associated with purchases that a user has voided.
Client Libraries
We have provided client libraries you can use to programmatically access the REST APIs. For more information, see Client Libraries and Code Samples.
Except as otherwise noted, the content of this page is licensed under the Creative Commons Attribution 4.0 License, and code samples are licensed under the Apache 2.0 License. For details, see the Google Developers Site Policies. Java is a registered trademark of Oracle and/or its affiliates.
Источник


