- Check your Apple ID device list to see where you’re signed in
- See where you’re signed in
- Use your iPhone, iPad, iPod touch, or Apple Watch to see where you’re signed in
- Use your Mac to see where you’re signed in
- Use your PC to see where you’re signed in
- Use the web to see where you’re signed in
- Add a device to the list
- Remove a device from the list
- Use your iPhone, iPad, or iPod touch to remove a device
- Use your Mac to remove a device
- Use your PC to remove a device
- Use the web to remove a device
- Permanently remove a device from your account page
- Как узнать свой UDID и не навредить себе (особенно если у вас iPhone XS или iPhone XS Max)
- Find My iPhone 4+
- Apple
- Screenshots
- Description
- iDevices Connected 4+
- iDevices, LLC
- Screenshots
- Description
Check your Apple ID device list to see where you’re signed in
Learn which devices appear in your Apple ID device list, how to see your device’s details, and how to remove a device, if necessary.
See where you’re signed in
Use the steps below to see the devices that you’re currently signed in to with your Apple ID.
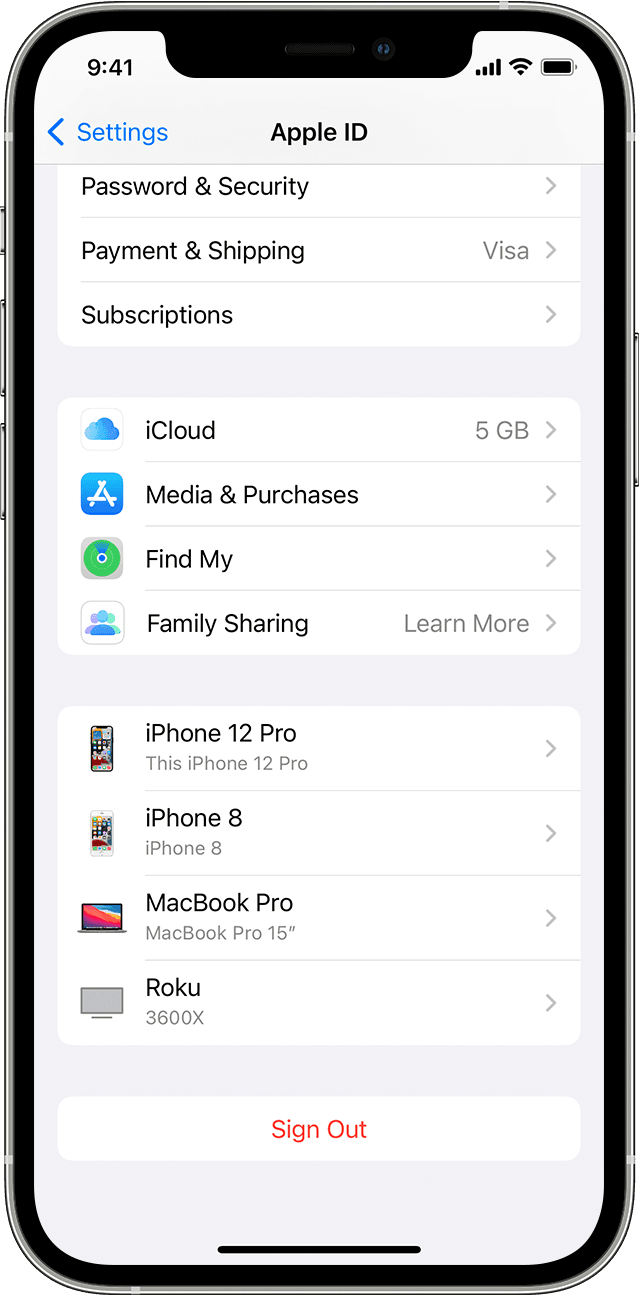
Use your iPhone, iPad, iPod touch, or Apple Watch to see where you’re signed in
- Tap Settings > [your name], then scroll down.
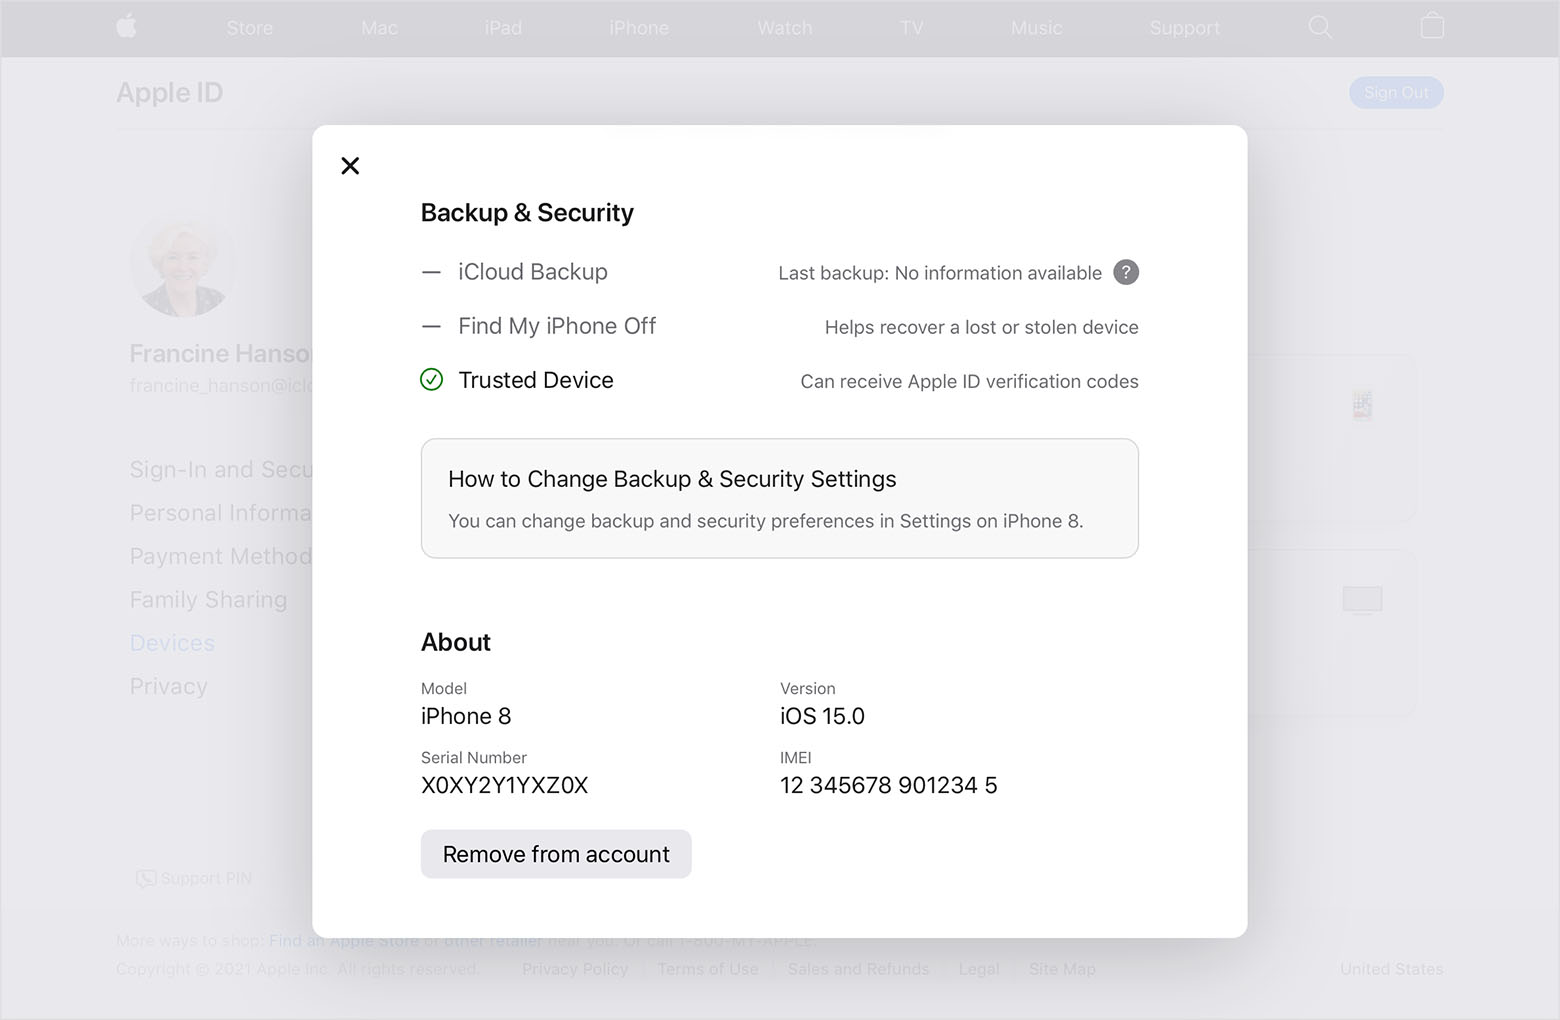
- Tap any device name to view that device’s information, such as the device model, serial number, OS version, and whether the device is trusted and can be used to receive Apple ID verification codes. The information might vary depending on the device type. You might need to answer your security questions to see device details.
![]()
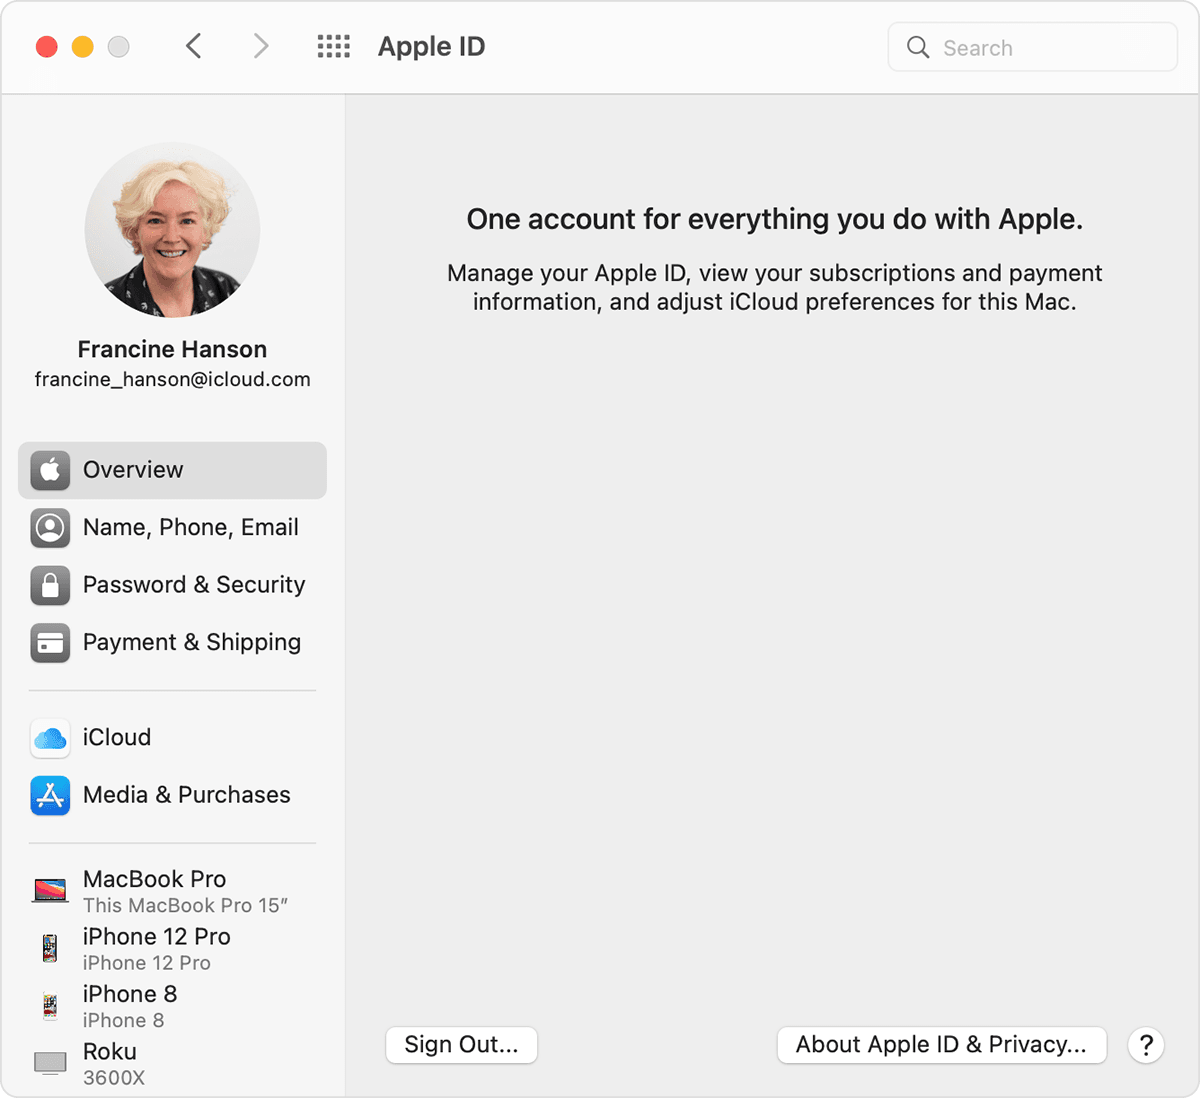
Use your Mac to see where you’re signed in
- Choose Apple menu > System Preferences.
- Click Apple ID.

- Click any device name to view that device’s information, such as the device model, serial number, and OS version. The information might vary depending on the device type. You might need to answer your security questions to see device details.
Use your PC to see where you’re signed in
- Open iCloud for Windows.
- Click Account Details, then click Manage Apple ID.
- Click any device name to view that device’s information, such as the device model, serial number, and OS version. The information might vary depending on the device type.
Use the web to see where you’re signed in
From the Devices section of your Apple ID account page, you can see all of the devices that you’re currently signed in to with your Apple ID, including Android devices, consoles, and smart TVs:
- Sign in to appleid.apple.com,* then select Devices.
- If you don’t see your devices right away, click View Details and answer your security questions.
- Click any device name to view that device’s information, such as the device model, serial number, and OS version. The information might vary depending on the device type.

* Depending on how you created your Apple ID, you might be required to provide additional information.
Add a device to the list
To add a device to the list, you need to sign in with your Apple ID. After you sign in on a device with your Apple ID, that device appears in the list. Here’s where you need to sign in:
- For iOS or iPadOS, sign in to iCloud, iMessage, FaceTime, iTunes & App Stores, or Game Center on the device. You can also see your paired Apple Watch.
- For macOS or Windows 10 and later, sign in to iCloud on the device.
- For Apple TV HD and later, sign in to the iTunes and App Store on the device.
- For Apple TV (3rd generation) and earlier, sign in to the iTunes Store on the device.
Your AirPods will appear in the Find My app, but they won’t appear in your Apple ID device list. You can remove your AirPods from your account using Find My. Devices running iOS 7 or earlier or OS X Mavericks or earlier won’t appear in your device list.
Remove a device from the list
If your device is missing, you can use Find My to find your device and take additional actions that can help you recover it and keep your data safe. If you aren’t using your device anymore, or if you don’t recognize it, you might want to remove it from the list.
If you set up two-factor authentication for your Apple ID, removing a device will ensure that it can no longer display verification codes. It also won’t have access to iCloud and other Apple services, including Find My, until you sign in again with two-factor authentication. The device won’t reappear in the list unless you sign in again.
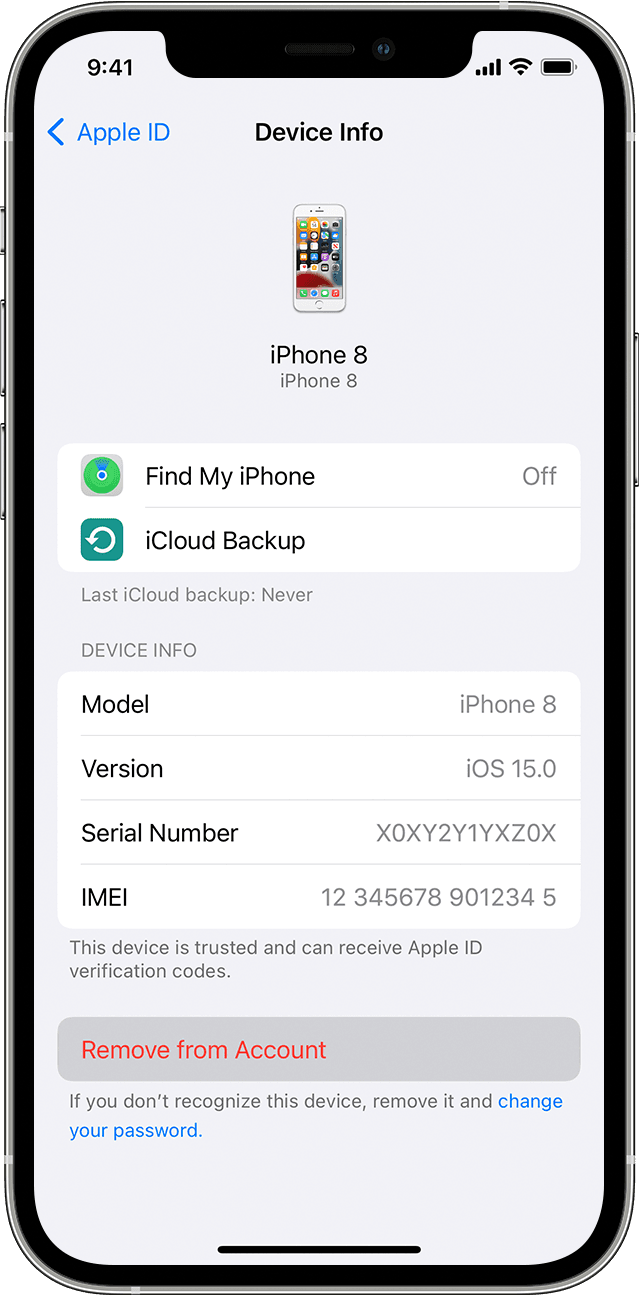
Use your iPhone, iPad, or iPod touch to remove a device
- Tap the device to see its details, then tap Remove from Account.
- Review the message that appears, then tap again to confirm that you want to remove the device.
- Want to permanently remove the device from your account page?
![]()
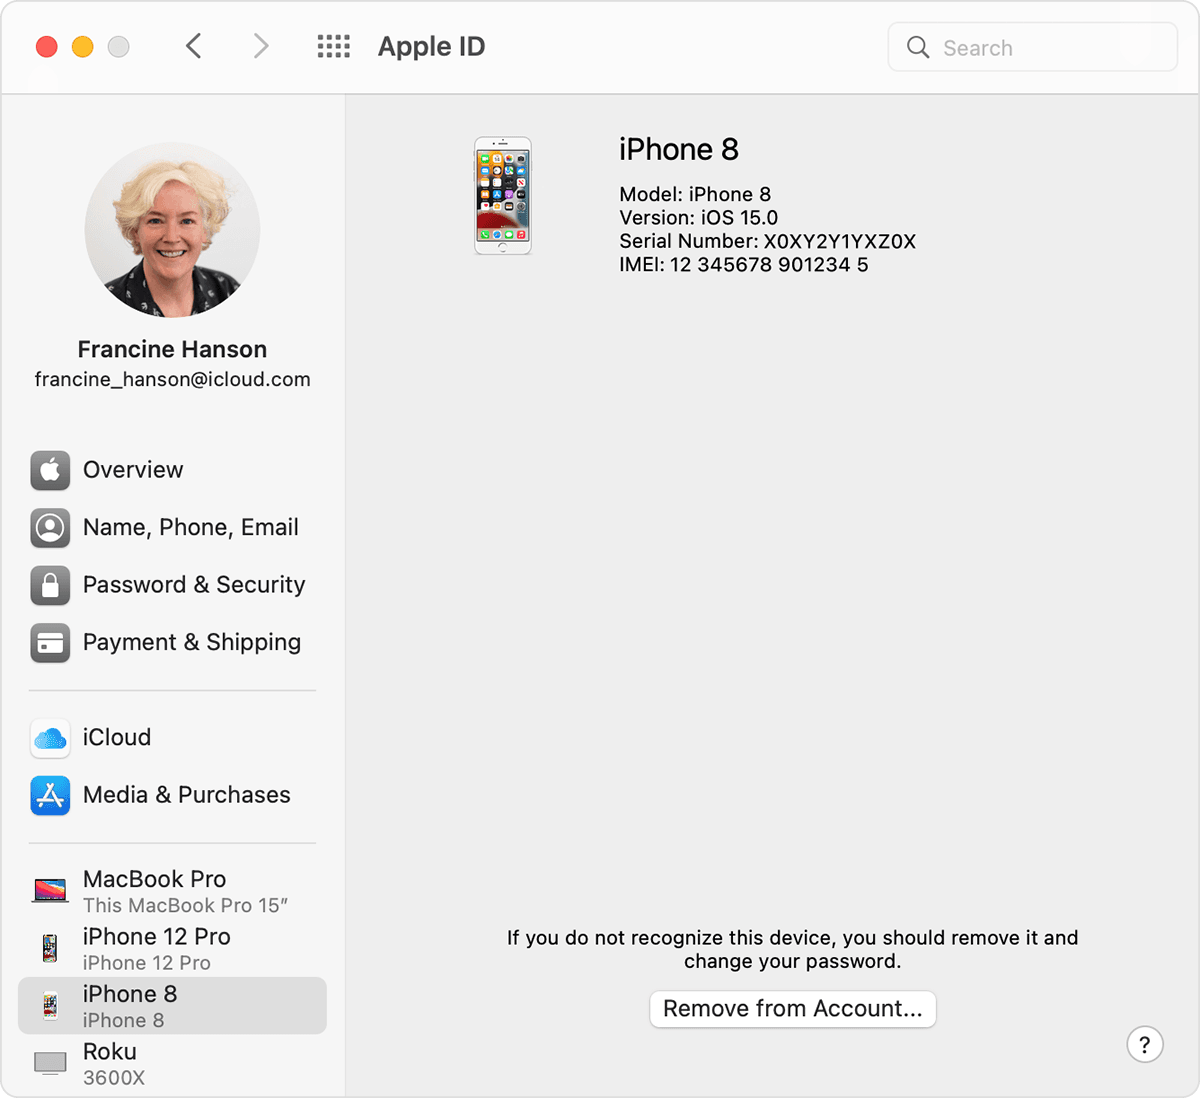
Use your Mac to remove a device
- Choose Apple menu > System Preferences.
- Click Apple ID.
- Click the device to see its details, then click Remove from Account.
- Review the message that appears, then click again to confirm that you want to remove the device.
- Want to permanently remove the device from your account page?
Use your PC to remove a device
- Open iCloud for Windows.
- Click Account Details, then click Manage Apple ID.
- Click the device to see its details, then click Remove from Account.
- Review the message that appears, then click again to confirm that you want to remove the device.
- Want to permanently remove the device from your account page?
Use the web to remove a device
- Sign in to appleid.apple.com, then select Devices.
- Click the device to see its details, then click «Remove from account.»
- Review the message that appears.
- Click again to confirm that you want to remove the device.
- Want to permanently remove the device from your account page?
Permanently remove a device from your account page
If you’re still signed in with your Apple ID on the device, it might reappear on your account page the next time your device connects to the Internet. To permanently remove the device from your account page, sign out of iCloud, iTunes & App Stores, iMessage, FaceTime, and Game Center on that device, or erase that device.
Источник
Как узнать свой UDID и не навредить себе (особенно если у вас iPhone XS или iPhone XS Max)
Подошёл очередной релиз, надо высылать, но нет UDID тестовых iPhone заказчика и сам клиент не знает, как их найти. Стандартная ситуация, мы пишем письмо и прикладываем ссылки на разные варианты или звоним и делаем аналогичные действия по Skype.
UDID — Unique Device Identifier. Если перевести на русский язык — «Уникальный идентификатор устройства». UDID уникальный для каждого iPhone / iPad / iPod. Предназначение у UDID одно. Уникальный номер для регистрации в портале разработчиков Apple Developer.
Хочу написать как это сделать просто и понятно.
Подключите ваш iPhone к компьютеру ( и не очень важно Mac или Windows это будет, запустите iTunes. Внутри щелкните значок iPhone вверху и перейдите на вкладку «Обзор».
Нажмите на метку «Серийный номер» до тех пор, пока она не изменится на UDID, там будут отображаться поля «Идентификатор модели», «ECID» и UDID из 40 шестнадцатеричных символов. Нажмите на правую клавишу мышки и «Скопировать» (пользователи Windows — Ctrl + C), чтобы скопировать UDID в буфер обмена.
Обязательно помним, что этот способ будет простым до сентября 2019 года, так как Apple отказывается от дальнейшего развития и сопровождения iTunes, что было анонсировано в июне 2019 года. Скачать последнюю версию и воспользоваться удастся, но как мы знаем, Apple быстро закручивает гайки.
Простой, но не очень безопасный по мнению многих людей, а особенно заказчиков, так как надо давать разрешение в настройках телефона.
Вы можете использовать один из многих сервисов, которые позволяют узнать ваш UDID:
1. IFunBox для Windows и Mac, чтобы получить UDID для iPhone XS или iPhone XS Max;
2. UDID.io входим только через телефон (можно через код)
На страничке нажимаем на зеленую кнопку «Tap to find UDID», устанавливаем сертификат в настройках — и готово, UDID вашего iOS- устройства у вас перед глазами;
3. SuperUDID, тут вообще просто: введите почту и переходите по ссылке, которая вам придет, конечно делать нужно это все с устройства, далее откроются настройки и будет предложено установить The Beta Family и вы видите в сафари свой UDID.
Может быть это ошибка или окно для особо внимательных, но пока оно есть, можно пользоваться. Подключаем ваш iPhone к Mac. Перейдите к -> «Об этом Mac». Нажмите на отчет о системе.
Далее выбираем слева раздел «USB». Нажимаем на iPhone и скопируем значение рядом с меткой серийного номера. Это UDID для iPhone XS и iPhone XS Max.
Ставим на свой Mac XCode и подключаем ваш iPhone. в Xcode откройте «Окно» -> «Устройства и симуляторы» и выберите ваше устройство.
Там вы увидите «идентификатор». Обратите внимание, что это другой формат, чем предыдущие iPhone (xxxxxxxx-xxxxxxxxxxxxxxxx)
Надеюсь, это статья была для вас полезна и немного помогла в работе.
Пишите свои мысли в комментариях.

эм
есть Apple Configuratot 2(от Apple, как ни странно) в макэппсторе для этого
да, спасибо, отличный инструмент
Привет! Это Василий Черепанов, юрист организации по защите прав потребителей Пермского края. В этот раз печальная история с успешным завершением о том как страховая компания безосновательно отказалась выплачивать страховое возмещение в размере почти миллиона рублей и как мы через суд заставили ее это сделать.
Twitter стала последней соцсетью, которая пытается повторить успех TikTok, пишет TechCrunch.
Предприниматель из Волгограда производит и продаёт по всему миру симуляторы дополненной реальности.
Дети смотрят на мир открытыми глазами и у них есть чему поучиться.
Пишу отзыв про geekbrains. Купила в черную пятницу у них курсы по Datsscientist, курсы куплены в рассрочку, были необходимы, чтобы усилить знания по питону для создания торговых ботов. Но так как в группе не нашлось свободных мест, то старт обучения ближайший БУДЕТ только 27 декабря (встреча с деканом), сами платные модули начнутся 10 января, то…
Источник
Find My iPhone 4+
Apple
Screenshots
![]()
![]()
![]()
![]()
![]()
Description
If you misplace your iPhone, iPad, iPod touch, or Mac, the Find My iPhone app will let you use any iOS device to find it and protect your data. Simply install this free app, open it, and sign in with the Apple ID you use for iCloud. Find My iPhone will help you locate your missing device on a map, remotely lock it, play a sound, display a message, or erase all the data on it.
For missing iOS devices, Find My iPhone also includes Lost Mode. Lost Mode locks your device with a passcode and can display a custom message and contact phone number right on the Lock Screen. While in Lost Mode, your device can keep track of where it has been and report back so you can view its recent location history, right from the Find My iPhone app.
Please note that Find My iPhone must be enabled in iCloud settings on your device before you can locate it with this app.
• Locate your iPhone, iPad, iPod touch, or Mac on a map
• Play a sound for two minutes at full volume (even if your device is set to silent)
• Remotely lock your device with a passcode
• Display a custom message on the Lock Screen
• View recent location history of your device while in Lost Mode (iOS devices)
• Get driving directions to device location
• Remotely erase all content and settings on your device
• Battery charge indicator
• View your current location and the location of your missing device on the same map.
• Cancel a pending erase request if your missing device is offline.
How Your Data is Used
When you use Find My iPhone, your device’s location and information about your device and your account will be sent to and retained by Apple. This enables Apple to provide you with this service. Your device location is only sent to Apple if you actively request the location of a device or accessory. If you choose to enable the Send Last Location feature, your device’s last known location will be sent to Apple automatically whenever your device’s battery reaches a critically low level. Apple retains location information and makes it accessible to you for 24 hours. It is then deleted.
Supported languages: English, Arabic, Australian English, Brazilian Portuguese, British English, Canadian French, Catalan, Croatian, Czech, Danish, Dutch, Finnish, French, German, Greek, Hebrew, Hindi, Hong Kong Chinese, Hungarian, Indonesian, Italian, Japanese, Korean, Malay, Mexican Spanish, Norwegian, Polish, Portuguese, Romanian, Russian, Simplified Chinese, Slovak, Spanish, Swedish, Thai, Traditional Chinese, Turkish, Ukrainian, Vietnamese
REQUIREMENTS
• Find My iPhone 4.0 requires iOS 8 or later and iCloud. You can create a free Apple ID to use with iCloud on your iPhone, iPad, iPod touch or Mac.
• Wi-Fi or cellular internet connection is required. WiFi-only devices must be connected to the Internet via a registered Wi-Fi network to be located.
Источник
iDevices Connected 4+
iDevices, LLC
Screenshots
![]()
![]()
![]()
![]()
![]()
![]()
![]()
Description
Create the smart home you envision and realize the connected lifestyle you expect with iDevices Wi-Fi-enabled switches, outlets and thermostat. Whether you’re at work, on vacation, or running around with the kids outside, control iDevices products from anywhere on your iOS device.
The iDevices Connected app is packed with intuitive smart features, empowering you to make the everyday things in your home extraordinary. We designed the app, but think of it as a blank canvas you can customize based on your lifestyle. Set schedules that cater to your daily life and make your home more efficient. Add a layer of security with location triggers that switch the lights on as soon as you pull into the driveway.
Design your smart home within the app and control it on a single screen. Make it your own with custom photos and accessory names. You can even group accessories into rooms and zones for simple, yet smart control.
Know your home like never before with comprehensive energy reporting and custom notifications that give you a heads up when something changes, even when you’re on the road.
While there’s no need for multiple apps or hubs, you can set up your HomePod, Apple TV, or iPad as a home hub for even additional functionality, including sunrise and sunset triggers. You can also connect with the IFTTT app to enable custom triggers, link multiple accessories, and further automate your smart home.
iDevices Features:
— Voice control with Siri®, Alexa*, or the Google Assistant*.
— Dynamic schedules & scenes
— IFTTT compatibility
— Easy in-app setup
— Energy reporting
— Remote access
— No hub required
*Requires Alexa-enabled accessory or a Google Assistant-enabled device.
Источник


