- Как узнать MAC-адрес на Android
- Что такое MAC-адрес и зачем он нужен?
- How To Change the MAC Address on your Android Device
- Top Reasons to Change Your MAC Address
- Changing the MAC Address using Root Access on Your Device
- Changing the MAC Address without Root Access on the Device
- What Is a MAC Address Anyway?
- What is a MAC address used for?
- 4 Easy Ways To Find MAC Address on Android
- 1. Find MAC address from the device information
- 2. Find MAC address from the WiFi settings
- 3. Use a dialer code to find MAC Address
- 4. Use a MAC address finder app
- Ending thoughts
- Что собою представляет MAC-адрес на Android, как можно его узнать и поменять
- Что такое MAC-адрес
- Как узнать MAC-адрес
- Как поменять MAC-адрес на Android
Как узнать MAC-адрес на Android
Для настройки локальной сети не редко требуется знать MAC-адреса всех устройств, которые подключаются к сети. Например, по mac-адресу устройствам могут выдаваться IP-адреса, или блокироваться не желательные Wi-Fi подключения. Поэтому не редко возникает необходимость узнать мак адрес на Андроид устройстве. В данной статье мы расскажем о том, как это можно сделать.
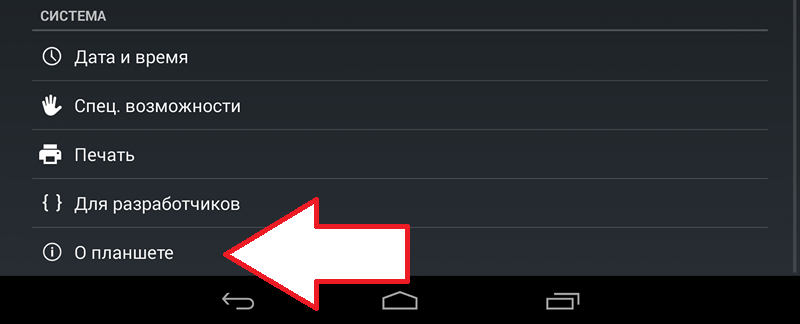
Для того чтобы узнать MAC-адрес на Андроид устройстве, откройте настройки и перейдите в раздел «О смартфоне» (или в раздел «О планшете», если у вас планшетный компьютер).
Дальше откройте раздел «Общая информация».

После этого перед вами откроется окно под названием «Общая информация».
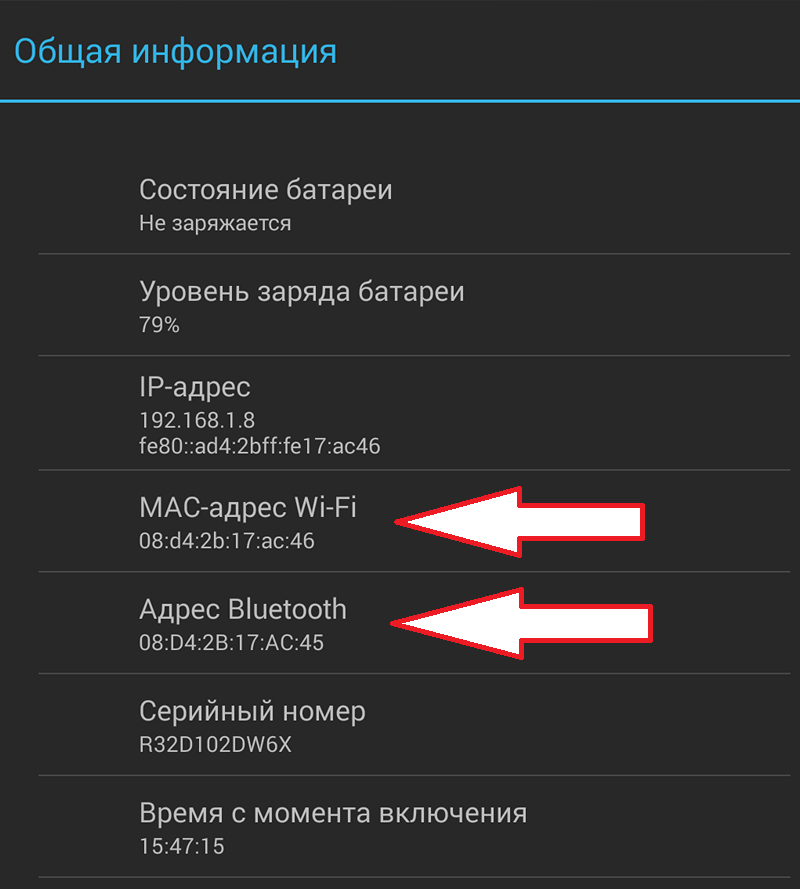
Здесь будет указан MAC-адрес Wi-Fi модуля, а также MAC Bluetooth. Нужно отметить, что если Bluetooth отключен в настройках, то узнать его MAC-адрес таким способом не удастся. В то время как информация об MAC-адресе Wi-Fi модуля отображается вне зависимости от того, включен он или нет.
Что такое MAC-адрес и зачем он нужен?
MAC-адрес на Андроид выполняет точно такие же функции как и на любом другом сетевом оборудовании, например на настольных компьютерах. MAC-адрес это уникальный номер для каждого сетевого устройства. Не существует двух устройств с одинаковым MAC-адресом. Но при этом, если существует необходимость, пользователь может сменить MAC-адрес, в том числе и на тот, который уже используется другим устройством.
В компьютерных сетях MAC-адрес используется для точной идентификации каждого сетевого узла. Это позволяет доставлять данные точно тому сетевому узлу, которому они и предназначались.
Наиболее распространенным форматом MAC-адреса является MAC-48. Данный формат используется в таких сетях как Ethernet, FDDI, Token ring и WiMAX. Мак-адрес в этом формате состоит их 48 бит, а адресное пространство начитывает 2 в 48 степени уникальных вариантов.
В статье не хватает важной информации? Расскажите об этом в комментариях.
Источник
How To Change the MAC Address on your Android Device
Mac addresses identify your devices on a network so that servers, apps, and the internet know where to send packets of data, and some also use it to track your device’s activity. Changing your device’s Mac address is often desired for invisibility purposes (hiding from other users and other devices), obtaining the benefits of other devices, preventing direct hacking, and more. This tutorial shows you how to change the MAC address on your Android device so you get more bandwidth speed, fewer app restrictions, reduced tracking actions, and even the ability to stop direct hacking. There are also some FAQs at the end to explain what a MAC address is, what it is for, and why you would want to change it.

Top Reasons to Change Your MAC Address
Sometimes, you may want your device to bypass access control lists on routers or servers to hide it from other networked devices and users. Other times, you may want your device to appear as another one even though it is not. Another term for this transition is Mac spoofing, which is done for legitimate and illicit purposes alike.
If your ISP or local domain restricts a device’s bandwidth, app use, or priority based on the identified Mac address, changing it to another device’s Mac address fools the ISP. This process allows your spoofed device to gain benefits from the other device. Of course, you’d have to use only one of the two devices that use the same MAC address.
Furthermore, hackers on the same network as your devices do exist, depending on circumstances. The danger occurs in schools, public Wi-Fi, and workplaces alike. Spoofing your Mac address prevents direct hacking because the impersonator cannot access your device directly without the actual address. Just think of this situation as using someone’s social security number. That number gives the perpetrator direct access to credit applications and more by having your actual SSN. In other words, the hacker impersonates you!! Just as the SSN identifies you globally, a Mac address identifies your device in the network.
You might wonder why it is important that people can’t track your online activities with your MAC access. Well, if a hacker has your MAC address, he can impersonate you and commit various crimes using your MAC address or steal from you. You wouldn’t really want any of that, would you?
On most networks, access restrictions are based on the IP address of a device, but when someone has your MAC address, he or she can easily work their way around such IP address security restrictions.
You could go as far as to change the MAC address of your network adapter and make the restriction based on MAC addresses connecting to it if you wish to do so.
Changing the MAC Address using Root Access on Your Device
Switching your Mac address can only be performed on Android devices on which you have root access. First, check for root availability on your Android device. Download the free Root Checker app from Google Play.
Don’t worry, the app is simple, and you basically launch after downloading and then tap on the “Verify root” button. This process shows you the status of root on your device, and you will see if root access is currently enabled.

If the Root Checker app confirmed that your device has root access, then just read on. If not, skip to the next section, where we show you how to change the MAC address on your Android device without having root access.
- Install BusyBox from Google Play.
- Install Terminal Emulator for Android from Google Play.
- Run the terminal emulator app and type “su” (which stands for “super” user), then press “Enter.”

- If the device asks you to allow the app to access root, tap on “Allow.”
- Type “IP link show” and then hit “Enter” again so that you can write down the interface name of your current network. For demonstration purposes here, we will refer to your network interface name as HAL9000.
- Type “busybox ip link HAL9000” (replace HAL9000 with the actual name of your network that you wrote down earlier).
- Your current MAC address will get displayed.
- To change the address, type “busybox config HAL9000 hw ether XX:XX:XX:YY:YY:YY” in the terminal, replacing “XX:XX:XX:YY:YY:YY” with your new MAC address, then press “Enter.”

You now have a new Mac address assigned to your device. Take note that the change is permanent, even after you restart your Android phone.
Changing the MAC Address without Root Access on the Device
- Go to “Settings.”
- Tap on “About Phone.”
- Select “Status.”
- You will see your current MAC address, and we suggest that you write it down, as you’ll need it later when you want to change it.
- Download a free app from Google Play called Terminal Emulator for Android.
- Run the app and type in the command “IP link show” and press “Enter.” After that, you will see the name of your network interface. Again for demonstration purposes, we shall call your network interface name “HAL9000”, but you should type in the actual name of your network interface.
- Type “ip link set HAL9000 XX:XX:XX:YY:YY:YY” and replace “XX:XX:XX:YY:YY:YY” with your new MAC address.
You now have a new Mac address for your device, except this procedure (without root) only lasts until you reboot your phone.
In closing, it’s not difficult to change your Mac address. It just requires a few apps and some commands. However, don’t forget that the “rootless” option is only temporary until you restart your phone. Even if you have root access, there may be times when using the no-root method comes in handy, such as when you are on public Wi-Fi for a few hours or wanting higher internet speeds and port availability on your friend’s Wi-Fi network. Using the rootless option allows your device to automatically return to the previous status later without requiring any manual changes.
What Is a MAC Address Anyway?
MAC (Media Access Control) address is a unique identifier attached to each network interface controller (NIC), whether an ethernet NIC or wireless NIC. If the internet protocol (IP) address changes for a give NIC, the MAC address still remains, identifying the device on the network. So, this means that your network adapter has one, as well as your Android smartphone, phablet, or tablet. The MAC address allows each device that connects to the Internet or a local network to get identified by its unique 12-character code.
What is a MAC address used for?
NIC devices contain unique MAC addresses. IP packets sent on the internet get sent from a MAC address, and those packets get sent to another MAC address. The receiving NIC device checks whether the destined packets match its address. If the address is not the same, the packets get discarded. This process ensures that all devices on the network get the correct IP packets.
Aside from internet and network data transmission processes, MAC addresses get used by internet service providers (ISPs) such as cable companies and mobile providers to control bandwidth and other features on a specific device. MAC addresses are also used to track stolen devices, and many apps require them to interact with the device, such as cloud software. Furthermore, location services utilize your device’s MAC address, such as Google Maps. The bottom line is that MAC addresses are essential to ensure the correct device gets the right data, and the communicating device or app interacts with the correct one.
Источник
4 Easy Ways To Find MAC Address on Android

If you are a network administrator, you probably have to deal with mac addresses often. MAC address is required to identify a device on a particular network and manage its connection. Although it’s similar to the device ID, but it’s specifically used for network connection.
You can use it to restrict network access to specific devices, apply network rules, and even change it to spoof a different device. I am sure you can see how important it is to know your device’s MAC address. Therefore, today I will show you 4 ways to find MAC address on any Android phone.
1. Find MAC address from the device information
The quickest way to find MAC address on Android is to look for it in the About device section.
Here’s how to access it:
- Go to “Settings” and tap on “About device”.
- Here tap on “Status” and you’ll find the MAC address under the “WiFi MAC address”

You can tap and hold on the MAC address to copy it and paste it anywhere you like.
2. Find MAC address from the WiFi settings
Alternatively, you can also find MAC address from WiFi advanced settings. Follow the below instructions:
- Access “Settings” and tap on “Connections” (or WiFi and networks) option.
- Now tap on “Advanced” button at the top-right corner.
- In the Advanced settings, you’ll find the MAC address at the bottom.

3. Use a dialer code to find MAC Address
If you are one of those geeky users who like using codes, then you’ll surely like this option. Like many other secret Android codes, there is also a dial pad code to find MAC address on Android. Here’s is what you need to do:
Open up the dial pad (the app you use for calling) and enter the code *#*#232338#*#*. A tiny window will open up to show your mac address.
Note: This trick may not work on some Android phones. For example, it doesn’t work on my Samsung device.
4. Use a MAC address finder app
If you frequently need to look for the MAC address of your Android phone, then using a dedicated app might be a better option. There are many apps for this purpose, but I recommend What’s my MAC address for its simplicity.
Just install and launch the app and it will show the device MAC address on the top. Additionally, it also shows SSID and BSSID (WiFi MAC address), which could also be useful in many situations. If you need to copy any of the information, just tap and hold on it.

Ending thoughts
These are all the methods I know to find MAC address on Android devices. I particularly like the first method on this list as it’s easier to access and you also have the option to copy the MAC address. If you know any other ways to find MAC address on Android, let us know in the comments below.
Источник
Что собою представляет MAC-адрес на Android, как можно его узнать и поменять
Не исключены ситуации, когда для нормальной работы в интернете нужно сменить МАС-адрес на смартфоне или планшете. Что он собой представляет и как его поменять, читайте далее в нашей статье.
 Как изменить MAC-адрес на Android.
Что такое MAC-адрес
МАС-адрес, который расшифровывается, как «Управление доступом к среде», это информация из нескольких битов, встраиваемая в каждое устройство, которое способно выходить в интернет. Как правило, владельцам смартфонов и планшетов на базе Android приходится сталкиваться с этим явлением, когда нужно ограничить доступ к Wi-Fi. Провайдеры также обращаются к МАС-адресу, чтобы регулировать выход пользователей в сеть.
Как узнать MAC-адрес
Теперь поговорим о том, как узнать МАК-адрес телефона на базе Андроид:
- Откройте «Настройки» и перейдите в раздел «Об устройстве».
- Найдите в списке «Состояние».
- Здесь вы увидите МАС-адрес, записанный цифро-буквенным кодом.

В принципе, теперь вы проинформированы, как узнать МАС-адрес телефона, только помните, что в разных Андроид-устройствах обозначенные выше разделы могут называться неодинаково. Бывают и некоторые проблемы. Например, вы нашли строчку с адресом, но вместо номера написано слово «Недоступно». Чтобы посмотреть значение, подключитесь к интернету через Сим-карту или Wi-Fi, а потом снова вернитесь к «Состоянию». Едва ли вы сможете достоверно узнать идентификатор бюджетного китайского смартфона – они меняют свой MAC постоянно, хоть и работают на привычной системе Андроид.
Как поменять MAC-адрес на Android
Для этого нужно обладать расширенными правами пользователя (Root). Фактически это означает взлом устройства: вы рискуете телефоном – в случае, если система повредится, вы не сможете перепрошить её по гарантийному талону. Root получают с помощью специальных приложений, типа Framaroot, только скачивать их нужно с осторожностью и лучше проверить на вирусы.

Также устанавливаем BusyBox – это непосредственно для смены MAC, и эмулятор терминала (он заменяет Андроидам «Командную строку»). Откройте последнее приложение, возле мигающего курсора впишите «su» и нажмите ОК. Вас спросят, можно ли использовать расширенные возможности – соглашайтесь. Далее пишите: «busybox ifconfig wlan0 hw ether новый адрес» (его можно сгенерировать с помощью онлайн-генератора).

Бывает и совершенно обратная ситуация, о которой уже упоминалось: устройство меняет адрес после каждой перезагрузки/включения. Таким образом, если вы подключаетесь к Wi-Fi, придётся постоянно копаться в настройках и разрешать доступ разным МАС. Чтобы остановить этот процесс, снова понадобится эмулятор терминала:
- Снова вбиваем туда «su», подтверждаем, что можно воспользоваться расширенными правами и переходим: cd/data/nvram/APCFG/APRDEB/WIFI.
- Сохраните элемент и перенесите в ПК.
- Далее понадобится HEX-редактор – это такое приложение для коррекции данных, с которым обычно работают программисты, но на самом деле в нем нет ничего сложного, если знать, что делать. Можно воспользоваться онлайн-версией или скачать полную.
- Откройте в редакторе скачанный файл – вы увидите набор цифр, разбитых по парам: 04 01 00 00 00 00 00 00 00 00 00 00…
- Пропустите четыре первые пары, а остальные нули замените адресом вашего устройства, только вместо двоеточий, разделяющих числа и буквы, поставьте пробелы.
- Снова войдите в терминал для Андроид и поменяйте название оригинального элемента (который вы копировали в ПК), например, добавив лишнюю букву.
- Теперь сюда же поместите обработанный элемент и перезапустите ОС.
Источник


