- Как я искал свой телефон с помощью Android Device Manager
- How to install Android CDC Driver Manually
- Install Android CDC Driver Manually
- Download Android USB Drivers for popular OEMs
- Purpose of Android USB drivers
- Download Android USB drivers for popular OEMs
- How to install Android USB drivers
- Manually install the driver for an unsupported device
Как я искал свой телефон с помощью Android Device Manager
В прошлую пятницу, по пути домой, я бездарно посеял свой телефон в автобусе. Осознание этого печального факта пришло позже, когда я уже выходил из метро. Новый Nexus 4 терять очень жалко. К счастью я знал о нескольких программах, которые могут отслеживать местоположение телефона.
Прийдя домой, я первым делом попробовал включить Prey, но потом я вспомнил, что после рутования телефона я забыл активировать свой аккаунт.
После этого я попытался поставить Plan B, но тут меня ждал облом. Plan B работает только на старых версиях ОС.
Почти смирившись с потерей телефона я наткнулся на Android Device Manager ( www.google.com/android/devicemanager ). Это новая штуковина, которая может отслеживать ваш телефон и не требует сторонних программ. (Наверное работает только с 4.2, ниже я не проверял).
Телефон был обнаружен в автобусном депо. Чем чёрт не шутит, подумал я и поехал туда. Но найти телефон когда в депо сотня автобусов очень затруднительно. По крайней мере его никто не взял и он скорее всего окажется в бюро находок 🙂
Все выходные телефон находился в депо, и я начал думать, что это какой-то глюк, т.к. с зарядника я его снял в пятницу утром.
Сегодня, перед выездом на работу, я обнаружил его не в депо, а на крупной автобусной остановке. Когда я пришел на работу, телефон был уже в районе университета, через весь город. Его никто не нашел, и он продолжает ездить на автобусе. По крайней мере теперь задача упрощается.
Зная конечную и начальную остановки я опредилил номер маршрута. №49 — Metrotown — UBC.
После утренней планерки, отследив телефон еще несколько раз эта теория подвердилась.
Используя мобильный сайт, который показывает автобусы на карте в реальном времени ( nb.translink.ca/Map/Route/049/Trip/EB1 ) я смог вычислить номер самого автобуса.
После чего осталось всего ничего 🙂 Я позвонил в бюро находок компании Translink, и подробно рассказал им в каком конкретном автобусе нужно искать мой телефон, и сиденье, на котором он был посеян.
Оператор была сильно удивлена точностью моих данных, а автобус как раз подъезжал к конечной.
Через пять минут мне перезвонили, и сказали что телефон найден! Victory.
Единственное, чего я не могу понять — так это время работы (с утра пятницы, до утра понедельника). Даже используя CyanogenMod это дофига, учитывая, что я долбил его по GPS каждые 5 минут на протяжении пары дней 🙂 Правда в нем есть индуктивное зарядное устройство Qi, может он лежал рядом с каким-нибудь электрокабелем…
Источник
How to install Android CDC Driver Manually
These are instructions on how to install Android CDC Driver on Windows Computer, including Windows XP, Windows Vista, Windows 7, Windows 8, Windows 8.1 and Windows 10.
Install Android CDC Driver Manually
Step 1. Download and Extract Android CDC Driver on your Windows Computer.
Step 2. Now, Open Device Manager on your Computer (to open device manager > Press Win + R to launch Run Command > In Run Command Window type devmgmt.msc and Hit OK Button).
Step 3. Once Device Manager is Launched, Click on your Computer Name.

Step 4. Now, Click on Action menu and Select Add Legacy Hardware.

Step 5. In the Add Hardware Wizard, Click on Next Button.

Step 6. Now, Select Install the Hardware that I manually Select from a list (advanced) and Click on Next Button.

Step 7. Now, under common hardware types > select on show all devices and click Next Button.

Step 8. Now, Click on Have Disk Button > Locate the Android CDC Driver (Android_Gadget_CDC_driver.inf) on your Computer.


Step 9. Once your driver is listed in the blank area, click on Next to continue.

Step 10. Now, Again Click on Next Button.

Step 11. Now, you will be able to see Windows Security Dialog Box. Under Windows Security Dialog Box, Select Install this driver software anyway.

Now, the device manager will install the Android CDC driver on your computer (may take 1-2 minutes only).
Step 12. Now, Click on Finish button to close the Add Hardware Wizard.

Step 13. Below you can see the Android CDC driver is installed and listed in the device manager.

[*] Android CDC Driver is made to work on mediatek chipsets only. You need to install the CDC Driver to flash stock firmware using SP Flash Tool.
[*] Driver is not digitally signed error: If you got this error then you need to fix the driver signature enforcement manually, for that see this tutorial.
[*] CDC Driver may not work with SN Write Tool to Flash IMEI on mediatek devices.
[*] Credits: Android CDC Driver is created and distributed by Mediatek Inc. So, full credit goes to them for sharing the driver for free.
Источник
Download Android USB Drivers for popular OEMs
So you’ve got an Android device and want to dive deep into the world of modding? Be it rooting or installing a custom ROM like LineageOS, most of the aftermarket modding requires you to connect your Android smartphone to a computer using a USB cable so you can use tools like the Android Debug Bridge (ADB) and Fastboot to interact with the device. For an Android power user, you may also want to reinstall the factory firmware on your phone, which means you have to deal with the OEM-specific flashing utilities.
However, none of these tinkering jobs are possible if your PC can’t see the target device in the first place. As in the case of Windows, the operating system may require an additional piece of software known as the “driver” in order to properly recognize all the different connection modes exposed by the Android device. Below you can find a list of official OEM-provided Android USB driver packages and a generic driver installation guide. If you don’t see the maker of your device listed or you see a misplaced link, send a message to Skanda HazarikaВ (SkandaHВ on the forums) with the device details.

Table of Contents:
Purpose of Android USB drivers
The USB interface of an Android device is a pretty complex object. Depending on the configuration, it may expose the standard Android USB debugging interface, the fastboot interface, and various other SoC-specific diagnostic interfaces to the computer. Simultaneously maintaining more than one interface is supported as well, e.g. you can interact with your device with ADB while configuring the internal modem parameters.
Keep in mind the aforementioned scenarios are a bit different from connecting the device through the plain old Media Transfer Protocol (MTP) or Picture Transfer Protocol (PTP) mode. MTP enables the end-user to browse the internal memory on the device from a PC as if it’s an external storage drive. Microsoft ships a generic MTP/PTP driver with every edition of Windows since Windows XP, so you don’t need an external driver for that.
Download Android USB drivers for popular OEMs
Most Android OEMs offer official driver packages for their devices. Besides the ADB and Fastboot interfaces, these drivers also support proprietary flashing protocols designed by the corresponding device maker. For example, if you want to flash a Samsung Galaxy device, you must install the Samsung USB driver package beforehand.
Note that Microsoft has been shipping a generic ADB driver with Windows for a while, so installing the OEM driver just for the sake of USB debugging might not sound worthwhile anymore. Windows can also check and install the missing drivers on the fly through Windows Update. However, Microsoft-recommended drivers are not always the best choice for complex USB interfaces, so do check out the official driver pack whenever possible.

The inbox Android USB debugging driver of Windows in action
Get the appropriate driver for your device from the index below:
| OEM | Android USB Driver |
|---|---|
| Acer | Download Link |
| Alcatel | Download Link |
| ASUS | Download Link |
| Blackberry | Download Link |
| Dell | Download Link |
| Fujitsu | Download Link |
| Download Link | |
| HTC | Download Link |
| Huawei | Download Link |
| Intel | Download Link |
| Kyocera | Download Link |
| Lenovo |
|
| LG | Download Link |
| Motorola | Download Link |
| MediaTek | Download Link |
| NVIDIA | Download Link |
| Samsung | Download Link |
| Sharp | Download Link |
| Sony | Download Link |
| Toshiba | Download Link |
| Vivo/iQOO | Download Link |
| Xiaomi | Download Link |
| ZTE | Download Link |
How to install Android USB drivers
Now that you’ve downloaded the suitable driver package for your device, it’s time for you to install it. Some OEMs offer standard installer executables, which means you can easily install the whole driver suite by double-clicking on the setup file and following the wizard.

However, Google and a few other vendors prefer to stick with the bare INF and associated binary files which are packed inside a zip or rar archive. Such packages need to be installed using Device Manager, but you have to extract the contents of the archive beforehand.
- Right-click on the Start button and select the Device Manager entry. You can also call the Microsoft Management Console snap-in named devmgmt.msc directly from Run to open Device Manager.

Device Manager under Windows 10
- Connect the Android device to your PC. Depending on the selected configuration, you may see one or more unknown devices popping up.

- (Optional) Right-click on the unknown device entry, select Properties, move to the Details tab, and finally select Hardware Ids from the dropdown menu. Now open your favorite search engine, paste the hardware identifier in the search box, and go through the search results. This is a crude way to determine the probable interface your device is currently exposing.

- Right-click on the unknown device entry and select Update drivers. Now select Browse my computer for drivers/driver software and point the wizard to the folder where you extracted the driver package.
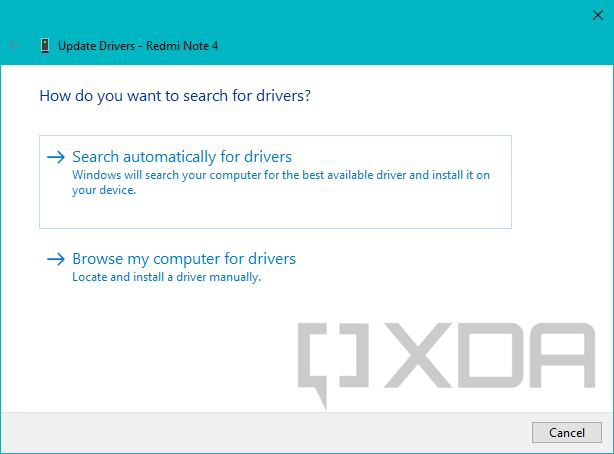

- If everything goes right, you should see a confirmation page like the following.

Manually install the driver for an unsupported device
On some occasions, the OEM drivers aren’t enough. Perhaps you’ve stumbled upon a no-name generic tablet, or the flash mode interface of your shiny new phone has yet to get an official driver from its maker. In that case, you can forcibly install an existing driver package for a similar USB interface through Device Manager.
- Open Device Manager and locate the unknown device entry.
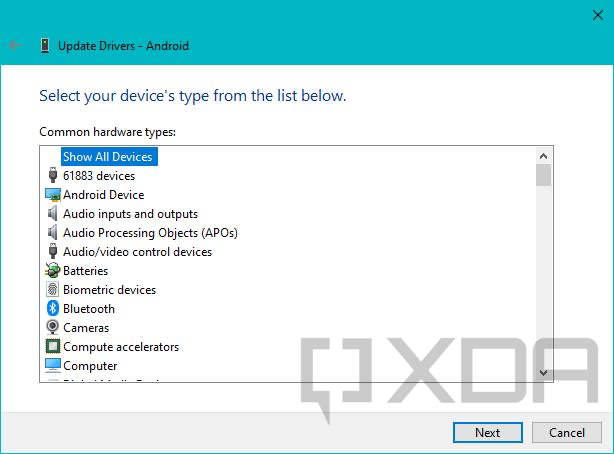
- Right-click on it and select Update drivers. Select Browse my computer for driver software and then choose the option named Let me pick from a list of available drivers on my computer.

- Now select Show All Devices and click Next. On the next screen, click on the Have Disk… button.

- At this point, you need to browse to the location where the extracted driver for a similar device is located. Pick the INF file from the list of files and select Open.

- Now carefully choose the driver model. For example, if you’re trying to install the Fastboot mode driver for a device, select the Android Bootloader Interface from Google’s driver set. Windows might show a warning related to compatibility, but you can ignore it and continue the installation process anyway.


This method lets you force-install a signed driver without breaking its digital signature, so you don’t need to turn off driver signature enforcement on a 64-bit Windows instance.
You’ve now got the correct USB driver installed on your computer and your Android device is ready to receive instructions. Now it’s time to put it all together and run your first ADB command!
Источник


