- What to do before you sell, give away, or trade in your iPhone, iPad, or iPod touch
- If you still have your iPhone, iPad, or iPod touch
- Transfer information to your new device
- Remove your personal information from your old device
- If you no longer have your iPhone, iPad, or iPod touch
- If you’re trading in an Android device to Apple
- Learn more
- About the ‘Trust This Computer’ alert on your iPhone, iPad, or iPod touch
- What the trust settings on your device mean
- Choose whether to trust a computer
- Change your settings for trusted computers
- Get help
- If you see No Service or Searching on your iPhone or iPad
- Check your coverage area
- Restart your iPhone or iPad
- Check for a Carrier Settings update
- Take out the SIM card
- Reset your Network Settings.
- Update your iPhone or iPad
- Contact your carrier
- Get more help
- View and edit your Access Point Name (APN) on your iPhone and iPad
- Enter your APN settings automatically
- View and edit your APN settings
- Reset your APN settings
What to do before you sell, give away, or trade in your iPhone, iPad, or iPod touch
Use these steps to transfer information to your new device, then remove your personal information from your old device.
Before you sell, give away, or trade in your device, you should first transfer information to your new device, then remove your personal information from your old device.
You shouldn’t manually delete your contacts, calendars, reminders, documents, photos, or any other iCloud information while you’re signed in to iCloud with your Apple ID. This would delete your content from the iCloud servers and any of your devices signed in to iCloud.
If you still have your iPhone, iPad, or iPod touch
Follow these steps to transfer information to your new device, then remove your personal information from your old device.
Transfer information to your new device
If you have a new iPhone, iPad, or iPod touch, you can use Quick Start to automatically transfer information from your old device to your new device if you’re using iOS 11 or later. Use iCloud, iTunes, or the Finder to transfer information to your new device if you’re using iOS 10 or earlier.
If your phone number will change with your new device, add additional trusted phone numbers to your account to ensure you don’t lose access. If you no longer have access to your old phone number, you can generate a two-factor authentication code on your old device if needed.
Remove your personal information from your old device
- If you paired an Apple Watch with your iPhone, unpair your Apple Watch.
- Back up your device.
- Sign out of iCloud and the iTunes & App Store.
- If you’re using iOS 10.3 or later, tap Settings > [your name]. Scroll down and tap Sign Out. Enter your Apple ID password and tap Turn Off.
- If you’re using iOS 10.2 or earlier, tap Settings > iCloud > Sign Out. Tap Sign Out again, then tap Delete from My [device] and enter your Apple ID password. Then go to Settings > iTunes & App Store > Apple ID > Sign Out.
- If you’re switching to a non-Apple phone, deregister iMessage.
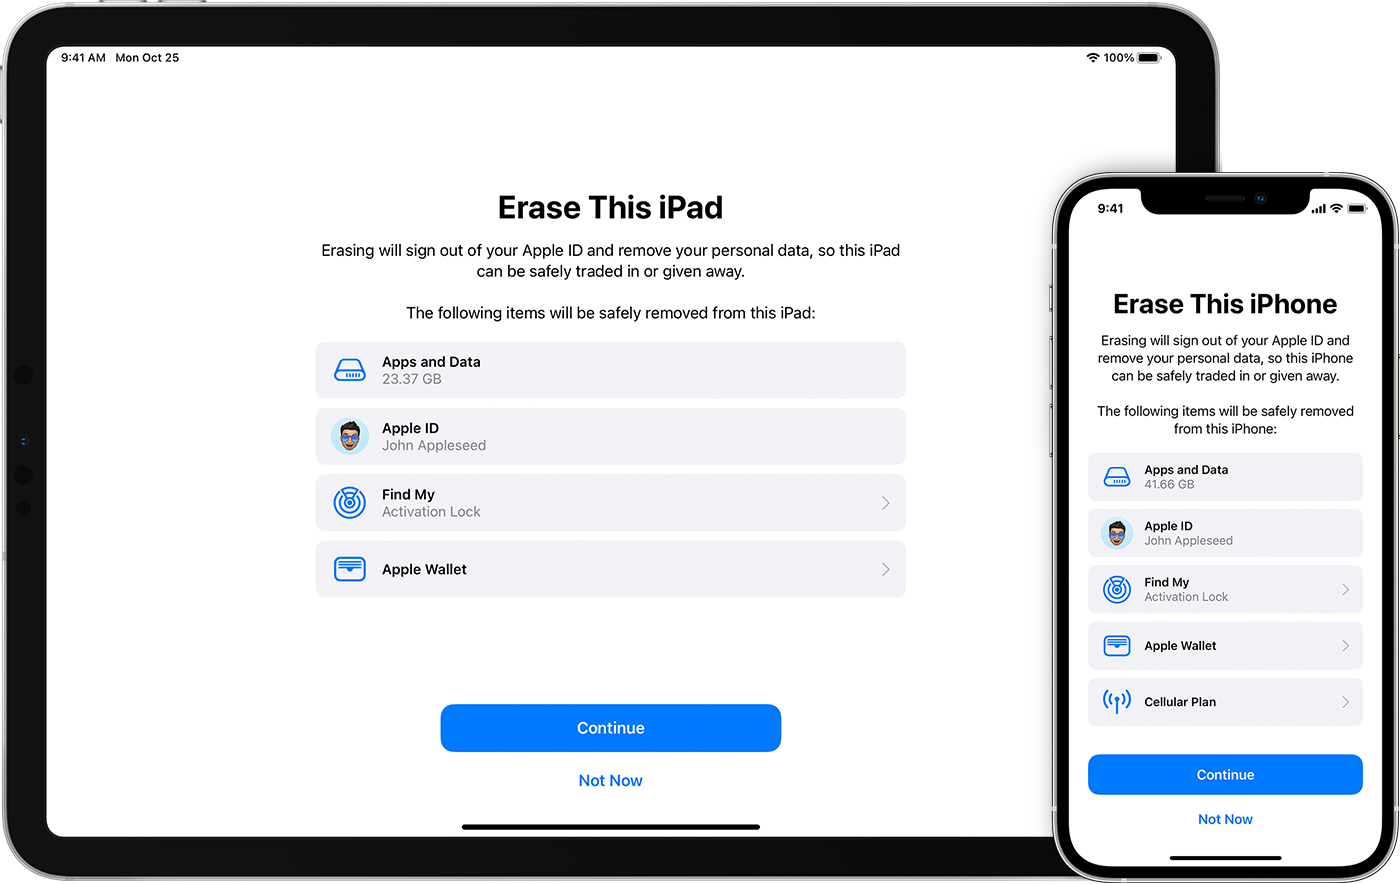
- Go back to Settings and tap General > Transfer or Reset [device] > Erase All Content and Settings. If you turned on Find My [device], you might need to enter your Apple ID and password. If your device uses eSIM, choose the option to erase your device and the eSIM profile when asked.
- If asked for your device passcode or Restrictions passcode, enter it. Then tap Erase [device].
- Contact your carrier for help transferring service to a new owner. If you aren’t using a SIM card with your device, you can contact them to get help transferring service to the new owner.
- Remove your old device from your list of trusted devices.
When you erase your iPhone, iPad, or iPod touch, Find My [device] and Activation Lock are turned off.

If you no longer have your iPhone, iPad, or iPod touch
If the steps above weren’t completed and you no longer have your device, use these steps:
- Ask the new owner to erase all content and settings using the above steps.
- If you’re using iCloud and Find My [device] on the device, sign in to iCloud.com/find or the Find My app on another device, select the device, and click Erase. After the device has been erased, click Remove from Account.
- If you can’t follow either of the above steps, change your Apple ID password. This won’t remove personal information that’s stored on your old device, but it prevents the new owner from deleting your information from iCloud.
- If you’re switching to a non-Apple phone, deregister iMessage.
- If you’re using Apple Pay, you can remove your credit or debit cards at iCloud.com. Choose Account Settings to see which devices are using Apple Pay, then click the device. Next to Apple Pay, click Remove.
- Remove your old device from your list of trusted devices.
If you’re trading in an Android device to Apple
Before you send in an Android device to Apple as a trade-in, be sure to do the following:
- Back up your data.
- Erase the device.
- Remove any SIM cards, memory cards, cases, and screen protectors.
Contact your device’s manufacturer if you need help.
Learn more
- Make a backup of your iPhone, iPad, or iPod touch or restore from a backup.
- Remove all of your cards from Apple Pay.
- Get help if your iPhone, iPad, or iPod touch is lost or stolen.
- Learn about Activation Lock.
- No matter the model or condition, we can turn your device into something good for you and good for the planet. Learn how to trade in or recycle your iPhone, iPad, or iPod touch with Apple Trade In.
When you tap Erase All Content and Settings, it completely erases your device, including any credit or debit cards you added for Apple Pay and any photos, contacts, music, or apps. It will also turn off iCloud, iMessage, FaceTime, Game Center, and other services. Your content won’t be deleted from iCloud when you erase your device.
Источник
About the ‘Trust This Computer’ alert on your iPhone, iPad, or iPod touch
Learn about trusted computers and find out how to change your settings.
What the trust settings on your device mean
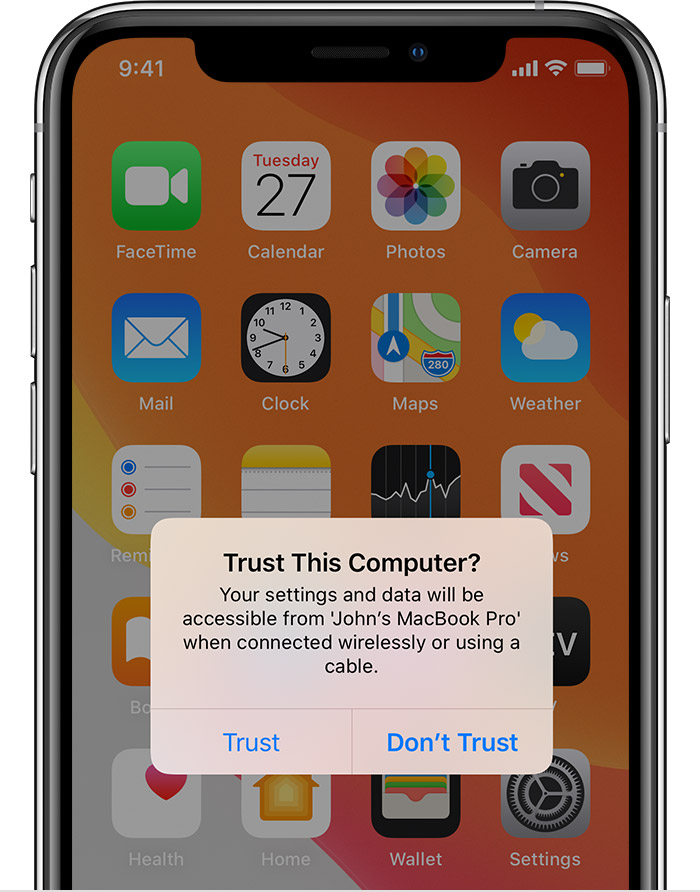
When you connect your iPhone, iPad, or iPod touch to a computer or other device for the first time, an alert asks whether you trust the computer:
- Trusted computers can sync with your device, create backups, and access your device’s photos, videos, contacts, and other content. These computers remain trusted unless you change which computers you trust or erase your device.
- If you choose not to trust a computer, you block its access to content on your device. You’ll see the trust alert every time that you connect your device to that computer.
Choose whether to trust a computer
- Connect your iPhone, iPad, or iPod touch to your computer or another device.
- Enter your passcode, if you have one, to unlock your iPhone, iPad, or iPod touch.
- If you want to allow your computer to access information on your device, select your device in Finder and click Trust, or if you’re using iTunes, click Continue.

- On your iPhone, iPad, or iPod touch, confirm that you allow your computer or other device to access your data. If you don’t want to trust the computer or other connected device, tap Don’t Trust on your device. If you want to trust your computer, tap Trust.
Change your settings for trusted computers
Your device remembers the computers you’ve chosen to trust.
If you don’t want to trust a computer or other device anymore, change the privacy settings on your iPhone, iPad, or iPod touch. Go to Settings > General > Reset > Reset Location & Privacy. Now when you connect to formerly trusted computers, the Trust alert will ask you whether you trust that computer.
Get help
If you tap Trust or Don’t Trust but doesn’t accept your answer, or if the Trust alert won’t appear, follow these steps. Try again after each:
If the above steps don’t help, go to Settings > General > Reset and tap Reset Network Settings. This also resets Wi-Fi networks and passwords, cellular settings, and VPN and APN settings that you’ve used before.
If you downloaded iTunes for Windows from the Microsoft Store, make sure that iTunes Mobile Device Helper is enabled as a startup item.
Information about products not manufactured by Apple, or independent websites not controlled or tested by Apple, is provided without recommendation or endorsement. Apple assumes no responsibility with regard to the selection, performance, or use of third-party websites or products. Apple makes no representations regarding third-party website accuracy or reliability. Contact the vendor for additional information.
Источник
If you see No Service or Searching on your iPhone or iPad
If you see No Service or Searching on your iPhone or iPad (Wi-Fi + Cellular), or can’t connect to a cellular network or cellular data, follow these steps:
Check your coverage area
Make sure that you’re in an area with cellular network coverage. Then follow these steps:
- To turn cellular data on or off, go to Settings, then tap Cellular or Mobile Data. If you’re using your iPad, you might see Settings > Cellular Data.
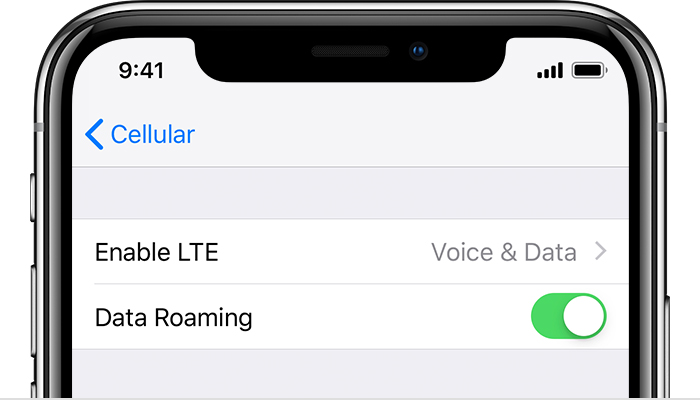
- If you’re traveling internationally, make sure that your device is set up for data roaming. Go to Settings > Cellular > Cellular Data Options > Data Roaming.
Restart your iPhone or iPad
Restart your device. If you’re not sure how to do this, follow these steps to restart your iPhone or restart your iPad.
Check for a Carrier Settings update
To manually check for and install a carrier settings update:
- Make sure that your device is connected to a Wi-Fi or cellular network.
- Tap Settings > General > About. If an update is available, you’ll see an option to update your carrier settings.
- To see the version of carrier settings on your device, tap Settings > General > About and look next to Carrier.
If you insert a new SIM card into your iPhone or iPad, you need to download the carrier settings for your new carrier.
Take out the SIM card
After removing the SIM card, put it back in. You might need to contact your carrier:
- If the SIM card is damaged, or doesn’t fit in the SIM tray, ask your carrier for a new SIM card.
- If you transferred your SIM card from another device, ask your carrier if your SIM card works with your iPhone or iPad.
Learn more about removing your iPhone SIM card or iPad SIM card.
Reset your Network Settings.
Go to Settings > General > Reset > Reset Network Settings. This also resets Wi-Fi networks and passwords, cellular settings, and VPN and APN settings that you’ve used before.
Update your iPhone or iPad
Update your iPhone or iPad to the latest version of iOS.
Contact your carrier
Issues with your carrier or account might affect your service. Contact your carrier to:
- Verify that your account is active and in good standing.
- Make sure there are no outages in your area.
- Check that your device isn’t blocked from receiving cellular services and is set up with the right data plan.
Only your wireless carrier can access and manage details about your account. If you need help finding your wireless carrier’s service page, use the Apple carrier-support article or an online search engine.
Get more help
If your carrier confirms that there’s no issue with your account or network, but you still can’t connect to a cellular network, contact Apple Support.
If you see an alert next to No Service, learn what you can do.
Источник
View and edit your Access Point Name (APN) on your iPhone and iPad
Learn how to view and edit the APN for cellular data services on your iPhone and iPad.
The Access Point Name (APN) defines the network path for all cellular data connectivity. Some carriers require you to enter your APN settings to set up your cellular service.
You can only edit or view your APN on your iPhone and iPad if your carrier allows it. If you can’t modify your APN settings, contact your carrier.
Enter your APN settings automatically
If your cellular carrier supports this feature, you can populate your APN settings automatically in iOS 15 and iPadOS 15 and later:
- Insert your SIM card.
- On your iPhone or iPad, go to Settings > Cellular > Cellular Data.
- Under Cellular Data, choose Use Carrier Settings.
If you don’t see the option to use carrier settings, follow the steps below to enter your APN settings.
View and edit your APN settings
If you enter incorrect APN settings, you might lose cellular data connectivity and receive additional charges. Don’t edit the APN unless directed by your carrier or mobile device administrator. Contact your carrier to verify the correct APN settings.
If your carrier allows it, you can view your APN settings in one of the following locations:
- Settings > Cellular > Cellular Data Options > Cellular Network
- Settings > Mobile Data > Mobile Data Options > Mobile Data Network
If your device doesn’t have either option, contact your carrier.
To change your settings, tap each field and enter the details from your carrier. The settings should save automatically. Depending on your carrier, you might not be able to change the cellular data settings. If your carrier needs a different APN setting, you might be able to use a configuration profile with the correct setting.
Unless you’re using a configuration profile, updating iOS resets any changes made to your APN settings. If you edit your APN settings before updating iOS, your settings will reset to the default values. You might need to reenter your settings after an iOS update.
Reset your APN settings
To revert to your carrier’s default APN information, go to Settings > Cellular > Cellular Data Network > Reset Settings. If you installed a configuration profile, the profile’s default information will be used instead.
If you’re using an iPhone or iPad in an enterprise environment, you might need to contact your mobile device administrator to change your APN. If you change APN settings that a mobile device administrator set for you from a configuration profile, here’s how to change it back:
- On iPhone: Go to Settings > Cellular > Cellular Data Network, then tap Reset Settings.
- On iPad: Remove the configuration profile and add it again.
If you’re a mobile device administrator, you can use Apple Configurator or another mobile device management solution to change the APN and other advanced settings.
Источник


