- How to Disable Updates on an Android Device
- How to Turn Off Automatic OS Updates on an Android Device?
- Method 1 – Postponing the Updates
- Method 2 – Enable Developer Mode
- How to Turn Off Automatic Updates for Google Play Apps?
- How to Turn Off Auto Updates on Android TV?
- How to Turn Off Auto Updates for Specific Apps?
- How to Turn Off Auto Updates on Mobile Data?
- Controlling the Updates on Your Android Device
- Как запретить обновление конкретного приложения на Android устройстве (Обновлено: или всех приложений сразу)
- Как запретить обновления для конкретного приложения, установленного на Android устройстве
How to Disable Updates on an Android Device
Automatic updates are admittedly a nuisance sometimes, but for the most part, they are necessary. If you’re an Android device user, you’re probably used to either getting notifications that updates are available or that your OS and the apps have already been updated.

However, there are instances when you don’t want your Android smartphone or tablet to update without your confirmation first. Perhaps you’re connected to mobile data, and you have a monthly data limit.
Other reasons might include that you might not have enough storage or that your phone is not brand new. This article will show you how to disable these updates.
How to Turn Off Automatic OS Updates on an Android Device?
The reason your Android needs regular system updates is not only that you can benefit from new features. Often, updates are necessary because they fix an existing bug or a glitch reported by the users.
Still, some Android users would prefer to hold off on their devices receiving an automatic update and would instead do it manually.
Giving yourself time to research what the new updates bring will provide you with a sense of what to expect when you finally do update Android OS on your device. So, to ensure you don’t get automatic updates on your Android, here is how you can turn them off.
Method 1 – Postponing the Updates
Almost all Android devices give you the option to download the new OS version using only Wi-Fi. The latest updates are often over 100MB, and most people would rather not spend their data on acquiring the new OS.
Often, this is the default setting on Android. However, you can turn it off. When you do, you will only get a notification that the new Android OS version is available, but the device won’t automatically download it.
Then, you can go into the device’s settings and download the updates manually when you’re ready. Here’s how you do this:
- Go to your Android phone’s Settings.

- Tap on “Software update.”
- Toggle the “Auto download over Wi-Fi” switch to off.


There is one downside to this method. The notification which informed you about the new update won’t be removed from your home screen until you actually download and install the update. When you want it gone from your screen, follow these steps:
- Open Settings on your device.
- Select “Software update.”
- Select “Download and install.”

Method 2 – Enable Developer Mode
There is another strategy you can try, though it will require a few extra steps. As well as the readiness to dig a little deeper and block the Android updates completely. Here’s what we are talking about:
- Again, go to your device’s Settings app.
- Usually, at the very bottom, you’ll see the “About Phone” or “About Device” option. Tap on that.
- Then, select the “Software Information” option.
- Scroll down and select “Build Number.”
- You’ll need to tap on that several times consecutively until you get the notification that you’ve enabled the “Developer mode.”


This is the point where you need to go back to the original settings screen. You’ll notice next to the “About Device” section another one that says, “Developer options.”
All you have to do is tap on that section and search for “Automatic system updates.” Finally, ensure that this feature is disabled. This process will prevent you from receiving automatic system updates on your Android device.
How to Turn Off Automatic Updates for Google Play Apps?
You might not be against having your Android OS receive regular updates. But when it comes to auto-updates for apps, that’s a different story. How many apps have you downloaded from the Play Store? All apps have regular updates, and the most popular issue them quite frequently.
While some users don’t see a problem with that, others find themselves confused every time they receive a notification that their device has low storage, or their mobile data is running low.
With Android apps, manual updates are often the more prudent solution. Here’s how you can set that up on your device:
- On your Android device, launch the Play Store app.
- Tap on the three horizontal lines in the top left-hand corner of the screen.
- Now, select “Settings” followed by “Auto-update apps.”
- From the pop-up screen, select the “Don’t auto-update apps” option.
- Tap on “Done.”


That’s all there is to it. From that moment on, you will need to update your apps manually. That means checking the Play Store from time to time to see if any new versions of the app are available.
Keep in mind that it’s not uncommon for users to forget about this and find themselves experiencing issues with an app, unaware that there’s an update that can fix the problem.
How to Turn Off Auto Updates on Android TV?
If you have a Sony, Sharp, Phillips, or any other brand of smart TVs that run on Android OS, you also have the option to turn off automatic app updates. Here’s how:
- From your TV’s home screen, select the “Applications” option and then launch the Play Store app.
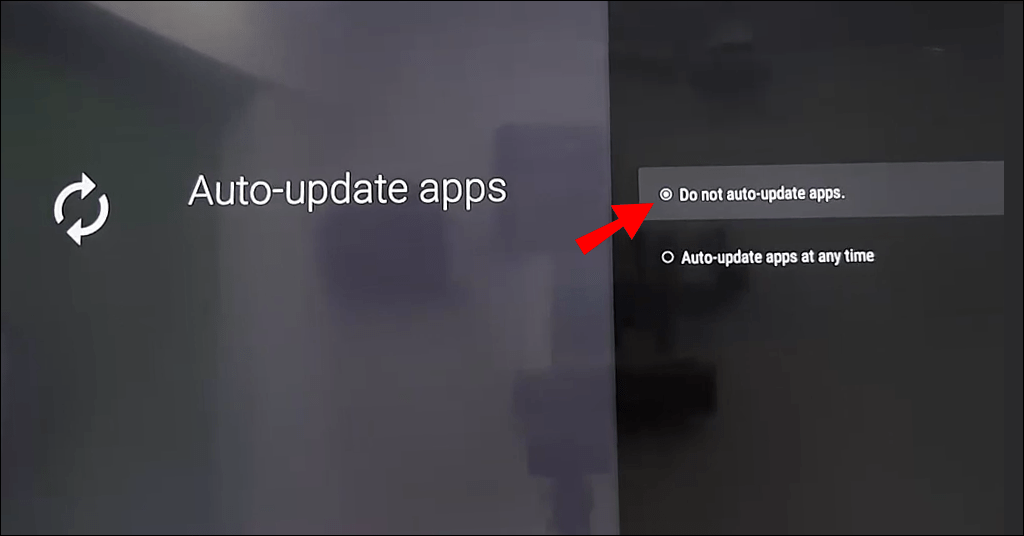
- Select “Settings” followed by “Auto-update apps.”
- Disable the settings with your remote.


How to Turn Off Auto Updates for Specific Apps?
Another potential problem you might have is that you already have an auto-update setting for apps but you wish to disable it for one app specifically.
Apps such as Instagram and Chrome are often large, and it’s understandable that you want to approve it first. This is something you can do via the Play Store. Follow these steps to learn how to do it:
- Launch the Play Store app on your Android device.
- Search for the specific app in the search bar.
- Once you find it, tap on the three vertical dots in the top right-hand corner of the screen.
- Make sure to uncheck the auto-update box from the list of options.


How to Turn Off Auto Updates on Mobile Data?
When it comes to Android system updates, you don’t have to worry about auto-updates when you’re using mobile data. Unless you download the software manually, Android won’t push them on your device.
However, as far as apps go, you do have the option only to receive auto-updates if you’re using Wi-Fi. This is the middle ground between not having any control over your apps’ updates and forgetting to update them from time to time. Here’s what you need to do only to receive app auto-updates when connected to Wi-Fi:
- Open the Play Store on your Android device.
- Tap on the “Auto-update apps” option.
- Select “Over Wi-Fi only.”
- Tap on “Done.”


Now, you don’t have to worry about any app you have using up all your mobile data ever again. To reverse this, follow the same steps and select the “Over any network” option.
Controlling the Updates on Your Android Device
Sometimes, it’s easier to allow automatic updates to happen and not think specifically about which apps need updating and when.
With system updates, it’s probably better not to postpone them for too long unless your device really is better off without it. However, apps are more complicated because depending on how many you have on your Android device, the auto-updating can be an ongoing process.
While you can disable the auto-updates completely, most users choose to turn off the mobile data auto-updates only. Ultimately, the choice is yours.
What is your preferred setting when it comes to auto-updates? Let us know in the comments section below.
Источник
Как запретить обновление конкретного приложения на Android устройстве (Обновлено: или всех приложений сразу)
Разработчики приложений для мобильных устройств постоянно совершенствуют свои детища, но иногда слишком рьяные попытки улучшить их приводят к прямо противоположному результату.
Поэтому нам зачастую приходится пользоваться старыми версиями программ, которые нас, в отличие от обновленных, устраивают целиком и полностью. Однако, операционная система Android постоянно норовит обновить устаревшие по её мнению приложения, регулярно предлагая нам скачать новые версии из Play Маркет или делая это самостоятельно. Как этого избежать?
С некоторых пор в Android появилась возможность отключать автоматическое обновление конкретного приложения, установленного на вашем устройстве.
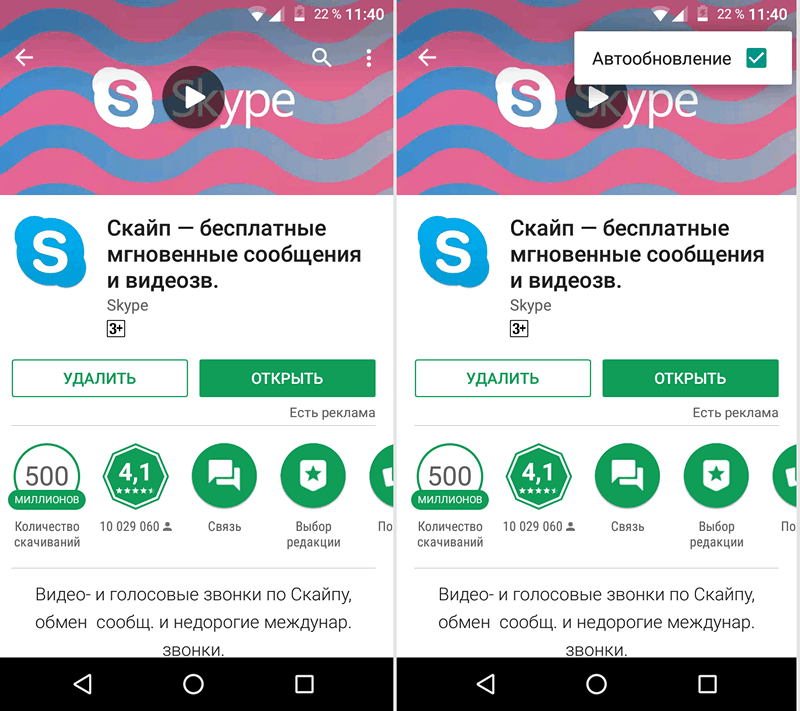
Для этого вам нужно открыть приложение Play Маркет, перейти в раздел «Мои приложения», выбрать нужную вам программу и открыть её страницу. В открывшемся окне нажмите на кнопку меню в виде вертикального троеточия и уберите отметку напротив пункта «Автообновление»:
Всё. Теперь приложение не должно будет автоматически обновляться на вашем устройстве. Тем не менее всегда существует риск того, что вы случайно обновите его вместе с другими приложениями, установленными на вашем устройстве. Как избежать этого?
Как запретить обновления для конкретного приложения, установленного на Android устройстве
Для того, чтобы Play Маркет не предлагал больше устанавливать обновления для конкретного приложения и автоматически не обновлял его вам нужно будет удалить подпись разработчика из его APK файла, подписать APK файл новым ключом и установить его.
Для неопытного пользователя всё это звучит непонятно, но делается оно очень просто:
1. Найдите APK файл нужной вам версии приложения. Скачать APK файл нужной вам версии можно либо на этом ресурсе, либо на различных тематических форумах.
По сути APK файл представляет собой обычный zip-архив, в котором размещен код приложения, изображения, которые вы видите на экране во время его работы, тексты переводов на различные языки, и цифровую подпись его издателя. Первое, что нам нужно сделать — это удалить цифровую подпись.
2. Для этого откройте APK файл в приложении 7zip или любом другом архиваторе или приложении, умеющем работать с Zip-архивами, и удалите имеющуюся внутри него папку с наименованием META-INF, в которой, собственно, и расположена эта подпись:
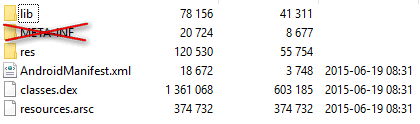
Возможно, что предварительно вам придется сменить у файла расширение c apk на zip, а затем, после удаления подписи, вернуть его обратно.
3. Если вы скачивали APK файл и удаляли их него подпись на своем ПК или ноутбуке, то теперь вам нужно будет скопировать его на свое Android устройство.
4. Установите на свое Android устройство бесплатное приложение ZipSigner, установочный APK файл которого доступен для скачивания по этому адресу.
5. Запустите ZipSigner и откройте в нем APK файл, который нам нужно подписать новой подписью.
Для этого нажмите на кнопку «Выбрать файл» и в открывшемся окне проводника перейдите к местоположению APK файла, который мы будем подписывать и выберите его.
С помощью кнопки «Конечный» вы можете задать имя, которое получит подписанный файл.
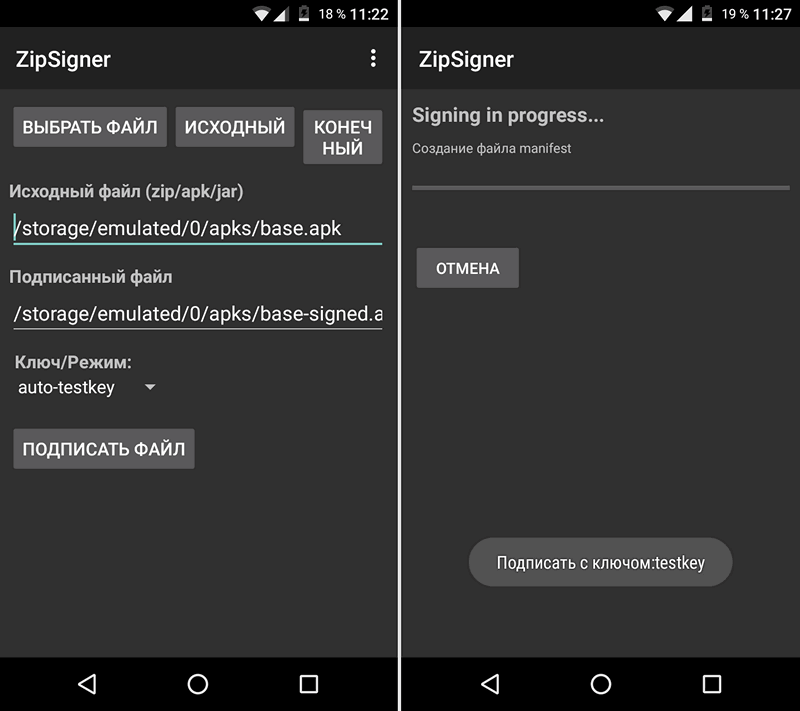
5. Нажмите на кнопку «Подписать файл» и дождитесь окончания процедуры подписи.
6. Выйдите из приложения ZipSigner и откройте любой менеджер файлов, в котором вам нужно будет просто запустить свежеподписанный APK файл чтобы установить его на ваш смартфон или планшет.
По окончанию установки вы сможете пользоваться приложением как обычно, и Google Play Маркет не будет больше предлагать вам обновить его или установить из онлайн-магазина Google более свежую версию.
Напомню также, что вы можете получить переподписанное Android приложение и с помощью еще одной бесплатной программы: App Cloner, которая умеет делать копии приложений. Полученную с помощью него копию вам нужно будет оставить на смартфоне, а оригинал, при желании, удалить. При этом копия с помощью Google Play Маркет обновляться не будет.
Добавлено 30.07.2020:
Если вы решили не обновлять приложения на своем устройстве вообще, то вы можете запретить обновления сразу для всех приложений. Для этого:
1. Запустите Play Маркет
2. Откройте Настройки
3. Выберите пункт «Автообновление приложений»
4. В открывшемся меню поставьте отметку напротив пункта «Никогда»
Источник


