- How to automatically disable mobile data on WiFi on Android
- Enable Developer Options
- Disable mobile data on WiFi
- 5 настроек Android, которые сохранят ваши данные, аккумулятор и многое другое
- Включите сохранение данных
- Отключение роуминга данных
- Отключить настройку «Неизвестные источники»
- Установите Battery Saver для автоматического включения
- Сохраняйте резервные копии данных на Android
- How to Disable Data Roaming on iPhone and Android
- What is Data Roaming?
- Data Roaming Charges Can Be Excessive
- Disable Data Roaming on iPhone
- Enable or Disable Data Roaming on Android Phone
- Disabling «scoped storage» via ADB on Note 10+ updated to Android 11
- Breadcrumb
- paggps
- Tanis64
- blackspy_
- blackhawk
- Tanis64
- blackhawk
- Scoped storage on Android 11 is ruining the Google Photos experience
- blackhawk
- How to get rid of Google Photos’ out-of-sync changes prompt on Android 11
- How to get rid of Google Photos’ out-of-sync changes prompt on Android 11
- blackhawk
- pierro78
- blackhawk
How to automatically disable mobile data on WiFi on Android
Nov 20, 2018
Comment
When you use your mobile data instead of a WiFi network, your phone’s battery drains faster. This isn’t an Android specific thing. It also happens on iPhones, and any other portable device that can connect to a mobile network. Most people keep their mobile data off until they have to go outside and know they won’t be connected to a WiFi network. If you keep your mobile data on in case your WiFi isn’t working, your battery drains much faster. Android has a built-in feature that lets you automatically disable mobile data on WiFi.
This feature is kind of hidden. It’s only available if you have Developer options enabled.
Enable Developer Options
You need to first enable developer options. Open the Settings app and go to the About Phone section. On some phones, you might have an About device section. Under this section, you need to find the Build number or the Build Information.
Tap the build number seven times and it will enable Developer options.
Disable mobile data on WiFi
Now that you have developer options enabled, open the Settings app and tap Developer Options. Developer Options might be nested under another set of settings. Once you’re on the Developer options screen, scroll down to the Networking group of settings, and turn the ‘Mobile data always active’ option off.
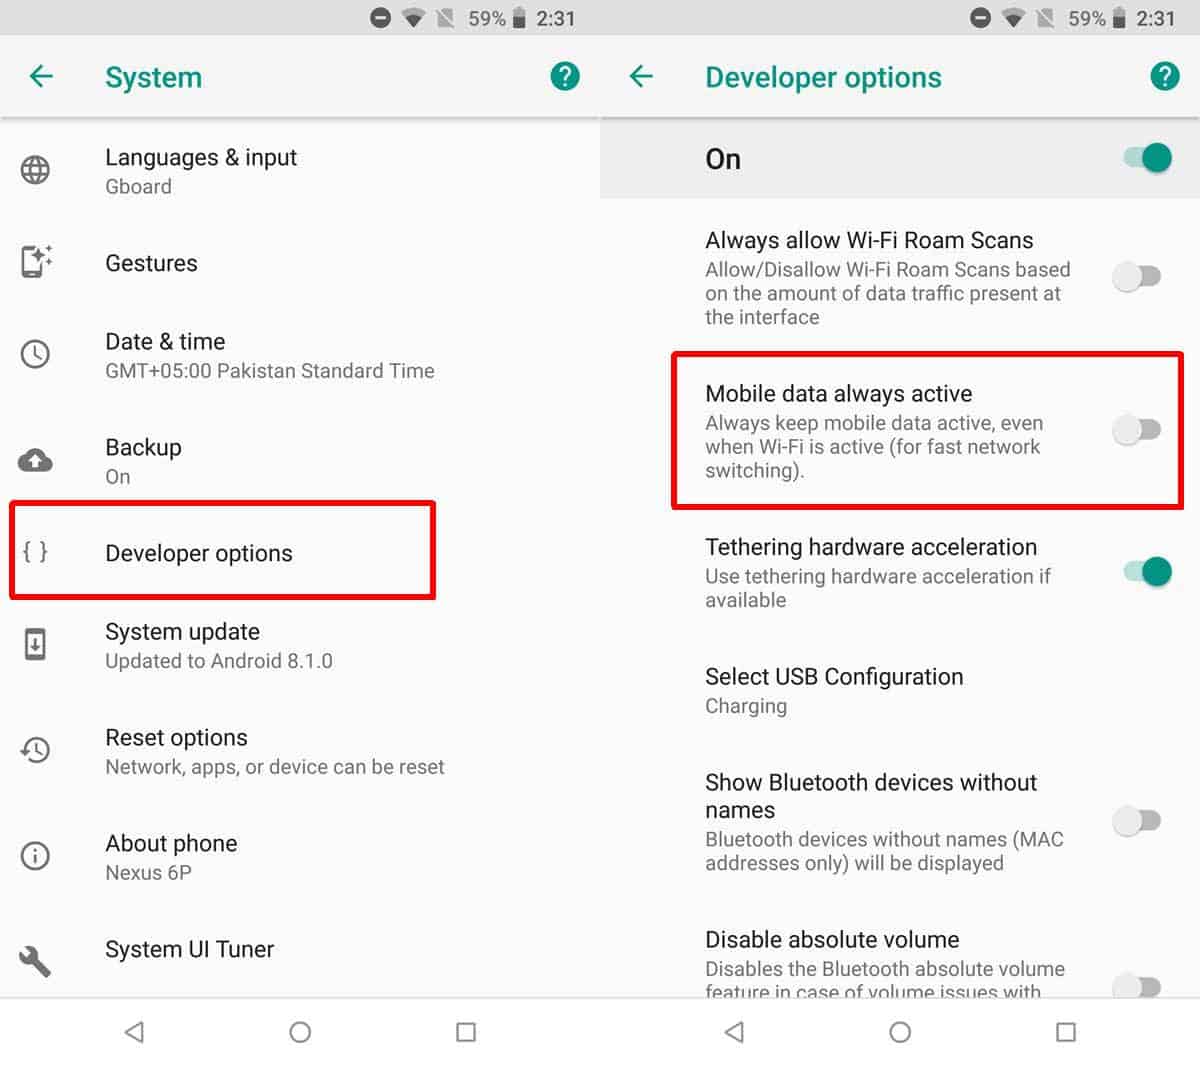
With this option turned off, your device’s mobile data will be turned off when it’s connected to a WiFi network. When your device loses connectivity to a WiFi network, whether it’s because the router has been turned off, the network isn’t working, or you’ve left a WiFi network’s range, mobile data will be turned back on.
When your phone’s battery is low, and you can’t get to a charging point, turning the mobile data off will help it last longer. The difference it makes can be quite a bit. If you’re looking to extend how much use you get out of a single charge, you can also enable low battery mode but doing so will not turn off mobile data. It’s something you have to manually turn off.
iOS has something similar called WiFi Assist though if you want to disable it, you don’t need to enable any special settings. Remember that it’s ‘similar’, not exact. What the feature on iOS does is that it prevents your device from using your cellular data when the WiFi network signal is weak. It doesn’t turn cellular data off. It can prevent your cellular data from being used unnecessarily but it won’t help your battery last longer.
Источник
5 настроек Android, которые сохранят ваши данные, аккумулятор и многое другое

Независимо от того, что вы делаете в своем Android смартфоне, есть пять настроек, которые должны знать все пользователи. Эти жизненно важные функции которые сберегут ваши данные и аккумулятор.
Включите сохранение данных
Если у вас нет безлимитного интернета, скорее всего вы следите за использованием мобильных данных. К сожалению, приложения для Android известны тем, что они используют больше данных, чем хотелось бы, особенно в фоновом режиме.
После того, как вы включили функцию Android Saver, вы можете выбрать, какие приложения (например, Gmail) могут продолжать использовать фоновые сотовые данные.
Вот почему вы должны сразу включить функцию Android Saver. При включенной функции экономии данных ваш телефон Android будет ограничивать использование сотовых данных фоном, тем самым избавляя вас от любых неприятных сюрпризов на вашем ежемесячном мобильном счете.
Просто нажмите «Настройки»> «Использование данных»> «Хранилище данных», затем включите настройку.
Блокирование фоновых сотовых данных имеет свои недостатки. Например, Data Saver не позволит Gmail получать новые сообщения, Twitter не будет уведомлять вас об упоминаниях, если вы вручную не перезагрузите фид, и ваше любимое приложение новостей не обновит свои статьи до тех пор, пока вы не откроете его.
К счастью, вы можете выбрать, какие приложения могут продолжать использовать фоновые мобильные данные, в то время как Data Saver включен. На экране «Параметры экономии данных» коснитесь «Неограниченный доступ к данным», затем переверните переключатели рядом с приложениями, которые вы хотите, чтобы «Data Saver» пропускал их.
Отключение роуминга данных
Даже если у вас есть деньги для безлимитного тарифа, вы все равно можете получить непредвиденные сбои данных, если у вас включен этот конкретный параметр.
Если вам не нравятся неприятные сюрпризы в вашем ежемесячном счете за связь, обязательно отключите настройку роуминга данных Android.
Функция «Роуминг данных Android» позволяет вашему телефону использовать сотовые данные, когда вы «роумируете» в другой сети (обычно из-за того, что вы покинули зону покрытия вашего оператора).
Чтобы отключить роуминг данных, нажмите «Настройки»> «Использование данных», нажмите трехточечную кнопку в правом верхнем углу экрана, коснитесь «Сотовая сеть», затем отключите параметр «Роуминг данных».
Отключить настройку «Неизвестные источники»
Один из плюсов Android есть то, что вы не ограничены магазином Google Play, когда дело касается приложений. Действительно, вы можете загружать и устанавливать приложения из любого стороннего магазина приложений или веб-сайта — из магазина приложений Amazon и DownloadAtoZ в Mobango и SlideMe.
Если вы отключили настройку Unknown Sources, вы заблокируете любые приложения, отличные от Google Play, которые будут установлены на вашем телефоне Android.
Когда включен параметр «Неизвестные источники» открывается дверь всем сторонним приложениям, которые хотят самостоятельно установится на ваш телефон. Выключите Unknown Sources, и ваш Android-телефон заблокирует установку любого приложения, которое не из Google Play.
Чтобы включить или отключить установку Неизвестные источники, нажмите «Настройки»> «Безопасность».
Установите Battery Saver для автоматического включения
Даже когда телефоны Android становятся все более и более мощными, срок службы батареи, похоже, продолжает сокращаться.
Вы можете настроить Android Battery Saver на автозапуск, когда время автономной работы вашего телефона начинает сокращаться.
Вот почему Battery Saver — такая обязательная функция Android. После активации Battery Save переключит ваше устройство в режим с низким энергопотреблением, затемняя экран, отключая большинство фоновых приложений и сервисов местоположения.
Красота режима Battery Saver заключается в том, что вам не нужно включать его вручную.
Нажмите «Настройки»> «Аккумулятор»> «Экономия заряда батареи». Включите автоматически, затем выберите уровень заряда батареи, на котором будет срабатывать функция: 5% или 15%.
Сохраняйте резервные копии данных на Android
И последнее, но не менее важное: сохраняйте данные приложения и настройки в облаке. Просто включите эту настройку и Android будет периодически загружать бекапы текущего состояния вашего телефона на Google Диск. Если вам когда-либо понадобится стереть или даже заменить ваш телефон, вы сможете восстановить большинство своих данных и настроек.
Нажмите «Настройки»> «Резервное копирование и сброс»> «Резервное копирование моих данных», а затем переверните переключатель.
Источник
How to Disable Data Roaming on iPhone and Android
By: Waseem Patwegar
Considering those stories of outrageous Data Roaming charges, it is really important that you understand “Data Roaming” and how to Enable or Disable Data roaming on your iPhone or Android Phone.
What is Data Roaming?
Technically your iPhone or Android phone is said to be in Roaming Mode when it connects to cellular towers that are not owned or operated by your cellular service provider (Verizon, AT&T, Sprint, etc.).
In case this sounds scary, you can take solace from the fact that you won’t be incurring Data Roaming charges as long as you remain within the coverage area specified in your Cellular Plan.
Depending on your Cellphone plan, you may incur roaming charges when you travel to another area within the same country or travel outside the country. Hence, it is highly recommended that you carefully read the contract with your service provider to find out when Data Roaming charges come into play.
Data Roaming Charges Can Be Excessive
As you must be already aware, Data Roaming charges can quickly add up and shoot up your phone bill by hundreds or even thousands of dollars.
Apart from voice calls, Roaming charges apply to text messages, uploading pictures, accessing the internet and any activity on your iPhone or Android Phone that makes it connect to a cellular network.
It is important to remember that you can accumulate Data Roaming Charges simply by leaving your iPhone or Android Phone turned on while you are travelling outside the Country. There are a number of apps on your smartphone that automatically connect to a network in the background and transmit information using your expensive Roaming Data.
To be really safe, you should consider turning off Cellular Data entirely on your iPhone while you are travelling abroad and make use of WiFi networks.
Disable Data Roaming on iPhone
Follow the steps below to Disable Data Roaming on your iPhone.
1. From the home screen of your iPhone, tap on Settings
2. Next, tap on Cellular
3. Disable Data Roaming on your iPhone by toggling Data Roaming to OFF (White) from its current ON (Green) setting (See image below).
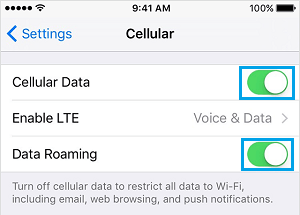
Additionally, you should also consider disabling Cellular Data on your iPhone to make sure that all data usage on your iPhone is restricted to WiFi only and no Cellular Data is used by your Phone.
Note: Disabling Data Roaming will also disable international or out of area text messages on your iPhone.
Enable or Disable Data Roaming on Android Phone
1. Tap on the Settings App on your Android Phone.
2. Next, scroll down to Mobile Networks located under section Connections and tap on it.
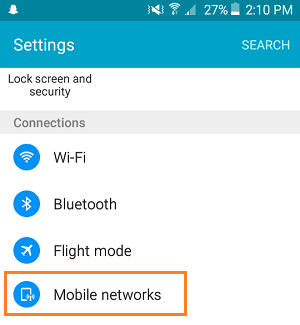
3. On the Mobile Networks screen, make sure that Data Roaming is set to OFF Position (See image below).
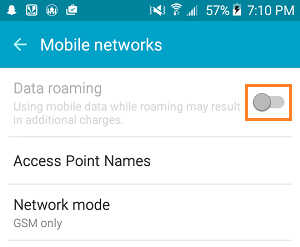
With Data Roaming is Disabled, you can make use of apps like WhatsApp, Google Hangouts and Skype over a WiFi connection to stay in touch with your family and friends.
Источник
Disabling «scoped storage» via ADB on Note 10+ updated to Android 11
Breadcrumb

paggps
Senior Member
Hello,
I would like to know, for those who already received stock Android 11 on their Note 10/Note 10+, if the ability to disable the new «scoped storage» via ADB, on a «per-app» basis is really available and working, as described in this article:
The Storage Access Framework is the only way for apps to work with all your files in Android Q. And it’s terrible
At the bottom of the article, ADB commands for disabling / enabling scoped storage are depicted:
Disable:
adb shell cmd appops set your-package-name android:legacy_storage allow && \
adb shell am force-stop your-package-name
Enable:
adb shell cmd appops set your-package-name android:legacy_storage default && \
adb shell am force-stop your-package-name
Did someone try these ADB commands? Teoretically, with these one can fix any compatibility issue with Android 11.

Tanis64
Senior Member
So far for me it didn’t work.
Using my Note10+ (Exynos Variant) with Android 11 OnUI 3.0 last updatet by end of january to the second Android 11 release for this device.
Full Samsung Stock and not rootet.
What did I test?
With Samsung’s own File Explorer (My Files) on pre Andorid 11 Firmware you have fully access to the Android/data folder on the SD-Card (External Storage).
Since Google mandatory Scoped Storage with Android 11, the Samsung’s File Manager My Files only shows an empty directory here.
But via adb shell I have read access to all folders in the directory Android/data on my SD-Card (External Storage)
with ls -lah —color i can see all the subfolders that containing the specific app Data.
Unfortunately the adb shell rm commend doesn’t work.
So if there is any Applikation writing to the Android/data/nameofApp Folder this could be running in problems with less storage.
If the App has the option build in to move or delete files from this location this will help, but if not I see no way tzo delete that zombie files from the sd-card, except to remove the card from the device and try to access it via an adapter from the PC or Mac. But this will only work on non encrypted sd-cards!
So i give it a try with the adb shell
after connecting to my device i opened the shell for adb with te command adb shell
so i guess the force close was necassary for overtaking the changed app options.
This doesn’t change anything, so for me it doesn’t work.
The only way, in my opinion, is that samsung is going to request a special Access (MANAGE_EXTERNAL_STORAGE) by google for their app my files, as mentioned at the end of the linked youtube video.

blackspy_
Senior Member
Disable:
adb shell cmd appops set your-package-name android:legacy_storage allow && \
adb shell am force-stop your-package-name
Enable:
adb shell cmd appops set your-package-name android:legacy_storage default && \
adb shell am force-stop your-package-name
Did someone try these ADB commands? Teoretically, with these one can fix any compatibility issue with Android 11.
i did try these commands and they worked for Osmand and Sygic, as well as for Root Explorer. of course you have to be rooted.
i am still struggling with windows, not seeing /Android/data on the SDcard though.
would anyone happen to know, to which apps i have to apply those commands to allow windows to write to external/android/data/ ?
what i absolutely do not understand: this scoped storage was introduced to raise security, in the way that apps can’t see other apps data. but: looking at internal storage Android/data/ i see all files and i can also overwrite them.
i assume, that these changes will be gone, once you update the apk and you will have to re-apply them. also this is a temporary behaviour — i assume google will in the future prevent these modifications.
conclusion: if i want to use two apps like Guru Maps and Osmand, both of them store around 50 GB of data just for Europe, i have to have all those maps in the internal memory. let’s assume i only have 128 GB . Or, as far as i understood, you can still have the data on the sdcard (some apps can), but everytime you startup the app, it will copy the data to a temp directory to internal memory — which is in fact the same as having the data in internal: you NEED to have the space. i tried with Osmand — it works, but it takes . around 20 minutes until the app starts.
all this seems not to be very handy to me

blackhawk
Senior Member
i did try these commands and they worked for Osmand and Sygic, as well as for Root Explorer. of course you have to be rooted.
i am still struggling with windows, not seeing /Android/data on the SDcard though.
would anyone happen to know, to which apps i have to apply those commands to allow windows to write to external/android/data/ ?
what i absolutely do not understand: this scoped storage was introduced to raise security, in the way that apps can’t see other apps data. but: looking at internal storage Android/data/ i see all files and i can also overwrite them.
i assume, that these changes will be gone, once you update the apk and you will have to re-apply them. also this is a temporary behaviour — i assume google will in the future prevent these modifications.
conclusion: if i want to use two apps like Guru Maps and Osmand, both of them store around 50 GB of data just for Europe, i have to have all those maps in the internal memory. let’s assume i only have 128 GB . Or, as far as i understood, you can still have the data on the sdcard (some apps can), but everytime you startup the app, it will copy the data to a temp directory to internal memory — which is in fact the same as having the data in internal: you NEED to have the space. i tried with Osmand — it works, but it takes . around 20 minutes until the app starts.
all this seems not to be very handy to me
Scope storage is a resource hog and serves little or no purpose for experienced users.
Know what you load, monitor, and use a VNP firewall like Karma Firewall* to enforce security.
I refuse to leave Pie for the psuedo security bs of Q and 11. It’s performance impact is less noticeable on the even faster cpu’s/ram of the newest phones but it’s stealing their edge too.
*Karma’s logging feature appears to not work with Q and above. you know for security
Tanis64
Senior Member
blackhawk
Senior Member
Lol, another depth marker as Google heads to crush depth.
Google must be smoking Bill Gates bad stash and are power mad. They want to control everything and everyone. A malignant cancer at this point.
Anyone thinking about loading 11 better read this.
Quick summary; it’s a lick on you.

Scoped storage on Android 11 is ruining the Google Photos experience
blackhawk
Senior Member
How to get rid of Google Photos’ out-of-sync changes prompt on Android 11

Member
How to get rid of Google Photos’ out-of-sync changes prompt on Android 11
I don’t think scoped storage is the best thing under the sun, however, I work with IT users all day, sometimes they do the weirdest stuff imaginable, dumb stuff that defies common logic, other times they do things I didn’t even know where possible and screw up.
I think scoped storage is like child proofing. We know it sucks, we know it restricts us but for the average Joe it may actually be useful.
I once had a user call me because they wanted to #upgrade the DPI on a S8 and increased it out of the displays range. I have no idea where he went and got that information, how he ran the command and why, but he lost the phone, went to OEM support where they told him no fix was available besides MB replacement (squeezing cents maybe) and I helped him by setting the default values via ADB. Still have no idea where he got that info and why he wanted to do it.
Sometimes the needs of the many really outweigh the needs of the few .
blackhawk
Senior Member
I don’t think scoped storage is the best thing under the sun, however, I work with IT users all day, sometimes they do the weirdest stuff imaginable, dumb stuff that defies common logic, other times they do things I didn’t even know where possible and screw up.
I think scoped storage is like child proofing. We know it sucks, we know it restricts us but for the average Joe it may actually be useful.
I once had a user call me because they wanted to #upgrade the DPI on a S8 and increased it out of the displays range. I have no idea where he went and got that information, how he ran the command and why, but he lost the phone, went to OEM support where they told him no fix was available besides MB replacement (squeezing cents maybe) and I helped him by setting the default values via ADB. Still have no idea where he got that info and why he wanted to do it.
Sometimes the needs of the many really outweigh the needs of the few .
No one needs a big sister. not even a moron.
The biggest source of malware is still the user.
The user needs a certain level of wherewithal otherwise something will eat them for sure.
No saving dumb bunnies.
The Star Trek movies just suck more the older I get
pierro78
Senior Member
ungoogled-chromium-android-extensions apparently doesn’t support android 11 «scoped storage» (more info on https://www.reddit.com/r/AndroidQuestions/comments/nhsxtx ) does somebody know if there would be a workaround in android 11 to allow ungoogled-chromium-android-extensions to load extensions from the phone storage ??
blackhawk
Senior Member
I just got a new N10+ that’s running on Android 10 (so I have one running on Pie, one on Q).
Q concerned me however it appears scoped storage isn’t active on any of my apps maybe because they are older. Other than killing Karma Firewall’s valuable logging feature almost everything else including the Double Tap apk seems to work. Permissions and navigation are worse than Pie but not completely overbearing like they are in R. Dark mode is better.
Q maybe snapper than Pie, power consumption is similar; too soon to call that though.
Do Not upgrade to 11, it’s not a pretty picture. Q is as high as you can go without incurring major bs issues. R is a bloatware packed hog of a OS.
If this fat lady sings. run.
edit, got my Q’s and R’s confused. feel the stress
Q killed the hell out of Brave browser. No fix. Now bad sites can hide in plain sight.
Good Lock’s analog clocks suck, of course Samsung just had to change styles to be hip. Groovy.
If I disable Framework the battery life in Q might exceed my Pie variant however overall it’s less functional because of excessive app restrictions. Pie had similar but less restrictive issues as Q while R is just simple unusable. R is a no go, a dead horse in the sun is no fun.
My Pie variant never has any malware issues, only Android’s already over active security restrictions. What’s Android do? Made it even worse.
Fktard Gookill, you do know the definition of insanity, don’t you? 


Источник


