- Правильное отключение уведомлений на Android
- Отключение уведомлений на Android
- Способ 1: Отключение оповещений
- Способ 2: Меню «Уведомления»
- Способ 3: Уведомления приложений
- Способ 4: Настройки приложения
- Способ 5: Блокировка SMS и звонков
- How to turn off notifications in Android 11 and older
- How to turn off notifications in stock Android 11
- Use the Notification Shade
- Use Settings
- Snooze a notification
- Disable Wireless Emergency Alerts
- How to turn off notifications in Android 10 (Samsung)
- Use the Notification Shade
- Use Settings
- Snooze a notification
- Disable Wireless Emergency Alerts
- How to turn off notifications in Android 9.0 Pie
- How to turn off notifications in Android 8.0 Oreo
- Review and set notifications
- Turn off all lock screen notifications
- How to turn off notifications in Android 7.0 Nougat
- Set notification rules for all apps
- How to turn off notifications in Android 5 & 6
- Set notification rules for all apps
- How to turn off notifications in Android 4.1 and 4.4
- Set notification rules for all apps
- How to turn off notifications in older versions of Android
- Customizing notifications
Правильное отключение уведомлений на Android

Любое Android-устройство по умолчанию предоставляет множество важных функций, среди которых особого внимания заслуживает система мгновенных уведомлений. Несмотря на то, что в большинстве случаев подобного рода оповещения играют далеко не последнюю роль, иногда они становятся проблемой. В ходе сегодняшней инструкции мы расскажем про их отключение на Android.
Отключение уведомлений на Android
На платформе Андроид избавиться от оповещений можно пятью основными способами, как с использованием стандартных функций устройства, так и прибегнув к дополнительным приложениям. Кроме того, практически каждое установленное ПО предоставляет собственные настройки, позволяющие деактивировать те или иные уведомления.
Способ 1: Отключение оповещений
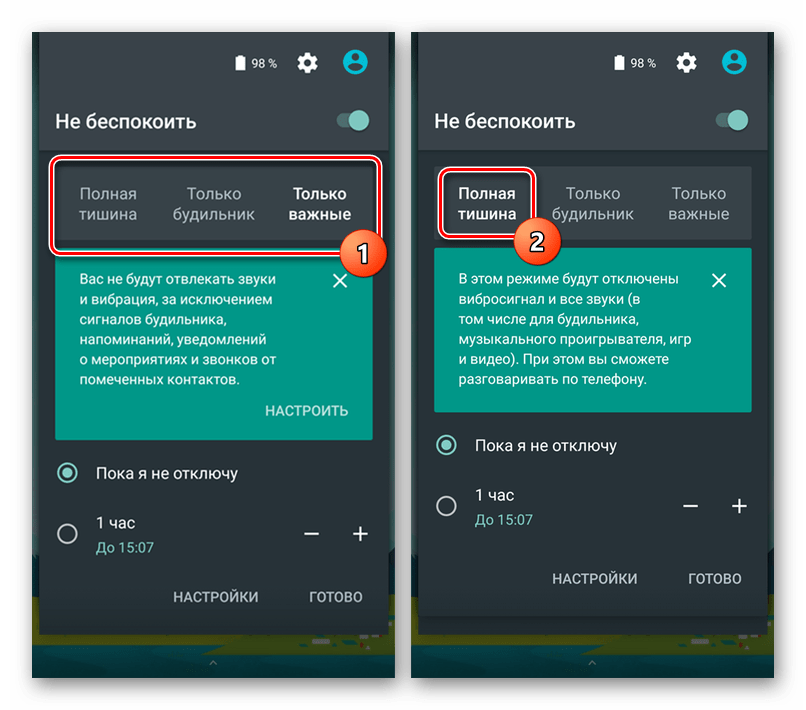
Вне зависимости от установленной версии Android отключить уведомления можно, воспользовавшись шторкой. При этом данный метод лишь отчасти относится к отключению оповещений, так как большинство из них все равно будет там скапливаться.
- Через панель быстрого доступа выполнить отключение проще всего, так как достаточно тапнуть всего лишь по одной иконке. Для этого прежде всего разверните шторку и найдите значок с подписью «Только важные».

Панель быстрого доступа обновится, представив ряд параметров. Тапните по варианту «Полная тишина», чтобы отключить любые оповещения на устройстве.
Способ 2: Меню «Уведомления»
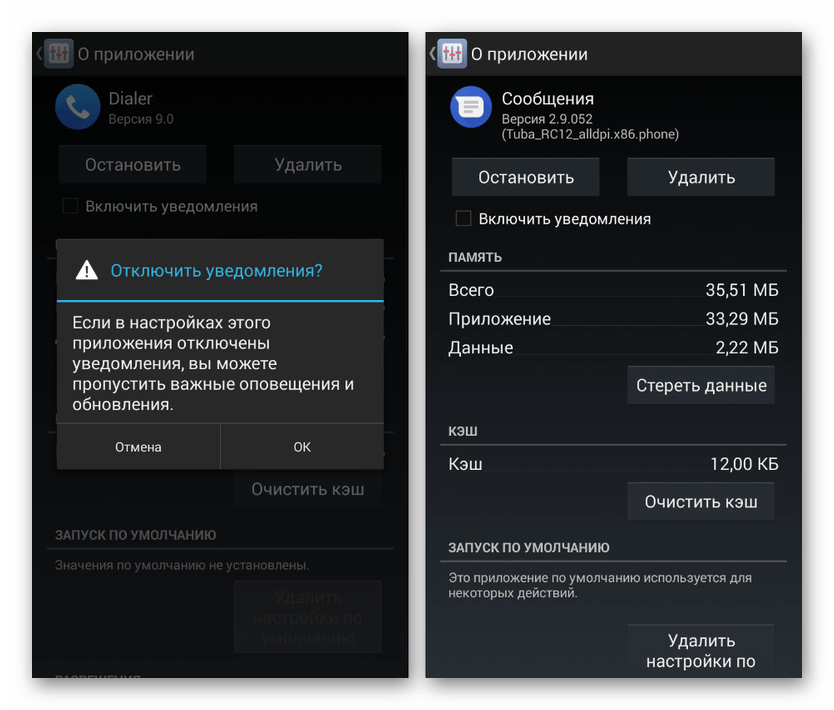
Самым очевидным отключением оповещений станет использование «Настроек», позволяющих гибко управлять операционной системой в целом. За пример мы возьмем две версии Android, поскольку эта процедура различается в зависимости от актуальности операционной системы. Андроид 5 и ниже в учет не берутся, поскольку такого пункта меню там нет.
Android 6-7
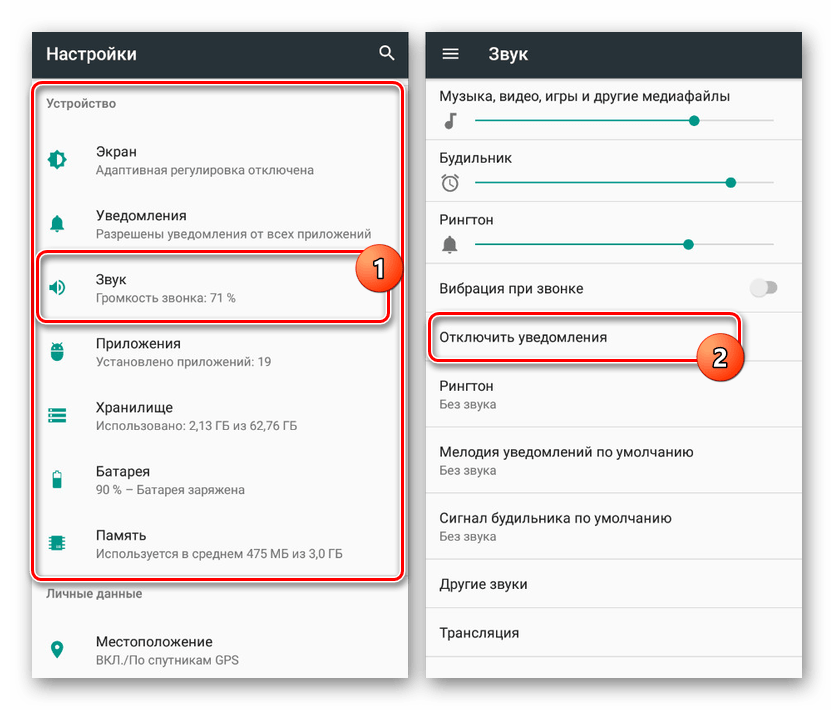
- Откройте приложение «Настройки», найдите блок «Устройство» и нажмите «Уведомления».

Каждому представленному в списке приложению доступна установка персональных параметров. Однако по большей части это не повлияет на сам факт получения оповещений.


Через «Настройки» перейдите на страницу «Звук» в блоке «Устройство». Здесь тапните по кнопке «Отключить уведомления».
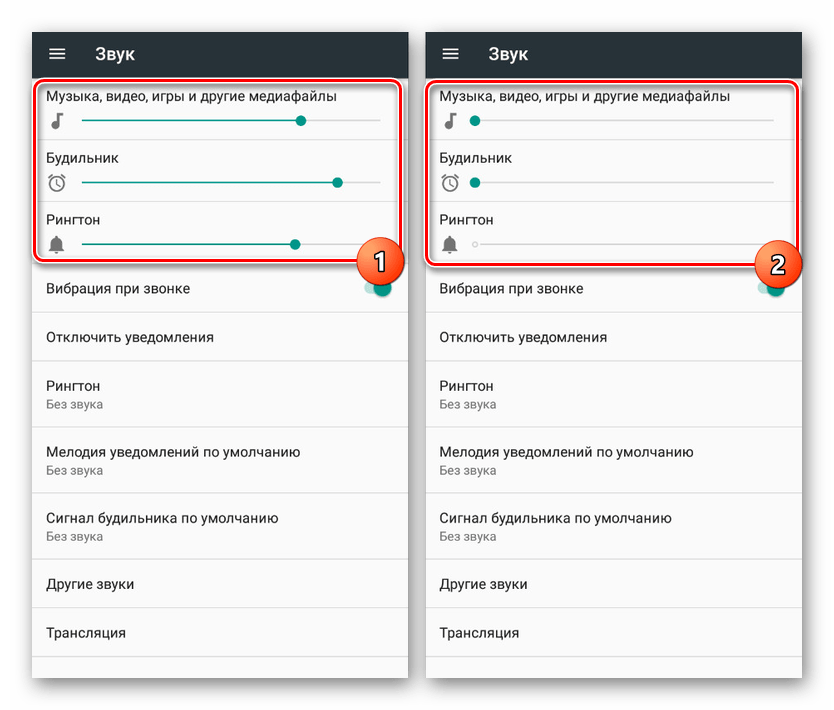
В разделе «Только важные» поменяйте положение ползунков, отключив каждое оповещение. Некоторые из них могут быть недоступны по тем или иным причинам.

Подобным образом измените параметры в разделе «Блокировка визуального оповещение», изменив состояние обоих ползунков.

В качестве завершения обязательно верните на стартовую страницу «Звук» и снизьте громкость каждого уведомления. При успешном изменении на верхней панели должен будет появиться новый значок.
Android 8-9
Начиная с Android 8, меню уведомлений было переработано. Практически все тематические параметры были объединены, благодаря чему пользователю гораздо удобнее отключить все ненужное.
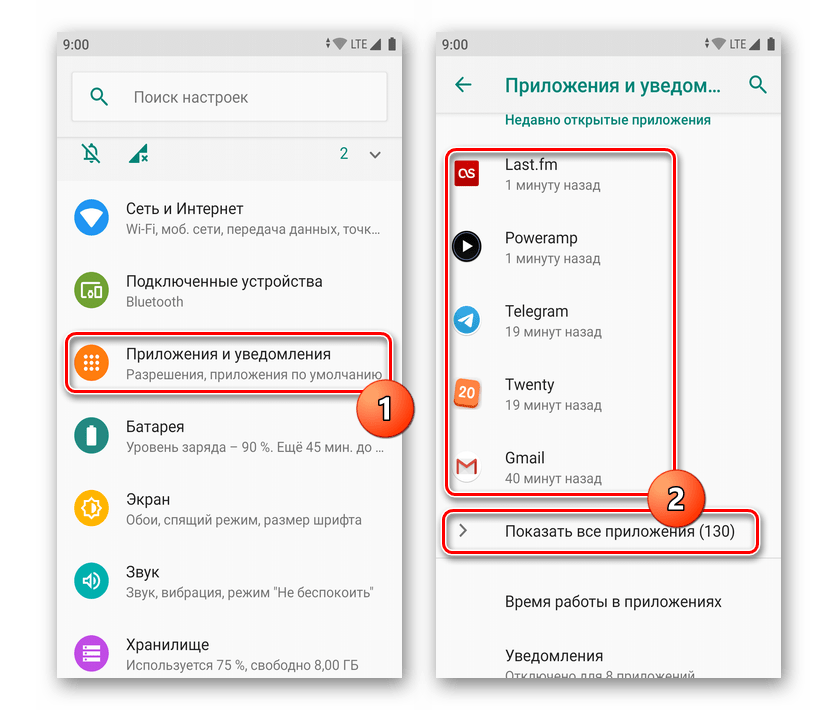
- Перейдите в «Настройки» и откройте пункт «Приложения и уведомления». Пролистайте чуть вниз и зайдите в раздел «Уведомления».

По необходимости настройте некоторые параметры, косвенно отвечающие за работу оповещений, а пролистав ниже, перейти к списку приложений для массового отключения уведомлений. Изначально отображается 3 приложения, для которых недавно пришли оповещения, а чтобы перейти к полному списку инсталлированного ПО, тапните на «Смотреть все за последние 7 дней».

В новом окне вы можете нажать на кнопку с тремя точками, чтобы дополнительно отобразить системные процессы (1), так как среди них тоже есть те, что отправляют оповещения пользователю. Для удобства с «Самых новых» переключитесь на «Самые частые» (2), чтобы узнать, что именно рассылает больше всего оповещений. Останется только касанием переключить тумблер влево (3), чтобы конкретное приложение или процесс больше не могло присылать вам уведомления.

Если у вас не получилось отключить конкретные уведомления, попробуйте следующий метод, напрямую дополняющий уже сказанное по ходу инструкции.
Способ 3: Уведомления приложений
Помимо системных оповещений различного рода, можно произвести отключение уведомления для отдельных приложений, преимущественно установленных из Google Play Маркета. Рассмотрим этот процесс на примере разных версий Android.
Android 4 и 5
- В разделе «Настройки» найдите блок «Устройство» и перейдите на страницу «Приложения».

Тапните по строке с приложением, уведомления которого хотите деактивировать. При этом вы можете предварительно перейти к работающему ПО или к полному списку на вкладке «Все».

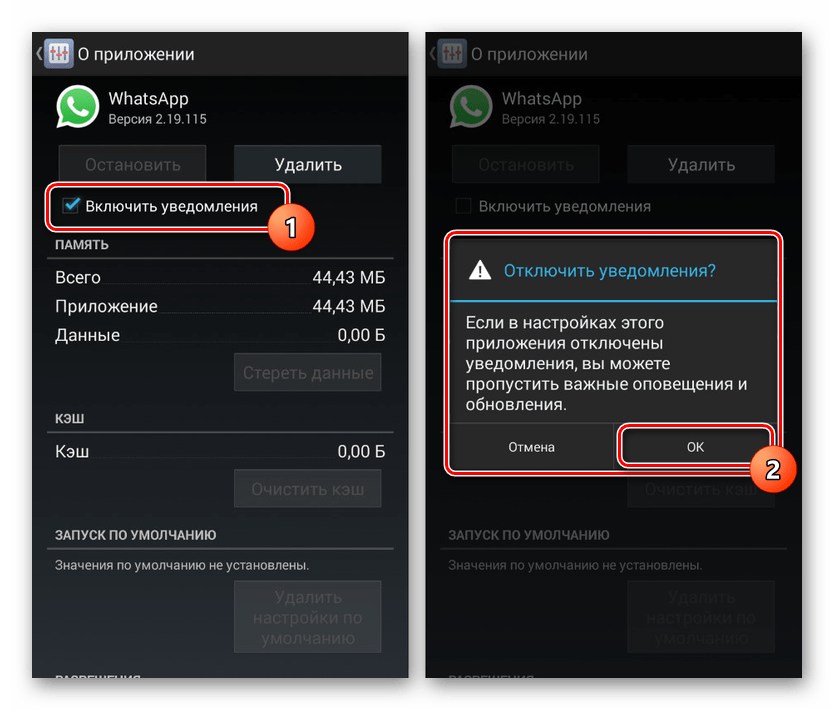
Оказавшись на странице с нужной программой, нажмите по строке «Уведомления». Сразу после этого потребуется выполнить подтверждение отключения через всплывающее окно.
Android 6 и выше
Обладатели более современных версий Android могут убирать уведомления немного по-другому, и для них доступны более удобные настройки выборочного отключения.
Для быстрого отключения оповещений от какого-то одного или пары приложений, достаточно воспользоваться шторкой в момент, когда они там находятся. Откройте шторку, сделайте долгий тап на уведомлении того приложения, которое не хотите видеть. Спустя 2 секунды появится вопрос, хотите ли вы, чтобы отображались эти уведомления, на который нужно ответить отрицательно. Уведомление сразу же пропадет, и больше от конкретного приложения вы их не получите. Включить их можно обратными действиями из шагов ниже.
На модифицированных версиях оболочки вместо этого вопроса система может перебросить вас в меню с настройками уведомлений приложения.

Предыдущий вариант не всегда удобен, поскольку некоторые приложения рассылают несколько видов оповещений, а отключить нужно лишь некоторые из них. К тому же не всегда удобно ждать, пока появится то или иное уведомление, или хочется вручную пройтись по всему установленному ПО и подробно настроить их. В этой ситуации поступите следующим образом:
- Откройте «Настройки» и перейдите в пункт «Приложения и уведомления» (либо просто «Приложения»). Если в списке недавно запущенных нет нужного приложения, разверните полный список и найдите нужный вариант. Тапните по строчке с ним.
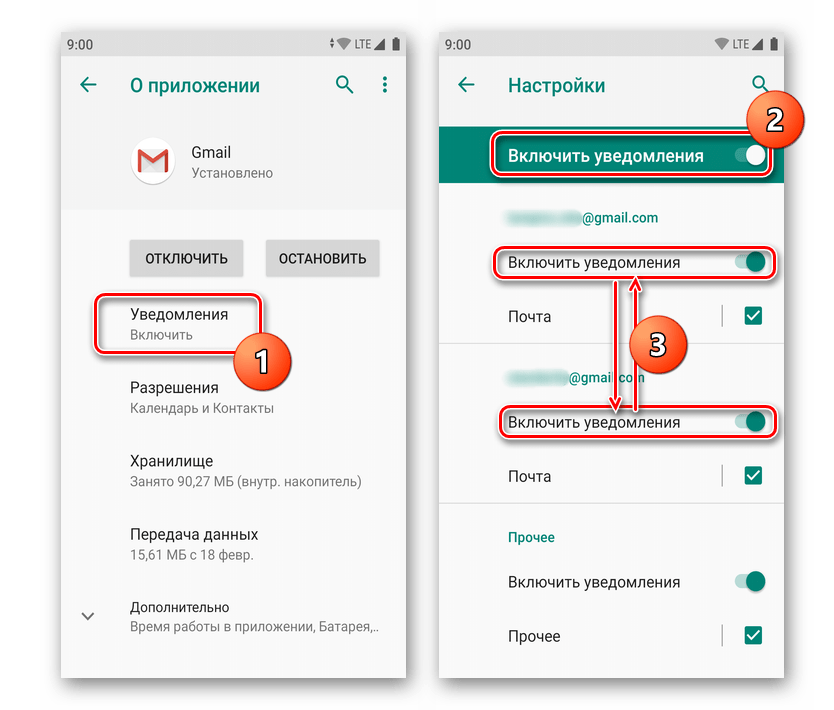
Найдите и зайдите в «Уведомления». Тут вы можете полностью отключить их все (2) или, если позволяет программа, произвести выборочную настройку (3). Последнее актуально, когда, например, приложение поддерживает многопрофильную авторизацию (под разными аккаунтами) или у него есть разные типы оповещений.
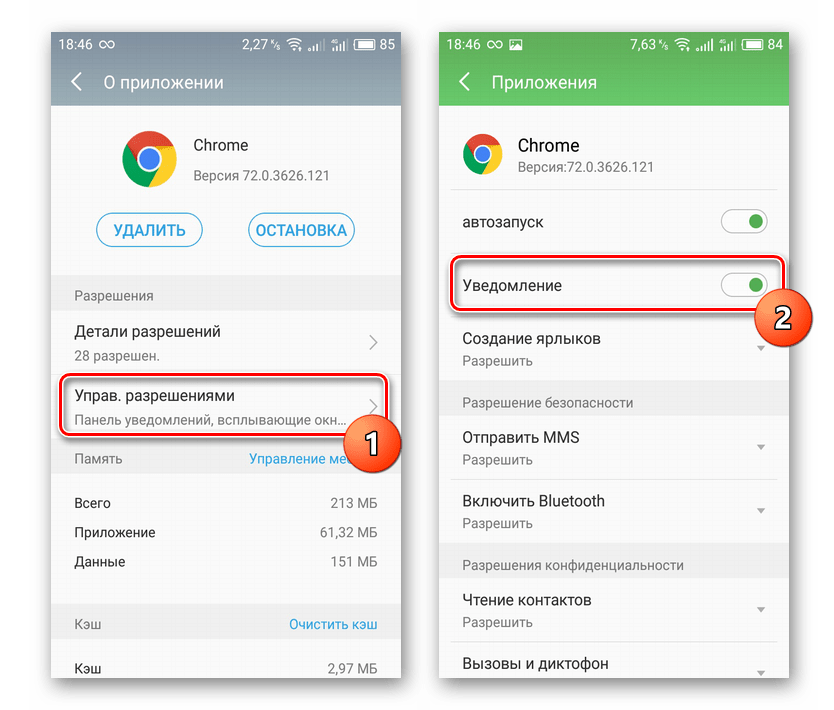
На сторонних прошивках ОС типа Flyme порядок действий сохраняется, другими могут быть только названия пунктов. Например, в смартфонах от Meizu, сперва надо выбрать приложение, тапнуть по нему, зайти в «Управ. разрешениями» и касанием сдвинуть переключатель в графе «Уведомление» влево. При этом на некоторых прошивках могут отсутствовать расширенные настройки отключения разных типов оповещений.
Этот способ лучше всего использовать вместе с предыдущим, избавляясь практически от всех уведомлений, не считая звонков и сообщений. При этом всегда можно оставить оповещения на свое усмотрение, например, о сообщения в социальных сетях или электронной почте.
Способ 4: Настройки приложения
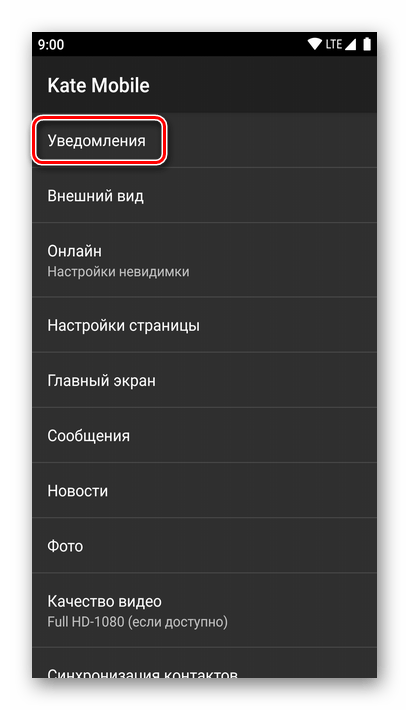
Не стоит забывать и о возможностях самих приложений. Многие из них содержат отдельный пункт меню в своих внутренних настройках, где каждый юзер может отредактировать их получение. Единую инструкцию по отключению таким образом составить нельзя, однако обычно отыскать необходимый параметр не составляет труда.
Вам достаточно запустить приложение и перейти в его настройки, нажав соответствующую иконку (стандартная Android-кнопка в виде трех точек или та, которую сделал разработчик приложения, например, в виде шестерни). Среди списка настроек отыщите пункт «Уведомления» или «Notifications» (либо что-то близкое к одному из этих значений) и произведите редактирование этого параметра согласно предоставленным там параметрам.
Способ 5: Блокировка SMS и звонков
Если вас постоянно беспокоят звонки и сообщения по номеру телефона, можете воспользоваться приложением «Телефон» или «Сообщения», чтобы заблокировать нежелательные оповещения. Предоставляются подобные функции не только в стандартных, но и установленных из Плей Маркета клиентах вроде ПО от Google,

Кроме блокировки конкретных абонентов подобные приложения часто предоставляют ряд параметров для отключения уведомлений. Более того, так как указанное ПО также установлено на смартфоне, вы всегда можете выключить оповещения третьим способом из данной инструкции.
В качестве альтернативы обоим вариантам и, по большей части, на случай если вам нужно заблокировать звонки не только от известных абонентов, но и от анонимных, ознакомьтесь со специальными приложениями. С их помощью настраивается автоматическое отклонение вызовов и сообщений, поступивших с неизвестных или скрытых номеров.

Отключая оповещения на телефоне, не стоит забывать, что настройки применяются на постоянной основе и без изменений останутся в выключенном состоянии. На этом же мы завершаем настоящую статьи и надеемся, представленных методов оказалось достаточно для блокировки нежелательных уведомлений на Android-устройстве.
Помимо этой статьи, на сайте еще 12473 инструкций.
Добавьте сайт Lumpics.ru в закладки (CTRL+D) и мы точно еще пригодимся вам.
Отблагодарите автора, поделитесь статьей в социальных сетях.
Источник
How to turn off notifications in Android 11 and older


Notifications are great for knowing when emails arrive or when someone talks junk on Facebook. However, they have a dark side: Spam. Developers take advantage of this in-your-ace advertisement, filling your Notification Shade with promotions and other useless messages. You can take a stand against this abuse by turning off their notifications.
In this guide, we show you how to turn off notifications in Android starting with version 11 all the way down to some tasty Android 4.1 Jelly Bean. Problem is, Android isn’t consistent across every device, so most of this guide applies to Google’s stock release. The Android 10 section, however, does apply to Samsung phones.
How to turn off notifications in stock Android 11
The best way to switch off notifications across the board is to tap the Do Not Disturb icon on the Notification Shade. With this option, you can determine what people, apps, alarms, and other services can push notifications to your screen. Check out our guide on how to use Do Not Disturb mode for more information.
Another way to turn off notifications is to silence apps individually. You can do this from the Notification Shade as each notification appears, or toggle each app individually all on one screen.
These instructions apply to stock Android 11, but mostly works with stock Android 10 too.
Use the Notification Shade

Step 1: Swipe down from the top to expand the Notification Shade.
Step 2: Long-press on the notification. If you’re trying to silence Gmail, for instance, you may need to long-press on an email listed in the group.
Step 3: Tap Turn Off Notifications in the bottom left corner.
Note: If the Notification is set to Default, you can always tap Silent to turn off the sound and vibration for that app’s notifications. You can also tap the cog symbol to access the app’s list of notification settings you can customize.
Use Settings


Step 1: Swipe down from the top to expand the Notification Shade and tap the cog icon.
Step 2: Tap Apps & Notifications.
Step 3: Tap Notifications.
Step 4: Under Recently Sent, tap See All from Last 7 Days.
Step 5: The list is set to show the most recent notifications. Tap the down arrow next to Most Recent and select the All Apps option.
Step 6: Tap the toggle next to the app you want to silence (or re-enable).
Snooze a notification

If you need a notification to be quiet for a spell, there’s a way to do that too.
Step 1: Swipe down from the top to expand the Notification Shade and tap the cog icon.
Step 2: Tap Apps & Notifications.
Step 3: Tap Notifications.
Step 4: Tap Advanced to expand these settings.
Step 5: Tap the toggle next to Allow Notification Snoozing.
Step 6: With the Notification Shade expanded, drag the notification left or right.
Step 7: Tap the Snooze icon next to the notification. It resembles an alarm clock with a “Z” on its face.
Step 8: Tap the down arrow that appears and select a duration from 15 minutes to 2 hours.
Disable Wireless Emergency Alerts
Step 1: Swipe down from the top to expand the Notification Shade and tap the cog icon.
Step 2: Tap Apps & Notifications.
Step 3: Tap Wireless Emergency Alerts.
Step 4: Tap the toggle next to Show Alerts. Alternatively, you can leave this toggle on and instead tap a toggle next to specific alerts.
How to turn off notifications in Android 10 (Samsung)


Android 10 introduced alerts and silent notifications. The former is your standard notification that rings or vibrates your phone and appears as an icon in the status bar. The latter is silent but can be accessed by opening your notification panel. However, because Samsung demands to be different, the methods of switching off notifications aren’t the same as stock Android.
It’s important to know that not all apps will offer you permission to turn off notifications. System apps like software updates, for example, are deemed essential for the well-being of your Android device, so they can’t be silenced.
Use the Notification Shade
Step 1: Swipe down from the top to expand the Notification Shade.
Step 2: Long-press on a notification.
Step 3: Tap the toggle next to Show Notifications to switch this app’s notification off.
Alternatively, you could tap the circle next to Silent and then tap Save if you don’t want the notification to completely go away.
Note: If you tap the Details link, you can toggle specific notification options associated with the app, as shown above.
Use Settings


Step 1: Swipe down from the top to expand the Notification Shade and then tap the cog icon.
Step 2: Tap Notifications.
Step 3: Scroll down and tap the See All link listed under Recently Sent.
Step 4: The list is set to show the most recent notifications. Tap the down arrow next to Most Recent and select the All option.
Step 5: Tap the toggle next to the app you want to silence (or re-enable).
Snooze a notification


Step 1: Swipe down from the top to expand the Notification Shade and then tap the cog icon.
Step 2: Tap Notifications.
Step 3: Tap the toggle next to Show Snooze Option to turn this feature on.
Step 4: With the Notification Shade expanded, drag the notification left or right.
Step 5: Tap the Snooze icon next to the notification. It resembles a bell with a tiny clock.
Step 6: Select a duration from 15 minutes to 2 hours and then tap Save.
Disable Wireless Emergency Alerts
Step 1: Tap to open Samsung’s Messages app.
Step 2: Tap the three-dot More icon.
Step 3: Tap Settings.
Step 4: Tap Emergency Alert Settings.
Step 5: Tap Emergency Alerts.
Step 6: Tap the toggle next to the alert you want to disable.
If you want to know more, you can also check our guide on how to delete apps on your Android device.
How to turn off notifications in Android 9.0 Pie


Here’s how to turn off any unwanted notifications on Android 9.0 Pie:
Step 1: Long-press on the notification in the Notification Shade.
Step 2: Tap Stop Notifications.
To tweak an app’s notifications:
Step 1: Long-press on the notification in the Notification Shade.
Step 2: Tap the Info icon (i).
Step 3: Tap Notifications.
Step 4: Tap the toggle next to Show Notifications, or tap a toggle next to a specific notification setting.
Note: The Notification Shade includes a Manage Notifications link at the bottom. You can also go into Settings > Apps & Notifications > Notifications > App Notifications to see a list of the notifications you’ve been getting, and you can sort them by Most Recent or Most Frequent, which is handy for unearthing those persistent annoyances and turning them off once and for all.
Android 9.0 Pie will notice when you repeatedly swipe a notification away without tapping on it or expanding and it will prompt you to turn notifications from that app off.
How to turn off notifications in Android 8.0 Oreo


Tapping a notification in Android 8.0 Oreo will still open the parent app, but you can also swipe from right to left to close the notification.
Step 1: Swipe down from the top to expand the Notification Shade.
Step 2: Swipe a notification part of the way from right to left. You will see two icons:
- Gear — This gives you the option to block notifications from that app. You might see a simple toggle to turn notifications off for that app, with the option to tap More Settings to jump to the app’s notifications page. Or you might get the option to tap All Categories to see exactly what notifications that app or service sends and toggle them off individually.
- Clock — This allows you to snooze the notification and choose a duration.
Review and set notifications
Step 1: Tap to open the Settings app.
Step 2: Tap Apps & Notifications.
Step 3: Tap Notifications.
Step 4: Tap App Notifications.
Step 5: Tap the individual apps and decide what notifications you want them to send.
Turn off all lock screen notifications
Step 1: Tap to open the Settings app.
Step 2: Tap Apps & Notifications.
Step 3: Tap Notifications.
Step 4: Tap On the Lock Screen.
Step 5: Select Don’t Show Notifications at All.
Check out our Android 8.0 Oreo tips to find out more about this version of Google’s platform.
How to turn off notifications in Android 7.0 Nougat


In Android 7.0 Nougat, tapping a notification will open the parent app, but you can also swipe right to left to close a notification.
Step 1: Swipe down from the top to expand the Notification Shade.
Step 2: Swipe a notification from right to left and then tap on the cog icon.
Step 3: Select one of three settings: Show Notifications Silently, Block All Notifications, or Don’t Silence or Block.
Alternatively, if you tap the More link, you can access the app’s settings to make additional changes.
Set notification rules for all apps
Step 1: Tap to open the Settings app.
Step 2: Tap Notifications.
Step 3: Select All Apps on the drop-down menu.
Step 4: Tap each app to access its notification settings.
You might want to delve into our Android 7.0 Nougat tips to find out what else it can do.
How to turn off notifications in Android 5 & 6


Google made some changes in Android 5.0 Lollipop to offer more control over notifications. For the first time, you had a dedicated notification section, and some real power to discern what can and can’t bother you. These instructions apply to Android 6.0 Marshmallow as well.
Step 1: Swipe down from the top to expand the Notification Shade.
Step 2: Long-press on a notification and then tap the Info icon (i).
Step 3: Tap the toggle next to Block to enable or disable this setting.
Set notification rules for all apps
Step 1: Tap to open the Settings app.
Step 2: Tap Sound & Notifications.
Step 3: Tap App Notifications.
Step 4: Tap to open an app and then tap the toggle next to Block to disable or enable its notifications.
Note: As shown above, each app has a Priority toggle to ensure that notifications gravitate to the top of your notification list and still come through when you’ve turned on Allow Only Priority Interruptions. This setting can be found in Settings > Sound & Notification > Interruptions > When Notifications Arrive.
If you use a PIN, pattern, or password for screen lock then you can also set notifications as Sensitive, which will prevent the notification content from showing up on your lock screen. For example, you’ll get a notification about a new email, but it won’t display any of the content in the email.
How to turn off notifications in Android 4.1 and 4.4

If you’re rocking Jelly Bean or KitKat on your Android device, then your task is easy. The fact that Google integrated a system for identifying the app responsibly and turning notifications off forevermore is a pretty clear sign notification spam was becoming a problem.
Step 1: Swipe down from the top to expand the Notification Shade.
Step 2: Long-press on the notification and then tap the Info icon.
Step 3: On the app management screen, tap the Show Notifications box.
Note: All notifications from that app will be turned off. As the warning states, “If you turn off notifications for this app, you may miss important alerts and updates.”
Set notification rules for all apps
Step 1: Tap to open the Settings app.
Step 2: Tap Apps.
Step 3: Slide over the All tab.
Step 4: Tap to open an app and then uncheck the box next to Show Notifications.
How to turn off notifications in older versions of Android
The horrible truth with older versions of Android is that you are at the mercy of the app developer. Each individual app handles its own notification system. To see whether you can turn off or customize your notifications, open the app in question and tap its Menu button. You should find a notifications option in Settings. There is no standard, so it could be anywhere, or it might not be an option at all.
Big apps like Facebook have a whole range of notification options. You can decide on alerts, vibrations, and choose ringtones, as well as dictate what should trigger an alert. Some apps don’t have any notification options at all. Facebook wants to ensure you know what’s happening on the platform. It also wants to get you to visit the app more often.
Customizing notifications
There are a whole host of custom options available on Android, allowing for an even deeper dive into your phone’s settings. These advanced options allow each type of notification to be assigned to a specific event, meaning you’ll know what’s happening, even if you can’t check your screen.
If you’re like most people, you probably use a standard ring for your phone calls and maybe a vibration or tone alert for texts and emails. Those default text and email notifications are often the same as the default for many of the apps you’re running. Due to the lack of variation, users can be unsure of how urgent the notification is or what app is sending it.
But using unique tones for each application will enable you to prioritize notifications from your Android device. Instead of picking up your phone for every notification just in case it’s an emergency, you can program certain types of alerts to play the same tone, so you always know what kind of notification is coming through your device.
You can also set a custom ring and text tone for each contact on your device, so you never have to worry about missing an important call or text ever again. It takes a while to do this if you have more than a handful of contacts, but it pays off in the long term when you know who’s calling you just by the ring.
There are multiple options for silencing and personalizing your notifications on Android. You can take it down to the basic level of silencing everything by setting it on airplane mode or allow only the most important notifications to come through by configuring custom settings per app or contact. Only you can decide how basic or advanced you want to get with it.
Источник


