- iOS Team Administration Guide
- Retired Document
- Creating and Downloading Development Provisioning Profiles
- Creating a Development Provisioning Profile
- Downloading and Installing a Development Provisioning Profile
- What is a provisioning profile & code signing in iOS?
- If somebody ask you about the iOS app deployment process, you can easily give the answer . But when they ask a level deeper, you may not have an answer. The above question is one such thing which every ios developer should know. Let’s see what it is.
- Why Provisioning Profiles?
- So, What is happening when we connect the device to xcode and installs the app??
- That’s all fine, But what is code signing?
- Asymmetric cryptography
- How asymmetric cryptography works??
- What is CSR(Certificate Signing Request) in iOS ??
- The process :
- If you enjoyed reading this post, please share and give some clapps so others can find it 👏👏👏👏👏 .
- iOS Provisioning Portal Help
- Retired Document
- Creating a Development Provisioning Profile
- Распространение приложения под iOS внутри компании (Enterprise Distribute iOS App in-house)
- 1 Шаг. Создание сертификата.
- 2 Шаг. Создание Apps ID.
- 3 Шаг. Создание Provisioning Profiles.
- 4 Шаг. Создание Xcode архивов (.xcarchive) на базе своего приложения в Visual Studio на Windows и последующего создания .ipa и .plist файлов
- 5 Шаг. Распространение приложения
iOS Team Administration Guide
Retired Document
Important: This document has been replaced by App Distribution Guide . App Distribution Guide offers step-by-step instructions for configuring, testing, and submitting your app for approval. This new document describes how to use Xcode and other Apple developer tools to create and configure your project, request signing certificates, create provisioning profiles, configure special App Store technologies, test your app on devices, create your app record in iTunes Connect, and submit your app for approval to Apple. If you have a company Apple Developer Program membership, you’ll also learn how to manage your team’s certificates and provisioning assets.
Creating and Downloading Development Provisioning Profiles
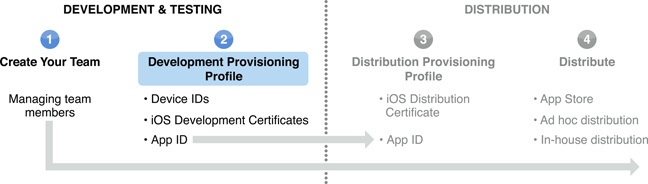
To install an app on a device during development, you need three things: an app ID that identifies the set of apps it authorizes to run, a list of devices your team wants to use for testing, and a list of developers permitted to sign the app. These three things are bundled in a development provisioning profile. A development provisioning profile uniquely ties developers and devices to a development team. A provisioning profile is valid for one year. A device can be added to multiple provisioning profiles.
For your convenience, Xcode creates a wildcard app ID, called iOS Wildcard App ID, that matches all your apps. The first time you register a device in Xcode, Xcode creates a development provisioning profile, called iOS Team Provisioning Profile, that uses the iOS Wildcard App ID. Xcode automatically adds new developer certificates and registered device IDs to the iOS Team Provisioning Profile so you can use iOS Team Provisioning Profile for all apps that don’t require an explicit app ID.
Only team agents and admins can create development provisioning profiles.
Creating a Development Provisioning Profile
Each Provisioning Profile has one app ID associated with it. If you have multiple apps using Apple Push Notification Service (APNS), In-App Purchase, iCloud, or Game Center, create a separate development provisioning profile for each app. If you are installing multiple apps but you are not using those features, use a wildcard app ID.
Downloading and Installing a Development Provisioning Profile
If your development certificate is specified in the provisioning profile, it should show up automatically in the Devices organizer in Xcode after the provisioning profile is approved. If the provisioning profile isn’t in the Provisioning Profile list, click Refresh. For more information, including how to install a provisioning profile on your device, see Provisioning a Device for Development . In order to test an app, the development provisioning profile must be installed on both a Mac and the device.
To install the provisioning profile manually on your Mac, drag the file onto the Xcode, iTunes, or iPhone Configuration Utility app icon.
Copyright © 2013 Apple Inc. All Rights Reserved. Terms of Use | Privacy Policy | Updated: 2013-04-23
Источник
What is a provisioning profile & code signing in iOS?
If somebody ask you about the iOS app deployment process, you can easily give the answer . But when they ask a level deeper, you may not have an answer. The above question is one such thing which every ios developer should know. Let’s see what it is.

Apr 10, 2018 · 5 min read

Source: Stackoverflow and internet 🤓.
Apple’s definition : A provisioning profile is a collection of digital entities that uniquely ties developers and devices to an authorized iPhone Development Team and enables a device to be used for testing.
Why Provisioning Profiles?
Unlike Android, you can’t install any app on an iOS device. It h as to be signed by Apple first. However, when you’re developing an app, you probably want to test it before sending it to Apple for approval. Provisioning profile act as a link between the device and the developer account. During development, you choose which devices can run your app and which app services your app can access. A provisioning profile is downloaded from your developer account and embedded in the app bundle, and the entire bundle is code-signed. A Development Provisioning Profile must be installed on each device on which you wish to run your application code. If the information in the provisioning profile doesn’t match certain criteria, your app won’t launch.
Each Development Provisioning Profile will contains:

- Development Certificates — development certificate. These are for developers who want to test the app on a physical device while writing code.
- Unique Device Identifiers (List of devices that the app can run on)
- an App ID ( this can include a * wild card to be used for many applications with similar bundle identifiers ). —An App ID is a two-part string used to identify one or more apps from a single development team.
Devices specified within the provisioning profile can be used for testing only by those individuals whose iPhone Development Certificates are included in the profile. A single device can contain multiple provisioning profiles.
So, What is happening when we connect the device to xcode and installs the app??
When you install the application on a device the following things happens:
- the provisioning profile in the Mac goes to the developer certificate in your key chain.
- xcode uses the certificate to sign the code.
- device’s UUID is matched with the IDs in the provisioning profile.
- AppID in the provisioning profile is matched with the bundle identifier in the app.
- The entitlements required are associated with the App ID.
- The private key used to sign the app matches the public key in the certificate.
Here is a screenshot from xcode signing section:

SO, from the above image, you can see that AppID is checked, certificate is validated, Team is matched, capabilities and entitlements are matched .
If all the above steps are successful the signed binary is sent to the device and is validated against the same provisioning profile in the app and finally launched. If anyone of these conditions fail, then the app will not install — and you’ll see a greyed-out app icon.
The difference between Development and Distribution Profiles is that Distribution Profiles don’t specify any Device IDs. If you want to release an App which should be limited to a number of registered devices, you need to use an Ad-Hoc profile for that.
Distribution Profiles is used to submit app to the App Store for distribution. After the app is reviewed by apple they sign in the app with their own signature that can run on any device.
That’s all fine, But what is code signing?
Signing your app allows iOS to identify who signed your app and to verify that your app hasn’t been modified since you signed it. The Signing Identity consists of a public-private key pair that Apple creates for you.
Asymmetric cryptography
Asymmetric cryptography uses a public key and a private key. The users have to keep their private key for themselves, but they can share the public key. And using those public and private keys, a user can prove that he is indeed himself.
How asymmetric cryptography works??
Assume there is a UserA and UserB .
- UserA create a PrivateKeyA + PublicKeyA.
- UserB create a PrivateKeyB + PublicKeyB.
To secure the communication between UserA and UserB,
- UserA shares his PublicKeyA with UserB .
- UserB shares his PublicKeyB with UserA.
… and both users keep the private key with themselves.
When UserA sends a message to UserB,
- UserA encrypts the message with UserB’s PublicKeyB and send the message.
- This message can only be decrypted using UserB’s PrivateKeyB.
… The same thing happens when the UserB sends a message to UserA.
Watch this video for more understanding about asymmetric cryptography : Youtube video by savjee.
What is CSR(Certificate Signing Request) in iOS ??
CSR is not something that is used only in iOS. It is used in many places.
A CSR or Certificate Signing request is a block of encoded text that is given to a Certificate Authority when applying for a certificate.
Here , we create a CSR and give it to apple which will create the certificate for you. It also contains the public key that will be included in the certificate. A private key is usually created at the same time that you create the CSR, making a key pair. A certificate authority will use a CSR to create your certificate, but it does not need your private key. You need to keep your private key secret. The certificate created with a particular CSR will only work with the private key that was generated with it. So if you lose the private key, the certificate will no longer work.
(optional — refer this link to understand how CSR works for SSL certificates. The procedure and working is almost similar)
The process :
- Create a Certificate Signing Request (CSR) through the Keychain Access Application.
- Keychain Application will create a private key (private key will be stored in the keychain) and a certSigningRequest file which you’ll then upload to Apple.
- Apple will proof the request and issue a certificate for you. The Certificate will contain the public key that can be downloaded to your system. After you downloaded it you need to put it into your Keychain Access Application by double clicking it. The Certificate will be pushed into the Keychain and paired with the private key to form the Code Signing Identity.
- Finally, at the time of app installation, the private key used to sign the app matches the public key in the certificate. If it fails, app is not installed.
If you enjoyed reading this post, please share and give some clapps so others can find it 👏👏👏👏👏 .
If you have any comment, question, or recommendation, feel free to post them in the comment section below!
Источник
iOS Provisioning Portal Help
Retired Document
Important: This document has been replaced by App Distribution Guide . App Distribution Guide offers step-by-step instructions for configuring, testing, and submitting your app for approval. This new document describes how to use Xcode and other Apple developer tools to create and configure your project, request signing certificates, create provisioning profiles, configure special App Store technologies, test your app on devices, create your app record in iTunes Connect, and submit your app for approval to Apple. If you have a company Apple Developer Program membership, you’ll also learn how to manage your team’s certificates and provisioning assets.
Creating a Development Provisioning Profile
Important This document has been replaced by App Distribution Guide . App Distribution Guide offers step-by-step instructions for configuring, testing, and submitting your app for approval. This new document describes how to use Xcode and other Apple developer tools to create and configure your project, request signing certificates, create provisioning profiles, configure special App Store technologies, test your app on devices, create your app record in iTunes Connect, and submit your app for approval to Apple. If you have a company Apple Developer Program membership, you’ll also learn how to manage your team’s certificates and provisioning assets.
After logging in to the iOS Provisioning Portal, click Provisioning in the sidebar.
Click New Profile.
Specify the profile name, select the certificates and devices you want to associate with this profile, and choose an app ID.
Источник
Распространение приложения под iOS внутри компании (Enterprise Distribute iOS App in-house)
(Осторожно, под катом трафик)
Подготовка и распространение приложения IOS внутри компании весьма непростая задача, особенно когда приложение написано на Windows с использованием Visual studio, а большинство туториалов в интернете описывают исключительно MacOS с использованием Xcode. Однако после часов сражения с детищем Apple, нам удалось свершить казалось бы невозможное, а именно: скрестить жирафа с носорогом собрать IOS приложение на Xamarin в архив Xcode, сразу на MacOS, после получить нужные файлы для распространения, и в завершении создать ссылку, по которой будет распространяться приложение.
Да, на слух вроде не очень сложно. Однако когда дело касается разработки приложений под устройства Apple, всё становится в несколько раз непонятней и сложней. И после триумфальной, но нелёгкой победы, нам захотелось оставить свой след в истории, написав сей туториал.

1. Должен быть Enterprise аккаунт Apple — $299 в год.
1 Шаг. Создание сертификата.
1. Сперва, на Mac, нужно создать запрос для создания сертификата. Для этого нужно открыть keychain access, например, через поиск:

2. Выбрать keychain access в левом верхнем углу экрана, в выпавшем меню выбрать “certificate assistant” —> “request a certificate from a certificate authority”, откроется соответствующие окно:
3. В появившемся окне заполняем поля “User Email Address” – свою электронную почту, и “Common Name” – имя ключа. А также выбираем пункт “Saved to disk”, чтобы сохранить файл запроса на компьютер. И нажимаем кнопку “Continue”:
4. Далее появится окошко, в котором нужно указать название файла запроса и выбор пути для сохранения файла. Вносим нужные изменения и сохраняем:
5. После успешного сохранения появится следующее окно. Нажимаем “Done”:
6. После мы можем увидеть, что создался файл запроса в месте сохранения (в данном примере на рабочем столе). Или мы можем увидеть созданный ключ в списке ключей в “keychain access”:
7. Далее нам надо создать сертификат, это мы сможем сделать на сайте Apple для разработчиков, войдя в свой аккаунт:
8. После успешного входа в аккаунт мы переходим в “Certificates, IDs & Profiles”, так же на странице сертификатов нужно убедиться, что выбрано “IOS, tvOS, watchOS”:
9. Далее на странице, в разделе “Certificates”, нужно выбрать “Production”:
10. На странице нажимаем на кнопку с изображением “+”, чтобы создать сертификат. Появится страничка, на которой надо выбрать тип создаваемого сертификата:
11. В данном примере нас интересует метод дистрибьюции In-House, поэтому типом сертификата нужно выбрать “In-House and Ad Hoc”. После нажать кнопку “Continue”:
12. После мы перейдём к следующей странице создания сертификата на которой будет описано как создать запрос на MacOS для сертификата. Мы уже создали этот запрос в предыдущих пунктах. Нажимаем кнопку “Continue”:
13. На следующем этапе вам потребуется загрузить файл запроса, который мы создали ранее на рабочем столе. После успешной загрузки нажмите “Continue”:
14. После произойдёт генерация сертификата, и на следующей странице его можно будет скачать на компьютер:
15. Скачиваем сертификат, в данном примере на рабочий стол. Так же мы можем увидеть созданный сертификат на сайте:
Как мы можем видеть, по итогу мы успешно получили сертификат. Следующим шагом будет создание ID приложения.
2 Шаг. Создание Apps ID.
На предыдущем шаге мы успешно создали сертификат, теперь нам нужно создать Apps ID. Для этого нужно:
1. На сайте Apple для разработчиков, в своём аккаунте перейти сперва в “Certificates, IDs & Profiles”, так же на странице сертификатов нужно убедиться, что выбрано “IOS, tvOS, watchOS”:
2. Далее на странице, в разделе “Identifiers”, нужно выбрать “App IDs”:
3. На странице нажимаем на кнопку с изображением “+”, чтобы создать App ID. Появится страничка, на которой надо выбрать настройки создаваемого ID. Настройки ID индивидуальны для вашего приложения, единственное важное уточнение – в графе App ID Suffix нужно выбрать Explicit App ID:
4. После создания App ID, его можно увидеть на сайте:
По итогу двух шагов, мы успешно получили сертификат и создали App ID. Далее нам надо при помощи созданного сертификата создать Provisioning Profiles. И это приводит нас к следующему шагу “3 Шаг. Создание Provisioning Profiles”.
3 Шаг. Создание Provisioning Profiles.
На предыдущем шаге мы успешно создали сертификат, теперь нам нужно с его помощью создать Provisioning Profiles. Для этого нужно:
1. На сайте Apple для разработчиков, в своём аккаунте перейти сперва в “Certificates, IDs & Profiles”, так же на странице сертификатов нужно убедиться, что выбрано “IOS, tvOS, watchOS”:
2. Далее на странице, в разделе “Provisioning Profiles”, нужно выбрать “ Distribution”:
3. На странице нажимаем на кнопку с изображением “+”, чтобы создать Provisioning Profiles. Появится страничка, на которой надо выбрать тип создаваемого профайла:
4. В данном примере нас интересует In-House метод дестрибьюции, соответственно выбираем тип профайла “In House” и нажимаем на кнопку “Continue”:
5. На следующей странице нужно выбрать ранее созданный, на шаге 2, App ID:
6. После нажатия кнопки “Continue” мы перейдём к выбору сертификата, мы создали его на 1 шаге. Далее нажимаем на кнопку “Continue”:
7. На следующей странице нам надо заполнить поле с именем профайла и проверить данные перед генерацией профайла:
8. После профайл будет сгенерирован и его можно будет скачать:
9. Скачиваем Provisioning Profile, в данном примере на рабочий стол. Так же мы можем увидеть созданный provisioning profile на сайте, и увидеть, что он активен:
По итогу 3 шагов мы успешно создали Provisioning Profile.
4 Шаг. Создание Xcode архивов (.xcarchive) на базе своего приложения в Visual Studio на Windows и последующего создания .ipa и .plist файлов
Предыдущие шаги выполнялись на компьютере от Apple (Mac), далее я расскажу как создавать .xcarchive в Visual Studio 2017 для Windows, сразу на Mac.
1. Для этого нам потребуется приложение Xamarin в Visual Studio, которое будет подключено к Mac:
2. В решение нужно выбрать проект IOS, нажав на него правой кнопкой мыши. В появившемся меню выбрать “Properties”. В открывшемся окне выбрать пункт “ios bundle setting”. Далее выбрать в “bundle setting” – “manual provisioning”, а ниже в графе “manual provisioning” выбрать свой сертификат и профайл который мы создали на предыдущих этапах:
3. В проекте IOS нужно выбрать файл Info.plist и убедится что “bundle identifier” совпадает с нужным App ID:
4. После откройте командную строку разработчика в Visual Studio (от имени администратора) “Developer Command Prompt for VS 2017” и либо перейдите в директорию с ios проектом, либо укажите полный адрес при создании команды. Данная команда создаст архив .xcarchive на Mac из Visual Studio. Сам по себе архив не содержит нужных нам для распространения .ipa и .plist файла поэтому после генерации архива нам потребуется создать их. Подробнее о том как создавать архив можно узнать здесь.
Команда: msbuild /p:Configuration=Release /p:ServerAddress=10.211.55.2 /p:ServerUser=xamUser /p:Platform=iPhone /p:ArchiveOnBuild=true /t:»Build» MyProject.csproj
5. После успешного выполнения команды на Mac должен был создастся архив. Нам надо запустить Xcode, в нём выбрать “Windows” и в этом меню выбрать “Organazer”. Там в разделе “Archive” мы увидим созданный архив .xcarchive:
6. Теперь нам надо создать файлы .ipa и .plist, на основе созданного архива.
При помощи их мы сможем распространять своё приложение минуя AppStore, например, внутри компании. Далее нам надо нажать кнопку “Distribute App”. В появившемся меню выбрать “Enterprise” и нажать кнопку “Next”:
7. Далее нужно выбрать устройства, на которые можно распространять и обязательно выбрать “include manifest for over-the-air installation”, для того чтобы можно было скачать приложение из браузера:
8. В следующем окне нужно указать “Name” – имя приложения; “App URL” – путь к .ipa файлу;”Display Image URL” – Путь к иконке 57х57;”Full Size Image URL” – Путь к иконке 512х512.
Важно что бы сервер на котором размещены файлы .ipa и .plist, был с шифрованием, то есть обязательно https. В примере используется сервис dropbox. При использовании сервиса dropbox важно знать: правильный путь к файлу по публичной ссылке должен начинаться не с “https://www.dropbox.com/”, как указано в сгенерированной ссылке, а с “https://dl.dropboxusercontent.com/”.
9. На следующем этапе нам нужно выбрать созданные сертификат и Provisioning Profile:
10. После мы увидим успешно собранное приложение, и мы должны выбрать куда сохранить папку с приложением, которое мы после будем распространять:
11. После сохранения на рабочем столе создалась папка. Содержимое папки вы можете видеть на скриншотах ниже, при генерации создаётся 4 файла .plist и обычно 1 .ipa, но в проверочном приложении это немного не так, но нас в данном случае будет интересовать файл у которого в имени только название нашего приложения. Что касается 4 файлов .plist, то далее нам понадобится файл “manifest.plist”. Для установки приложения нужен plist, в котором описаны предустановочные свойства. Подробнее узнать о Enterprise Distribution и посмотреть как выглядит manifest.plist можно здесь:
Таким образом на данном шаге мы успешно создали .ipa и .plist файлы приложения, созданного в Visual Studio 2017, и которые мы будем использовать для In-House дестрибьюции.
5 Шаг. Распространение приложения
На предыдущих шагах мы подготовили наше приложение к распространению. На данном шаге мы создадим простой html файл с ссылкой и выложим её на локальный IIS, это делается для упрощения примера, но местоположение ссылки роли не играет. Не в рамках примера ссылку
можно разместить на собственном сайте, чтобы она была доступно сотрудникам, как и файлы приложения, следует размещать на собственном сервере. Однако в этом примере, как упоминалось ранее, мы использовали сервис dropbox.
1. Сперва нам нужно разместить файлы (иконки, .ipa файл и manifest.plist) на dropbox и делаем их доступными по ссылке:
2. После создаём html файл, следующего содержания:
3. Далее выкладываем этот html файл на локальный IIS (или ваш сайт), и пройдя по данной ссылке с мобильного устройства нам предложат установить приложение. После установки приложения пользователю нужно подтвердить доверие сертификату на устройстве Settings → General → Device Management → «Enterprise Name» тогда только пользователи смогут открыть приложение:
Источник


