- Что значит ошибка DNS_PROBE_FINISHED_NXDOMAIN и как ее исправить в Chrome
- Причина возникновения ошибки DNS в браузере Chrome
- За что отвечают DNS-серверы?
- Использование DNS-серверов Google в Windows
- Как изменить адреса DNS на Андроиде?
- Очистка кэша в Windows
- «Dns probe finished nxdomain» — что за ошибка в браузере. Как ее исправить?
- Как можно попытаться исправить ошибку
- How to solve DNS_PROBE_FINISHED_NXDOMAIN issue [8 Solutions]
- What is error code DNS_PROBE_FINISHED_NXDOMAIN
- Error code dns_probe_finished_nxdomain in various browsers
- Google Chrome
- Mozilla Firefox
- Microsoft Edge
- Safari
- How to fix DNS_PROBE_FINISHED_NXDOMAIN error
- Method 01 Clear DNS Cache
- Windows
- Mac
- Linux
- Method 02 Release and Renew IP Address
- Windows
- Mac
- Method 03 Change DNS Servers
- Windows
- Mac
- Method 04 Reset all Chrome Flagsfor getting rid of DNS_PROBE_FINISHED_NXDOMAIN
- Method 05 DNS Client Service restart in Windows
- Method 06 Temporarily Disable VPN or Antivirus
- Method 07 Check Your Local Hosts File of the computer
- Windows
- Mac
- Method 08 Clear DNS Cache on Google Chrome
- Restart Your Computerfor drive away from DNS_PROBE_FINISHED_NXDOMAIN error
Что значит ошибка DNS_PROBE_FINISHED_NXDOMAIN и как ее исправить в Chrome
Пытаетесь открыть какой-либо сайт, но в окне браузера отображается ошибка DNS_PROBE_FINISHED_NXDOMAIN? В статье попытаемся разобраться, что является причиной проблемы и как ее исправить.

Причина возникновения ошибки DNS в браузере Chrome
На компьютере подключен Интернет, о чем свидетельствует значок в трее, но когда пытаетесь открыть любой сайт, то в браузере отображается ошибка следующего содержания DNS_PROBE_FINISHED_NXDOMAIN. Ошибка возникает именно в браузере Google Chrome и указывает на проблему с DNS-серверами.
За что отвечают DNS-серверы?
Каждой интернет странице присваивается свой уникальный IP адрес, который направляет посетителя на интересующий его сайт. Конечно, сложно запомнить IP адрес каждого сайта, на который хотим перейти, поэтому мы пользуемся доменными именами, например, domen.ru вместо сложного ряда чисел.
После введения доменного имени в адресную строку браузера, происходит перенаправление на соответствующий IP адрес, ведущий на запрашиваемую страницу. За преобразование доменных имен в IP адреса отвечают DNS-серверы, которые прописаны в роутере или модеме. Ошибка NXDOMAIN означает, что сервер не отвечает или не может установить подключение.
В этой ситуации возникнет ошибка при переходе на сайт, так как при проблемах с DNS-серверами не работает механизм, отвечающтй за «преобразование» доменных имен в IP адреса. При этом Skype и другие программы обмена сообщениями по-прежнему будут работать без проблем, так как они напрямую используют только IP адреса, все остальные будут отображать ошибку.
Рассмотрим несколько способов исправления этой ошибки.
Использование DNS-серверов Google в Windows
Одним из решений является изменение DNS. Google предоставляет свои адреса, которые можно прописать в настройках своей сетевой карты. Если с прежними у нас возникают ошибки, то смена их на серверы Google решит проблему, и интернет страницы снова начнут открываться.
Кликните правой кнопкой мыши на значок сети в области уведомлений в правом нижнем углу экрана. Из выпадающего меню выберите пункт «Центр управления сетями и общим доступом».

В меню боковой панели перейдите на вкладку «Изменение параметров адаптера». Откроется список сетевых устройств. Найдите в списке сетевую карту, которая используется для доступа в интернет. Если подключаетесь через Wi-Fi, карта будет отмечена зеленым индикатором. При подключении через сетевой кабель найдите устройство со статусом «Сеть».
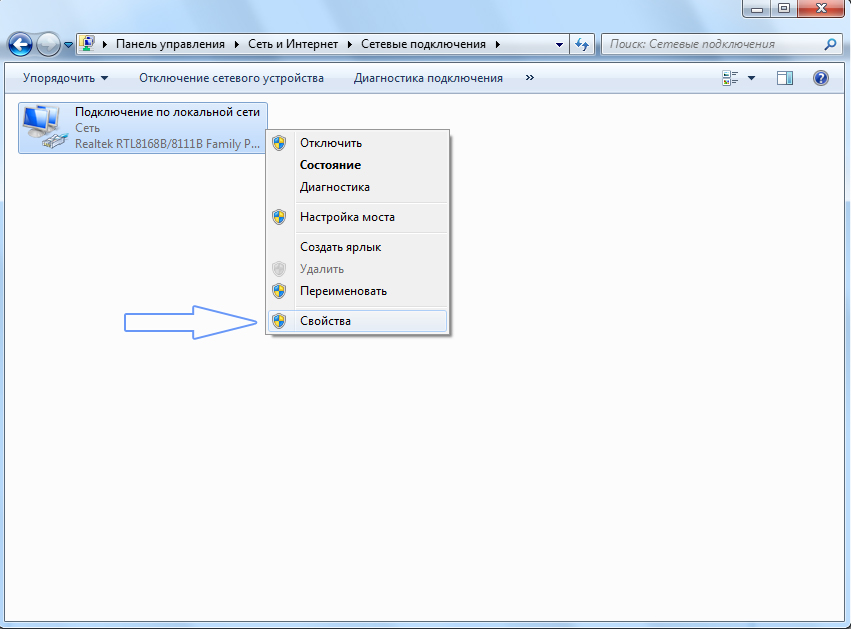
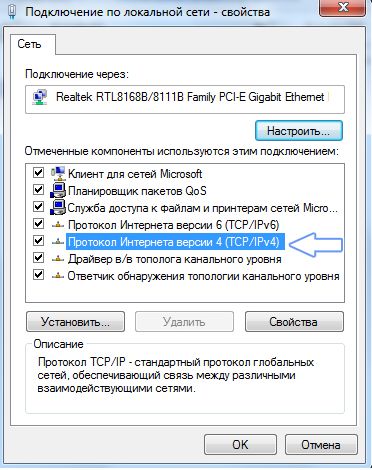
Кликните правой кнопкой мыши на значок сетевого адаптера и перейдите в пункт «Свойства». В свойствах сети найдите пункт «Протокол Интернета 4 (TCP/IPv4)». Дважды кликните на него, чтобы просмотреть детали.
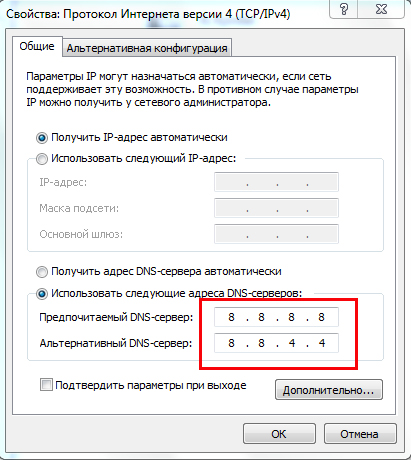
Отметьте пункт «Использовать следующие адреса DNS-серверов» и введите:
Предпочитаемый: 8.8.8.8
Альтернативный : 8.8.4.4
Сохраните изменения на «ОК» и попробуйте открыть какую-нибудь интернет страницу.
Адреса серверов можно также изменить в настройках роутера. Тогда их будут автоматически использовать все устройства, подключенные к сети Wi-Fi , и не нужно будет настраивать каждое устройство по отдельности.
Как изменить адреса DNS на Андроиде?
Если ошибка DNS_PROBE_FINISHED_NXDOMAIN возникает в браузере Chrome на Андроиде, то она также связана с серверами. На Андроиде также можно их изменить.
Перейдите на Андроиде в приложение Настройки и выберите вкладку «Wi-Fi». Удерживайте сеть, к которой подключены, и выберите в контекстном меню пункт «Изменить конфигурацию сети».
На экране конфигурации сети выберите «Показать дополнительные параметры». В настройках IP адреса выберите «Статический», в полях DNS1 и DNS2 введите следующие параметры:
DNS1: 8.8.8.8
DNS2: 8.8.4.4
Сохраните изменения и выйдите из настроек. Попробуйте открыть какую-то интернет страницу, ошибка должна исчезнуть.
Очистка кэша в Windows
Если смена адресов не помогла, то еще одним источником проблем может быть кэш DNS, который можно легко очистить в Windows.
Нажмите сочетание клавиш Win+R и введите команду:
После нажатия на Enter откроется окно командной строки. Для очистки кэша введите команду:
После ее выполнения кэш будет сброшен. Теперь попробуйте зайти на какой-то сайт. Его открытые может занять чуть больше времени, но он должен открыться без отображения DNS_PROBE_FINISHED_NXDOMAIN.
Источник
«Dns probe finished nxdomain» — что за ошибка в браузере. Как ее исправить?
 Здравствуйте.
Данная ошибка может внезапно возникнуть при попытке открыть какой-нибудь сайт в браузере (ее пример см. на скрине ниже 👇. Кстати, это касается в том числе и крупных сайтов: YouTube, Yandex, Mail и т.д.).
Что она означает : то, что ваш браузер не может соединиться с сайтом, т.к. возникла проблема с 👉 DNS (по ссылке рассказано подробно как «это всё работает»).
Происходит это чаще всего из-за некорректной работы вашего Интернет-провайдера, либо при попытке обратиться к несуществующему сайту (домену). Однако, есть и др. причины.
Ниже в заметке я приведу несколько важных моментов, на которые стоит обратить внимание. Пробежавшись по ним и выполнив оные — высока вероятность, что ошибку вы исправите (если, конечно, открываемый вами сайт жив. ). 👌
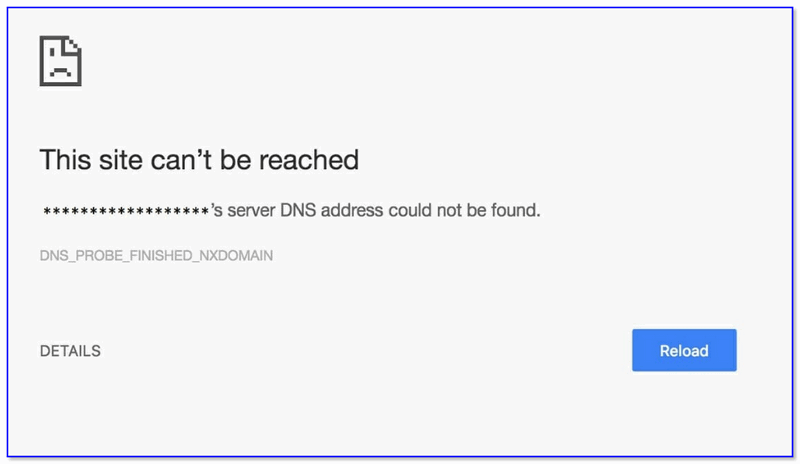
Пример ошибки «Dns probe finished nxdomain» (как она выглядит в Chrome)
Как можно попытаться исправить ошибку
👉 ШАГ 1: проверка «банальных» вещей
И так, для начала порекомендую выполнить следующее:
- перезагрузить компьютер и роутер (модем и пр. устройства, через которые выходите в сеть);
- очистить кэш браузера (обычно достаточно нажать в окне браузера сочетание Ctrl+Shift+Del) . После перейти на нужную страничку и нажать Ctrl+F5;
- если перед появл. проблемы устанавливали расширения и дополнения в браузер — желательно их отключить (удалить);
- попробовать открыть сайт в браузере Opera со включенным VPN;
- если установлен сторонний антивирус (брандмауэр) — отключить на время диагностики;
- не лишним будет проверить работу сайта, открыв его на телефоне (воспользовавшись мобильным интернетом).
👉 ШАГ 2: сброс сетевых настроек в Windows
Если у вас ОС Windows 10 — то произвести 👉 сброс настроек сети можно из параметров системы. Необходимо открыть раздел «Сеть и интернет / Состояние» . 👇
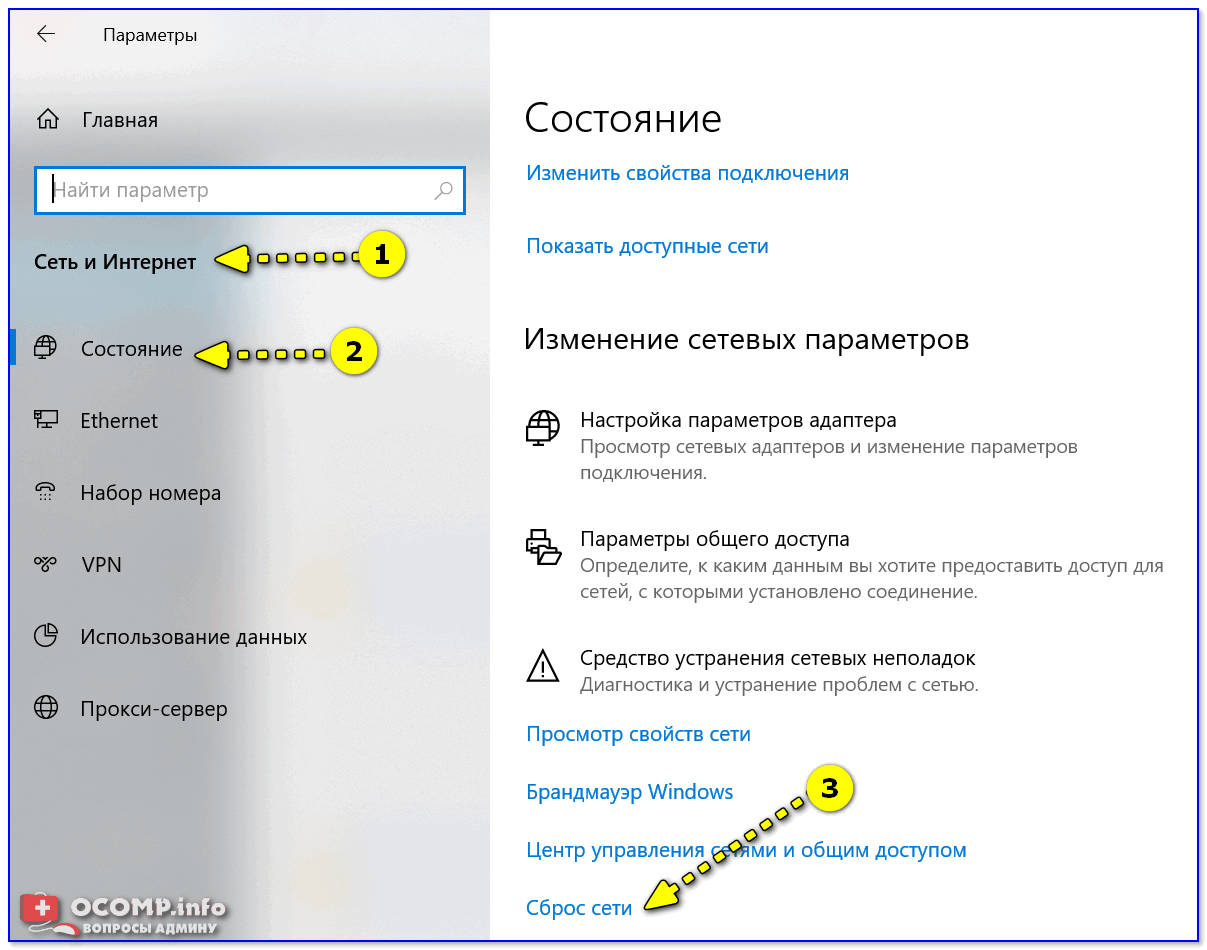
Сброс сети в Windows 10
Есть и более универсальный вариант — для этого понадобиться запустить 👉 командную строку от имени админа.
Далее нужно последовательно вводить нижеприведённые зеленые команды (и после каждой нажимать Enter):
- ipconfig/flushdns — эта команда удалит кэш DNS;
- ipconfig/renew — обновляем IP-адрес;
- netsh int ip set dns — устанавливаем новые DNS-серверы;
- netsh winsock reset — сбрасываем настройки Winsock.
Примечание : после желательно перезагрузить компьютер.
👉 ШАГ 3: попробуйте сменить DNS
Суть проблемы : когда вы пытаетесь открыть какой-нибудь сайт — компьютер сначала спрашивает у DNS-севера «где находится этот ресурс». Тот, найдя у себя в базе его IP — передает компьютеру, и после браузер загружает его и показывает вам.
По умолчанию, обычно, в настройках подключения к Интернет используются DNS-серверы провайдера. Разумеется, они не отличаются стабильностью (и возможно, что проблема возникла из-за их некорректной работы).
Для проверки и диагностики — можно попробовать вручную изменить эти DNS. Делается это достаточно просто.
Как сменить DNS:
- нажать Win+R, и в окне «Выполнить» использовать команду ncpa.cpl;
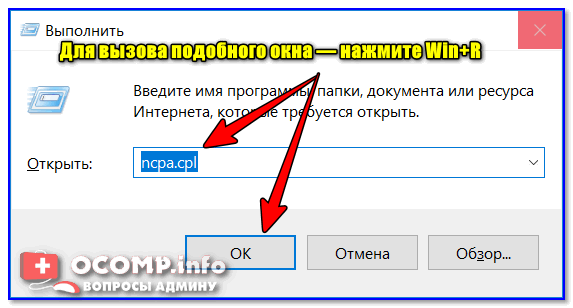
ncpa.cpl — просмотр всех сетевых подключений
далее нужно открыть свойства адаптера , через который вы выходите в Интернет (👇);

затем перейти в свойства протокола «IP- версии 4» и вручную указать DNS: 8.8.8.8 и 8.8.4.4 (это DNS от Google, но можно выбрать и другие).
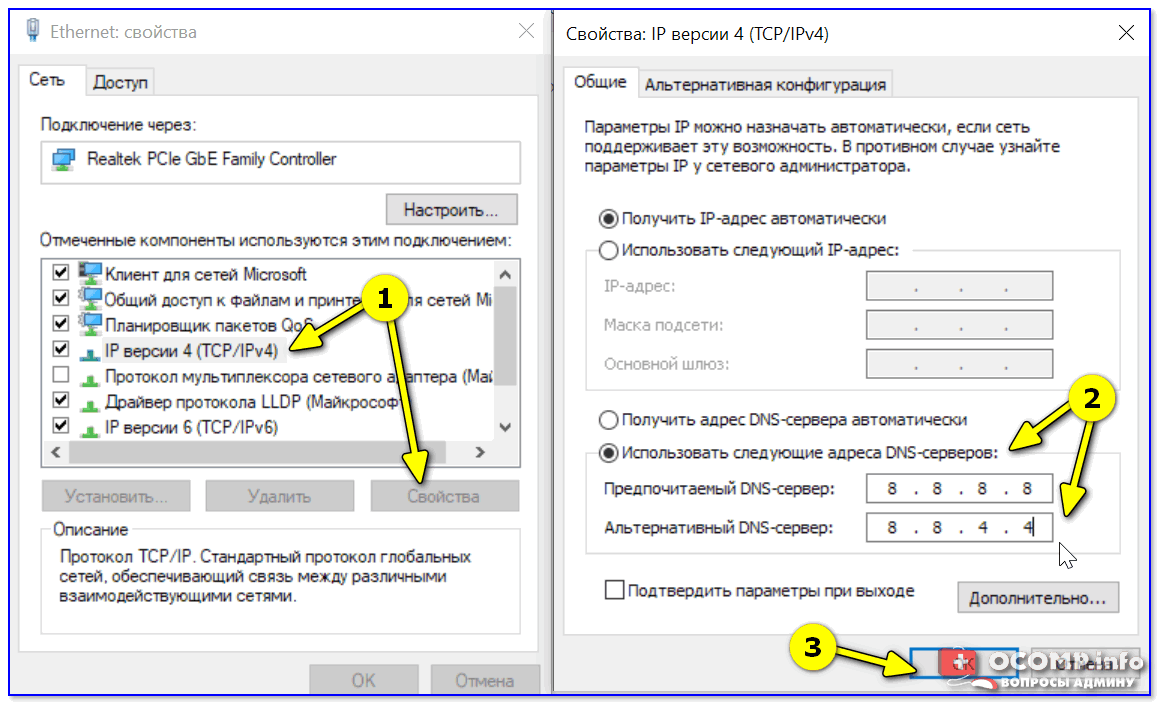
Использовать следующие DNS-адреса
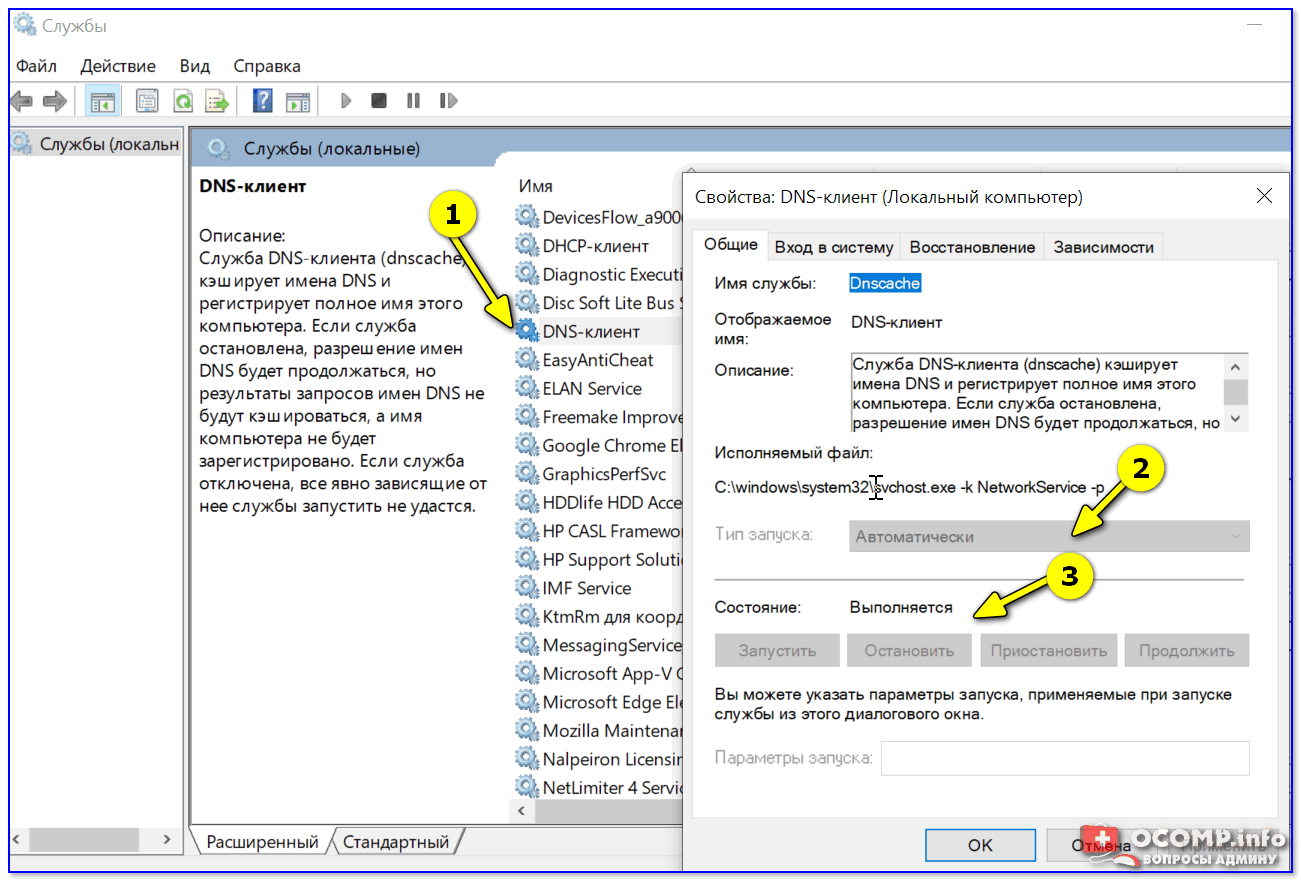
👉 ШАГ 4: проверьте службу DNS-клиент
Есть одна служба (ее точное название «DNS-клиент») , которая может вызвать обсуждаемую ошибку. Разумеется, необходимо проверить, а работает ли она. 👀
Для этого необходимо нажать Win+R, и в окно выполнить ввести команду services.msc.
В открывшемся окне среди списка служб нужно найти «DNS-клиент» и открыть ее. После проверить, чтобы ее состояние было «Выполняется» , а тип запуска был в режиме «Автоматически» . При необходимости — измените эти настройки.
👉 ШАГ 5: проверьте ПК на вирусы и рекламное ПО
Даже если у вас установлен современный антивирус — это не означает, что у вас в системе не может быть рекламного и вредоносного ПО (а оно часто может влиять на работу браузера/ сети) !
Я бы очень посоветовал прогнать систему с помощью спец. утилит: AdwCleaner (Malwarebytes Anti-Malware), AVZ. Как это лучше всё сделать — приведено в одной моей прошлой заметке (ссылка ниже 👇).
Как удалить вирусы с компьютера, если антивирус их не видит — пошаговая инструкция для начинающих
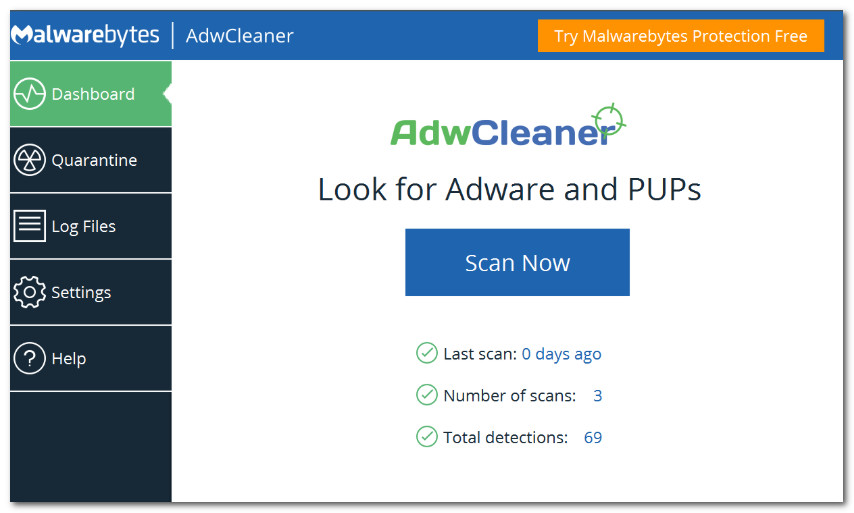
AdwCleaner: главное окно (кнопка начала сканирования «Scan Now»)
👉 ШАГ 6: уточните, нет ли у вас точки восстановления на дату, когда всё работало в штатном режиме
Ну и, пожалуй, последняя рекомендация: проверьте, возможно в вашей ОС Windows есть точка восстановления на момент, когда браузер работал в норм. режиме.
Чтобы посмотреть точки восстановления : нажмите Win+R, в окно «Выполнить» вставьте команду rstrui и нажмите Enter.

Просмотр списка контрольных точек — команда rstrui
Далее запустится встроенная утилита для восстановления системы (пользовательские файлы она не затрагивает, но возможно придется переустановить часть программ, игр, драйверов). Если есть возможность откатить систему — я бы рекомендовал воспользоваться возможностью. 👌

Выбор точки для отката системы
Как работать с точками восстановления в Windows 10 — несколько примеров для начинающих.
Если вы избавились от ошибки иным путем — подскажите в комментариях! (Заранее спасибо).
Источник
How to solve DNS_PROBE_FINISHED_NXDOMAIN issue [8 Solutions]
Imagine an exhausted working day at the office. There is a lot to do. But suddenly your Internet browser breaks off and gives you an error message showing something like “DNS_PROBE_FINISHED_NXDOMAIN error“. Even if you tried all the techniques you know, it doesn’t fix it. So now what? Believe us. We know the frustration you are in now. Before heading to get the technician support you can read this tutorial and find out what is the real cause of the situation and how to fix it without wasting time. It will prevent further interruptions. Let’s find out what is the problem first.
DNS_PROBE_FINISHED_NXDOMAIN Error Fixing For Chrome, Firefox, Edge, Safari, With Windows, Mac and Android
What is error code DNS_PROBE_FINISHED_NXDOMAIN
We can simply assume this error is occurring because you have problems with your DNS server. But those who can not be satisfied by that answer, DNS server means Domain Name System. Furthermore, simplification goes like this.
The Internet is essentially an abundance of numbers. But, Here Each website has its own and unique Internet Protocol address in numbers. As an example, 141.193.90.0 is the IP address of the Pinterest.com, a well-known social platform. That name is the “Domain name”. So if you just type that domain name in the search bar you will directly navigate to the corresponding page without any delay. Because the DNS servers we configured in our network settings will transfer the domain name into the IP address so we can access the precise website. So this error explicitly indicates that the connection could not be established because the configured DNS servers are not responding anymore.
This issue is also on your android phone, so check this out DNS_PROBE_FINISHED_NXDOMAIN android chrome error fix [5 options]
Error code dns_probe_finished_nxdomain in various browsers
Google Chrome
First, you will see the message “This site can’t be reached” or “The webpage is not available”. And you will definitely see the message that they said about the DNS address could not be found in google chrome browser. Hence, The bottom line is describing the error type.
 This is the Google Chrome web browser that shows this error as DNS_PROBE_FINISHED_NXDOMAIN.
Mozilla Firefox
The error may say something like this in Mozilla.
“Hmm. We’re having trouble finding that site. We can’t connect to the server at example.com.”
They don’t even mention any DNS servers but they suggest some alternatives you can try to establish the connection. Besides as you know the issue is the same.
 ‘Server Not Found’ an error in Mozilla Firefox
Microsoft Edge
In this browser, you will see “Hmmm… can’t reach this page” and some solutions which might work if the server settings aren’t the problem.
 DNS_PROBE_FINISHED_NXDOMAIN error in Microsoft Edge web browser
Safari
Not very charming but Safari simply show the complication in few sentences such as,
“Safari Can’t Find the Server. Safari can’t open the page “domain.com” because Safari can’t find the server “domain.com”.”
 DNS_PROBE_FINISHED_NXDOMAIN error in Safari web browser of Mac
Note – Even if the declaration is distinct to each one you have to understand the problem is the same.
How to fix DNS_PROBE_FINISHED_NXDOMAIN error
This problem may seem such hardcore right? Absolutely it might be able to give you a frustrating time. But do you know it can be fixed easily? There are a few tricks under our sleeves we can suggest. You can try each of them until your browser lets you go to where you need to go. Each browser and operating system may need a few different procedures. But it is not complicated. Actually, it’s pretty simple, let’s begin.
Method 01
Clear DNS Cache
DNS cache is a temporary information storage unit that stores machines’ OS or web browser DNS as a faster mechanism for retrieving websites that have already been accessed once or a few times earlier. It is efficient in accessing the corresponding IP address quickly. But too much DNS cache might encounter you with a bunch of problems such as DNS_PROBE_FINISHED_NXDOMAIN chrome. Hense clear DNS Cache is the solution. It will remove all the non-essentials data. Eventually, The computer will restore it when you access the websites next time.
Windows
Click the Start button ⟶ Type “cmd” in the search bar ⟶ Right Click ⟶ select the “Run as administrator” option.
 How to initiate the Command prompt in Windows 10
You will see a new window will show up on the screen and all you have to do is type this,
 Type “ipconfig/flushdns” in CMD
Finally, click Enter, and it is done.
 Successfully flushed the DNS Resolver Cache
So, Now the cache should be cleaned. Then reopen web browser and visit the website. This method should work, if not work find below the 2nd method.
In windows 7 or Windows XP, open the command prompt and do the same.
Windows key ⊞ + R key push together. then open the “RUN” window type “CMD” and hit the ENTER key.
Mac
This process is a little bit different than the Windows DNS flushing. You have to open the terminal window first. Enter ‘terminal‘ in the search field of Launchpad.
Now you have to enter the command that forces your computer to flush the Domain Name Servers which is outdated or overwritten. Select the command according to your Mac version and enter it in the terminal. If the command succeeds there will not be any output.
Enter the command below that corresponds to your version of macOS X.
macOS Lion (10.7), Mountain Lion (10.8), Mavericks (10.9), macOS El Capitan (10.11), Sierra (10.12), High Sierra (10.13), Mojave (10.14), and Catalina (10.15). If you use one of this macOS, So run the following command:
Next, you have to enter the computer password. Once done, the DNS cache should be clear.
macOS Yosemite (10.10)
Mac OS X Snow Leopard (10.6)
Mac OS X Leopard and below (10.5)
Linux
As far as we know, Ubuntu does not collect the DNS cache details like any other operating system. If so, it must be a manually installed service such as NSCD. Then we have to do this to clear DNS.
Open the Terminal by clicking Ctrl + Alt + T simultaneously.
Run command on init.d subdirectory:
Method 02
Release and Renew IP Address
If the previous trick did not work you have to go a little bit deeper this time. This is also clear DNS data but in depth.
Windows
Go to the command prompt (CMD) and run it as administrator options again. Then enter the following terms one step at a time.
How to initiate the Command prompt, run as administrator in Windows 10
1. Type ipconfig/release ⟶ press Enter key
By using this command we force the server that provides us with the DHCP to give up its lease and update the server status available for IP addresses.
 ‘ipconfig/release’ type in Command prompt
2. Type ipconfig/all ⟶ Enter
With this command, you can look up to full IP configuration for all of your adapters. So, It will display the IP address, subnet mask, and default gateway for all of them.
 ‘ipconfig/all’ typed
3. Then, type ipconfig/flushdns ⟶ Enter
As you can see in the term, it literally flushes all the DNS caches that are already stored on the computer. After the command clears it you will get a message confirming the cache was flushed successfully.
Successfully flushed the DNS Resolver Cache
4. Type ipconfig/renew ⟶ Enter
This command is executed to request new IP addresses from the DHCP Server by configuring settings. Moreover, the DHCP Server has to assign the next available IP to the machine.
 ‘ipconfig/renew’ type in CMD
5. Hereafter, type one by one following command
- netsh int ip set dns ⟶ press Enter key
- netsh winsock reset ⟶ Enter
 “netsh winsock reset” in CMD
So if you followed the exact instructions, you might fix the issue by now. But before checking it make sure to restart the computer.
Note to know briefly
When you modify the network configurations of a running computer netsh is the command-line utility that should be used. By netsh int ip set dns command, it will restore the default protocols back in the action. PC’s configurations for internet connectivity usually contained by Winstock settings. As in the second command, resetting it will recover the windows from any sockets errors most commonly arise when you download some unknown files and folders from unauthorized resources.
Mac
Step 01 – There are 2 major steps when releasing and renewing the Mac DNS settings. In the first step, you will be releasing the IP of the machine. So, Follow the instructions given below.
- First, click the apple icon ⟶ Go to system preferences.
- Click and go to the network in the upcoming window.
- Bottom of the window you will see the Button “Advanced” with a small question mark icon beside it. Click it.
- Click TCP/IP tab ⟶ click “Renew DHCP” lease button.
 Steps to find Mac System Preferences and network
Step 02 – Then we have to clear local DNS records. Just like windows 10 you have to use the Command line to do this. In Mac, it would be the terminal. Further, proceed with the instruction provided here.
- Just go to Utilities ⟶ click Terminal
- Enter dscacheutil -flushcache ⟶ Click Enter key
- You’ll be prompted to enter your computer password
 Execute the DNS flush command in mac terminal
After that, DNS cache should be clear. Even if the problem is solved you wouldn’t know until you relaunch the browser because Mac doesn’t provide you with a success message. Check it and you might fix DNS probe and finish no internet mac by now.
Method 03
Change DNS Servers
This method might be a little bit complex if you compare it with the previous ones. But nothing impossible if you have precise instructions to follow.
Now we will change the DNS servers manually. By default, those are assigned to your very own Internet Service Provider (ISP). You can change it to public DNS servers such as Google, Cloudflare, or OpenDNS. These servers are considered as safe and reliable public servers that do not harm your network or the PC.
But what if you are already using a free DNS and yet you’ve got ‘server DNS address could not be found. DNS_PROBE_FINISHED_NXDOMAIN’ with the network? Just switch back to the default Internet Service Providers (ISP’s) DNS servers. In rare cases, it might also resolve the problem.
Windows
Go to Control Panel Menu ⟶ Network And Sharing Center
 Network and Sharing Center
Click the Change adapter settings option.
 Change adapter settings in Network and Sharing Center
Now go to the connection now using ⟶ Right Click ⟶ Properties
 Network Connection Properties
In the networking tab, there will be a list of items using this connection. Find the ‘Internet Protocol Version 4 (TCP/IPv4)’ from the list. Then click the Properties button. Now you will get the property window of the Internet Protocol Version 4 (TCP/IPv4).
 IPv4 properties edit DNS server addresses
In General Tab, you will see two empty text fields in the bottom and fill it respectively mentioned below. But in any case, if you wanted to revert the step you wanted to know the existing data. So before resetting it you can note down those for good.
- Preferred DNS Server – 8.8.8.8 or 1.1.1.1
- Alternate DNS Server – 8.8.4.4 or 1.0.0.1
Finally, click Ok and it will save all the changes. Restart the browser and check if the problem is solved.
Note – The Server we used here is Google public Servers. Instead of that if you want to use some other services such as OpenDNS just include the following.
- Preferred DNS Server – 208.67.222.220
- Alternate DNS Server – 208.67.220.222
Mac
You have to go to system preferences before anything else.
 System Preferences
Click the network icon ⟶ Click the Button “Advanced” (It will be located in the bottom right of the window)
 Network, Advance in mac for IPv4 or IP v6 addresses
Now click on the tab “DNS”
As we discussed earlier now we are going to add public server addresses to your network. In this, we are using Cloudflare.
Enter the following details inappropriate fields.
- For IPv4: 1.1.1.1 and 1.0.0.1
- For IPv6: 2606:4700:4700::1111 and 2606:4700:4700::1001
 Add Public server addresses in DNS tab
Method 04
Reset all Chrome Flags
for getting rid of DNS_PROBE_FINISHED_NXDOMAIN
Even if we didn’t know for sure there might be issues with the Chrome settings. It can be accidentally modified or somehow messed up. So as a solution for dns_probe_finished_nxdomain windows 10, we can try to reset all the chrome settings back to default by a simple process.
- In Google address bar type the chrome://flags and click enter.
- You will get the experimented features page and now you can access these features.
- Click the button in the upper right corner says Reset All.
- Now close the browser and open it again.
- Check if the problem is solved or not.
 Reset All in Chrome Flags
Note – As you can see these features are not already finished. So it might mess things up. Be careful when you use them.
Method 05
DNS Client Service restart in Windows
If you work on a Windows computer, restarting DNS client services may resolve this issue.
Open the Command Prompt ( ⊞ Win + R keys). Type services.msc and press enter key.
 Command prompt (Run) “services.msc”
So, the services list appears. It has the “DNS Client” service, find it in the list. Then right-click on it, and select the Restart option.
 Restarting “DNS Client” Services
Note – If Restart is not activated suddenly, it will also appear in grey, then you can do this in another way. Again, open a command prompt and type CMD in it. The windows terminal will appear. So, type the net stop dnscache and net start dnscache two commands one by one in the terminal.
Method 06
Temporarily Disable VPN or Antivirus
Using Antivirus software and VPN is common in people who spend much more time surfing the internet. It is quite useful in various situations but this software might override or conflict your network settings inevitably. So there is a chance that your VPN or the virus guard is preventing you from accessing the targeted website. Fixing this problem is quite simple. Disable any active antivirus from its control panel. And you will be able to disable VPN on windows by sticking with this process.
- First, go to Control Panel ⟶ Network And Internet ⟶ Network Connections
- Select the active VPN that you want to disable ⟶ Click Properties.
- Network Tab ⟶ Click the button uninstall.
- To see if it resolves the DNS_PROBE_FINISHED_NXDOMAIN error in Chrome you better restart the PC once.
Method 07
Check Your Local Hosts File of the computer
What if all the above explainable solutions do not work for you? Actually don’t worry. It will narrow down the problem even more.
Every computer regardless of the operating system has a file that collects manual DNS entries which are affiliates with certain IP addresses. This is just a plain text file simply known as a localhost file. In networking, the localhost refers to the current computer we use. This file is not usually edited. In particular, it is only edited when you switch domains to a new host. However, this file can be modified or changed unknowingly without your prior knowledge. So it might be allied with the current situation you are in. Hence it’s worth double-checking to ensure. Don’t you think?
Windows
To check the localhost you will need a text editor such as Notepad, Notepad++, Atom, or Sublime.
- Start Menu ⟶ Search for the text editor ⟶ Right-click ⟶ Select “Run as administrator.”
- Within your text editor click File ⟶ Open and Browse ⟶ C:\Windows\System32\drivers\etc\
- Then, you will see a bunch of text files and select the “hosts” file to open it.
- Finally, you can check and make sure the website you are trying to connect is not listed there. If it is, then that’s the issue. And removing it will fix it.
 Location of the Local Hosts File in Windows 10
Mac
We are going to use the manual technique to check the localhost in Mac.
- First of all, Go to the “Terminal.” from Utilities
- Enter the command we mentioned below and press the enter key. But if it is essential you might have to provide the administrator password well.
sudo nano /private/etc/hosts - Now you have a chance to check the localhost file. Make sure the website you wanted to log is not listed here. If it is listed, remove the record and your browser will work just fine.
Method 08
Clear DNS Cache on Google Chrome
One of the simplest and quickest ways to try and only the chrome browser can do this. We hope this fixes a problem with DNS_PROBE_FINISHED_NXDOMAIN chrome.
Clear your browser’s DNS cache using the following words typing into the address bar.
Go to the Chrome address bar and type chrome://net-internals/#dns
![]() How to Clear DNS Cache on Google Chrome
How to Clear DNS Cache on Google Chrome
After that, click on the Clear host cache button.
 Clear Host Cache on Chrome
Now restart the browser form get rid of this bug and check your problem. The error is gone, right? If not, check your internet network. For example, try resetting the router.
Restart Your Computer
for drive away from DNS_PROBE_FINISHED_NXDOMAIN error
What? Is this the final method!? Actually, we know you are frustrated. But restarting your machine and starting all over again after relaunching the browser also has to be mentioned here. Because it also fixes some difficulties in the first place. Rebooting your machine clears a great deal of annoying temporary cache. Even after you try our tutorial which explained almost all solutions for the DNS_PROBE_FINISHED_NXDOMAIN error in chrome, but if you still could not connect the website you try to connect you should seek the help of technical officers.
Conclusion of DNS_PROBE_FINISHED_NXDOMAIN
Getting a connection error stating the webpage you wanted, can not be reached is one of the most irritating things that could happen when you browse the internet. We know how frustrated that can be. The error is and it is easy to fix with the correct tutorial. This problem is so common because people do not pay attention to the Domain Name Server issues much. But flushing it and resetting it will fix most of the problems. So here we discussed brilliant methods that help you to figure out what does DNS_PROBE_FINISHED_NXDOMAIN means.
Источник


