- How to downgrade from the Android 11 Beta 3 to Android 10 on Google Pixel [Video]
- How to downgrade from the Android 11 Developer Preview on Google Pixel
- 1. Download and install Android SDK Platform-Tools package
- 2. Enable USB debugging and OEM unlocking
- 3. Download the Factory Image for your device
- 4. Boot into device bootloader
- 5. Unlock the bootloader
- 6. Enter the flash command
- 7. Relock the bootloader (optional)
- 8. Reboot your phone
- More Android Basics:
- Vsesam
- Инструкция по откату андроид 11 до андроида 10
- Процесс перехода с андроид 11 до андроид 10
- Установка андроид 10 вместо андроид 11
How to downgrade from the Android 11 Beta 3 to Android 10 on Google Pixel [Video]
— Aug. 7th 2020 12:51 am PT
If you are not content with the most recent Android 11 Beta build on your Google Pixel, it’s probably music to your ears knowing that you can downgrade your OS to a stable version of Android 10 if you encounter any major problems.
We’ve shown you how to install the Android 11 Beta or Developer Preview phase, so it’s only fair that we show you how to downgrade from this experimental Android build.
You’re going to need to do a few things before you can revert to a stable Android 10 build, though. Firstly, be sure to back up all of your data before even attempting this. You will lose your device data, as this method requires a device wipe, and your device will be wiped several times during this process.
IMPORTANT NOTE: If you are a Pixel 4 owner and choose to downgrade back to Android 10, Face Unlock will no longer be able to be set up. For this reason, unless you are happy to only utilize PIN security, flashing back may only be worthwhile if you are happy to have Face Unlock and associated features disabled for the foreseeable future — at least until the full Android 11 upgrade is available.
This guide is also tailored for Windows users, so the process may vary for those using MacOS or Linux.
How to downgrade from the Android 11 Developer Preview on Google Pixel
Easy method: Simply opt-out from the Beta on the dedicated Android 11 Beta website and your device will be returned to Android 10.
- Download and install Android SDK Platform-tools
- Enable USB debugging and OEM unlocking
- Download the most recent compatible Factory Image
- Boot into device bootloader
- Unlock bootloader
- Enter the flash command
- Relock bootloader (optional)
- Reboot your phone
1. Download and install Android SDK Platform-Tools package
You’ll need to use ADB or Android Debug Bridge to downgrade your current Android build to an older version. We recommend installing the unzipped platform-tools package on your desktop for quick access when running commands. You can download the latest platform-tools zip file from here.
2. Enable USB debugging and OEM unlocking
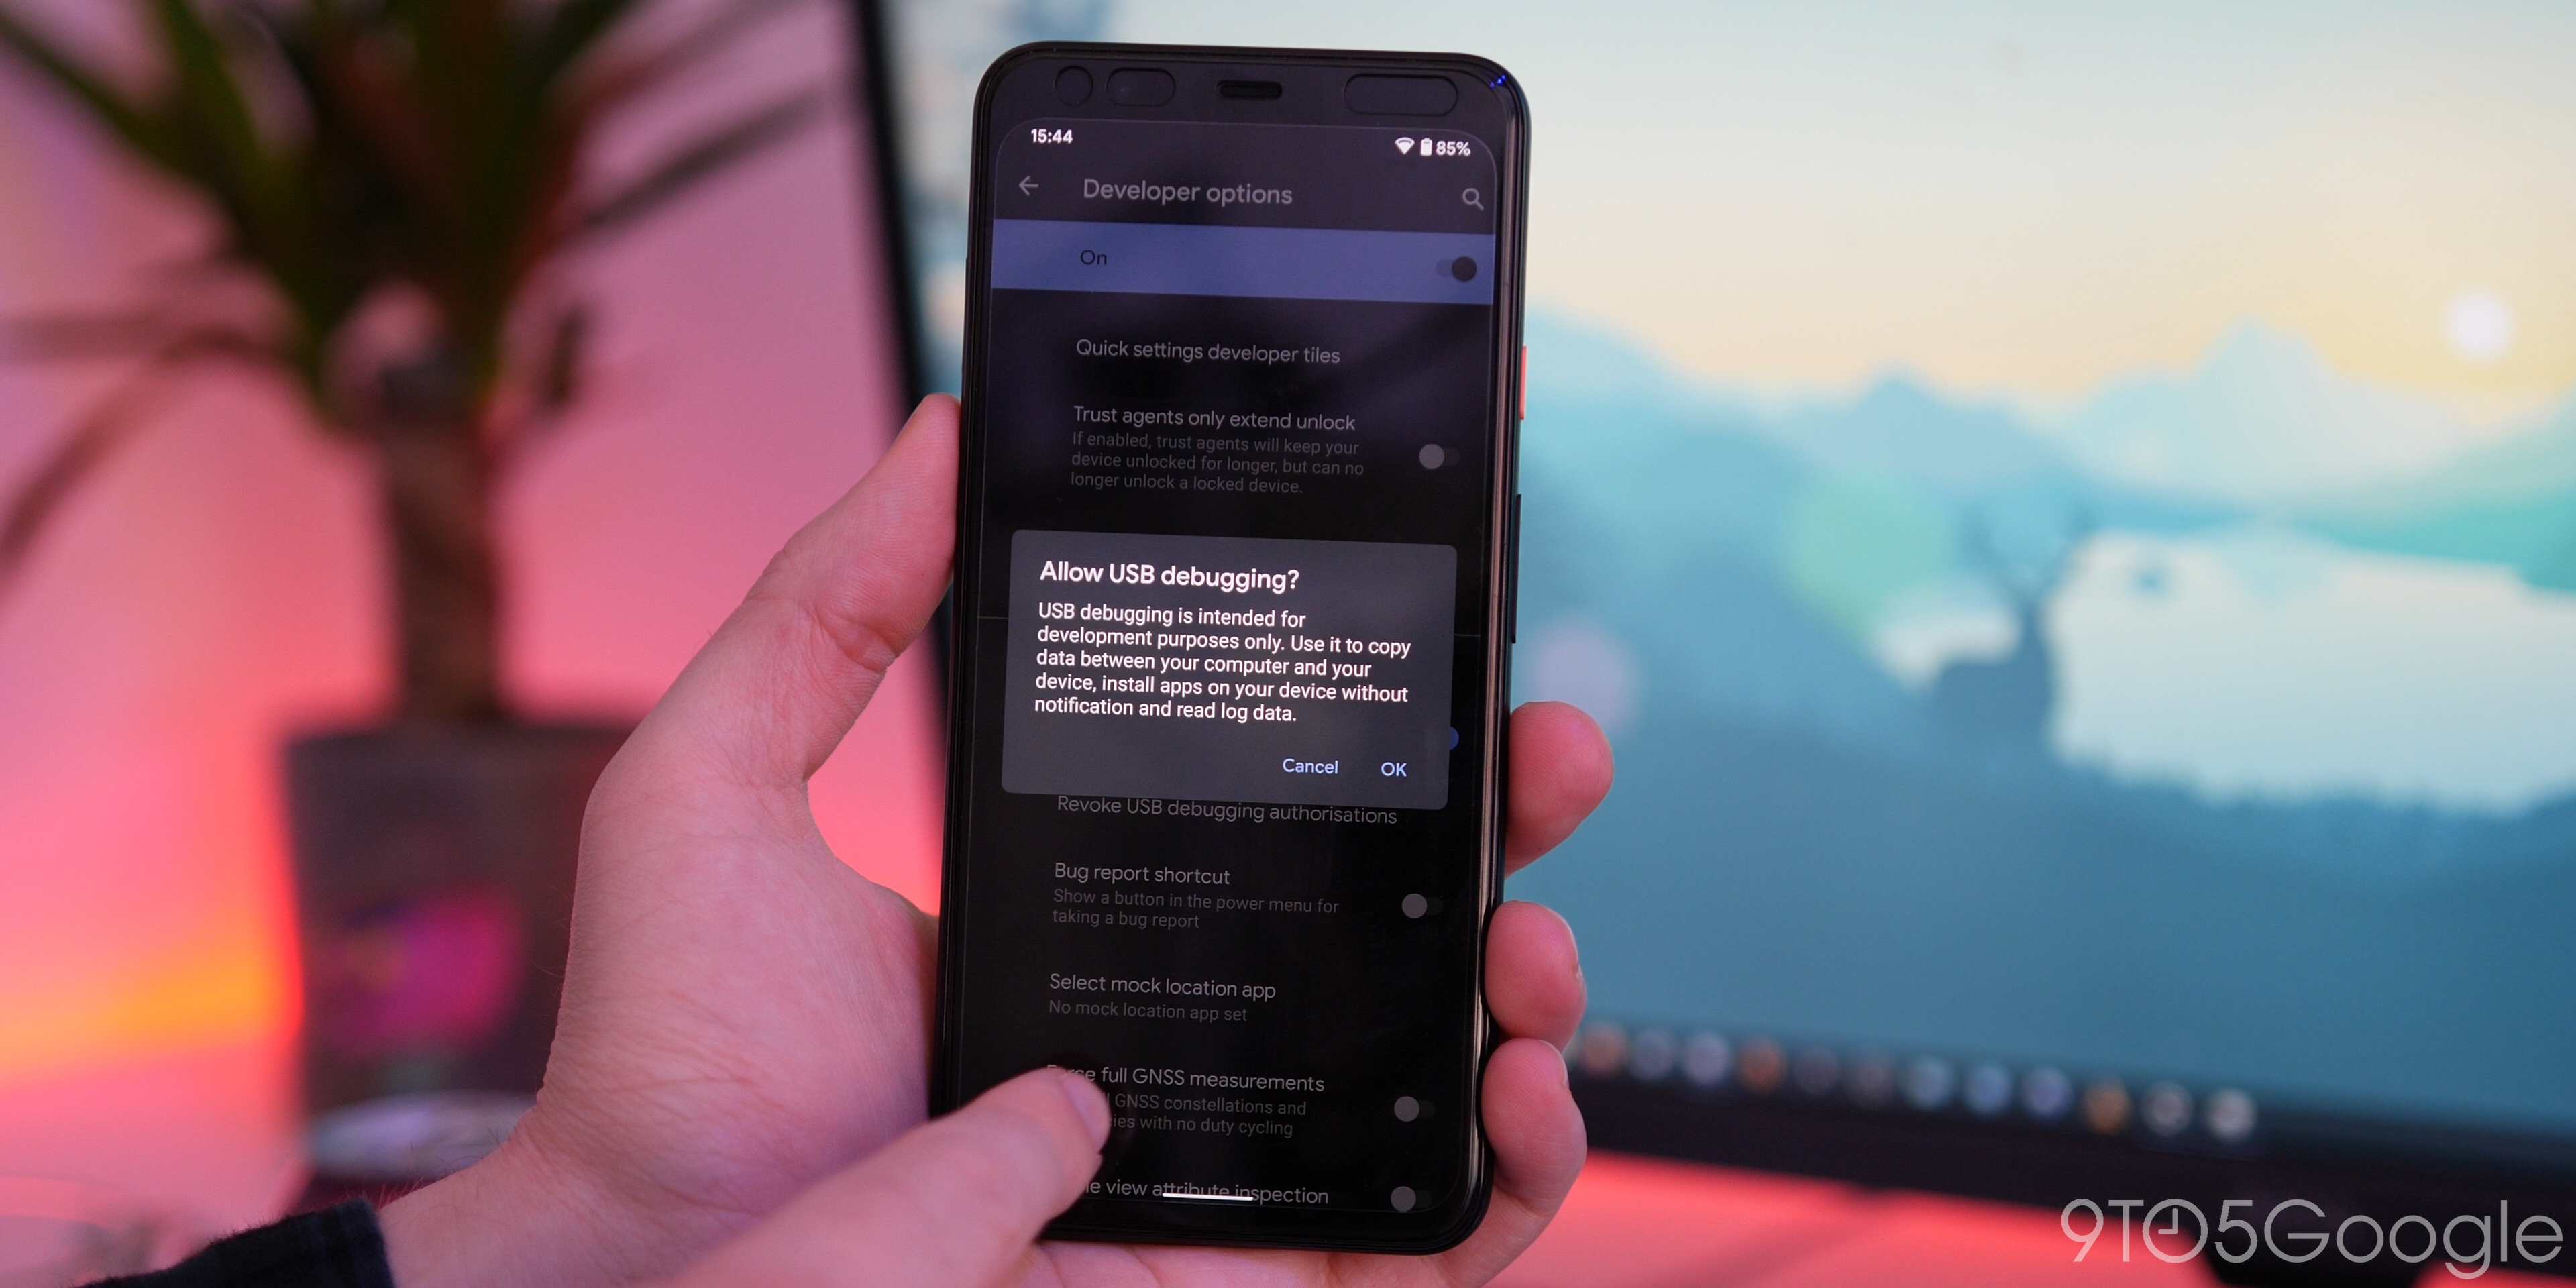
Firstly, ensure that you have Developer Options enabled on your Pixel, you can do that by heading to your device Settings > About phone, now tap “Build number” until a message confirms that you have Developer options enabled.
Now you need to head to Settings > System > Advanced > Developer options (you may need to expand a hidden menu for this). Before we are ready to continue, you will need to scroll down and enable “OEM unlocking” as this is integral for further steps. Now scroll slightly further down to the “Debugging” section and tap the “Allow USB debugging” option.
3. Download the Factory Image for your device
This is necessary for the Android 11 downgrade process. You’ll need to download the correct Factory Image for your device. This is essentially just a blank slate for your smartphone or snapshot of that particular Android build at that time. You can grab it from Google’s Factory Image OTA hosting site, which contains all Factory Images for Pixel and Nexus devices.
You will need to add this file and unzip its contents to the platform-tools folder for access later on.
Note: Do not extract into an internal sub-folder, just extract all files into the main platform-tool folder.
4. Boot into device bootloader
This can be done a couple of ways. The simplest way is to connect your device to your Windows PC and open platform-tools folder and typing “cmd” into your file manager address bar. This will open a Command Prompt window in the right place, now enter the following command to start the adb daemon:
Your Pixel device will now load into the bootloader, which is where we’ll need to be to send some commands.
Alternatively, you can press and hold the Power button and volume down key until you see the Android figure lying down. Now you will need to press and hold the power button and volume up button briefly before releasing the volume up key. Using the up and down volume buttons, you can scroll to select “enter fastboot.”
5. Unlock the bootloader
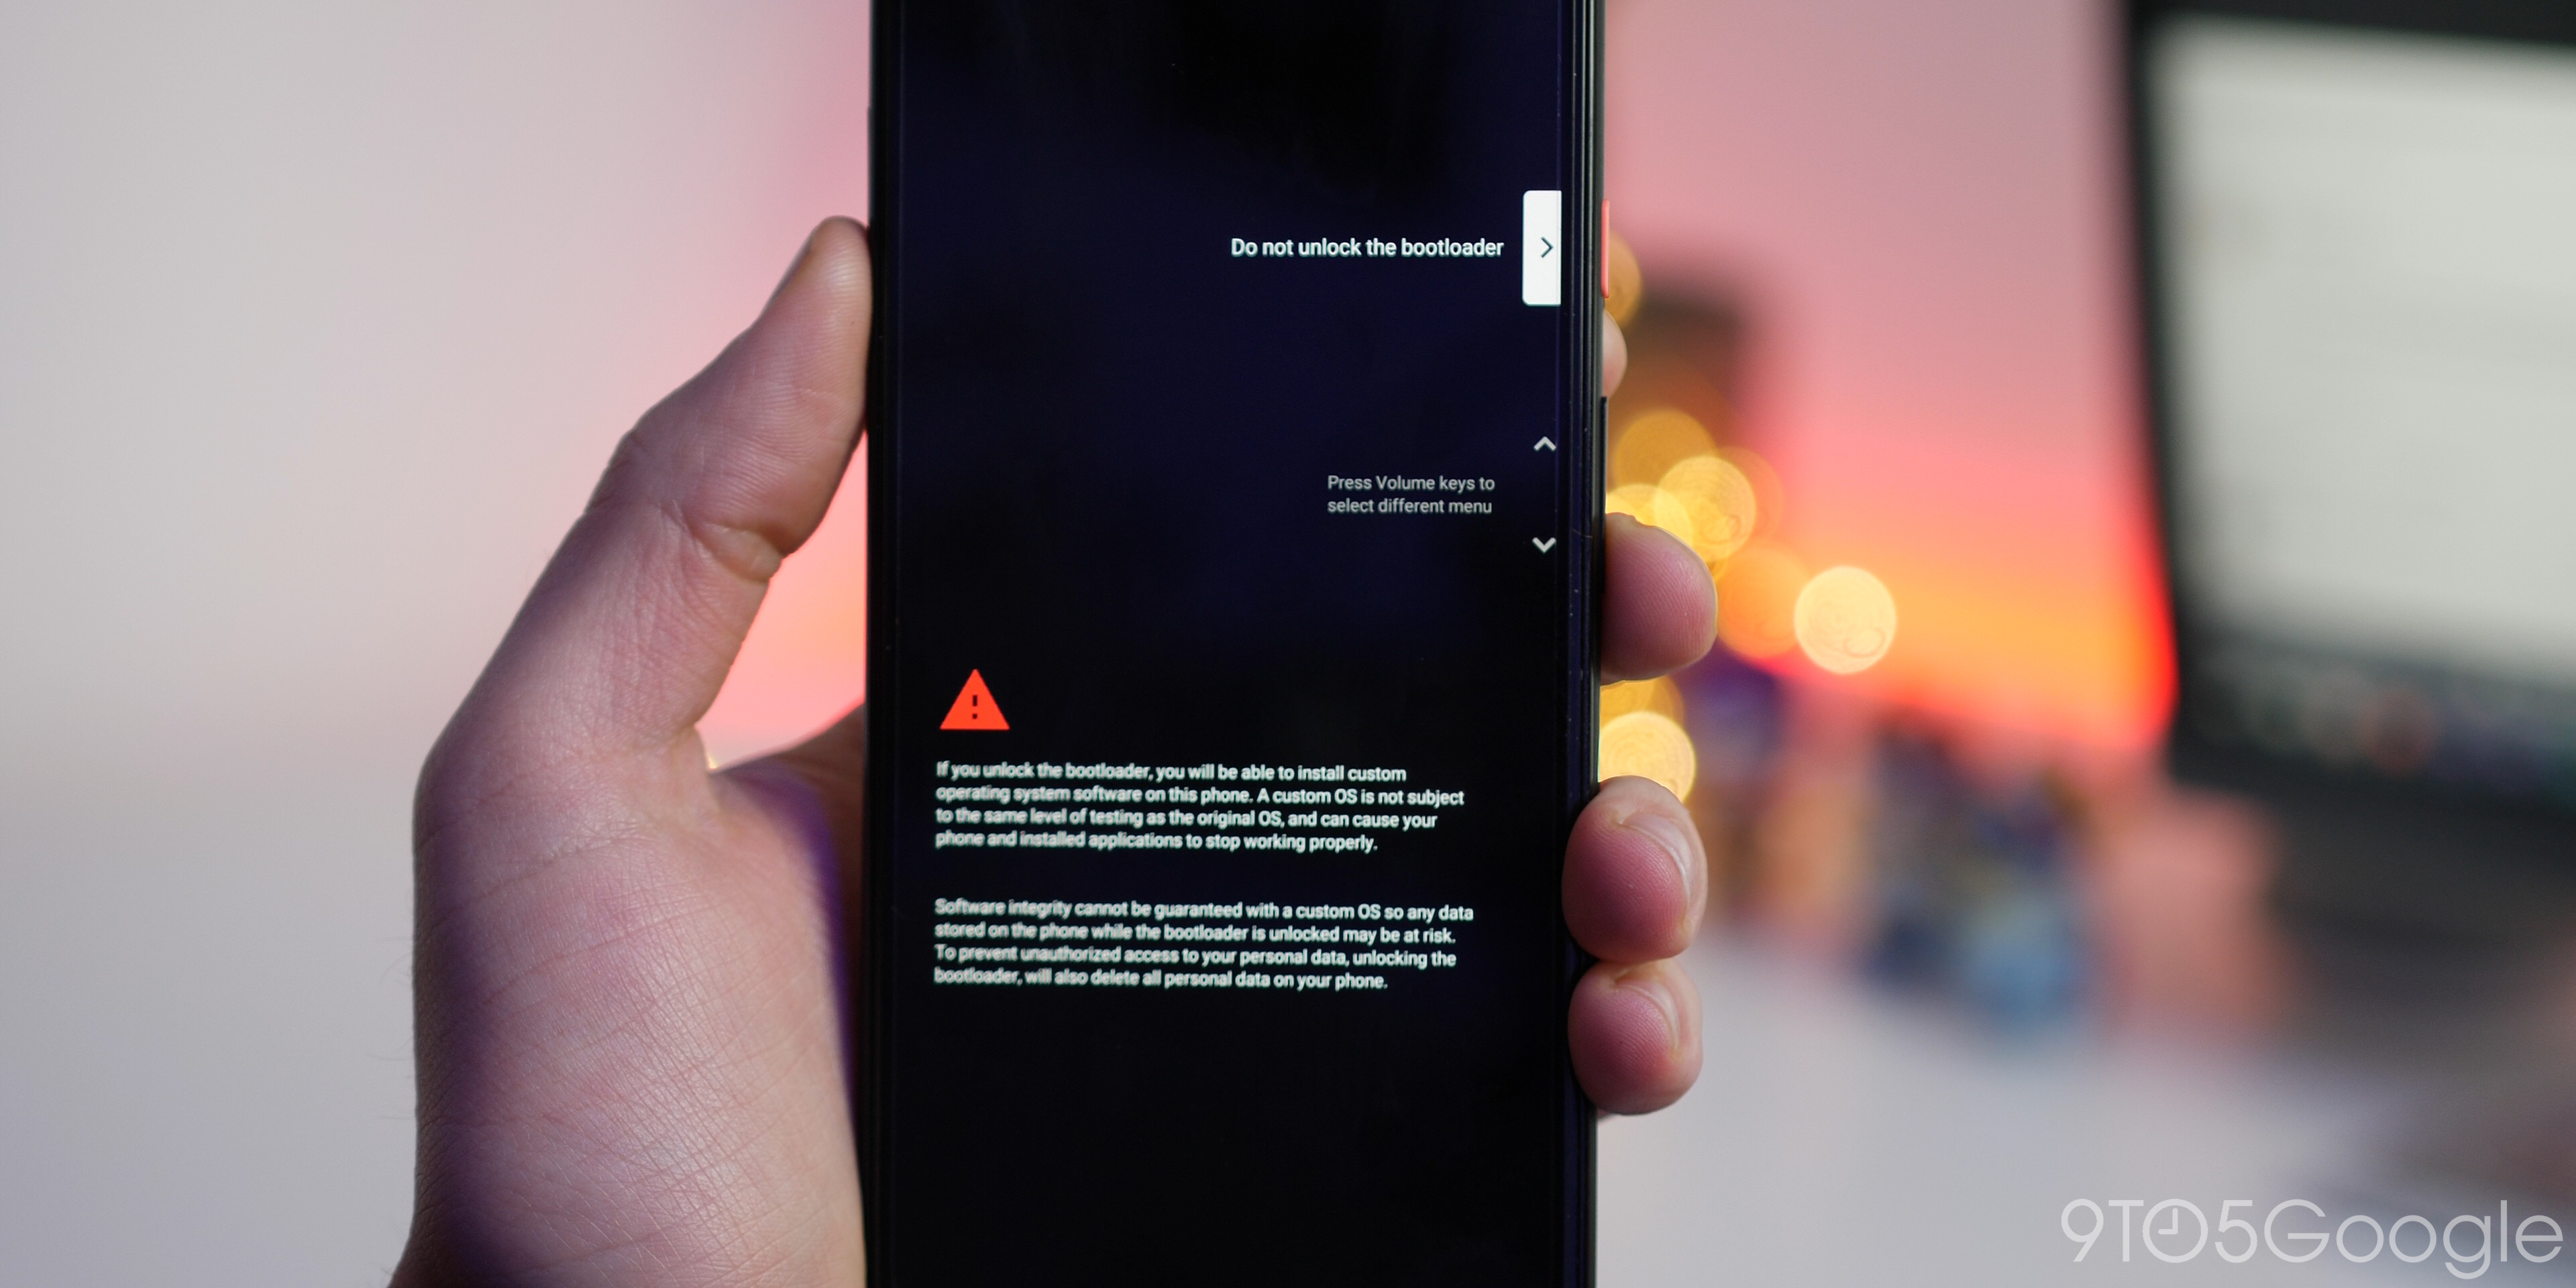
Unlocking the bootloader is necessary for the flashing process, as unfortunately you can’t flash a Factory Image and downgrade your Android version using the slightly simpler ADB sideloading method. This is a pretty simple process though. When using your command-line interface, enter the following command:
You will get a slightly daunting message on your display warning you that unlocking the bootloader may cause device instability. Using the physical volume keys, choose the “Unlock the bootloader” option and confirm your selection by pressing the power button. Restart your Pixel, as this process will wipe your smartphone.
We will also need to skip the device startup process to re-enable USB Debugging in preparation for the next step. Once you have done so, ensure your Pixel is connected to your PC, and you’ll need to enter the bootloader on your device with the following command again:
6. Enter the flash command
With all of your Factory Image files extracted into the platform-tools folder and accessible. You can now run the following command (with your open Command Prompt/PowerShell window):
Your Pixel will now begin the process of downgrading Android, which will take a few minutes. Leave the Command Prompt window open, and when the process has finished, you will see a completion message.
7. Relock the bootloader (optional)
This is an optional step, but is needed if you want to get future OTA updates. Otherwise, you’ll see a pop-up splash screen with a warning each time you reboot your device.
You will need to go through the device setup process again which you can skip wholesale. From here, go back and re-enable USB debugging from step No 2 — your bootloader is unlocked so OEM unlocking should be grayed out.
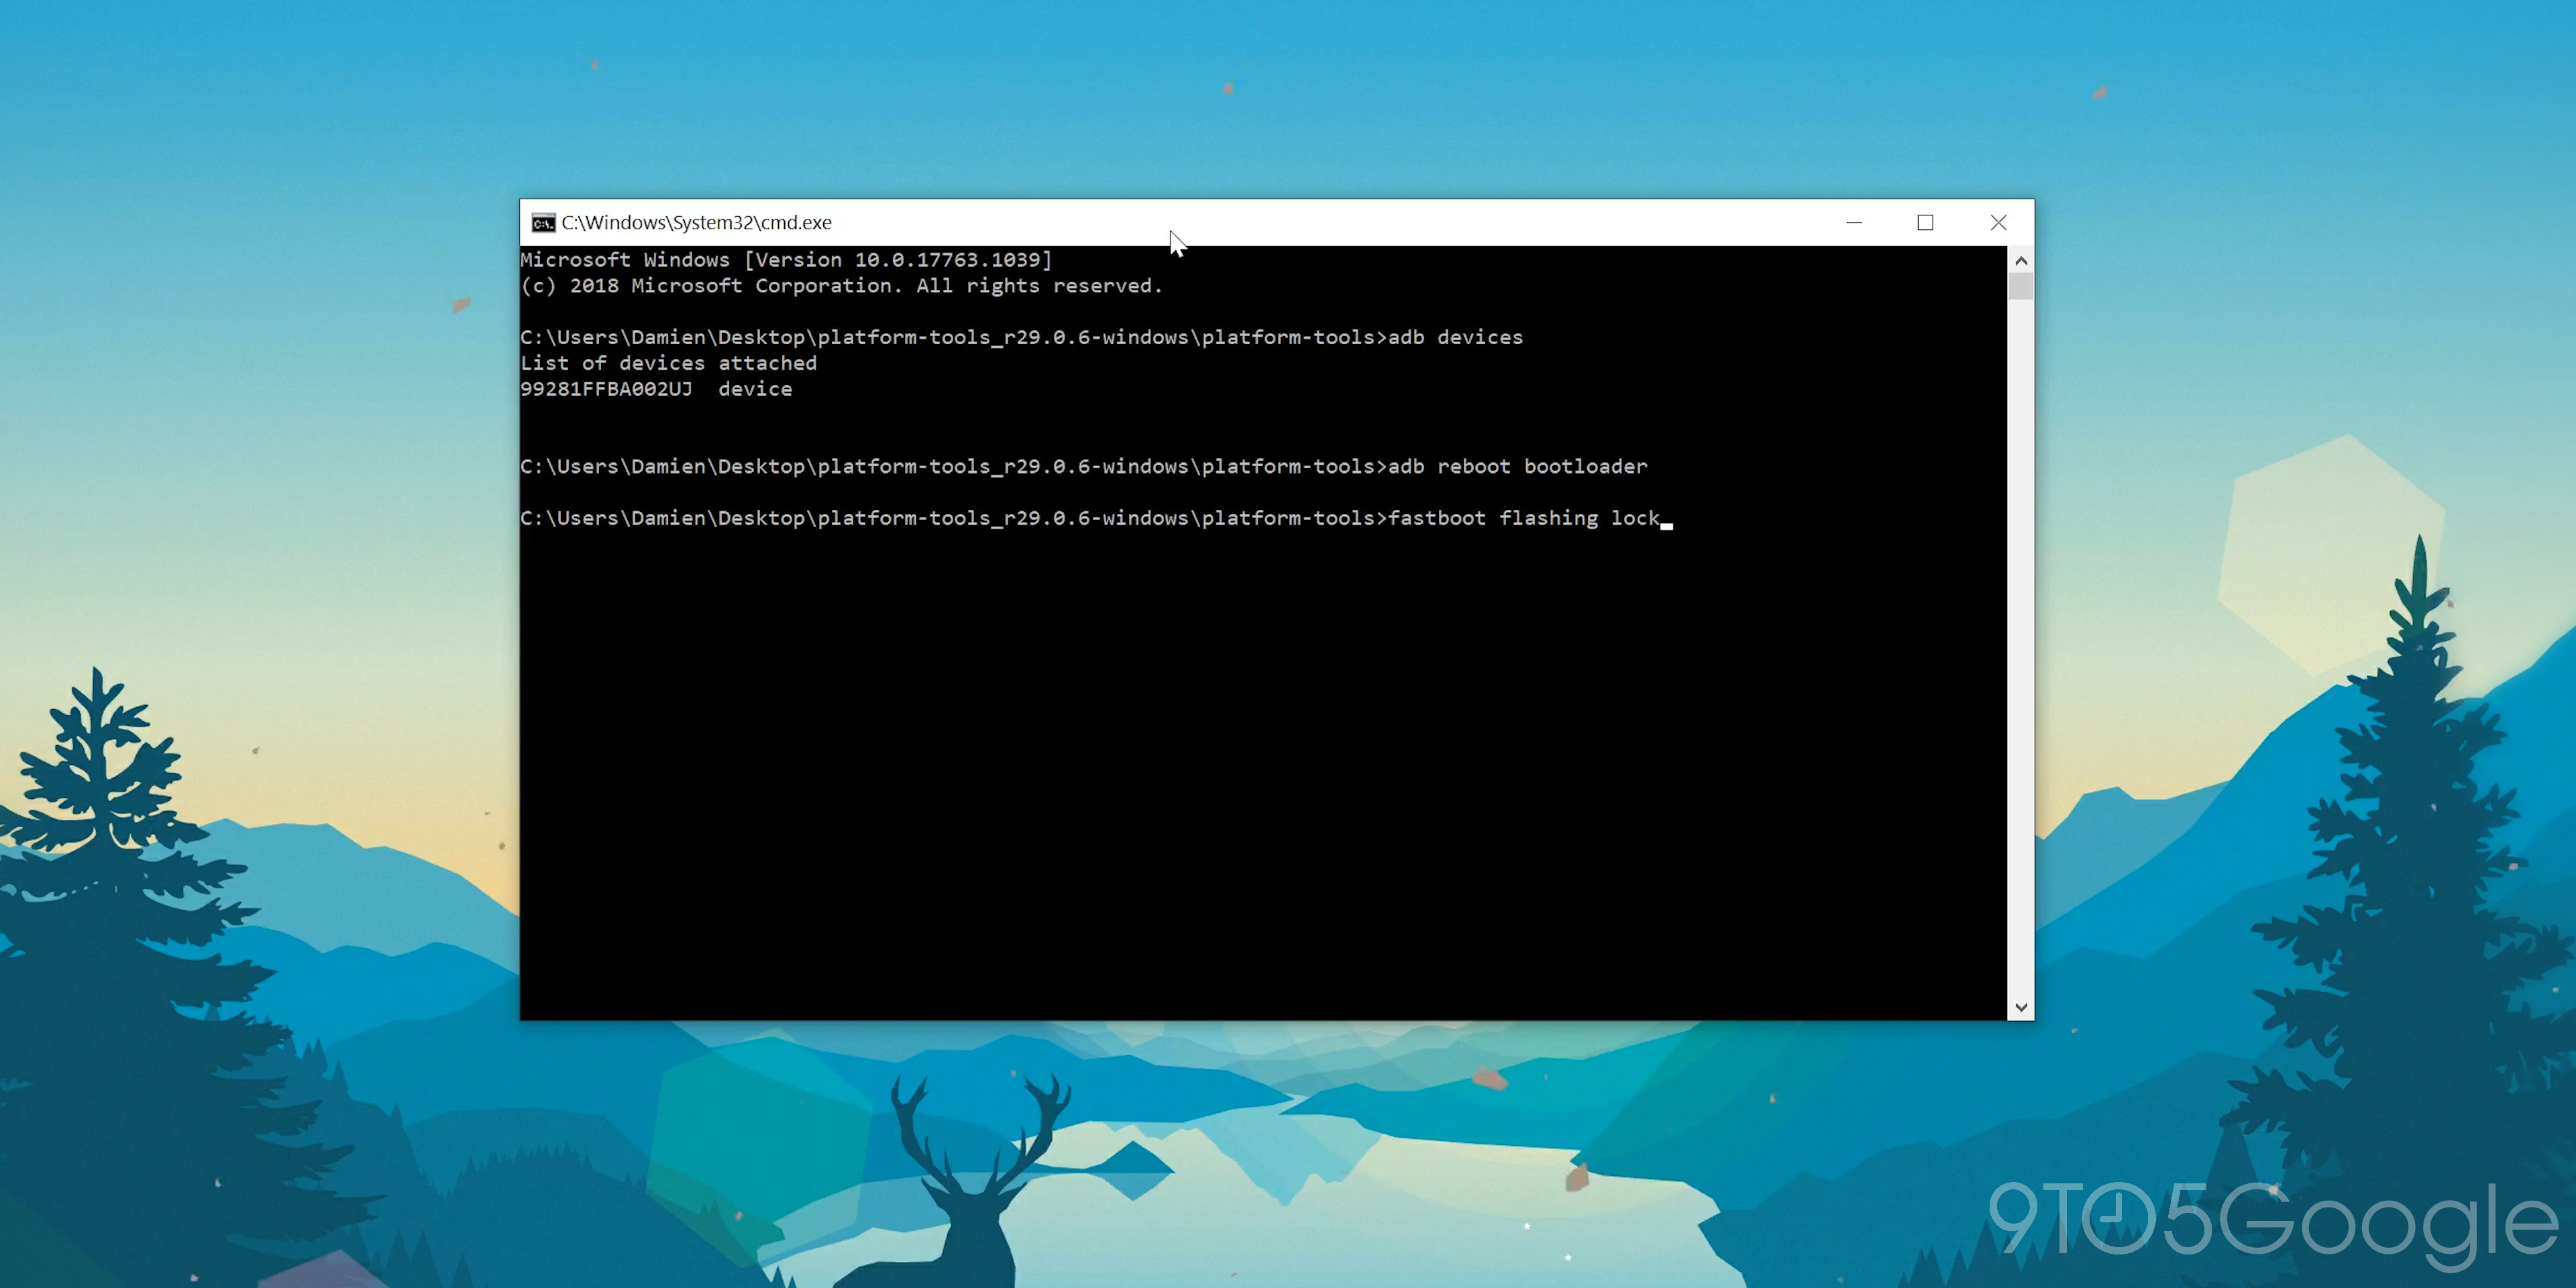
Plug your device back into your Windows PC and open your platform-tools folder and reopen a Command Prompt window using the “cmd.” Enter the following command to quickly load into your device bootloader:
Now we can re-lock the bootloader by entering the following:
On your Pixel, using the volume keys, scroll to the “lock the bootloader” option and tap the power button to accept. When confirmed “locked” will appear on screen within the bootloader menu. Note: This process will wipe your device a further time once you reboot your Pixel.
8. Reboot your phone

You can now disconnect your device and reboot as you have successfully downgraded from the Android 11 developer preview to Android 10. It should now load into the device setup process, allowing you to sign up and enjoy your stable Android build.
It’s also worth noting that this method will work if you do wish to downgrade from Android 10 to Android Pie on devices such as the Pixel 2 and Pixel 3. However, we do not recommend doing so, as this brings about various device security risks and further potential issues. That said, if you do choose to downgrade from one Android version to another, then you do so at your own risk.
Another thing to note is that for those with a Pixel 4 series device, Face Unlock will no longer be able to be set up on a device that is running Android 10 if it has previously run an Android 11 Beta build. This means that flashing back may only be worthwhile if you are happy to have Face Unlock and associated features disabled for the foreseeable future.
More Android Basics:
FTC: We use income earning auto affiliate links. More.
Источник
Vsesam
Я занимаюсь IT-технологиями где-то 15 лет и заметил, что ситуация во многих отношениях не поменялась.
Как раньше, так и теперь есть желающие откатить свежую версию назад на старую. Это происходит как с виндовс, так и на андроиде.
Видя, что сегодня есть желающие откатить версию андроид 11 до предыдущей 10, приведу инструкцию как это сделать.
Вам почти ничего не понадобится. Даже компьютера не нужно. Все произойдет на одном телефоне, хотя в один клик не получится.
В один клик можно было раньше — до месяца после обновления. Теперь чтобы перейти с версии андроид 11 назад до андроида 10 вам нужно откатить прошивку.
Другими словами, просто перепрошить свой телефон. Не пугайтесь. Да в сети пугают, но страшного в этом нет ничего.
Даже если вы сделаете самую критическую ошибку, все в любом случае можно восстановить, хотя в сети пишут получите кирпич — никогда не получите, шейте спокойно
ПРИМЕЧАНИЕ. Точно таким же способом можете откатить систему андроид 9, откатить до андроид 8 или перейти на андроид 7.
Инструкция по откату андроид 11 до андроида 10
С первых строк хочу заметить, что мои картинки могут полностью не совпасть с теми, что увидите на своем самсунге, xiaomi и так далее.
Это потому, что производители ставят свои оболочки, как One Ui самсунг или MIUI на xiaomi, но в любом случае вам понадобится прошивка и именно для вашего телефона.
Я здесь ссылок не ставлю, так как не знаю какой телефон, но если у вас будут трудности с поиском, то черкните в комментариях с указанием точной модели телефона, и я дам ссылку на скачивание.
Второе что вам понадобится это карта памяти. Можно и без нее, но я думаю, что у вас она точно есть и телефон поддерживает, поэтому как без карты памяти описывать не буду.
Если все это есть. Закиньте прошивку на флешку (лучше всего в корень, так проще потом найти). Это все что вам нужно, осталось лишь войти в режим рекавери на начать прошивку.
Как войти в рекавери, также сейчас описывать не буду, так как одного универсального способа нет. У кого трудности пишите в комментариях с указанием модели телефона.
Будем считать, что вы успешно вошли в рекавери и начнем откат с андроид 11 до 10. Поехали.
Процесс перехода с андроид 11 до андроид 10
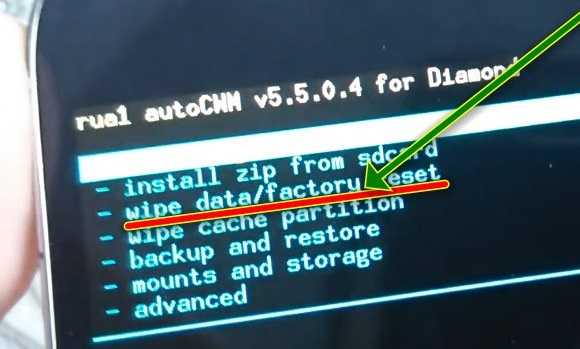
В пеню рекавери удалим установленный андроид 11 и отформатируем флеш память. Для этого выберите: «Wipe data/Factory reset» и подтвердите.
ПРИМЕЧАНИ: Выбор всегда делается голосовыми кнопками, а подтверждение кнопкой «Питание».
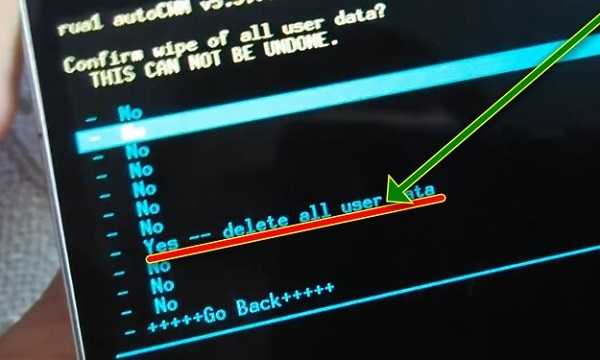
Затем выбор следует выбирать: «Yes — delete all user data» (может быть без «user» — Yes — delete all data) и также подтвердить.
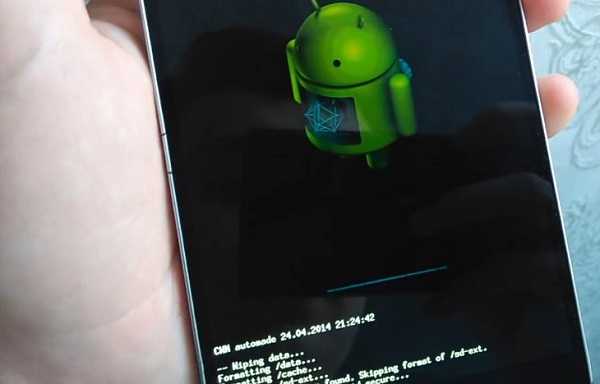
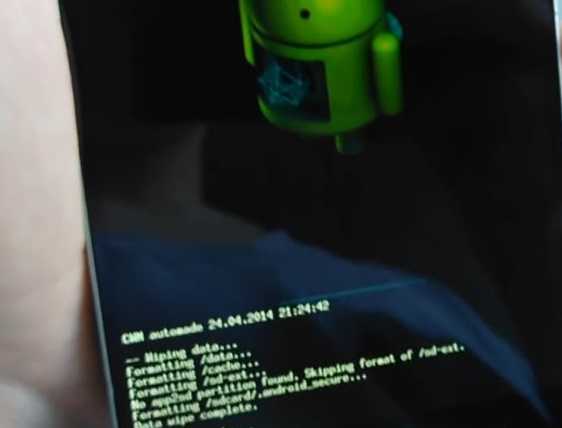
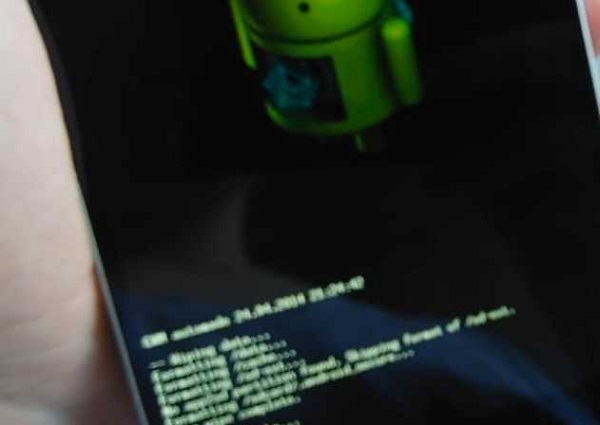
Теперь любуемся зеленным роботом и ждем окончания процесса.
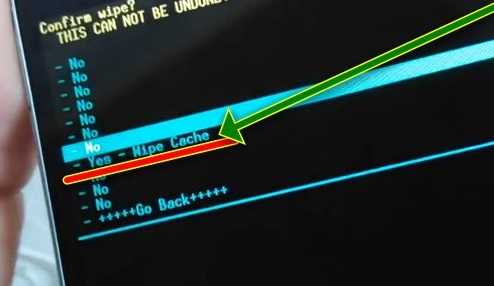
Далее переходим к удалению кеша, выбирая пункт: «wipe cache partation» и подтверждаем

Затем выбираем Yes — Wipe Cache и незабываем подтвердить.
Любуемся опять роботом.
По окончанию процесса удалим еще один кэш. Для этого выбираем строку: «advanced» (у всех может не быть.
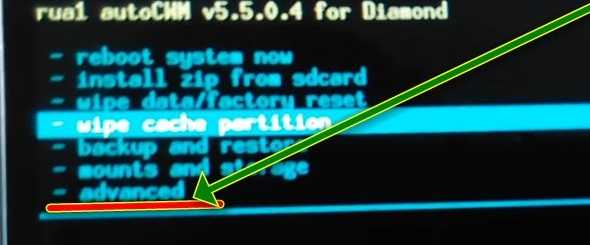
Далее выберите строку: «Wipe Delvik Cache» и, как всегда, подтверждаем.
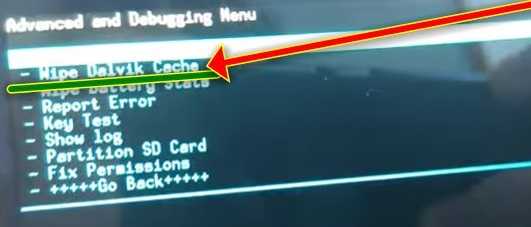
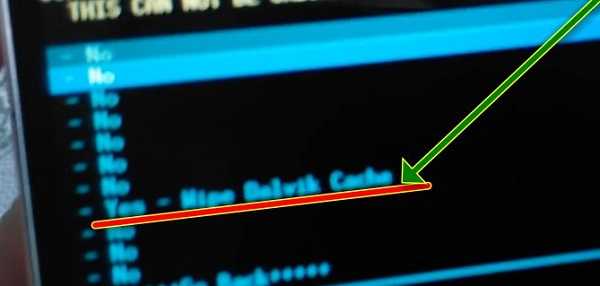
Теперь касаемся: «Yes — Wipe Delvik Cache» и питание.
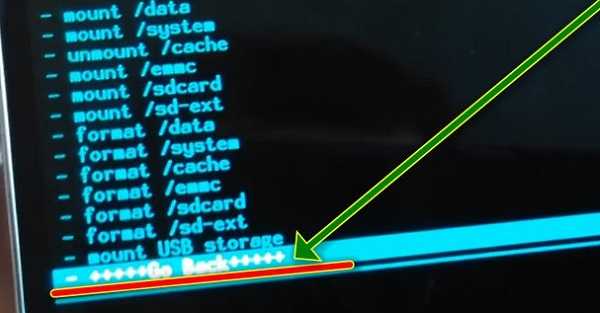
Все, андроид 11 удалили и почистили, теперь возвращаемся назад нажимая: «Go Back».
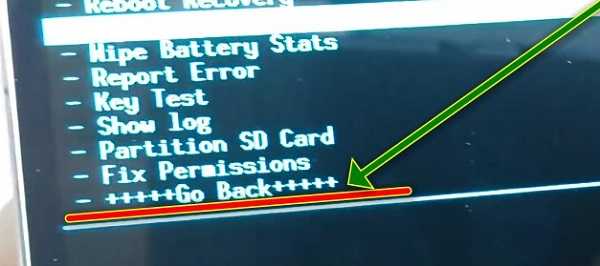
Теперь отформатируем память. Для этого переходим в пункт: «mounts and storage».
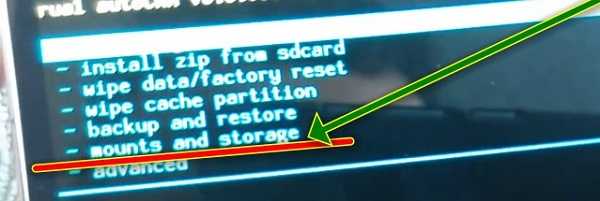
Далее выбираем: «format /sustem».
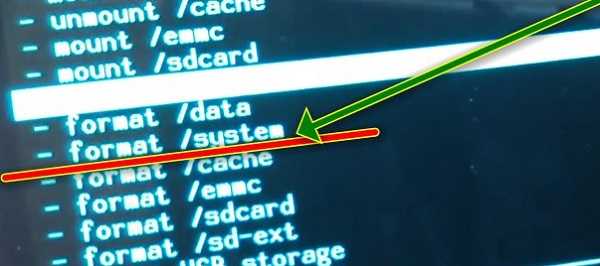
После этого: «Yes — format».
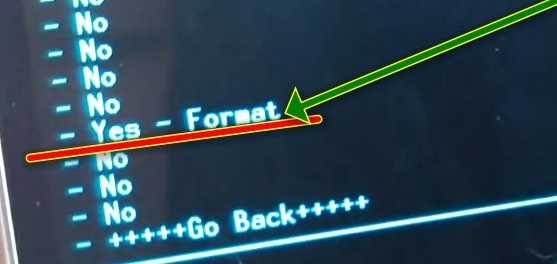
Ждем окончания форматирования любуясь роботом.
Все. Первый этап выполнили, переходим к заключительному.
Установка андроид 10 вместо андроид 11
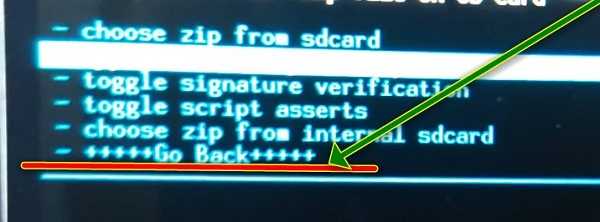
Возвращаемся в прежнее меню рекавери выбирая строку «Go Back».
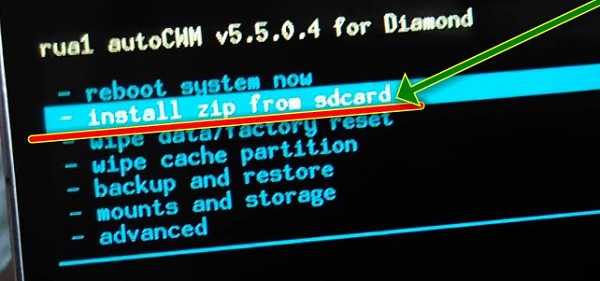
Теперь касаемся строчки: «install zip from sdcard» и не забываем подтвердить намерение.

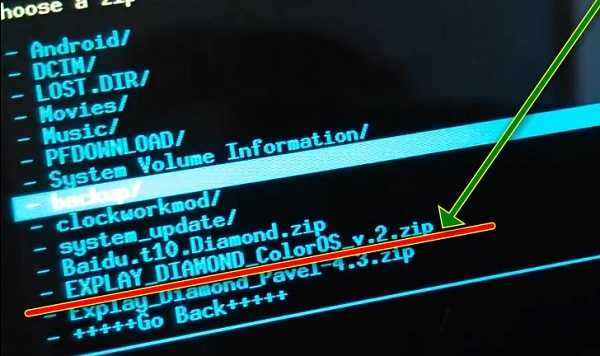
Следующий шаг: «choose zip from sdcard».
Вас перебросит на флешку. Найдите прошивку, которую туда закинули (обязательно должна быть в «Zip» архиве) и выберите ее.
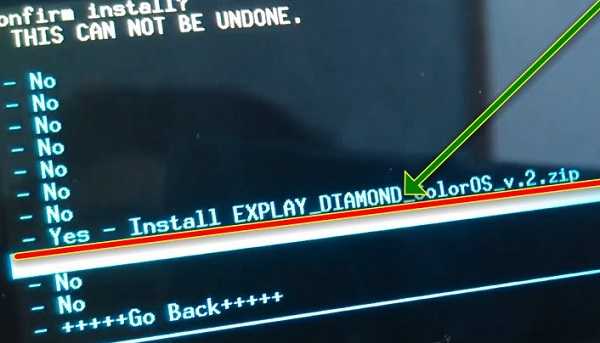
Я выбираю просто для примера прошивку «DIAMOND». У вас, разумеется, будет совсем другая, что-то наподобие десятки.
Теперь по просьбе загрузчика подтверждаем действие нажимая: «Yes — Install …».
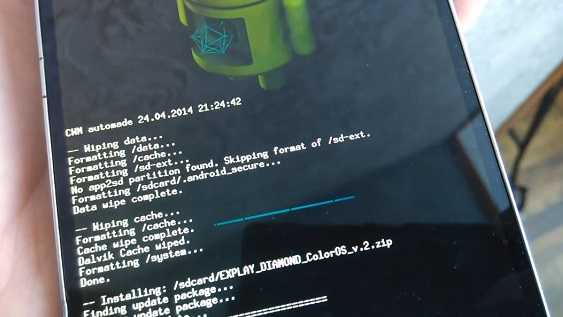
Отдыхаем пока идет прошивка.
Выбираем перезагрузку: «reboot system now».
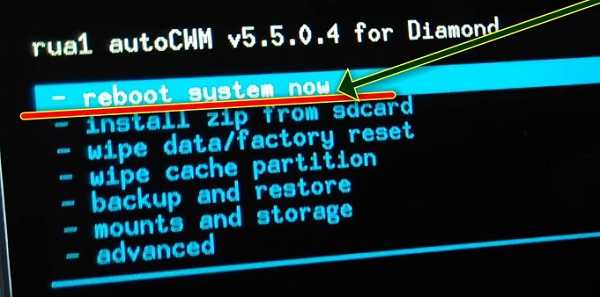
Все. Поздравляю. Вы только что откатили версию андроид 11 до предыдущей 10.
Источник


