- How to downgrade your iPhone from iOS 14 back to iOS 13
- Jump to:
- How to put your iPhone or iPad into recovery mode
- How to downgrade to an older version of iOS on your iPhone or iPad
- How to restore your archived iOS backup to your iPhone or iPad
- How to Downgrade iOS 14 on iPhone? [Top 3 Ways]
- Things You Need to Know before Downgrading
- Way 1: How to Downgrade from iOS 14 to an Older Version via the Recovery Mode
- Way 2: How to Downgrade from iOS 14 to iOS 13 Using IPSW File without Data Loss (Suppose It Is Still Being Signed)
- Way 3: How to Downgrade iOS 14 Beta to iOS 13 without Computer
- Lost Data After Downgrading iOS 14 on your iPhone?
- Final Words
- How to Go Back to a Previous Version of iOS on an iPhone
How to downgrade your iPhone from iOS 14 back to iOS 13
If you overly-excitedly updated to iOS 14 and are now faced with regret (you should have read our guide to everything you need to know about iOS 14), you can always downgrade your iPhone from the beta or public release back to iOS 13. All you need is an archived backup of your device from prior to installing the beta of iOS 14 on your Mac or Windows PC, and to follow the steps below!
Note: If you’re reading this article on the iPhone you want to revert, either print it out first or open it on another iPhone, iPad, or computer so that you can read along as you go.
Jump to:
Remember to make sure you have an archived copy of the previous version of iOS so you don’t have to start from scratch when you downgrade your iPhone from the beta or public release.
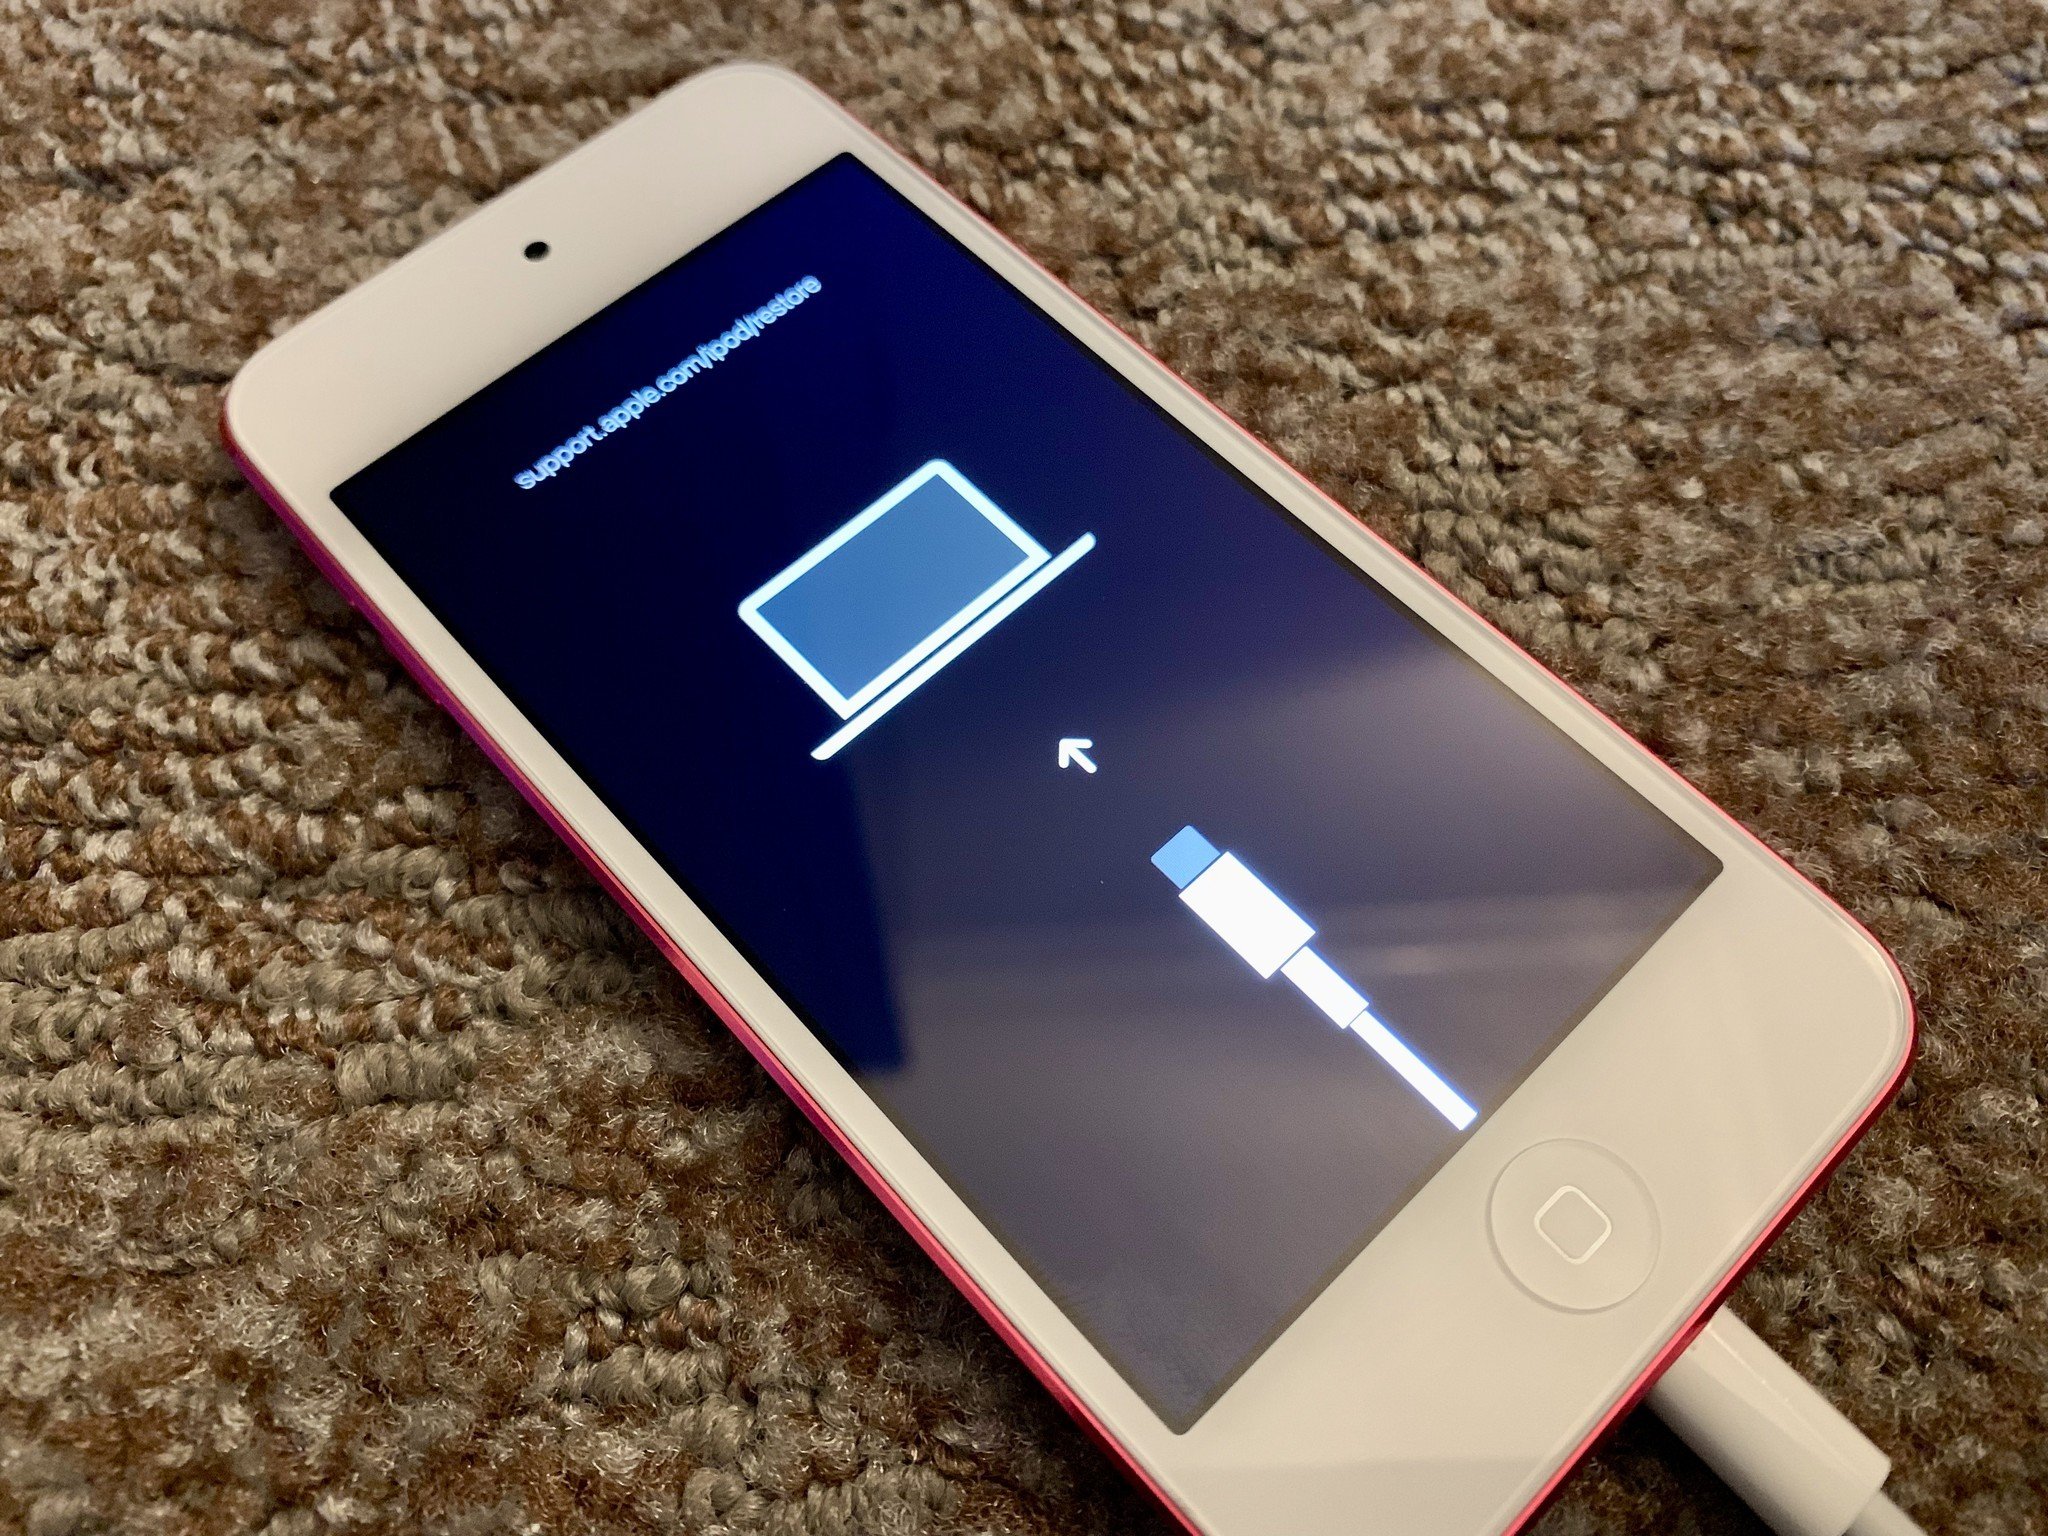
How to put your iPhone or iPad into recovery mode
There’s no button tap to revert your device back to the standard version of iOS. So, to get started, you’ll need to put your iPhone, iPad, or iPod touch into Recovery Mode.
Turn off your iPhone, iPad, or iPod touch following the steps below for your device:
- On iPhone and iPad devices with Face ID, Press and hold the Side button and either volume button until Slide to Power Off appears, and then drag your finger across the slider.
- On iPhone 8 and iPhone 8 Plus, hold down the Side button until Slide to Power Off appears, and then drag your finger across the slider.
- On iPhone 7, and older, all iPads with a Home button, and all iPod touch models, press and hold either the Side or Top button until Slide to Power Off appears, and then drag your finger across the slider.
Press the series of buttons related to your device, in order, to trigger Recovery Mode:
- On iPhone iPad devices with Face ID, press and hold the Side button until you see the Recovery Mode icon.
- On iPhone 8 and iPhone 8 Plus, press and hold the Side button until you see the Recovery Mode icon.
- On iPhone 7, iPhone 7 Plus, and iPod touch (7th Gen), press and hold the Volume Down button until you see the Recovery Mode icon.
- On an iPhone 6s and older, all iPads with a Home button, and iPod touch (6th Gen) and older: Press and hold the Home button until you see the Recovery Mode icon.
If for some reason, Recovery Mode doesn’t trigger to let you downgrade your iPhone from a beta or public release, you can also try putting your iPhone or iPad into DFU mode. Device Firmware Update mode is a little trickier to get into, but will often force a restore even when nothing else works.
How to downgrade to an older version of iOS on your iPhone or iPad
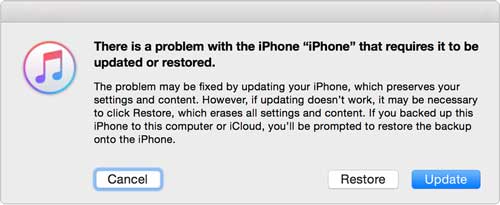
If Finder on your Mac or iTunes on your Windows PC doesn’t launch automatically, launch it manually. iTunes will detect your device in recovery mode and ask you what you want to do.
Note: in macOS Mojave and older, your device will connect to iTunes instead of Finder.
- Click Restore on the Finder popup.
- Click Restore and Update to confirm.

Click Next on the iOS 13 Software Updater.
Click Agree to accept the Terms and Conditions and start downloading iOS 13.
If your device reboots to iOS 14 before the download is complete, simply repeat the steps above and put it back into Recovery Mode. Once the download is complete, your iPhone, iPad, or iPod touch will be restored to the older version of iOS.
How to restore your archived iOS backup to your iPhone or iPad
Once your device is restored, it’ll have a clean copy of the latest standard version of iOS. To get your data back, you’ll need to restore from a previous backup. If you’ve been running the newest software for more than a day, your standard iCloud or iTunes backup will likely be based on that software release and may not restore properly to a device running the older version of iOS. That’s where the archived backup you made prior to installing the new software comes in. (You did make a backup, right?)
- Select Restore from this backup in iTunes (or Finder in macOS Catalina).
- Choose the archived backup you made before installing the beta software update.
Once the restore is completed, your iPhone or iPad should be back to where it was before you installed the new software. If you’ve made any major changes since then, and they don’t sync back some other way, you may have to repeat them to get back to exactly where you were before downgrading.
If you are fed up with your iPhone’s performance because it’s so dang old, we have some advice for how you can pick the best iPhone for your needs.
If you run into any trouble or have any questions, ask away in the comments!
Updated Sept. 2020: Updated for iOS 14.
Источник
How to Downgrade iOS 14 on iPhone? [Top 3 Ways]

Many people installed iOS 14 to have a taste of the new features. However, some bugs appear after installing the iOS 14, which affect users’ experience, for example, incompatibility of some apps, poor battery life, system crashes, etc. If you are having issues after installing iOS 14, you may now wonder how to downgrade from iOS 14 to iOS 13. Read along to learn what to do.
Things You Need to Know before Downgrading
Before you start to downgrade iOS 14, there are a few things you need to know.
Can I downgrade from iOS 14 to iOS 13?
Sadly, Apple stopped signing iOS 13, which means that iOS 13 is no longer available for downgrading. But the good news is, you can still follow this methods below to downgrade your latest iOS 14 to the previously available version.
Note: Downgrading iOS could cause data loss and you may run into unexpected errors during the process. Please think twice before you take the action.
Things Matter If you want to downgrade iOS 14:
1. You will need a Mac or Windows PC to perform this task. Make sure to have the latest iTunes installed on your Windows PC, or ensure that your Mac runs the latest macOS.
2. If you have installed watchOS7 on your Apple Watch, note that you are unable to use it with your iPhone after downgrading. The watchOS 7 isn’t compatible with iOS 13 and there’s no way to manually downgrade your Apple Watch to an older version.
3. It is to be noted that you are unable to restore the iCloud or iTunes backup created on the latest iOS 14 to a device running an older iOS. So, if you didn’t back up your device before updating to iOS 14, you need to start fresh after downgrading.
4. If you don’t have a previous backup of the older version, here we suggest you back up your iPhone or iPad to PC via Coolmuster iOS Assistant before downgrading to avoid losing important data. It is a secure way to store your files and allows you to restore backups to your device anytime.
Way 1: How to Downgrade from iOS 14 to an Older Version via the Recovery Mode
To uninstall iOS 14 immediately, you need to erase and restore your device, here’s how:
Step 1: Open iTunes on your computer or Finder if you are using Mac.
Step 2: Connect your device to your computer with a USB cable.
Step 3: Put your device into Recovery Mode by following the instructions below:
> For iPad with Face ID: Press and quickly release the Volume Up button. Then press and quickly release the Volume Down button. Next, press and hold the Top button until your iPad restarts. Keep holding the Top button until your device enters into the Recovery Mode.
> For iPhone X/8/8 Plus or later: Press and quickly release the Volume Up button. Then press and quickly release the Volume Down button. Finally, hold down the Side button until you see the Recovery Mode screen.
> For iPhone 7/7 Plus or iPod Touch (7th generation): Press and hold the Sleep/Wake and Volume Down buttons simultaneously. Do not release either button when you see the Apple logo on the screen. Keep holding down both buttons until the Recovery Mode screen shows up.
> For iPhone 6s or earlier, iPod touch (6th generation or earlier), or iPad with Home button: Press and hold the Sleep/Wake and Home buttons simultaneously. Do not release the button when you see the Apple logo on screen. Continue to hold down both buttons until the Recovery Mode screen appears.
Step 4: Click the Restore button when a prompt shows up on your computer. iTunes will erase data on your device and install the current non-beta version of iOS on your device. Wait for a while till the restore process is complete.
Step 5: If asked, please enter your Apple ID and password. This will disable Activation Lock on your device.
Step 6: Once the restore process is complete, you can set up your device with your archived backup. Again, note that you can not restore the iCloud or iTunes backup created on the latest iOS 14 to a device running an older iOS.
Way 2: How to Downgrade from iOS 14 to iOS 13 Using IPSW File without Data Loss (Suppose It Is Still Being Signed)
Using this method, your device won’t be wiped out, your files will be retained after the process. However, it is possible to come across some issues during the process and be warned that if the downloading fails or interrupted, your device may be unusable.
Updated: Apple stopped signing iOS 13 and unsigned IPSWs cannot currently be restored via iTunes. But you can follow this method to downgrade from iOS 14 to a older version as long as it is signed by Apple.
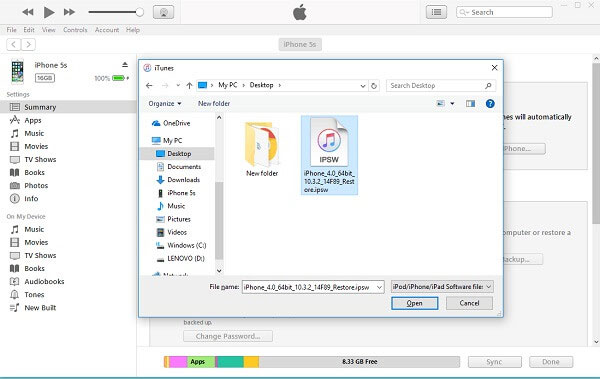
Step 1: Download the latest IPSW file for your device from here.
Step 2: Go to Settings > iCloud and then turn off the Find My iPhone feature on your device.
Step 3: Launch the latest iTunes on your computer (or open the Finder if you are using Mac) and connect your device to computer with a USB cable.
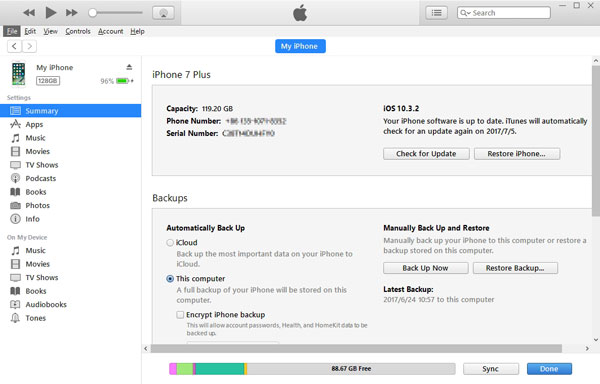
Step 4: Once iTunes detects your device, click the Device icon in iTunes and then click Summary option.
Step 5: Press the Shift key on your PC (or Option key on Mac) and click Check for Update on iTunes.
Step 6: Go to the previously downloaded IPSW file and click Open to install it on your iPhone or iPad. Click Update to confirm when you get a pop-up window. After installing the file, you will be downgraded to iOS 13 as you wish.
NOTE: Do not interrupt the process, otherwise you may lose data or your device may be unusable.
Step 7: If you have an iTunes backup, click Restore Backup option and select a backup in iTunes. Make sure it’s the correct backup of the previous iOS.
Way 3: How to Downgrade iOS 14 Beta to iOS 13 without Computer
It is possible to downgrade iOS 14 when it is still a beta version. And the operation is simple. That is to delete the beta profile and then wait for the new iOS 13 update. But you’ll need to continue using iOS 14 until a new version iOS 13 is available.
Here’s what to do:
Step 1: Open the Settings app on your iDevice.
Step 2: Tap General > Profiles & Device Management.
Step 3: Tap iOS Beta Software Profile > Remove Profile.
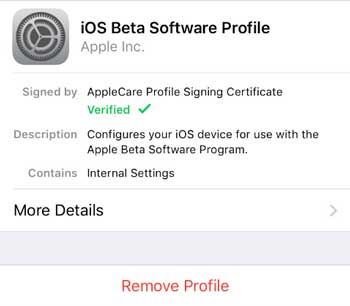
Step 4: Restart your device.
After deleting the beta profile, you will get the next public non-beta release. And when the newer version of iOS 13 is available, you can install it on your device. To do this, go to Settings > General > Software Update.
Learn more:
Your iPhone gets stuck on preparing update? Don’t fret. Here are 9 useful tips that can solve this issue.
Lost Data After Downgrading iOS 14 on your iPhone?
What to do if you lost data after downgrading from iOS 14? Don’t worry, you can use Coolmuster iOS Data Rescuer to easily recover data on iPhone, iPad or iPod touch no matter you have a backup or not.
Free download and install the right version of this software on your computer, and see how to recover lost data after iOS 14 update/downgrade >>


Final Words
That’s all for the methods on how to remove iOS 14. And it would be easier to get the job done if you are running an iOS 14 beta. After reading this post, we hope you can successfully downgrade from iOS 14 and run a smooth and stable iOS on your device.
Which method worked for you? Let us know in the comment section below.
Источник
How to Go Back to a Previous Version of iOS on an iPhone
This article was written by Luigi Oppido and by wikiHow staff writer, Nicole Levine. Luigi Oppido is the Owner and Operator of Pleasure Point Computers in Santa Cruz, California. Luigi has over 25 years of experience in general computer repair, data recovery, virus removal, and upgrades. He is also the host of the Computer Man Show! broadcasted on KSQD covering central California for over two years.
The wikiHow Tech Team also followed the article’s instructions and verified that they work.
This article has been viewed 105,161 times.
This wikiHow teaches you how to downgrade iOS on your iPhone using iTunes on your Windows PC or Finder on your Mac. Before you restore a previous version of iOS, it’s important that you back up your data to iCloud or your computer in case anything goes wrong.


Luigi Oppido
Computer & Tech Specialist Expert Interview. 24 March 2021 Backing up your iPhone ensures you won’t lose any of your data such as your photos, contacts, and installed apps.
- You will be prompted to restore your backup during the setup process.
Источник


