- How to Download Photos from Google Photos
- Download Photos on Android/iOS Devices
- Download Photos on Desktop
- Downloading Multiple Photos from Google Photos
- Downloading from Google Photos
- 4 Ways to Transfer Photos from Android to Android
- Part 1: How to transfer photos from Android to Android using MobileTrans?
- MobileTrans — Phone Transfer
- Part 2: How to transfer photos from Android to Android using Bluetooth?
- Part 3: How to transfer photos from Android to Android using Android Beam
- Part 4: How to transfer photos from Android to Android using dr.fone — Phone Manager (Android)?
- dr.fone — Phone Manager (Android)
How to Download Photos from Google Photos

 Android
- Chromebook
- Mac
- Windows
- Device Missing?
 Android
 Chromebook
 Mac
Mac Windows
Google Photos is one of the world’s most popular photo storage and sharing services. Android phones tend to come with Google Photos pre-installed on the home screen and people often use it instead of the Android-native gallery app.
Still, you may want some photos saved on your actual device. Downloading photos and videos from Google Photos is entirely possible and rather straightforward. Here’s how to do it.
Download Photos on Android/iOS Devices
Here’s how to download photos from Google Photos on your Android/iOS phone or tablet. First of all, you need to make sure that the Google Photos app is installed on the device. If not, go to Google Play/App Store and download it. Once downloaded and installed, tap the app’s icon to use it. If you’re prompted to log in, use your Google credentials to do it.

Once in Google Photos, find the photo/video that you wish to save and select it. Then, tap the three-dot icon and select Save to device or Download from the menu. This will save the photo/video on your Android/iOS phone or tablet.


Download Photos on Desktop
Downloading photos and videos to the computer is a very common thing. You might want to edit the videos, backup the files, and so on. The approach here is somewhat different from mobile/tablet versions of the Google Photos app. In fact, you won’t even use the app but just the website.

Go to photos.google.com and select the photo that you want to save. Open it and then navigate to the upper-right corner of the screen, click the three-dot icon and select Download. This will save the photo(s) that you’ve selected to your computer.

Downloading Multiple Photos from Google Photos
Naturally, you can download more than one photo from Google Photos. To do this, simply select multiple photos, whatever device you’re using, navigate to the three-dot icon, click/tap it, and select Download. This will automatically download all the selected photos to your device.

Another way to select and download multiple photos is by selecting them by date. Above each series of photos that you took on a day, you have a date they were taken on. There should be a checkmark that you can select near that date. Selecting that checkmark will automatically check all the photos taken on that particular day. Click the three-dot icon and select Download to save all photos to your device.

Finally, there’s a way to download the entirety of your Google Photos content. Bear in mind that this won’t delete the content from Google Photos; it’s just going to download it to your device.


First, go to this page. You’ll see a list of all your things Google-related. Towards the top of the list, on the right side, select Deselect all. Then, scroll down until you find the Google Photos entry. Alternatively, use the browser search option to find the entry. Then, check the box to the entry’s right. Followed by selecting Next, located at the bottom of the list.

Now, if you wish to export the photos at this time only, leave the Export once option selected. Alternatively, if you want the export to occur every two months for a year, select that option.

Now, select the file type and other settings, and go to Create export. Keep in mind that this export can take for hours, even days, depending on how much content we’re talking about. Once it’s done, you’ll be notified and you’ll be able to download these files.

Downloading from Google Photos
There are multiple ways to download files from Google Photos. Whether you’re doing it from a smartphone, tablet, or a PC, it can definitely be done. You can also download and export multiple photos at once.
Which method did you go with? Did you use the PC, your smartphone, or your tablet? Did you run into any inconvenience? Tell us all about it in the comments below.
Источник
4 Ways to Transfer Photos from Android to Android


“Is there an easy solution to help me? I change to a new android phone and need to transfer all photos from old to new phone.”
You want to share the pictures taken during trips with your friends or family members or you just got a brand new Android device and want to move all your loved photos from the old Android to the new Android device?
If you want to transfer photos from Android to Android, but you don’t know much about Android photo transfer then this is just the article for you. Keep on reading this to know everything related to how to transfer pictures from Android to Android.
Part 1: How to transfer photos from Android to Android using MobileTrans?
MobileTrans is a very handy data transfer software that can meet most of your Android needs. With MobileTrans — Phone Transfer, you will be able to transfer photos from Android to Android easily and efficiently.
Besides, you can easily do the data transfer between Android and iOS devices in one click when you need to upgrade to a new device.
Let’s check how to transfer photos from Android to Android with MobileTrans — Phone Transfer.
MobileTrans — Phone Transfer
1-Click Phone to Phone Transfer
- • Easy, fast and safe.
- • Transfer photos, text messages, contacts, notes, and many other file types.
- • Move data between devices with different operating systems, i.e iOS to Android.
- • Supports iOS devices that run the latest iOS 14
- • Supports over 8000+ Android devices. Works for all models of iPhone, iPad, and iPod.

- Download and install MobileTrans on your computer. Select the «Phone Transfer» module.
![]()
Then connect both your Android phones to the computer. Select Photos from the supported file type list and click on the «Start» button.
![]()
There you go! You have successfully transferred photos from one Android to another Android Device.
![]()
Here is the video tutorial for you:
Part 2: How to transfer photos from Android to Android using Bluetooth?
Another simple way for Android photo transfer is via Bluetooth, and probably this is the only way that works on almost every device presently in usage in this world. You just have to follow the two simple steps to know how to transfer pictures from Android to Android.
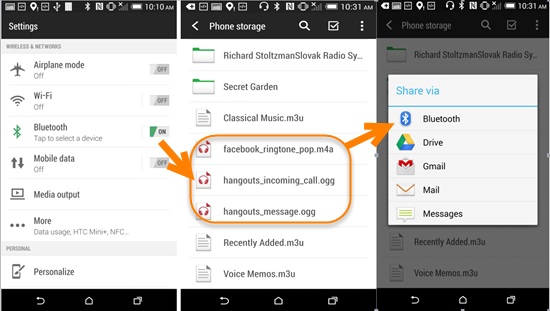
- Turn on the Bluetooth on both android devices and pair Bluetooth with those two devices. Select Bluetooth option that will be available in the settings then turn it вЂon’ on both android devices for file sharing. After that, establish a connection between the two phones to pair them successfully and exchange files.
- Now, share photos between those two android devices.
- When the two smartphones have been successfully paired and connected, open the “File Manager” option on the phone desktop, then select the music that you want to transfer and press it for 2 seconds to share to the destination phone via Bluetooth.
Part 3: How to transfer photos from Android to Android using Android Beam
Android Beam is a software that allows you to send content between devices just by pressing them back-to-back. Android Beam is very ideal for sharing content – web pages, maps, videos, photos, and more – with other people’s Android phones and tablets. Many latest Android phones have integrated NFC hardware under their panel and support Android Beam on them.
Here are the tips on how to transfer photos from Android to Android using Android Beam.
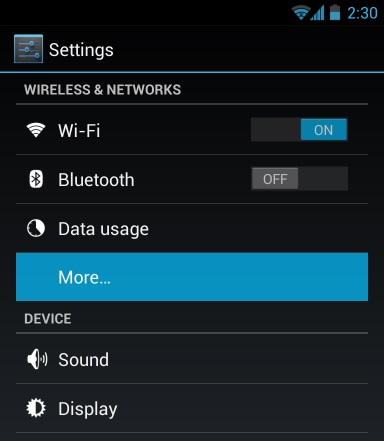
Step 1: Check for NFC Support
- Before you try to transfer photos between two Android devices using Android Beam, you will need to ensure that both your Android devices support NFC. Some Android smartphones support NFC, however, some don’t come with NFC support, so it is necessary to check before you launch this process.
- To check for NFC support, open your device’s Settings screen and tap on “More…” that will be located under Wireless & networks.

Step 2: Open the Content that You Want to Share
Once your device confirms that you have NFC support and you can use Android Beam, you need to navigate to the content that you want to share. For example, here’s how you would share various types of content using this toolkit:
- Web Page: Open it in Chrome (it is always advisable to use chrome for this purpose).
- YouTube Video: Open it in the default YouTube app, pre-download the app on both devices).
- Map Directions or a Location: Open the Google Maps app and pull up the directions or the location that you want to share.
- Contact Information: Open the contact card in the People app on the sender device.
- An App: Open its download page on Google Play Store.
- Photos: Open a photo in the gallery. You can also send multiple photos by opening the default gallery app, you just have to long-press a photo’s thumbnail, and then tap all the other photos you want to send to select them. With the photos selected, you can finally start the beaming process.
Step 3: Beam the Content
- Now, before you can send your content between two devices with Android Beam, they must both be powered on and completely unlocked. If either device screen is off, or if either device is at its lock screen (or is password-encrypted), Android Beam won’t work, and you can’t transfer photos.
- With both devices on and unlocked, press them back-to-back to transfer your music from one Android to Another.
Part 4: How to transfer photos from Android to Android using dr.fone — Phone Manager (Android)?
dr.fone — Phone Manager (Android)
Transfer Photos from Android to Android flexibly and easily.
- • Transfer files between Android and computer, including contacts, photos, music, SMS, and more.
- • Manage, export/import your music, photos, videos, contacts, SMS, Apps, etc.
- • Transfer iTunes to Android (vice versa). • Manage your Android device on the computer.
- • Fully compatible with Android 10.
- Download and install dr.fone — Phone Manager on your computer. Select the «Phone Manager» from all the models.

Connect both your Android phones to the computer. dr.fone will recognize them and display them like below. Select the Android phone which you would like to transfer photos from.
![]()
Go to the Photos tab on the top. It will display all the photos on your source Android phone. Select the photos you would like to transfer and click Export > Export to Device to transfer the selected photos to the target Android phone.
![]()
So, in this article, we discussed how to transfer photos from Android to Android. I would recommend everyone to use the Wondershare toolkit for this process as it is the safest, secure, and easy to use toolkit for Android photo transfer process. They are the best toolkit makers all over the globe. Lastly, I hope that you enjoyed reading this article on how to transfer pictures from Android to Android.
Источник


