- Turn on Sync Library with Apple Music
- Here’s what you need
- Turn on Sync Library
- On your iPhone, iPad, or iPod touch
- On your Mac
- On your PC with iTunes for Windows
- On other devices
- If you don’t subscribe to Apple Music
- Need help?
- Learn more
- If your computer doesn’t recognize your iPhone, iPad, or iPod
- Additional steps for Mac
- If your iPhone, iPad or iPod touch won’t update
- If there’s not enough space to update
- If the download takes a long time
- If you can’t reach the update server or can’t verify the update
- Use iTunes to sync your iPhone, iPad, or iPod with your computer
- What you can sync with iTunes
- Sync or remove content using iTunes
- Sync your content using Wi-Fi
- Move from Android to iPhone, iPad, or iPod touch
- Before you begin
- Tap Move Data from Android
- Open the Move to iOS app
- Wait for a code
- Use the code
- Connect to a temporary Wi-Fi network
- Choose your content and wait
- Set up your iOS device
- Finish up
- If you need help with the transfer
- If you need help after the transfer
Turn on Sync Library with Apple Music
If you subscribe to Apple Music, you can turn on Sync Library to access your music library and music that you’ve downloaded from Apple Music on all of your devices.
Here’s what you need
- Update your iPhone or iPod touch to the latest version of iOS, iPad to the latest version of iPadOS, or Mac to the latest version of macOS. On a PC, make sure that you have the latest version of iTunes for Windows.
- Subscribe to Apple Music or iTunes Match.
- Sign in to all of your devices with the same Apple ID that you use with Apple Music or iTunes Match.
- Connect your devices to the Internet over a Wi-Fi or cellular network. On a Mac or PC, you can also connect to the Internet using Ethernet.
Apple Music availability varies by country and region. Learn what’s available in your country or region.
Turn on Sync Library
With the latest version of iOS, iPadOS, and macOS, Sync Library is turned on by default. If you turned off Sync Library, you can turn it back on. Just follow the steps below for your device.

On your iPhone, iPad, or iPod touch
- Go to Settings > Music.
- Turn on Sync Library. If you don’t subscribe to Apple Music or iTunes Match, you won’t see an option to turn on Sync Library.
If Sync Library is updating or turned off, you’ll see a message at the top of the Library tab in the Apple Music app.
![]()
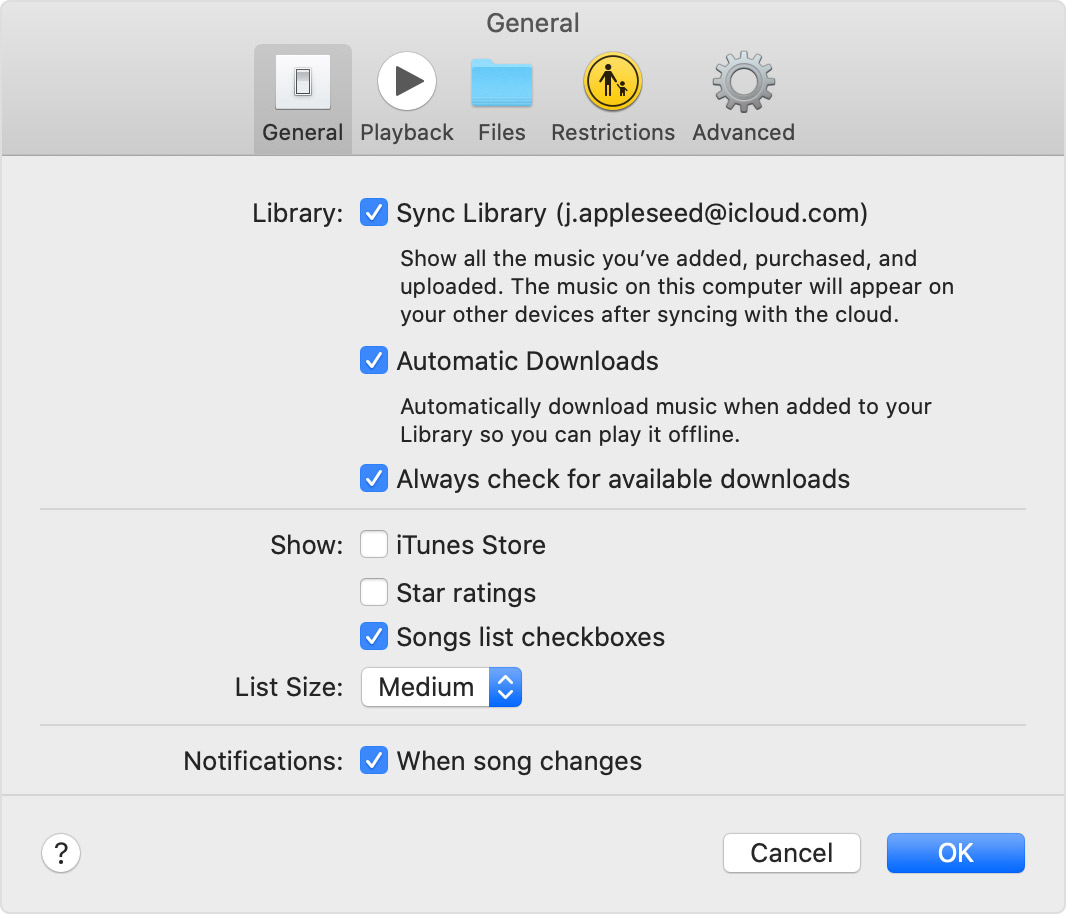
On your Mac
- Open the Apple Music app.
- From the menu bar at the top of your screen, choose Music > Preferences.
- Go to the General tab and select Sync Library to turn it on. If you don’t subscribe to Apple Music or iTunes Match, you won’t see an option to turn on Sync Library.
- Click OK.
If you have a large music library, it might take some time to upload and sync your music library across all of your devices.
On your PC with iTunes for Windows
In iTunes for Windows, iCloud Music Library isn’t turned on by default. To turn on iCloud Music Library:
- Open iTunes.
- From the menu bar at the top of your screen, choose Edit > Preferences.
- Go to the General tab and select iCloud Music Library to turn it on. If you don’t subscribe to Apple Music or iTunes Match, you won’t see an option to turn on iCloud Music Library.
- Click OK.
If you have a large music library, it might take some time to upload and sync your music library across all of your devices.
On other devices
If you subscribe to Apple Music, you can also access your music library — without having to turn on Sync Library — on other devices that support the Apple Music app and on music.apple.com.

If you don’t subscribe to Apple Music
- If you only want to sync your existing music library across all of your devices, and not any music from the Apple Music catalog, you can subscribe to iTunes Match on your computer. iTunes Match lets you access your music library on any Apple device or a PC with iTunes for Windows.
- If you buy music from the iTunes Store, you can redownload your past music purchases on your Apple device or a PC with iTunes for Windows.
- You can also manually sync music from your computer to your iPhone, iPad, or iPod touch.
Need help?
- If you sign out of your Apple ID or cancel your Apple Music or iTunes Match subscription, you won’t be able to access and sync your music library on all of your devices. The original song files will remain on the device that they were uploaded from.
- Apple Music isn’t a back up service. Make sure to back up your iPhone, iPad, iPod touch, Mac, or PC, so that you have a copy of your music and other information in case your device is ever replaced, lost, or damaged.
- You can have up to 100,000 songs in your music library. Songs that you buy from the iTunes Store don’t count against this limit.
- If a song is grayed out, incorrect music plays, or you can’t access your music library, learn what to do.
Learn more
- Learn how to join Apple Music.
- Learn about the icons that you might see next to songs when you turn on Sync Library.
- If Sync Library is turned on, a song that you delete from one device is deleted everywhere.
- Learn what to do if songs in your music library are grayed out.
Information about products not manufactured by Apple, or independent websites not controlled or tested by Apple, is provided without recommendation or endorsement. Apple assumes no responsibility with regard to the selection, performance, or use of third-party websites or products. Apple makes no representations regarding third-party website accuracy or reliability. Contact the vendor for additional information.
Источник
If your computer doesn’t recognize your iPhone, iPad, or iPod
If you connect your device to your computer with a USB cable and your computer doesn’t recognize your iPhone, iPad, or iPod, learn what to do.
If your computer doesn’t recognize your connected device, you might see an unknown error or a «0xE» error. Follow these steps and try to connect your device again after each step.
- Make sure that your iOS or iPadOS device is turned on, unlocked, and on the Home screen.
- Check that you have the latest software on your Mac or Windows PC. If you’re using iTunes, make sure you have the latest version.
- If you see a Trust this Computer alert, unlock your device and tap Trust. If you can’t unlock your device because you forgot your passcode, find out what to do.
- Unplug all USB accessories from your computer except for your device. Try each USB port to see if one works. Then try a different Apple USB cable.*
- Restart your computer.
- Restart your iPhone, iPad, or iPod touch.
- Follow these additional steps for your Mac or Windows PC.
- Try connecting your device to another computer. If you have the same issue on another computer, contact Apple Support.
Additional steps for Mac
- Connect your iOS or iPadOS device and make sure that it’s unlocked and on the Home screen.
- On your Mac, choose Finder > Preferences from the Finder menu bar, then click Sidebar at the top of the preferences window. Make sure that «CDs, DVDs and iOS Devices» is checked.
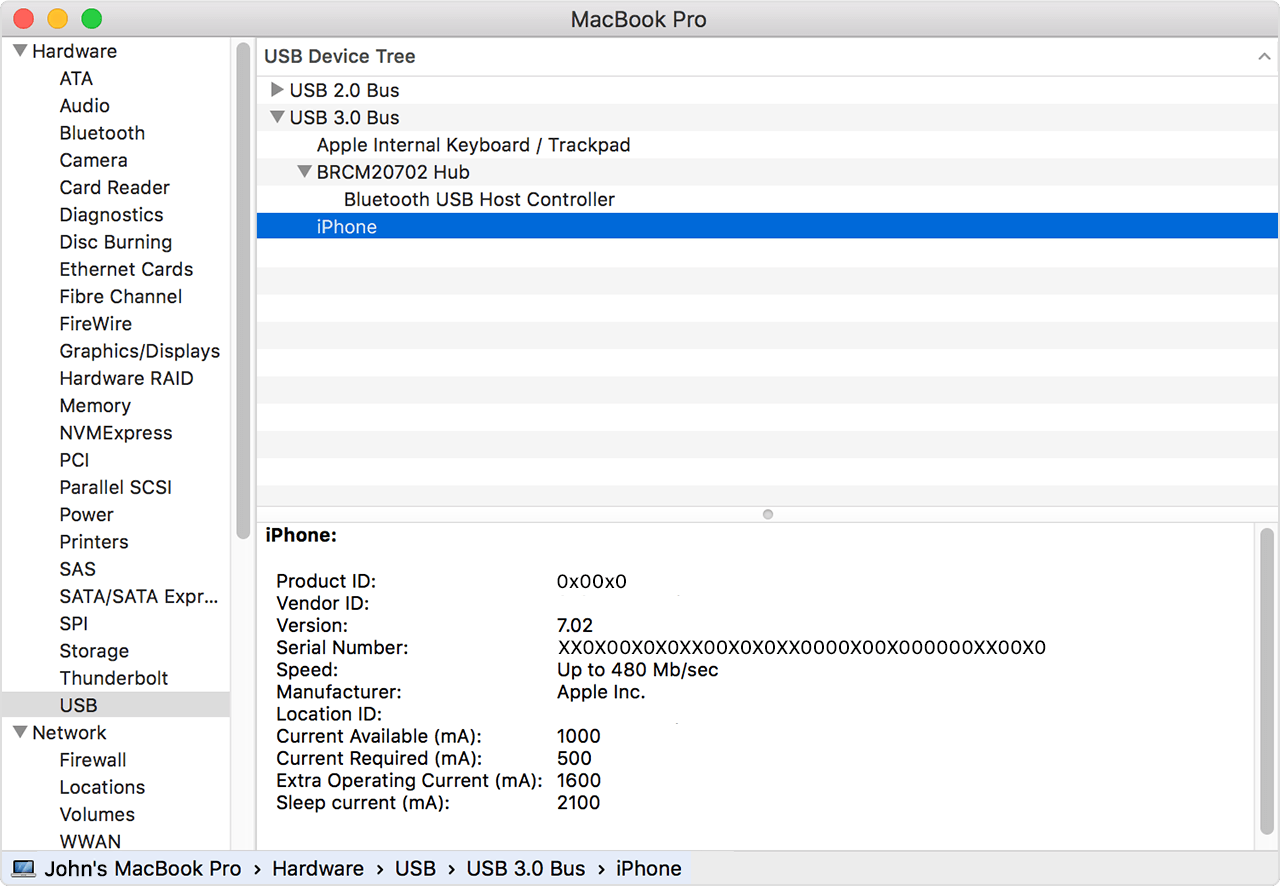
- Press and hold the Option key, then choose System Information from the Apple menu . From the list on the left, select USB.
- If you see your iPhone, iPad, or iPod under USB Device Tree, get the latest macOS or install the latest updates. If you don’t see your device or still need help, contact Apple Support.

Information about products not manufactured by Apple, or independent websites not controlled or tested by Apple, is provided without recommendation or endorsement. Apple assumes no responsibility with regard to the selection, performance, or use of third-party websites or products. Apple makes no representations regarding third-party website accuracy or reliability. Contact the vendor for additional information.
Источник
If your iPhone, iPad or iPod touch won’t update
You might be unable to update your iPhone, iPad, or iPod touch wirelessly—or over the air—for one of these reasons.
- Not enough available storage space on your device
- Downloading the update takes a long time
- Unable to reach the update server
- The update doesn’t complete
If there’s not enough space to update
If there isn’t enough space to download and install an update, the software on your device will try to make space. It will remove only app data that it can download again and doesn’t remove or relocate any of your data. If your device still doesn’t have enough space, you can use your computer to update your device.
If you can’t connect your device to your computer, you can make room for the update by removing content and apps on your device that you don’t use. Go to Settings > General > [Device name] Storage.
If the download takes a long time
You need an Internet connection to update your device. The time it takes to download the update varies according to the size of the update and your Internet speed. You can use your device normally while downloading the update, and your device will notify you when you can install it. To improve the speed of the download, avoid downloading other content and use a Wi-Fi network if you can.
If you can’t reach the update server or can’t verify the update
If you try to update your device, you might see one of these messages:
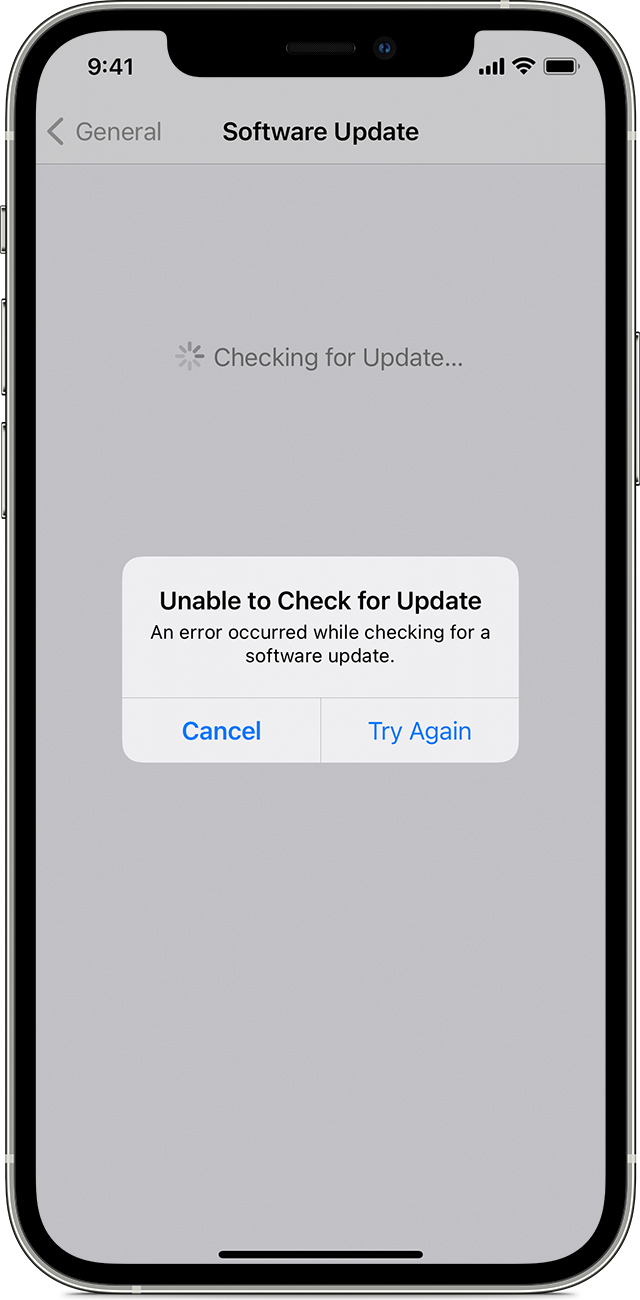
«Unable to Check for Update. An error occurred while checking for a software update.»
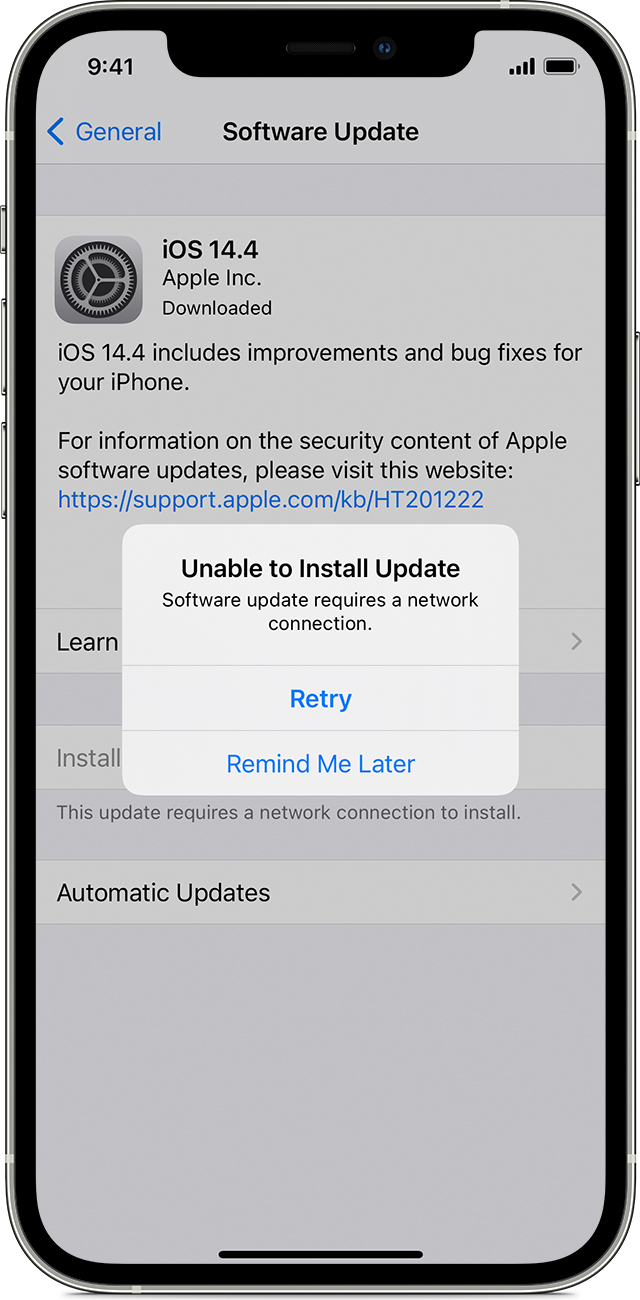
«Unable to Install Update. [Software] update requires a network connection.»
Try updating your device again using the same network. If you still see one of these messages, try updating your device using another network or update your device with your computer. If the issue happens again after trying to update with multiple networks, remove the update.
Источник
Use iTunes to sync your iPhone, iPad, or iPod with your computer
Learn how to sync music, movies, and more using iTunes on your Mac or PC.
If you’re using macOS Mojave or earlier or a Windows PC, use iTunes to sync content to your devices. Before you use iTunes to sync content to your iOS or iPadOS device, consider using iCloud, Apple Music, or similar services to keep content from your Mac or PC in the cloud. This way, you can access your music, photos, and more on your devices when you aren’t near your computer. Learn more about using Apple Music or iCloud Photos instead of iTunes.
If you use iCloud or other services like Apple Music to keep your content up-to-date across all of your devices, some syncing features through iTunes might be turned off.
What you can sync with iTunes
- Albums, songs, playlists, movies, TV shows, podcasts, and audiobooks.
- Photos and videos.
- Contacts and calendars.
iTunes features might vary by country or region.
Sync or remove content using iTunes
- Open iTunes and connect your device to your computer with a USB cable.
- Click the device icon in the upper-left corner of the iTunes window. Learn what to do if you don’t see the icon.
- From the list under Settings on the left side of the iTunes window, click the type of content that you want to sync or remove. * To turn syncing on for a content type, select the checkbox next to Sync.
- Select the checkbox next to each item that you want to sync.
- Click the Apply button in the lower-right corner of the window. If syncing doesn’t start automatically, click the Sync button.


* You can only sync your device with one iTunes library at a time. If you see a message that your device is synced with another iTunes library, your device was previously connected to another computer. If you click «Erase and Sync» in that message, all content of the selected type on your device will be erased and replaced with content from this computer.
Sync your content using Wi-Fi
After you set up syncing with iTunes using USB, you can set up iTunes to sync to your device with Wi-Fi instead of USB.
- Connect your device to your computer with a USB cable, then open iTunes and select your device. Learn what to do if your device doesn’t appear on your computer.
- Click Summary on the left side of the iTunes window.
- Select «Sync with this [device] over Wi-Fi.»
- Click Apply.
When the computer and the device are on the same Wi-Fi network, the device appears in iTunes. The device syncs automatically whenever it’s plugged in to power and iTunes is open on the computer.
Источник
Move from Android to iPhone, iPad, or iPod touch
Ready to transfer to iOS? Download the Move to iOS app to get help switching from your Android device to your new iPhone, iPad, or iPod touch.
If you can’t use the Google Play Store, learn how to download Move to iOS.
Before you begin
- On your Android device, make sure that Wi-Fi is turned on.
- Plug your new iOS device and your Android device into power.
- Make sure that the content you’re moving, including what’s on your external Micro SD card, will fit on your new iOS device
- If you want to transfer your Chrome bookmarks, update to the latest version of Chrome on your Android device.
Tap Move Data from Android
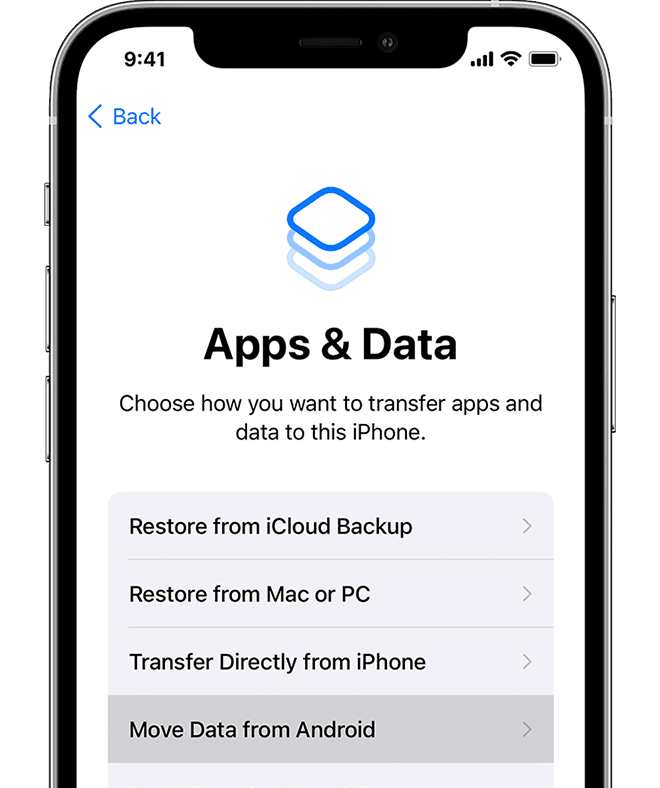
While you set up your new iOS device, look for the Apps & Data screen. Then tap Move Data from Android. (If you already finished setup, you need to erase your iOS device and start over. If you don’t want to erase, just transfer your content manually.)
Open the Move to iOS app
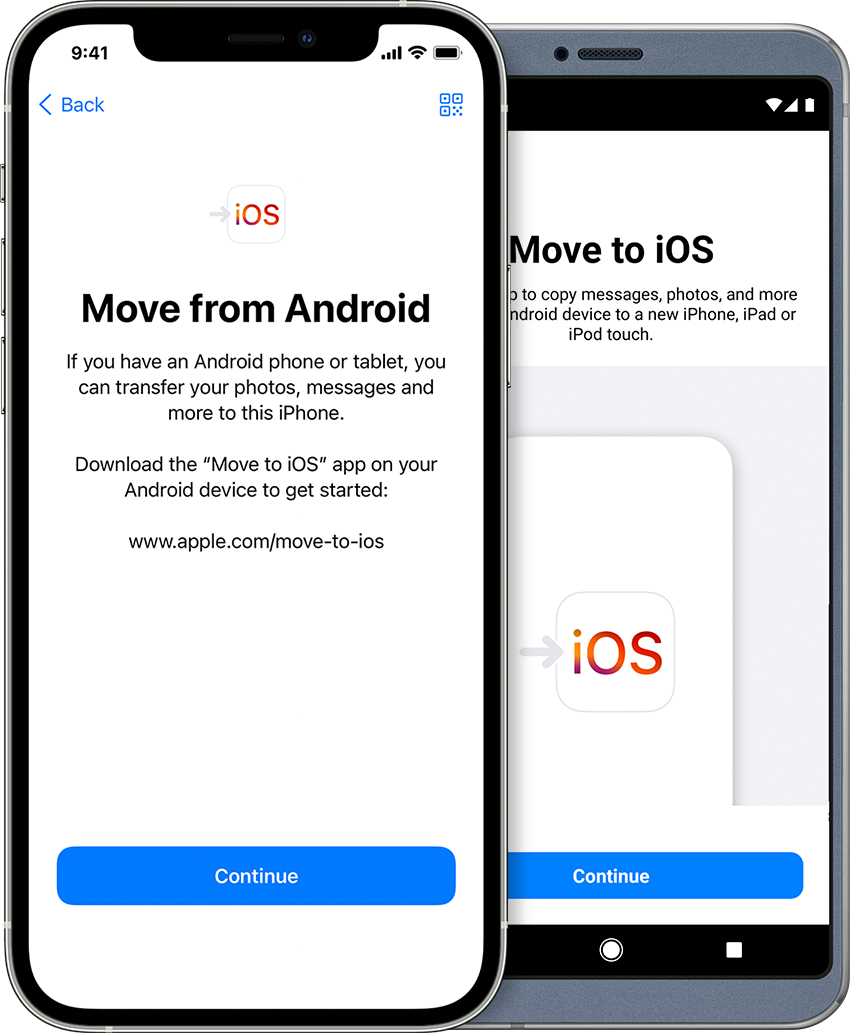
On your Android device, open the Move to iOS app. If you don’t have the Move to iOS app, you can tap the QR code button on your new iOS device and scan the QR code using the camera on your Android device to open the Google Play Store. Tap Continue, and read the terms and conditions that appear. To continue, tap Agree.
Wait for a code
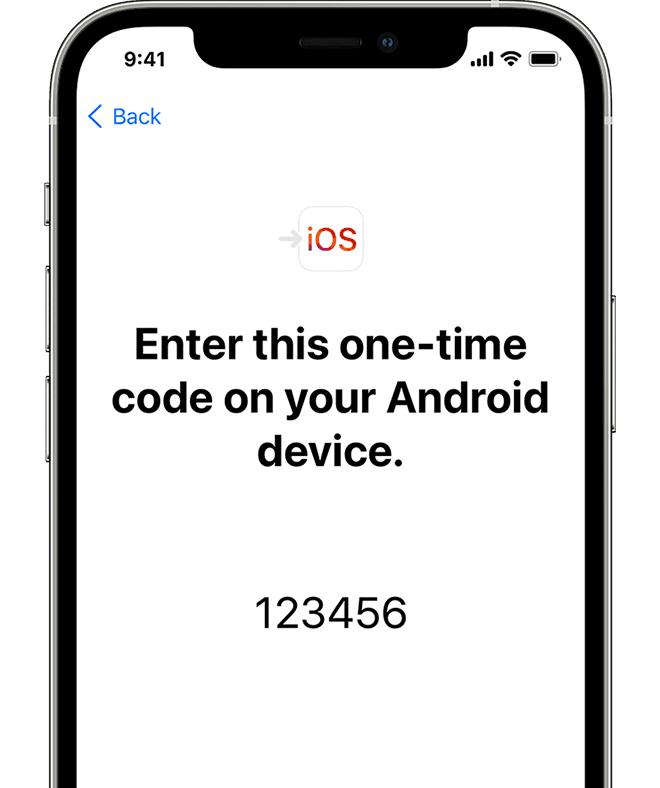
On your iOS device, tap Continue when you see the Move from Android screen. Then wait for a ten-digit or six-digit code to appear. If your Android device shows an alert that you have a weak internet connection, you can ignore the alert.
Use the code
Enter the code on your Android device.
Connect to a temporary Wi-Fi network
Your iOS device will create a temporary Wi-Fi network. When asked, tap Connect to join that network on your Android device. Then wait for the Transfer Data screen to appear.
Choose your content and wait
On your Android device, select the content that you want to transfer and tap Continue. Then—even if your Android device shows that the process is complete—leave both devices alone until the loading bar that appears on your iOS device finishes. The whole transfer can take a while, depending on how much content you’re moving.
Here’s what gets transferred: contacts, message history, camera photos and videos, photo albums, files and folders, accessibility settings, display settings, web bookmarks, mail accounts, and calendars. If they’re available on both Google Play and the App Store, some of your free apps will also transfer. After the transfer completes, you can download any free apps that were matched from the App Store.
Set up your iOS device
After the loading bar finishes on your iOS device, tap Done on your Android device. Then tap Continue on your iOS device and follow the onscreen steps to finish setup for your iOS device.
Finish up
Make sure that all of your content transferred. Music, books, and PDFs need to be moved over manually.
Need to get the apps that were on your Android device? Go to the App Store on your iOS device to download them.
If you need help with the transfer
- Make sure that you leave both devices alone until the transfer finishes. For example, on your Android device, the Move to iOS app should stay onscreen the whole time. If you use another app or get a phone call on your Android before the transfer finishes, your content won’t transfer.
- On your Android device, turn off apps or settings that might affect your Wi-Fi connection, like the Sprint Connections Optimizer or the Smart Network Switch. Then find Wi-Fi in Settings, touch and hold each known network, and forget the network. Then try the transfer again.
- Restart both of your devices and try again.
- On your Android device, turn off your cellular data connection. Then try the transfer again.
If you need help after the transfer
- Get help if Messages doesn’t work as expected after you transfer your content.
- If you don’t see apps from your Android device on your new iOS device, find and download them in the App Store on your new device.
- You might find that only some content transferred and your iOS device ran out of space, or your iOS device might appear full even though the transfer didn’t finish. If so, erase your iOS device and start the transfer again. Make sure that your Android content doesn’t exceed the available space on your iOS device.
Information about products not manufactured by Apple, or independent websites not controlled or tested by Apple, is provided without recommendation or endorsement. Apple assumes no responsibility with regard to the selection, performance, or use of third-party websites or products. Apple makes no representations regarding third-party website accuracy or reliability. Contact the vendor for additional information.
Источник


