- Как установить рингтон на Android
- Установка рингтона на примере Android смартфона Google Nexus
- Установка рингтона на примере Android смартфона от Samsung
- How to add custom ringtones and sounds to your Android phone
- How to find and set ringtones through the Zedge app
- 1. ExpressVPN: The best VPN available right now
- How to manually add a ringtone file to the Ringtones folder
- How to set a custom ringtone in Settings
- How to apply a custom ringtone to a contact
- How to set a custom notification sound in Settings
- Your turn
- VoLTE: How to use it and why you should care
- PlayStation reportedly planning service to compete with Xbox Game Pass
- Here are the first 9 things to do with that Pixel 6 you bought Black Friday
- These Halloween-themed wallpapers are perfect for the season
Как установить рингтон на Android
Когда пользователь впервые сталкивается с смартфоном нового типа, ему нужно быстро разобраться с тем, как пользоваться некоторыми основными функциями. В этой статье мы рассмотрим одну из таких основных функций, а именно установку рингтонов. В этой статье вы узнаете, как установить рингтон на Андроид смартфон со стандартной оболочкой и оболочкой от Samsung.
Установка рингтона на примере Android смартфона Google Nexus
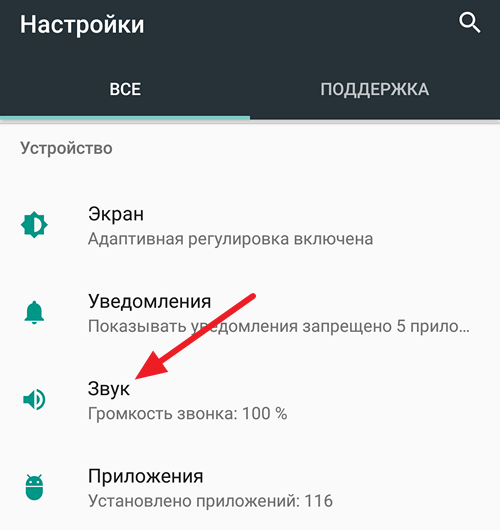
Для начала расскажем, как установить рингтон, если у вас смартфон со стандартной оболочкой Android. Как не сложно догадаться, сначала зайти в настройки Андроида. Для этого откройте верхнюю шторку и нажмите на кнопку с шестеренкой, либо найдите приложение «Настройки» в списке приложений или на рабочем столе. После того, как вы открыли Настройки, вам нужно перейти в раздел «Звук» (группа настроек «Устройство»).
А потом нужно открыть подраздел, который называется «Рингтон».
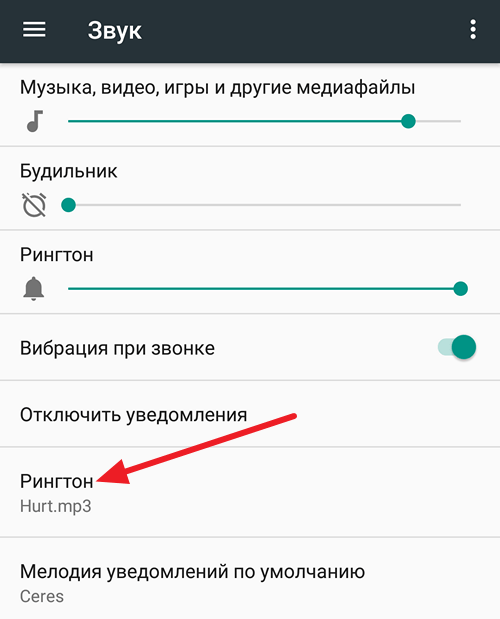
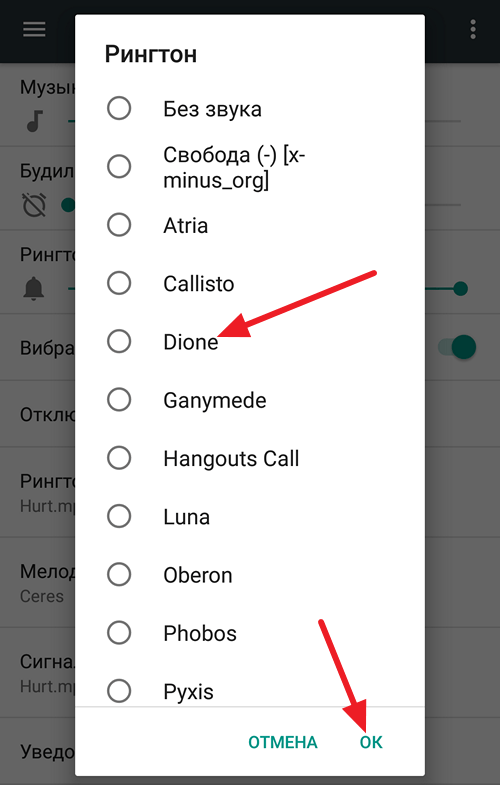
Таким образом вы откроете список рингтонов, которые уже присутствуют в вашем Андроид смартфоне и которые можно использовать. Для того чтобы установить один из этих рингтонов выберите его и нажмите на кнопку «Ок». После этого выбранный рингтон будет установлен в качестве стандартного и будет проигрываться при входящем вызове.
Если вас не устраивают стандартные рингтоны и вы хотите использовать собственную мелодию, то эту мелодию нужно сначала загрузить в память устройства и разместить в папке /media/audio/ringtones/. Это можно сделать по-разному, но проще всего подключить Андроид смартфон к компьютеру с помощью USB кабеля. Этот вариант мы и рассмотрим чуть ниже.
Подключите свой Андроид смартфон к компьютеру с помощью USB кабеля и откройте окно «Мой компьютер». После подключения там должна появиться иконка вашего смартфона. Если такая иконка есть, то просто откройте ее.
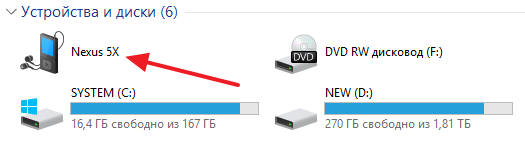
Если иконка смартфона не появилась, то вам нужно изменить режим работы смартфона с USB подключением. Для этого на смартфоне нужно открыть верхнюю шторку, нажать на уведомления о подключении и в открывшемся меню выбрать «Передача файлов».
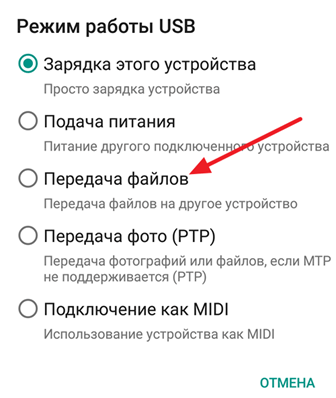
После открытия смартфона на компьютере нужно перейти в раздел «Внутренний накопитель», а потом в папку /media/audio/ringtones/. Если папка /ringtones/ отсутствует то ее можно создать самостоятельно.
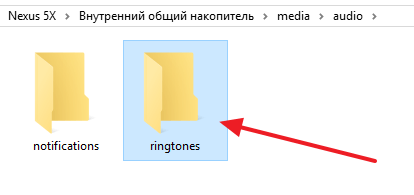
Скопируйте нужные рингтоны в папку /media/audio/ringtones/ и вы сможете установить их на свой смартфон через настройки.
Установка рингтона на примере Android смартфона от Samsung
Если у вас смартфон от компании Samsung, то процесс установки рингтона будет немного проще. Сначала вам нужно открыть приложение «Настройки», а потом перейти в раздел «Звук» (вкладка «Устройство»).

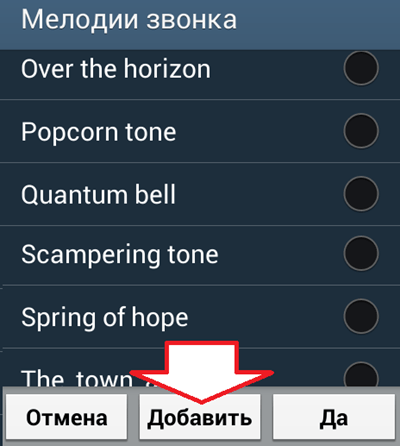
Дальше появится список настроек звука. Здесь нужно перейти в подраздел с названием «Мелодии звонка».

В результате откроеся меню со стандартными рингтонам. Если вам подходит один из стандартных рингтонов, то можете просто его выбрать и нажать на кнопку «Да». Если же вы хотите установить собственный не стандартный рингтон, то вам нужно нажать на кнопку «Добавить».
Дальше откроется файловый менеджер, с помощью которого можно выбрать любой рингтон, который находится в любой папке на смартфоне. Как видите, в случае смартфона от Samsung вам не нужно специально подключать устройство к компьютеру и загружать рингтон в какую-то конкретную папку. Здесь все можно сделать через интерфейс смартфона.
Источник
How to add custom ringtones and sounds to your Android phone
 Source: Ara Wagoner / Android Central
Don’t like your launcher? Pick out a new one from among the best Android launchers. Don’t like your garishly gray keyboard? Change it up! Got the same ringtone as that annoying coworker at the other end of the room? Just don’t like the lame, old sounds that came with your sweet, new phone? No problem! We have options aplenty for Android sounds these days, and once you get the hang of these tools, the world is your ringtone. Whether you need to find that sweet new sound or just need to know how to add a custom ringtone to your Android phone, we have you covered!
Let awesome ring.
How to find and set ringtones through the Zedge app
There’s a lot of places to find ringtones, but far and away, the easiest is Zedge. Zedge is a customization app that looks to personalize your phone in a number of ways, but most notably with its Ringtone and Wallpaper galleries. Zedge even streamlines the process, letting you download and set your ringtone from the same screen! I will admit the ads on Zedge have gotten a bit much over the years, but if you like to change your ringtone every few weeks, you can shell out for the ad-free upgrade.
Browsing the app is a simple affair; you can browse by category or search for something specific. Once you find a ringtone in the app you like, here’s how to set it:
- Tap the Set in the middle of the ringtone’s details screen.
- Tap Set Ringtone.
Tap Allow to allow Zedge to download the ringtone to your phone’s storage.
 Source: Ara Wagoner / Android Central
Tap the back button to return to Zedge.
Source: Ara Wagoner / Android Central
You’ll see a toast notification at the bottom of the screen telling you the ringtone has been applied. If you wish to set a ringtone to a specific contact or as your notification tone, you can select those options from the same Set menu.
![]()
1. ExpressVPN: The best VPN available right now
This is our top pick for anyone looking to get started with a VPN. It offers a great mix of speed, reliability, outstanding customer service, and affordability. There is a 30-day money-back guarantee, so give it a shot today.
How to manually add a ringtone file to the Ringtones folder
If you already have a cool, custom ringtone you just need to add to your phone, then you’ll need a file manager app to get it into the Ringtones folder. Now, some phones have good file managers on them out of the box, but if not, you’ll need to download one from the Google Play Store; for our steps, we’re using Solid Explorer.
- Long-press your custom ringtone in the Downloads folder (or whichever local folder you downloaded it to). After long-pressing the first ringtone, you can tap more ringtones if you wish to copy multiple sounds at once.
- Tap the Copy icon ( two documents stacked on top of each other).
- Swipe in from the left edge of the screen to open the location menu. (If you’re using Android 10 gestures, turn your phone horizontal to get two tabs, the left window will be your source folder, and the right folder you can navigate to the Ringtones folder.)
Tap Internal Memory.
Source: Ara Wagoner / Android Central
Tap Paste.
Source: Ara Wagoner / Android Central
On some phones, the Settings app will see the new ringtones immediately, but if yours doesn’t, reboot the phone. Upon reboot, the new ringtones should appear in the list of available ringtones in the Sounds menu.
How to set a custom ringtone in Settings
- Open Settings.
- Tap the Sounds section. If you don’t see a section with Sound in the title, type «Ringtone» into the search bar at the top of your Settings app.
Tap Phone ringtone.
Source: Ara Wagoner / Android Central
Tap Save or OK. If you do not see these options on your device, simply tap the back button to exit the ringtone picker.
Source: Ara Wagoner / Android Central
If your custom ringtone has been properly set, you will see its name underneath the Phone ringtone.
How to apply a custom ringtone to a contact
By giving each of your most-used contacts a unique ringtone, you can tell who is calling without having to scramble across the room and grab your phone off the charger. This is useful at all times, but especially during work hours, when answering personal calls can earn you a reprimand, but missing a client call could slow down your progress.
- Open Contacts.
- Tap the contact you wish to set a custom ringtone for.
Tap the three-dot menu icon in the top right corner.
Source: Ara Wagoner / Android Central
Tap Save or OK. If you do not see these options on your device, simply tap the back button to exit the ringtone picker.
Source: Ara Wagoner / Android Central
How to set a custom notification sound in Settings
You didn’t settle for a default ringtone, so why would you settle for a default notification tone? If you already have a text tone you like — I have about ten I’ll cycle through myself — you can add them to the Notifications folder just as we added our custom ringtones to the Ringtones folder. From there, the process should seem familiar by now.
- Open Settings.
- Tap Sound. This menu may be named differently depending on your phone, with possible names being Sound and Display, Personalization, etc.
Tap Default notification sound.
Source: Ara Wagoner / Android Central
Tap Save or OK. If you do not see these options on your device, simply tap the back button to exit the sound picker.
Source: Ara Wagoner / Android Central
If your custom notification sound has been properly set, you will see its name underneath the Default notification sound.
Your turn
What awesome custom ringtones are you adding to your Android phone? I’m partial to Disney fireworks music, but Star Wars blaster and lightsaber sounds are pretty fun, too. Share your most outrageous and hilarious ringtones in the comments!
Updated December 2020: We’ve spruced up this guide to keep things as current and clear as possible. Happy ringtone hunting!
We may earn a commission for purchases using our links. Learn more.
![]()
VoLTE: How to use it and why you should care
VoLTE — or Voice over LTE — is the new standard for calling throughout the U.S., Canada, and parts of Europe. Not only does it facilitate much higher call quality between cell phones, but it allows devices to stay connected to LTE while on a call, improving data speeds for everyone.
![]()
PlayStation reportedly planning service to compete with Xbox Game Pass
Sony is planning to create a service similar to Xbox Game Pass, according to a new report. The service could launch as early as sometime in the spring of 2022, with multiple tiers.
![]()
Here are the first 9 things to do with that Pixel 6 you bought Black Friday
Google has made the initial setup of a Pixel relatively painless these days, but that initial tutorial and then installation of all your old apps don’t quite get everything set up perfectly. If you picked up a Pixel 6 or 6 Pro during the insane carrier deals on Cyber Monday or Black Friday, here’s what to do with it first.
![]()
These Halloween-themed wallpapers are perfect for the season
Old wallpapers are sad wallpapers. Get some warm, new, pumpkin-y varieties to celebrate the spooky, yet sweet season we call Halloween.
Источник


