- Mediatek Android MT65xx Preloader Driver Free
- App Information
- Preloader Driver
- How to communicate with your Mobile Phone:
- Mt65xx Preloader USB driver
- Install MediaTek MT65xx USB VCOM Drivers [for Windows all]
- Install MediaTek VCOM Drivers on Windows
- Prerequisites: (Only for Windows 8, Windows 10 or later)
- Steps: to install MediaTek VCOM drivers
- tehnotone.com
- In tone with technology
- SP Flash Tool + MediaTek MT65xx drivers download and installation guide including bricked devices
- Let’s Prepare our bricked MediaTek MT65xx device for a new beginning
- This procedure apples to your MT65xx device if:
- What if our MT65xx device has got the wrong preloader? Here we go…
- This procedure apples to your MT65xx device if:
Mediatek Android MT65xx Preloader Driver Free

App Information
Flashing of a phone is not a beginner’s task; it needs competency and expertise regarding smartphones. If you have to need to flash your phone, our today’s post will shed light on this topic.
Sometimes, while flashing with the SP tool, which is the most popular and used, a tool to flash a mobile phone, there has been an error of not having an Android mt65xx Preloader driver. This driver is the most important factor in flashing a phone with SP tools.
Preloader Driver
Mt65xx Preloader drivers are required to, correctly install on Windows PC where you are flashing your MediaTek chipset or Custom stock of Android ROM.
When you Install the SP tool and connect your MediaTek device with this flashing tool, after connecting, you will see some yellow dots by going in Device manager and checking your drivers. The yellow dots show the deficiency of mt65xx Preloader driver.
How to communicate with your Mobile Phone:
Therefore, to solve the error you need to download mt65xx Preloader driver from our website, as we have given links at the bottom of this post. Download the drivers, extract the drivers on your desktop and run the setup files, as will be mentioned on the files.
When the drivers will be completed installation. You again connect your PC with your Mobile phone via SP tools. Now you will see all that is fine, you have successfully installed the mt65xx Preloader driver in your PC.
One more thing I would like to mention, before installing and downloading any mtk65xx preloader USB Vcom drivers, you need to check either it is 32 bit or 64 bit. You check your windows version and then install the driver.
You can even install the driver by going auto driver option. In this way, you will check your device manager yellow dots, and click on that to update the driver. You need to do this after downloading the mt65xx driver.
When you will click to update your driver, this will lead you to browse where you have stored this driver. You will click on that and this auto driver will detect automatically, hence you will be able to install the driver successfully.
Mt65xx Preloader USB driver
Now connect your Flashing tool with your PC, and do the rest task, like Flashing of your phone, making Backup of your device, and even knowing the software and hardware info of your device. This is the most used and trusted tool to flash your phones.
As I said, we have given links to mt65xx Preloader drivers and SP tools as well. You can tap on the download button to download the file. If you have any further queries, comment down in the comment section area.
Источник
Install MediaTek MT65xx USB VCOM Drivers [for Windows all]


MT65xx Preloader USB drivers are required to be correctly installed on Windows for flashing devices running on MediaTek chipset with custom or stock compatible Android ROM.
For non-techies, flashing, however is another job which is performed by another tool such as for MediaTek devices, SP Flash Tool is most common utility software among consumers. Such tools first need to detect and communicate with the device which is going to be flashed. That’s where most of the beginners fail having successfully connected their devices to the computer so does the flashing tool. If you are a beginner, this tutorial will help you pass connecting your MediaTek powered smartphone successfully .
Note: This tutorial is not for flashing devices but just for making your device ready to be flashed.
Install MediaTek VCOM Drivers on Windows
Note: If you are on 64-bit Windows or Windows 8 or later versions, you will need to disable digital driver signature enforcement as told in prerequisites below. Or otherwise, Windows XP, Vista (32-bit) or Windows 7 (32-bit) users should ignore the prerequisites section and proceed to the steps to install VCOM drivers as there as unsigned drivers installation will be allowed on those PC.
Prerequisites: (Only for Windows 8, Windows 10 or later)
64-bit Windows editions require digitally signed drivers. As many devices ship with unsigned drivers.
Restart computer with Advanced Startup Options
(Windows 8 or later):
- A simple trick is to Shift+Restart– then wait till the computer restarts with advanced startup options. (Usually you need to go through System settings to advanced startup.
- Once restarted with Advanced Startup Options, Choose Troubleshoot > Advanced options > Startup Settings > Restart – (your computer will restart again with a list options)
- Press 7 to initiate a reboot with “Disable driver signature enforcement”.
Windows Vista 64-bit or Windows 7 64-bit:
- You can normal restart your PC and press F8 on the startup. Then you can choose “disable driver signature enforcement“
Windows will now restart and will allow you to install unsigned drivers. You can now perform following steps without any trouble.
Steps: to install MediaTek VCOM drivers
- First of all, download drivers (.zip).
- Extract the downloaded zip file in some folder.
- You can now do one of the following:
- From the extracted zip file, you can run InstallDriver.exe with administrative rights (Run as Administrator) to install the drivers automatically.
- You will be prompted with a security warning to install unsigned drivers; You must accept that and continue with installation by clicking Install Anyway. Otherwise the drivers won’t install.
- After using this step to install driver automatically, you don’t need to continue with following steps as the drivers have been installed.
- OR the recommended way to continue with the following steps to install drivers manually via device manager.
- From the extracted zip file, you can run InstallDriver.exe with administrative rights (Run as Administrator) to install the drivers automatically.
- Open Device Manager – you can open device manager by many ways; one is to Right-click my computer > properties > device manager.
- While in Device Manager, right-click on the top node (PC name) and choose Add legacy hardware
Click to enlarge
» data-medium-file=»https://i0.wp.com/techprolonged.com/wp-content/uploads/2015/03/drive-1.jpg?fit=300%2C177&quality=100&strip=all&ssl=1″ data-large-file=»https://i0.wp.com/techprolonged.com/wp-content/uploads/2015/03/drive-1.jpg?fit=786%2C464&quality=100&strip=all&ssl=1″ loading=»lazy» src=»https://i0.wp.com/techprolonged.com/wp-content/uploads/2015/03/drive-1-786×417.jpg?resize=583%2C309&quality=100&strip=all» alt=»Click to enlarge» width=»583″ height=»309″ srcset=»https://i0.wp.com/techprolonged.com/wp-content/uploads/2015/03/drive-1.jpg?resize=786%2C417&quality=100&strip=all&ssl=1 786w, https://i0.wp.com/techprolonged.com/wp-content/uploads/2015/03/drive-1.jpg?resize=710%2C375&quality=100&strip=all&ssl=1 710w» sizes=»(max-width: 583px) 100vw, 583px» data-recalc-dims=»1″/>
- 2K_XP_COM – for Windows XP and earlier versions
- Vista – for Windows Vista
- Win7 – for Windows 7 and later inc. 8 and 10
You will be prompted with a security warning to install unsigned drivers; You must accept that and continue with installation by clicking Install Anyway. Otherwise the drivers won’t install.
You can comment below and ask about any trouble.
Источник
tehnotone.com
In tone with technology
SP Flash Tool + MediaTek MT65xx drivers download and installation guide including bricked devices
Example of a MediaTek Chipset on a PCB
The following archive contains MTK interface drivers (32 & 64 bit) for Windows XP, Windows Vista, Windows 7 & Windows 8:
Let’s Prepare our bricked MediaTek MT65xx device for a new beginning
This procedure apples to your MT65xx device if:
A. The MT65xx device starts but hangs at manufacturer logo or somewhere else.
B. The MT65xx device restarts continuously after a specific number of seconds.
C. You want to update the MT65xx device with another firmware, or a specific firmware component like “recovery“.
1. Shut down your MT65xx device and wait until it vibrates and all lights are off.
2. Remove the back cover of the device and take out the battery pack from the device.
During the interventions that I’ll describe on this page, every time you connect your MT65xx device to your PC you will need to make sure that it is turned off, or, if it’s possible, it has the battery pack taken out. The procedures described below will work by putting your MT65xx device in Download Mode, a state in which the Flash Memory can be formatted and reprogrammed.
The flash memory holds all the binary information required for the MT65xx device to boot up and function. (The flash memory also contains the internal memory of the device, holding up drivers, applications and other types of data in memory structures like ROM (Read Only Memory) & NVRAM (Non-Volatile Random Access Memory). The flash memory of MT65xx devices with an unlocked boot loader can be reprogrammed in a way that a software (SP Flash Tool – SmartPhone Flash Tool for example) can write data to it between specific points (also known as memory blocks). Example: between 0x0 and 0x600000. These points in memory are contained in a file whose name includes “scatter”, file which must be loaded in the SP Flash Tool. Based on this file, the software will then look for the required components in the same directory in which the “scatter” file resides, listing them afterwards.
If you can not remove the battery from your device (if it’s a tablet for example) you only need to shut down the device in a normal manner, or, if that’s not possible, do a forced shut down by holding down the power button for about 10 seconds, until all lights are off. (I know that my own MediaTek 6589 device – Acer Liquid E2 Duo Dual SIM, has a LED indicator near the top, but other devices for which this guide could apply might not have such an indicator).
3. Extract “MT65xx Drivers” folder from the archive.
4. Open up the Device Manager window on your Windows PC.
5. Connect your device to the PC via the USB cable keeping an eye on the Device Manager window.
The notification LED on the MT65xx device (if there is one) must light up in a deep blue color as soon as you connect it to the PC. If your device was alive before you removed the battery or shut it down (I mean not bricked), In the Device Manager window the unknown device “MT65xx Preloader” should show up.
Normally You’ve only got about 5 seconds to right-click the unknown device in the Device Manager window and then to update the driver. After 5 seconds the MT65xx device will automatically close the communication interface and the “MT65xx Preloader” will be gone until next time you connect your MT65xx device to the PC.
6. Right-click the “MT65xx Preloader” from the Device Manager window and click “Update driver software”. Use the second option to manually install the driver by indicating the driver directory.
7. Browse to the extracted folder “MT65xx Drivers” and select the folder corresponding to the version of Microsoft Windows that you are running. Click “Next” and the driver should now be installing…
The MT65xx device will keep the communication interface alive longer (as long as required) if it detects a data flow from the PC (Example: from SP Flash Tool). That is of course if you got the driver named “MediaTek PreLoader USB VCOM Port (COMx)“ installed and showing up under “Ports (COM & LPT)“ in the Device Manager window, as soon as you connect your device to the PC. This also means that the device driver that you have installed at Step 7 was correctly recognized. In normal circumstances, with the battery pack inside, the Integrated Circuit within the MT65xx device will begin to charge the battery after 5 seconds.
What if our MT65xx device has got the wrong preloader? Here we go…
For the record, I will consider the MT65xx device as being recoverable through this procedure in that case in which there still is an interaction with the Device Manager on the Windows PC when you connect the MT65xx device without the battery pack if possible, via USB and the blue light turns ON (if the notification LED exists).
This procedure apples to your MT65xx device if:
A. The MT65xx device is not starting at all.
B. The MT65xx device is starting/restarting (vibrates) but the screen remains black.
C. The SP Flash Tool reports an error that prevents the successful download of the firmware files to your MT65xx device because your “PRELOADER” firmware component that you are trying to download is bad or corrupt.
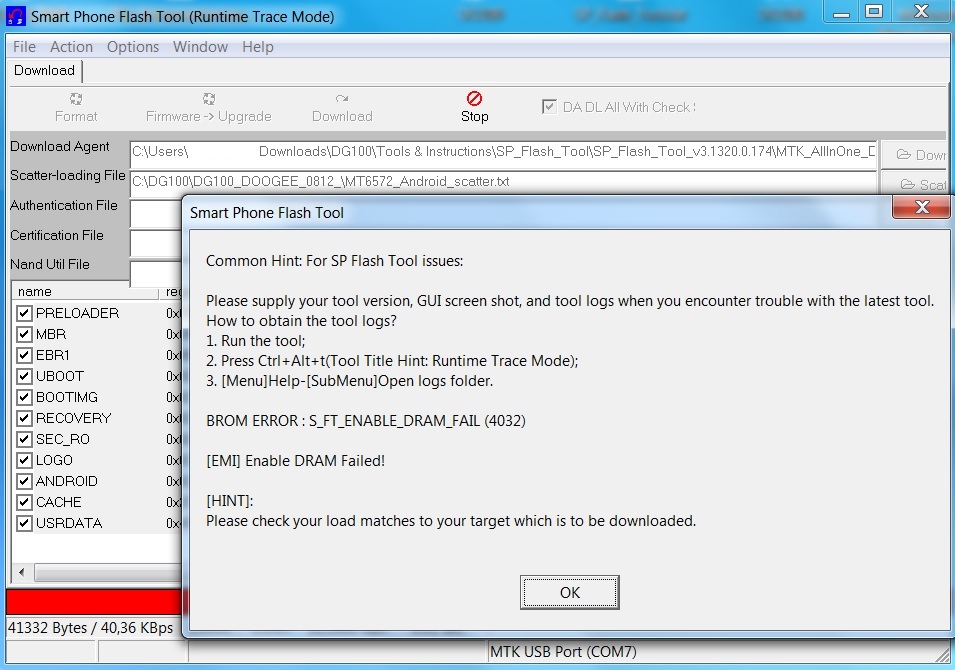
SP Flash Tool Error: BROM ERROR : S_FT_ENABLE_DRAM_FAIL (4032)
A, B and C are cases in which most likely you previously downloaded a bad or corrupt “PRELOADER” firmware component to your MT65xx device via SP Flash Tool. To get the right idea you might want to read below:
There is the situation in which if you download a new firmware to your MT65xx device that has either a bad, incompatible or corrupt “PRELOADER” component. The SP Flash Tool will report the download as being successful but your MT65xx device will not start afterwards and neither will the SP Flash Tool be able to download the firmware components again because the normal “MediaTek PreLoader” communication interface will not start unless the SP Flash Tool will first send a good “PRELOADER” firmware component.
The “PRELOADER” firmware component has the required attributes to allow the MT65xx device to communicate with the PC trough the normal “MediaTek PreLoader” download interface, trough which the SP Flash Tool is capable to send the rest of the firmware components to the Flash Memory of the MT65xx device. If this “PRELOADER” firmware component was previously downloaded to the Flash Memory of the MT65xx device but it was incorrect or corrupt, the MT65xx device will use a special, low-layer interface, to communicate with the PC. This interface is non-removable and is the only interface that allow us to change the “PRELOADER” firmware component if intended.
The SP Flash Tool can also handle this low-layer interface. However, the SP Flash Tool can only use this low-layer download interface to replace the “PRELOADER” component of the firmware. Afterwards, with the correct “PRELOADER” firmware component, the MT65xx device will instantly reinitialize its related Integrated Circuits, switching to the normal “MediaTek PreLoader” download interface that will take in the rest of the firmware components sent by SP Flash Tool. Your device will NOT remain dead if you follow this trough.
This low-layer interface is there to save the device no-matter how worst it got bricked. You only need the right driver to start the recovery process of the Flash Memory. The proper driver for this low-layer download interface is also located in “MT65xx Drivers” folder. The MT65xx device will keep the low-layer download interface alive for about one minute. During this time you need to update or install the driver.
In this case, initially, the PC could show an “Unknown Device” in Device Manager window, then it might automatically install a driver from Windows Update, most likely THE WRONG DRIVER . If this is the case, you must then manually force-update the driver for the low-layer download interface of the MT65xx device.
In my case, Microsoft Windows 7 64 bit wrongly installed the low-layer download interface of my MT65xx device as a “Alcatel Single RNDIS Interface” under “Network adapters“. The device is sometimes with an exclamation mark and it disconnects regularly being unable to start. That was because my PC was set to automatically search for drivers at Windows Update for all the new connected devices, so I expected this to happen. A simple method to avoid this scenario is to disconnect the PC from the internet before connecting the MT65xx device to that PC via USB. Otherwise you might have a hard time finding the device in the Device Manager window. depending upon the exact model of your MT65xx device and the operating system on your PC.
But if the bad has happened I had to right-click the suspicious device, select “Update driver software“, then browse the extracted “MT65xx Drivers” folder. In my case, in which a wrong driver was already installed for the low-layer download interface of my MT65xx device, I had to select the second option, to manually browse for the driver (Select it from a list from my computer) so that I can force-replace the wrong driver found automatically by Windows Update. So you must do if this is the case. Also you might select “Show all devices” from the device type selection window.
I clicked “Have Disk…” and browse to the “MT65xx Drivers” folder where I opened the one corresponding to my operating system, selected MDMCPQ.INF and hit “Open” then “OK“. In the window “MTK USB Port” was now shown as being installed, which is the correct low-layer download interface driver that I wanted to have.
On 64 bit operating systems you might need to confirm the unsigned driver installation and you might also do some settings in order to to allow your 64 bit operating system to use unsigned drivers like the ones provided on this page. My experience with these drivers on Microsoft Windows 7 64 bit was OK.
The point is that, when you connect the device with no battery inside or turned off and the blue light comes on, in the Device Manager Window you must have one of this two devices showing up under “Ports (COM & LPT)“:
1. The low-layer download interface – driver name: MTK USB Port (COMx)
2. The MediaTek PreLoader download interface – driver name: MediaTek PreLoader USB VCOM Port (COMx)
If you have that, you might proceed downloading the correct firmware on your MT65xx device unsing SP Flash Tool. When you recover your MT65xx device from the state in which it has the wrong preloader, you must have both drivers mentioned above ready to establish the download link with your MT65xx device. You can look at the guide at the top side of this article to see how the MT65xx device behaves when it has the correct preloader.
If you have trouble installing a new MTK driver in your system or you see a high or unusual number beside COM Ports displayed in the Device Manager, you might want to clean the USB driver garbage in your system with USBDeview – Download USBDeview for 32 & 64 bit Windows – learn what it does and how to get rid of unwanted USB drivers and COM Port duplicates.
Источник


