- ImageButton Drop Shadows on Android
- Android: Rounded Corners with a Bevel/Drop Shadow
- XML Drawable
- layer-list
- Applying the XML Drawable
- Get posts like this in your inbox.
- Reader Interactions
- Comments
- Android Drop Shadow on View
- Applying box shadows in React Native
- Using React Native shadow props for iOS box shadows
- We made a custom demo for . No really. Click here to check it out .
- Adding the styles.elevation prop for Android
- React Native cross-platform box shadow
- Cross-platform box shadow limitations
- Using react-native-shadow-2
- Conclusion
- LogRocket: Instantly recreate issues in your React Native apps.
- xalexchen / ShadowLayout.java
ImageButton Drop Shadows on Android
This Android platform-specific is used to enable a drop shadow on a ImageButton . It’s consumed in XAML by setting the ImageButton.IsShadowEnabled bindable property to true , along with a number of additional optional bindable properties that control the drop shadow:
Alternatively, it can be consumed from C# using the fluent API:
A drop shadow is drawn as part of the ImageButton background, and the background is only drawn if the BackgroundColor property is set. Therefore, a drop shadow will not be drawn if the ImageButton.BackgroundColor property isn’t set.
The ImageButton.On method specifies that this platform-specific will only run on Android. The ImageButton.SetIsShadowEnabled method, in the Xamarin.Forms.PlatformConfiguration.AndroidSpecific namespace, is used to control whether a drop shadow is enabled on the ImageButton . In addition, the following methods can be invoked to control the drop shadow:
- SetShadowColor – sets the color of the drop shadow. The default color is Color.Default .
- SetShadowOffset – sets the offset of the drop shadow. The offset changes the direction the shadow is cast, and is specified as a Size value. The Size structure values are expressed in device-independent units, with the first value being the distance to the left (negative value) or right (positive value), and the second value being the distance above (negative value) or below (positive value). The default value of this property is (0.0, 0.0), which results in the shadow being cast around every side of the ImageButton .
- SetShadowRadius – sets the blur radius used to render the drop shadow. The default radius value is 10.0.
The state of a drop shadow can be queried by calling the GetIsShadowEnabled , GetShadowColor , GetShadowOffset , and GetShadowRadius methods.
The result is that a drop shadow can be enabled on a ImageButton :
Источник
Android: Rounded Corners with a Bevel/Drop Shadow
posted on August 1, 2011 by Donn Felker
Sometimes in Android you want to add a little depth and personality to your android layouts. A basic layout is rectangle with square corners and is quite ugly. I’m going to show you how to create this:

Notice the bottom part of the screen shot, we have a small bevel/shadow to help create depth in the view. This can be completed with one of two ways.
- A 9 patch image
- XML Drawable
I’m going to show you how to do this with a XML Drawable.
Why not use a 9 patch image? Simple … you’d need many 9 patch images for MDPI, HDPI, and the various other resolutions and folders. Therefore, if you need to update this you’ll need to edit/create many different images in order to update the design. With the XML drawable approach you will only need one file (the one you’re about to create) and the Android system will draw the items on the screen for each resolution. Its much easier to maintain and utilize in the app.
XML Drawable
To create an XML Drawable, create a file with the name of rounded_corners_white.xml in the /res/drawable folder.
In the file fill it in with this code:
layer-list
A layer list is just that, a list of layers that will compose the drawable that Android will draw on the screen. A layer-list contains various layers that you define. They are evaluated from top to bottom. meaning the layer on the bottom will be “on top” (kind of backwards, I know).
The first item is an item that defines the background shadow. What I have defined here is a background grey color with a corner radius the same as the bottom layer. This basically creates the same exact shape as the top, but with a different color. At this point we have a rounded rectangle with rounded corners.
Now for the bottom. The bottom item contains a shape that is a rectangle with rounded corners. Pretty simple. The only difference is this code: android:bottom=”3px”. This code instructs the android platform to offset this layer by 3px on the bottom. Therefore, the grey background will now show from the bottom layer giving the effect that there is a shadow/depth to the layout.
Applying the XML Drawable
To apply the rounded corner to a LinearLayout (or Relative, Frame, etc) you will need to set the XML Drawable to the background property of the layout as shown below.
You’ve now set the background to “@drawable/rounded_corners_white” and when you run the app you will now have rounded corners with a drop shadow/bevel/depth to it.
I’ve added other items to this view (the text views) and background colors so you can see it on your app and so it looks somewhat good.
Get posts like this in your inbox.
Everything I share on my site will get sent out to my email newsletter first. This includes new articles, any things I’m working on, early access and discounts to products/books/ebooks and more. If you want it early, hop on the list below.
What kind of stuff am I going to be sharing?
I will teach you about how to start freelancing and consulting from a software developer perspective, how to work for yourself, increase productivity, find clients and make more as a freelancer/consultant. I’ll also share the lessons I’ve learned in over 20 years in freelancing and consulting that will save you time, money and frustration. I look forward to chatting with you via email.
Reader Interactions
Comments
in my prg i try this but erre acure like.
[2011-08-04 13:19:27 – ract] ActivityManager: Warning: Activity not started, its current task has been brought to the front
[2011-08-04 13:24:36 – ract] Error in an XML file: aborting build.
[2011-08-04 13:25:07 – ract] Error in an XML file: aborting build.
[2011-08-04 13:26:24 – ract] Error in an XML file: aborting build.
Источник
Android Drop Shadow on View
Я сделал большой поиск примеров кода, но ничего не могу найти.
В частности, я хочу добавить тень к png drawable, которую я использую в ImageView. Этот png drawable представляет собой закругленный прямоугольник с прозрачными углами.
Может ли кто-нибудь указать пример кода, как добавить приличную тень для просмотра в коде или в XML?
Вы можете использовать комбинацию Bitmap.extractAlpha и BlurMaskFilter, чтобы вручную создать тень для любого изображения, которое вам нужно отобразить, но это будет работать только в том случае, если ваше изображение загружается или отображается только раз в то время, поскольку процесс дорог.
Псевдокод (может даже компилироваться!):
Затем поместите shadowImage в свой ImageView. Если это изображение никогда не изменяется, но отображается много, вы можете создать его и кэшировать в onCreate, чтобы обойти дорогостоящую обработку изображений.
Даже если это не работает как есть, этого должно быть достаточно, чтобы заставить вас двигаться в правильном направлении.
Для использования теневой тени используйте код ниже
Использовать выше выпадающего для фона вида
Это помогло мне заставить тень работать, поэтому я хотел бы поделиться рабочим кодом:
Для API 21 (5.0) + добавьте android:elevation=»4dp» или android:translationZ=»4dp» чтобы просмотреть описание. Документация

Всегда используйте прозрачную тень, чтобы они могли придерживаться любого цвета.
Источник
Applying box shadows in React Native
July 16, 2021 5 min read 1520

Applying box shadows in a React Native app is not always straightforward. Because developers must build for both Android and iOS platforms, applying consistent box shadows with different platform-specific implementation processes can be tedious.
In this article, we will learn how to implement box shadows in a React Native app across the Android and iOS platforms.
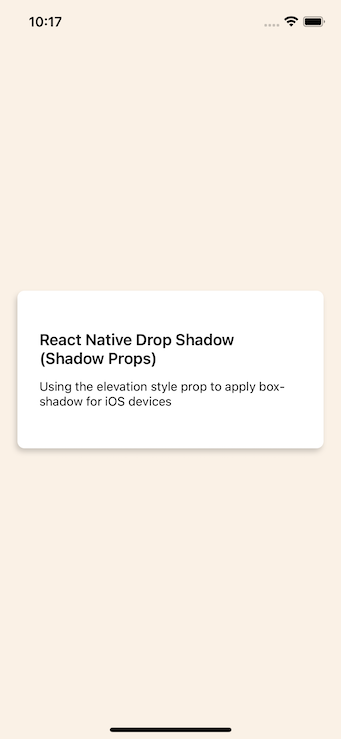
Using React Native shadow props for iOS box shadows
To create shadow boxes for iOS devices, we can use four React Native shadow props.
The first is shadowColor , which determines the box shadow’s color. Note that this is the only shadow prop that works for Android devices.
The second prop, shadowOffset , accepts objects containing width and height properties with a numerical value:
Because it is described by the X and Y offsets relative to the element the box shadow is applied to, the width property determines the X offset of the shadow while the height property determines the Y offset.
Both width and height props can accept positive and negative values.
The third prop is shadowOpacity , which sets the transparency of the box shadow. The prop’s value ranges from 0 to 1 , with 0 representing complete transparency and 1 representing complete opacity.
The fourth prop is shadowRadius , which accepts a number as its value to set the blur radius of the component. The larger the value, the larger the blur, marking the shadow bigger and lighter. This prop does not accept negative values.
Let’s use these props by applying a box shadow to a card component with the following:
We made a custom demo for .
No really. Click here to check it out .
Next, import StyleSheet to apply multiple styles to the card component:
With the code added, the app renders a card with a box shadow.
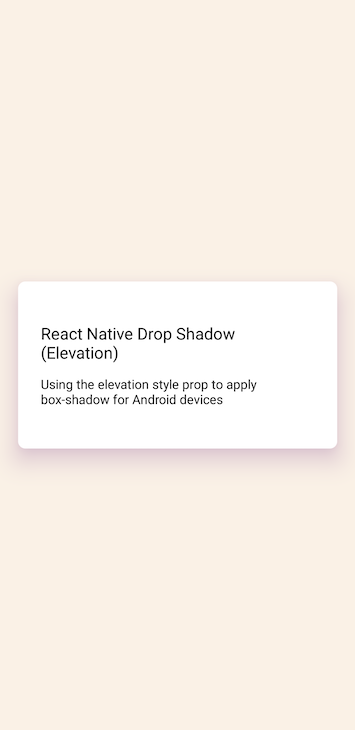
Adding the styles.elevation prop for Android
For adding box shadows in Android, we can use the elevation prop, which uses the Android Elevation API.
To learn how to use a box shadow with this method, let’s apply a box shadow to a card component. Note that the styles.elevation prop only works when it is applied to a component:
Next, import the StyleSheet again to style the card:
By setting the elevation to 20 with a shadowColor , we can apply a box shadow to our Android card component.
Notice there is no control over the blur radius, opacity, and offset of the box shadow; we only have control over the color of the shadow.
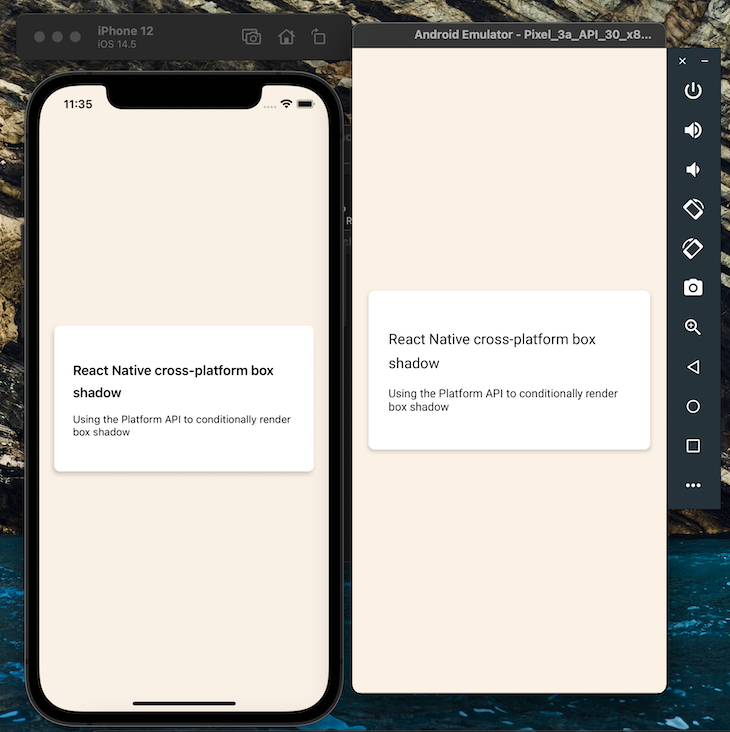
React Native cross-platform box shadow
In this section, we will combine the elevation style props and shadow props to implement box shadows for both Android and iOS devices rather than using two separate processes.
Using the Platform API from React Native, let’s create a function we can later invoke to conditionally render a box shadow for our card component based on a user’s device.
We’ll begin by setting up the card:
Next, under our styles object, let’s create the generateBoxShadowStyle function that applies the box shadow based on a user’s operating system:
With the code we just implemented, our app can now check the user’s device platform and apply the appropriate box shadow props.
Let’s now invoke the generateBoxShadowStyle function and pass in the value of our shadow and elevation props as arguments:
It then renders the following to both platforms:
Cross-platform box shadow limitations
While we applied a standard box shadow, there are use cases when we may need full control of the box shadow’s offset, opacity, and blur radius. This can include:
- Applying a box shadow to a or
Once the installation completes, re-sync the Android Gradle build toolkit or restart the development server.
Next, we can import the package:
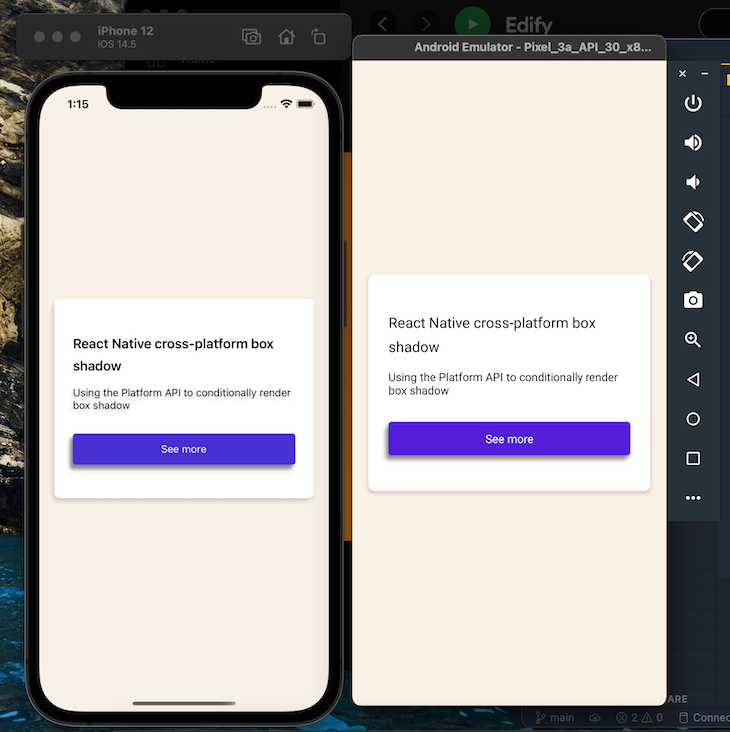
Now, let’s create a custom button using the
Using react-native-shadow-2
The react-native-shadow-2 package is an improved version of react-native-shadow by providing more functionalities, Typescript support, and written from scratch to reduce dependencies that affect performance.
Unlike implementing a drop shadow with react-native-drop-shadow , which creates a bitmap representation of its child components, react-native-shadow-2 uses the react-native-svg shadow plugin for consistent implementation across the Android and iOS platforms.
To get started, install both of these packages in the project directory root:
To ensure this runs on iOS, CD into the ios directory and run pod install to sync the packages we just installed:
The code produces the following:
Conclusion
The major problem with shadow props in React Native is that they cannot be used in Android applications.
However, by using react-native-drop-shadow and react-native-shadow-2 , we can easily implement consistent box shadows into our React Native apps for both Android and iOS platforms.
The full code used in this tutorial is available on GitHub. Feel free to drop a comment to let me know what you thought of this article. You can also find me on Twitter and GitHub. Thank you for reading!
LogRocket: Instantly recreate issues in your React Native apps.

LogRocket is a React Native monitoring solution that helps you reproduce issues instantly, prioritize bugs, and understand performance in your React Native apps.
LogRocket also helps you increase conversion rates and product usage by showing you exactly how users are interacting with your app. LogRocket’s product analytics features surface the reasons why users don’t complete a particular flow or don’t adopt a new feature.
Start proactively monitoring your React Native apps — try LogRocket for free.
Источник
xalexchen / ShadowLayout.java
This file contains bidirectional Unicode text that may be interpreted or compiled differently than what appears below. To review, open the file in an editor that reveals hidden Unicode characters. Learn more about bidirectional Unicode characters
| import android.content.Context ; |
| import android.graphics.Bitmap ; |
| import android.graphics.BlurMaskFilter ; |
| import android.graphics.BlurMaskFilter.Blur ; |
| import android.graphics.Canvas ; |
| import android.graphics.Color ; |
| import android.graphics.Paint ; |
| import android.graphics.Paint.Style ; |
| import android.graphics.Rect ; |
| import android.graphics.RectF ; |
| import android.util.AttributeSet ; |
| import android.view.View ; |
| import android.widget.RelativeLayout ; |
| /** |
| * This custom layout paints a drop shadow behind all children. The size and opacity |
| * of the drop shadow is determined by a «depth» factor that can be set and animated. |
| */ |
| public class ShadowLayout extends RelativeLayout < |
| Paint mShadowPaint = new Paint ( Paint . ANTI_ALIAS_FLAG ); |
| float mShadowDepth; |
| Bitmap mShadowBitmap; |
| static final int BLUR_RADIUS = 6 ; |
| static final RectF sShadowRectF = new RectF ( 0 , 0 , 200 , 200 ); |
| static final Rect sShadowRect = new Rect ( 0 , 0 , 200 + 2 * BLUR_RADIUS , 200 + 2 * BLUR_RADIUS ); |
| static RectF tempShadowRectF = new RectF ( 0 , 0 , 0 , 0 ); |
| public ShadowLayout ( Context context , AttributeSet attrs , int defStyle ) < |
| super (context, attrs, defStyle); |
| init(); |
| > |
| public ShadowLayout ( Context context , AttributeSet attrs ) < |
| super (context, attrs); |
| init(); |
| > |
| public ShadowLayout ( Context context ) < |
| super (context); |
| init(); |
| > |
| /** |
| * Called by the constructors — sets up the drawing parameters for the drop shadow. |
| */ |
| private void init () < |
| mShadowPaint . setColor( Color . BLACK ); |
| mShadowPaint . setStyle( Style . FILL ); |
| setWillNotDraw( false ); |
| mShadowBitmap = Bitmap . createBitmap(sShadowRect . width(), |
| sShadowRect . height(), Bitmap . Config . ARGB_8888 ); |
| Canvas c = new Canvas (mShadowBitmap); |
| mShadowPaint . setMaskFilter( new BlurMaskFilter ( BLUR_RADIUS , Blur . NORMAL )); |
| c . translate( BLUR_RADIUS , BLUR_RADIUS ); |
| c . drawRoundRect(sShadowRectF, sShadowRectF . width() / 40 , |
| sShadowRectF . height() / 40 , mShadowPaint); |
| > |
| /** |
| * The «depth» factor determines the offset distance and opacity of the shadow (shadows that |
| * are further away from the source are offset greater and are more translucent). |
| * @param depth |
| */ |
| public void setShadowDepth ( float depth ) < |
| if (depth != mShadowDepth) < |
| mShadowDepth = depth; |
| mShadowPaint . setAlpha(( int ) ( 100 + 150 * ( 1 — mShadowDepth))); |
| invalidate(); // We need to redraw when the shadow attributes change |
| > |
| > |
| /** |
| * Overriding onDraw allows us to draw shadows behind every child of this container. |
| * onDraw() is called to draw a layout’s content before the children are drawn, so the |
| * shadows will be drawn first, behind the children (which is what we want). |
| */ |
| @Override |
| protected void onDraw ( Canvas canvas ) < |
| for ( int i = 0 ; i getChildCount(); ++ i) < |
| View child = getChildAt(i); |
| if (child . getVisibility() != View . VISIBLE || child . getAlpha() == 0 ) < |
| continue ; |
| > |
| int depthFactor = ( int ) ( 80 * mShadowDepth); |
| canvas . save(); |
| canvas . translate(child . getLeft() + depthFactor, |
| child . getTop() + depthFactor); |
| canvas . concat(child . getMatrix()); |
| tempShadowRectF . right = child . getWidth(); |
| tempShadowRectF . bottom = child . getHeight(); |
| canvas . drawBitmap(mShadowBitmap, sShadowRect, tempShadowRectF, mShadowPaint); |
| canvas . restore(); |
| > |
| > |
| > |
You can’t perform that action at this time.
You signed in with another tab or window. Reload to refresh your session. You signed out in another tab or window. Reload to refresh your session.
Источник


