- В Android Q beta 4 заработали динамические обновления системы
- Как устанавливать образы Android с помощью Dynamic System Updates (DSU)
- Behind Dynamic System Updates in Android Q: How Google is using Project Treble to improve future Android releases
- Dynamic System Updates in Android Q
- Requirements for Dynamic System Updates
- Security for Dynamic System Updates
- Installing a GSI
- The reason behind Dynamic System Updates
- Dynamic System Updates
- Kernel requirements
- Partition requirements
- Vendor HAL behavior
- Weaver HAL
- Gatekeeper HAL
- Verify boot
- Rollback protection
- Hardware requirements
- Available frontends
- Launching DSU using adb
- Launching DSU using an app
- One-click DSU loader
- Feature flag
- Vendor host system images on GCE (optional)
- Multiple-partition DSU in ZIP file
- OEM-signed DSU
- DSU JSON descriptor
- Compatibility management
- Revoking DSU keys for security
- DSU procedures
- Generating a new key pair
- Adding the pairing pubkey to the ramdisk
- Generating the AVB pubkey attribute in the JSON descriptor
- Signing a DSU package
- Verifying the DSU package locally
- Making a DSU package
- Customizing the one-click-DSU
В Android Q beta 4 заработали динамические обновления системы
Google только что выпустила Android Q beta 4, и в этом обновлении заработала одна очень занятная функция. В новую бета-версию завезли возможность динамического обновления системы или, как ее называет сама Google, Dynamic System Updates. Новая функция позволит вам временно установить на свой смартфон системный образ или другую версию Android, а затем просто перезагрузить устройство, чтобы вернуться к исходной версии ОС.
Мишааль Рахман (Mishaal Rahman) из издания XDA Developers обнаружил новую функцию, которая призвана облегчить предварительный просмотр новых обновлений. В частности, динамические обновления системы позволят вам временно установить общий системный образ (GSI), предоставленный производителем устройства. GSI по сути является чистой версией Android и используется для проверки совместимости Android на смартфонах.
Google добавляет, что вы также можете установить и другой образ системы Android с помощью этого метода, хотя неясно, означает ли это, что теперь можно таким методом устанавливать любые пользовательские ROM, или только официальные ROM.
Как устанавливать образы Android с помощью Dynamic System Updates (DSU)
Согласно странице Google по этой теме, GSI должен быть подписан Google или производителем вашего устройства. Кроме того, производители должны будут также добавлять возможность динамического обновления системы и со своей стороны. Однако, так как Google и сама является производителем смартфонов, она подтвердила, что новая функция уже доступен на Pixel 3 и Pixel 3 XL.
Хотите опробовать новую функцию и у вас есть Pixel 3/3 XL или другой смартфон, производитель которого совместно с Google подписал необходимый для него GSI? Тогда теперь вам нужно активировать функцию DSU с помощью команды ADB или через Настройки > Система > Параметры разработчика > Feature flags > settings_dynamic_android. Затем вам нужно будет загрузить GSI для вашего устройства и выполнить несколько команд ADB, которые приведены на специальной странице Google, которая посвящена DSU. Если все выполнено успешно, вам будет предложено перезагрузить телефон с новым обновлением.
Не нравится обновление? К счастью, вы можете просто перезагрузить телефон, чтобы отключить его и вернуться к текущему обновлению. Будем надеяться, что Google работает с разработчиками кастомных ROM, чтобы пользователи могли опробовать новые образы, а это должно сэкономить время разработчикам, позволяя им быстро тестировать свои приложения.
Делитесь своим мнением в комментариях под этим материалом и в нашем Telegram-чате.
Источник
Behind Dynamic System Updates in Android Q: How Google is using Project Treble to improve future Android releases
Alongside the release of Android 8.0 Oreo, Google unveiled Project Treble: a major rearchitecting in the way the Android OS framework and the vendor HALs and Linux kernel communicate. Treble is a major initiative designed to reduce Android platform version and security patch fragmentation, and all Android-branded devices launching with Android Pie are required to support Project Treble. OEMs and vendors test Treble compatibility by booting a Generic System Image (GSI)—a pure stock build of Android from AOSP—and passing the Vendor Test Suite (VTS) and Compatibility Test Suite-on-Generic System Image (CTS-on-GSI). The GSI has proven useful in not only allowing software engineers working for OEMs test Treble compatibility, but it has also opened the door for a large custom ROM community on XDA. For the Android Q release, Google wants to make GSIs useful for another group: app developers.
Since the first stable release and source code drop of any given Android platform release usually comes in August, developers who would want to test the next Android release on a real device typically need access to a Google smartphone if they don’t want to wait for the update to reach their own hardware. However, Google worked with OEMs to bring an Android P beta to several devices last year, and they’ve followed up on that this year with an Android Q beta. Alongside an official Android Q beta, Google this year also released an official Q beta GSI so any developer with a Project Treble-compatible device can install the latest Q release without having to wait months for the build to reach their devices. This new way of testing the next Android release gives developers more opportunities, and thus more time, to test their apps against major changes in Android.
Unfortunately, the current method of installing a GSI can be difficult. It requires unlocking the bootloader—which means wiping all user data and/or voiding the warranty—and flashing an image via the fastboot protocol. It’s not a quick and simple process for an app developer to do, if their device even allows for unlocking the bootloader. That’s why, for the past several months, Google has worked on a new way to boot GSIs. Enter a new feature called Dynamic System Update, or DSU.
(This feature was previously developed under the names “Live Image,” “Dynamic Android,” and “Android on Tap,” so don’t be surprised if Google calls it something else in a few weeks or months.)
Dynamic System Updates in Android Q
The goal of the DSU feature is to allow a developer to boot into a GSI without interfering with the current installation. That means the bootloader doesn’t need to be unlocked and the user data doesn’t need to be wiped. The installation process is also greatly simplified as Google has provided a command line interface via ADB and an app that can be controlled via intents. Here’s what it looks like to boot a GSI using DSU:
In this video*, a Google Pixel 3 XL running Android Q beta 3 reboots into a GSI. In this environment, an app developer can install and test their app for Q API compatibility. When they’re done testing, they can simply reboot back into the regular Q beta 3 software on the device. You’re basically dual booting a GSI so you can safely test your app!
*We recorded this video at Google I/O 2019 when DSU wasn’t publicly available yet, so the Q beta 3 build on the filmed Pixel 3 XL was slightly modified by Google to include DSU support. Devices running Q beta 4 and later are eligible to support DSU if they meet the requirements below.
Requirements for Dynamic System Updates
Getting what’s essentially dual booting up and running wasn’t an easy task for Google. Major changes had to be made to the way partitions are managed on the Pixel 3, Google’s testbed for DSU. Thus, the first major requirement for DSU support is that the device supports dynamic partitions. Dynamic partitions involve one real partition of storage that’s divided into resizable logical partitions like system, vendor, odm, oem, product, etc. During the installation of a GSI, space is reserved for new system and userdata partitions by taking unused blocks from the existing userdata partition. Since these new partitions can be several gigabytes in size, DSU support only makes sense with logical partitions otherwise a device would need to permanently reserve several gigabytes of storage space for GSI installations.
Other requirements include a ramdisk, which decides whether to boot to recovery, system, or a logical partition, and a metadata partition to store the metadata of the GSI. In general, the building blocks for DSU support are Android Q launch requirements, according to Project Treble lead Iliyan Malchev. We’re not sure if everything that’s needed to support DSU is an Android Q launch requirement, but we can presume that most if not all devices launching with Android Q can support DSU even if Google does not currently require them to. So far, only the Pixel 3, Pixel 3 XL, Pixel 3a, and Pixel 3a XL have dynamic partitions, and of these devices, only the Pixel 3 and Pixel 3 XL support DSU in Android Q beta 4. Although DSU support isn’t required, Google hopes that OEMs enable the feature anyway because it simplifies securely testing for Treble compatibility. For example, an OEM software engineer can put a GSI on an SD card so they can quickly boot on multiple devices to test Treble compatibility.
Security for Dynamic System Updates
Since DSU introduces essentially a second operating system into the mix, Google needs to make sure that this new installation can’t be tampered with to break the integrity of the device. Thus, the same basic security protections for the original installation are in place for the GSI installation: Android Verified Boot and SELinux policies. Furthermore, only apps with the INSTALL_DYNAMIC_SYSTEM signature|privileged permission can initiate a GSI installation, while apps with the MANAGE_DYNAMIC_SYSTEM signature permission can enable/disable or wipe a GSI installation. This means that only trusted, system-level apps can work with DSU.
To ensure that the original user data is protected, Google has added an extra protection mechanism in Android Q. Called “Checkpoint,” the feature protects against user data destruction by restoring checkpointed partitions to their original state. Checkpoints are useful for not just DSU, though. They’re also used to protect against botched Project Mainline APEX module and A/B OTA updates. (Devices with A/B partitions already have rollback protection, but those rollbacks require factory data resets while user data checkpoints do not.)
Installing a GSI
If your device supports DSU like the Pixel 3 series, then it’s easy to install a GSI. You first have to make sure that the Dynamic System feature flag is enabled through one of two ways:
- If you’re on a userdebug build, enable the settings_dynamic_android flag in Settings > System > Developer options > Feature flags.
- If you’re on a user build, run the following adb shell command:
Then, download the latest Android Q beta GSI from Google or your device’s OEM. (DSU only allows installing GSIs signed by Google or an OEM.) Once downloaded, use simg2img to convert the sparse image to a raw image. Use gzip to pack the raw image, and then copy the resulting archive to a location on your device’s external storage (e.g. /data/media/0/Download) or an actual external storage medium (like a physical SD card). Lastly, launch the DynamicSystemInstallationService app with the right intent to begin installation:
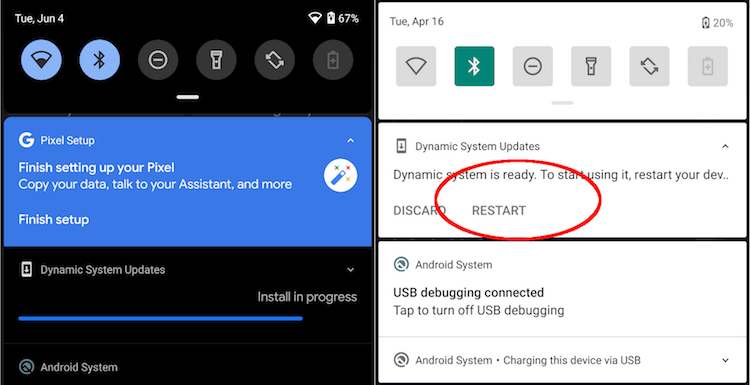
Once you click restart, you’ll boot into the GSI. The usability of the device in the GSI depends on how well your device’s OEM implemented Treble (or rather, how little they violated Treble compatibility.) Some devices will work better with GSIs than others, but in general, don’t expect to use this installation as a daily driver. You’re meant to test your app then get out by rebooting. If you want to stay in the GSI installation for further testing, then you can use the gsi_tool shell command.
The full GSI installation instructions for DSU can be found here. Bugs can be filed on the Google Issue Tracker, Reddit, or Stack Overflow.
The reason behind Dynamic System Updates
When I spoke to Iliyan Malchev at Google I/O, he reiterated what Hung-ying Tyan from the Treble team said about early GSI access at November’s Android Dev Summit. Google made DSU to solicit feedback from as wide an audience as possible. The goal is to improve the quality of the GSI, which in turn improves the quality of the future Android release since a GSI is the purest form of Android. Google is currently the only company that tests next-version GSI compatibility (for example, how well the Android Q system image works on top of the Android P vendor implementation), but as more people flash GSIs and give feedback, OEMs can fix Treble compatibility violations so GSIs will work even better in the future. Iliyan says there’s strong interest from OEMs and vendors like Qualcomm in reusing vendor images from the previous Android release with the next-version system image. Initiatives like DSU help Google and OEMs plug the gap in coverage from automated tests like VTS and CTS-on-GSI. Thus, Google gets more beta testers to give feedback on the next Android release, while also hearing about Treble compatibility violations so OEMs can improve their work.
The addition of Dynamic System Updates in Android Q is welcome, but it’s not going to be the dual boot solution some of you are hoping for. As mentioned previously, only system images signed by Google or OEMs can be installed. When I asked Iliyan about the possibility of extending DSU to support an ecosystem of alternative Android systems, he said that it’s technically possible to do so as DSU is simply a channel to deliver system images. Any OEM can use it however they want so long as the end result is Android compliant. Google hasn’t created an alternative to the OTA system here, and DSU isn’t intended to be used for true dual booting. Regardless, the work that Google has done on Treble is making Android more modular, so I wouldn’t be surprised if native dual booting becomes reality down the road.
Источник
Dynamic System Updates
Dynamic System Updates (DSU) allows you to make an Android system image that users can download from the internet and try out without the risk of corrupting the current system image. This document describes how to support DSU.
Kernel requirements
In addition, DSU relies on the device-mapper-verity (dm-verity) kernel feature to verify the Android system image. So you must enable the following kernel configs:
Partition requirements
Starting in Android 11, DSU requires the /data partition to use the F2FS or ext4 file system. F2FS gives better performance and is recommended, but the difference should be insignificant.
Here are some examples of how long a dynamic system update takes with a Pixel device:
- Using F2FS:
- 109s, 8G user, 867M system, file system type: F2FS: encryption=aes-256-xts:aes-256-cts
- 104s, 8G user, 867M system, file system type: F2FS: encryption=ice
- Using ext4:
- 135s, 8G user, 867M system, file system type: ext4: encryption=aes-256-xts:aes-256-cts
If it takes much longer on your platform, you may want to check if the mount flag contains any flag that makes “sync” write, or you can specify an “async” flag explicitly to get better performance.
The metadata partition (16 MB or larger) is required for storing data related to the installed images. It must be mounted during first stage mount.
The userdata partition must use F2FS or ext4 file system. When using F2FS, include all F2FS related patches available in the Android common kernel.
DSU was developed and tested with kernel/common 4.9. It’s recommended to use kernel 4.9 and higher for this feature.
Vendor HAL behavior
Weaver HAL
The weaver HAL provides a fixed number of slots for storing user keys. The DSU consumes two extra key slots. If an OEM has a weaver HAL, it needs to have enough slots for a generic system image (GSI) and a host image.
Gatekeeper HAL
The Gatekeeper HAL needs to support large USER_ID values, because the GSI offsets UIDs to the HAL by +1000000.
Verify boot
If you want to support booting Developer GSI Images in LOCKED state without disabling verified boot, include Developer GSI keys by adding the following line to the file device/ /device.mk :
Rollback protection
When using DSU, the downloaded Android system image must be newer than the current system image on the device. This is done by comparing the security patch levels in the Android Verified Boot (AVB) AVB property descriptor of both system images: Prop: com.android.build.system.security_patch -> ‘2019-04-05’ .
For devices not using AVB, put the security patch level of the current system image into the kernel cmdline or bootconfig with the bootloader: androidboot.system.security_patch=2019-04-05 .
Hardware requirements
When you launch a DSU instance, two temporary files are allocated:
- A logical partition to store GSI.img (1
1.5 G)
We recommend reserving at least 10 GB of free space before launching a DSU instance. DSU also supports allocation from an SD card. When an SD card is present, it has the highest priority for the allocation. SD card support is critical for lower-powered devices that might not have enough internal storage. When an SD card is present, make sure it’s not adopted. DSU doesn’t support adopted SD cards.
Available frontends
You can launch DSU using adb , an OEM app, or the one-click DSU loader (in Android 11 or higher).
Launching DSU using adb
To launch DSU using adb, enter these commands:
Launching DSU using an app
The main entry point to DSU is the android.os.image.DynamicSystemClient.java API:
You must bundle/preinstall this app on the device. Because DynamicSystemClient is a system API, you can’t build the app with the regular SDK API and you can’t publish it on Google Play. The purpose of this app is:
- Fetch an image list and the corresponding URL with a vendor-defined scheme.
- Match the images in the list against the device and show compatible images for the user to select.
Invoke DynamicSystemClient.start like this:
The URL points to a gzipped, non-sparse, system image file, which you can make with the following commands:
The filename should follow this format:
One-click DSU loader
Android 11 introduces the one-click DSU loader, which is a frontend in the developer settings.

Figure 1. Launching the DSU loader
When the developer clicks the DSU Loader button, it fetches a pre-configured DSU JSON descriptor from the web and displays all applicable images in the floating menu. Select an image to start the DSU installation, and the progress shows on the notification bar.

Figure 2. DSU image installation progress
By default, the DSU loader loads a JSON descriptor that contains the GSI images. The following sections demonstrate how to make OEM-signed DSU packages and load them from the DSU loader.
Feature flag
The DSU feature is under the settings_dynamic_android feature flag. Before using DSU, make sure the corresponding feature flag is enabled.

Figure 3. Enabling the feature flag
The feature flag UI might be unavailable on a device running a user build. In this case, use the adb command instead:
Vendor host system images on GCE (optional)
One of the possible storage locations for the system images is the Google Compute Engine (GCE) bucket. The release administrator uses the GCP storage console to add/delete/change the released system image.
The images must be public access, as shown here:

Figure 4. Public access in GCE
The procedure to make an item public is available in the Google Cloud documentation.
Multiple-partition DSU in ZIP file
Starting in Android 11, DSU can have more than one partition. For example, it can contain a product.img in addition to the system.img . When the device boots, the first stage init detects the installed DSU partitions and replaces the on-device partition temporarily, when the installed DSU is enabled. The DSU package may contain a partition that doesn’t have a corresponding partition on the device.

Figure 5. DSU process with multiple partitions
OEM-signed DSU
To make sure all images running on the device are authorized by the device manufacturer, all images within a DSU package must be signed. For example, assume there’s a DSU package that contains two partition images like below:
Both system.img and product.img must be signed by the OEM key before they are put into the ZIP file. The common practice is to use an asymmetric algorithm, for example, RSA, where the secret key is used to sign the package and the public key is used to verify it. The first stage ramdisk must include the paring public key, for example, /avb/*.avbpubkey . If the device already adopted AVB, the existing signing procedure will suffice. The following sections illustrate the signing process and highlight the placement of the AVB pubkey that is used to verify the images in the DSU package.
DSU JSON descriptor
The DSU JSON descriptor describes DSU packages. It supports two primitives. First, the include primitive includes additional JSON descriptors or redirects the DSU loader to a new location. For example:
Second, the image primitive is used to describe released DSU packages. Inside the image primitive there are several attributes:
The name and details attributes are strings that are shown on the dialog for the user to select.
The cpu_api , vndk , and os_version attributes are used for compatibility checks, which are described in the next section.
The optional pubkey attribute describes the public key that pairs with the secret key that’s used to sign the DSU package. When it’s specified, the DSU service can check if the device has the key used to verify the DSU package. This avoids installing an unrecognized DSU package, for example installing a DSU signed by OEM-A to a device made by OEM-B.
The optional tos attribute points to a text file that describes the terms of service for the corresponding DSU package. When a developer selects a DSU package with the terms of service attribute specified, the dialog box shown in Figure 6 opens, asking the developer to accept the terms of service before installing the DSU package.

Figure 6. Terms of service dialog box
For reference, here’s a DSU JSON descriptor for the GSI:
Compatibility management
Several attributes are used to specify the compatibility between a DSU package and the local device:
cpu_api is a string that describes the device architecture. This attribute is mandatory and is compared with the ro.product.cpu.abi system property. Their values must match exactly.
os_version is an optional integer that specifies an Android release. For example, for Android 10, os_version is 10 and for Android 11, os_version is 11 . When this attribute is specified, it must be equal to or greater than the ro.system.build.version.release system property. This check is used to prevent booting an Android 10 GSI image on an Android 11 vendor device, which is currently not supported. Booting an Android 11 GSI image on an Android 10 device is allowed.
vndk is an optional array that specifies all VNDKs that are included in the DSU package. When it’s specified, the DSU loader checks if the number extracted from the ro.vndk.version system property is included.
Revoking DSU keys for security
In the extremely rare case when the RSA key pair used to sign the DSU images is compromised, the ramdisk should be updated as soon as possible to remove the compromised key. In addition to updating the boot partition, you can block compromised keys using a DSU key revocation list (key blacklist) from an HTTPS URL.
The DSU key revocation list contains a list of revoked AVB public keys. During DSU installation, the public keys inside the DSU images are validated with the revocation list. If the images are found to contain a revoked public key, the DSU installation process stops.
The key revocation list URL should be a HTTPS URL to ensure the security strength, and is specified in a resource string:
The string’s value is https://dl.google.com/developers/android/gsi/gsi-keyblacklist.json , which is a revocation list for Google-released GSI keys. This resource string can be overlayed and customized, so that OEMs who adopt the DSU feature can provide and maintain their own key blacklist. This provides a way for the OEM to block certain public keys without updating the device’s ramdisk image.
The format of the revocation list is:
- public_key is the SHA-1 digest of the revoked key, in the format described in the generating the AVB pubkey section.
- status indicates the revocation status of the key. Currently, the only supported value is REVOKED .
- reason is an optional string describing the reason for revocation.
DSU procedures
This section describes how to perform several DSU configuration procedures.
Generating a new key pair
Use the openssl command to generate an RSA private/public key pair in .pem format (for example, with size 2048 bit):
The private key might not be accessible and is only kept in a hardware security module (HSM). In this case, there might be a x509 public key certificate available after key generation. See the Adding the pairing pubkey to the ramdisk section for instructions to generate the AVB public key from a x509 certificate.
To convert an x509 certificate to PEM format:
Skip this step if the certificate is already a PEM file.
Adding the pairing pubkey to the ramdisk
The oem_cert.avbpubkey must be put under /avb/*.avbpubkey to verify the signed DSU package. First, convert the public key in PEM format to AVB public key format:
Then include the public key in the first stage ramdisk with the following steps.
Add a prebuilt module to copy the avbpubkey . For example, add device/ / /oem_cert.avbpubkey and device/ / /avb/Android.mk with content like this:
Make the droidcore target depend on the added oem_cert.avbpubkey :
Generating the AVB pubkey attribute in the JSON descriptor
The oem_cert.avbpubkey is in the AVB public key binary format. Use SHA-1 to make it readable before putting it into the JSON descriptor:
This will be the content of the pubkey attribute of the JSON descriptor.
Signing a DSU package
Use one of these methods to sign a DSU package:
Method 1: Reuse the artifact made by the original AVB signing process to make a DSU package. An alternative approach is to extract the already signed images from the release package and use the extracted images to make the ZIP file directly.
Method 2: Use the following commands to sign DSU partitions if the private key is available. Each img within a DSU package (the ZIP file) is signed separately:
For more information about adding add_hashtree_footer using avbtool , see Using avbtool.
Verifying the DSU package locally
It’s recommended to verify all local images against the pairing public key with these commands:
The expected output looks like this:
Making a DSU package
The following example makes a DSU package that contains a system.img and a product.img :
After both images are signed, use the following command to make the ZIP file:
Customizing the one-click-DSU
By default, the DSU loader points to a metadata of GSI images which is https://. google.com/. /gsi-src.json .
OEMs can overwrite the list by defining the persist.sys.fflag.override.settings_dynamic_system.list property that points to their own JSON descriptor. For example, an OEM may provide JSON metadata that includes GSI as well as OEM proprietary images like this:
It’s possible for an OEM to chain published DSU metadata as shown in Figure 7.

Figure 7. Chaining published DSU metadata
Content and code samples on this page are subject to the licenses described in the Content License. Java is a registered trademark of Oracle and/or its affiliates.
Источник


