Creating Dynamic Layouts in Android
What are Dynamic Layouts?

Generally, we develop the layout for an Android application by creating the XML file. These are called static layouts.
Static you ask? Yes, because you can not add/delete any View Type in XML on runtime.
Dynamic layouts are developed using Java and can be used to create layouts that you would normally create using an XML file.
Why do we need them?
Let’s say we are fetching some data from our server and we want to create n number of fields/buttons/options in our layout. How do we do that using the only XML? That’s right!
But we can use Java to replicate the exact layout that we would normally create using XML.
It can be used to create LinearLayout, ScrollView, etc.which can further add TextView, EditText, RadioButtons, Checkbox inside it.
Where do Dynamic Layouts excel?
Let’s say we want to show some items in our layout that were frequently bought together(all items are of the same View Type).
There are quite a few ways to show them in our layout:
1. Adding static views in our XML(if we know the exact amount of items).
2. Using Recycler View to inflate the items in our layout.
3. Creating Dynamic Views using Java.
What if we do not know the exact number of items to be displayed and our
layout require different View Types( like 3 TextViews, 2 CheckBoxes, etc.)?
Possible solutions to tackle this problem:
1. Adding static views in our XML won’t work this time because we do not . know the exact number of views we need.
2. Using Recycler View could work but the same View Types should be grouped together in a list. There is not much flexibility in this case.
3. However, this is where Dynamic Layouts take the lead! They are flexible and can add multiple View Types to our layout in any order.
Источник
Android Desk
Creating Dynamic Views in android
I was just in search of creating views without XML in android and yes, found the solution. So just thought of sharing the same with you all.
I’ve created an easy to understand example for you. Here, in my example I’ve created a button which when clicked each time adds a TextView and an EditText with its serial numbers. Confused?
Just read on and you will understand better.
Let’s start now. First of all I’ve created an object of ScrollView within which I’ll add the LinearLayout . Here is the code:
In the above code, I’ve created an object of ScrollView and also a LinearLayout. Then I’ve set the Orientation for the layout and finally added the view which here is the LinearLayout to the ScrollView.
NB: If you want to know the purpose of ScrollView, please do refer ScrollView(link).
Next, we are going to add Button using java code.
Here, I’ve created the object of Button and then set the Title and finally, added it to the LinearLayout.
Now, with in the Button click added the TextView and EditText as shown in the code snippet below:
So as we click on the Button a TextView and an EditView is created dynamically.
Finally, we need to make these contents added to be visible to the user. So we use setContentView() and within the function the object of ScrollView is placed as it holds all the other View.
Now the Whole code:
The Screen Shots:

Hope this post was useful. Keep Reading.. 🙂 Happy coding. )
Источник
Dynamic Views in Android
This tutorial is about creating dynamic views in android based on json data. These json data can be a server response or may be not. For everybodies sake, I have stored my json data in the asset folder itself. But, we can use this tutorial by fetching json data from whereever you want. This may help you to fetch your json data. Ok, now lets get started.
What are dynamic views?
Its the process of using one activity as a container and drawing multiple view in the same activity. These views are not declare in XML. We are generating our widgets dynamically.
Our Scenario:
We will create a Profile Activity. The MainActivity is the ViewProfileActivity. EditProfileActivity creates the Dynamic Views and stores user inputs. We have three snapshots of our project. 
ViewProfileActivity-SS(1) is the screenshot of the Profile Page of the user. The Edit Profile button located in the top of the ViewProfileActivity starts the EditProfileActivity represented by EditProfileActivity-SS(2). EditProfileActivity displays the dynamic views. It allows user to provide their inputs. At the end of the layout, there is a save button through which the user can store their inputs and finish the EditProfileActivity. After the user presses the Save button, they are redirected to the ViewProfileActivity which displays all their inputs stored in the dynamic widgets.
ViewProfileActivity just displays the data.
The layout for ViewProfileActivity is as follows:
The content of ViewProfileActivity is as follows:
The main work is done by EditProfileActivity. The functionalities of EditProfileActivity are listed below:
1.It fetches the json data from the asset folder named “jsonresponse.txt” and then parses the json data to the java objects. These java objects are created from helper classes. Helper classes are specifically create to hold the parsed json data. We are using two helper classes: Field and ProfileInfoHolder.There is a demo of Parser class:
The contents of helper class Field are as follows:
The contents of helper class ProfileInfoHolder are as follows:
The parser class parses the json data into java objects in the following way:
2.It instantiates the DynamicFormCreation class. Dynamic form creation class creates dynamic widgets. While instantiating the class, we pass the profile field objects and ids. We pass ids because we can manually assign ids when we create dynamic widgets. Passing ids is important because it makes it easy to store user inputs from these widgets.The content of DynamicFormCreation class is given below:
3.It instantiates StoreDynamicFormValues class to store the user inputs from the dynamic widgets. We have to pass the container layout where we have created our dynamic views and arraylist where we have stored the profile fields and ids for dynamic views. The content of StoreDynamicFormValues is given below:
Hence, its time to summarise the content of EditProfileActivity. The layout for EditProfileActivity is as follows:
The complete source code for EditProfileActivity is given below
Here, we have also create a UtilityClass that stores the codes which can be reused again and again throughout our project. The content of Utility Class is as folllow:
The project is stored in GitHub. Download it and check it out.
Hope you enjoyed reading my blog. See you next time through my blog. Until then, Happy Coding 🙂
Источник
Dynamic views in android
Dynamic Android views for various screen sizes
This is a tutorial for creating dynamic views in Android that will adjust based off the screen size the user is loading your app on.
I’ve been struggling to figure out how to dynamically change my app so that it will scale properly for different screen sizes. After, a lot of google searches and stack overflow reading I started to look at Android design in a completely different way.
Creating layouts is very easy using Android Studio and all though there is a robust amount of different views or layouts a problem still arises. How do I make this app work for everyone rather than a specific phone screen? When using Android Studio you can configure multiple emulators for various Android devices and each one has slightly different dimensions.
For my specific project, I needed to create a 2×3 (2 columns x 3 rows) and so I tried various layout types to achieve this. My thought process, since there are different types of layouts like grid layout, Linear Layout, Relative Layout, etc.. One of the layouts would probably help me achieve this task. What I didn’t realize is that no matter what layout I choose, there is still going to be code that has to work out the size of the screen and then set each cell dynamically. In my case, the 2×3 grid was simply six buttons.
What I found, is that the layout really doesn’t matter in regard to arranging views to be dynamic based on varying screen sizes. For other scenarios, let’s say you were making an API call to Flickr for photos and then wanted those to be positioned in a 2×3 grid which the user could scroll through you would use a Grid View or a Recycler View with a grid layout manager, but there would still be some math involved in working out how much space (height/width) each cell would be.
How to get the total height of your screen
This is great for getting the ‘total’ height of your screen, but this doesn’t account for the status bar height and the action bar height.
How to get the height of your Action Bar
System.out.println(«Action Bar Height: » + getActionBarHeight()); // in the onCreate method
I’ve confirmed this method works. I came across ‘getActionBarHeight()’ reading stack overflow, here is a link to the question/answer.. https://stackoverflow.com/a/27970879
How to get the height of your Status Bar
System.out.println(«Status Bar Height: » + getStatusBarHeight()); // in the onCreate method
I’ve confirmed this method works. I came across ‘getStatusBarHeight()’ reading stack overflow, here is a link to the question/answer.. https://stackoverflow.com/a/3356263
How to do the math for a 2×3 layout
In my case, I’m using six buttons (two buttons x three buttons). This code is inside my onCreate() method.
This code allows me to get the height and width needed for each button in my 2×3 layout. Now I need to attach the height/width to each button.
Attaching the Height/Width to the buttons
I’m using a hybrid approach to the UI, where I declare my buttons in the XML, give each button an id, then connect them to my Java code. The code below is in the onCreate method.
This code combines everything so far, except the methods ‘getActionBarHeight()’ and ‘getStatusBarHeight()’ which you can find above.
Positioning the buttons and updating the UI
This is not the cleanest code, I’m sure. However, this does work and writing it out the long form way was easier for me to wrap my head around. What we are doing is telling each button how to position itself on the screen. Button 1 (btn1), does not need this due to it being preset at the 0,0 naturally.

About
This is a tutorial for creating dynamic views in Android that will adjust based off screen size.
Источник
How to implement Dynamic Views in Android ?

One of the challenges of being an Android developer is to minimise unnecessary app updates . Releasing updates for small UI changes hurts a bit.
Imagine a situation where
— A view in your app has to be changed dynamically from time to time.
— A new component has to be added in a layout.
The common practice to handle the above situations is to make respective changes and release an update .
This post will try to throw some light on a technique which can update Android native layouts on the go without releasing any updates.
json2view is the best open source library which aims to solve this problem. It can convert a compatible json file to an Android view which can be loaded dynamically. It also provides a functionality to convert an xml layout to a compatible json file.
A sample code of a layout before and after converting it to a json.
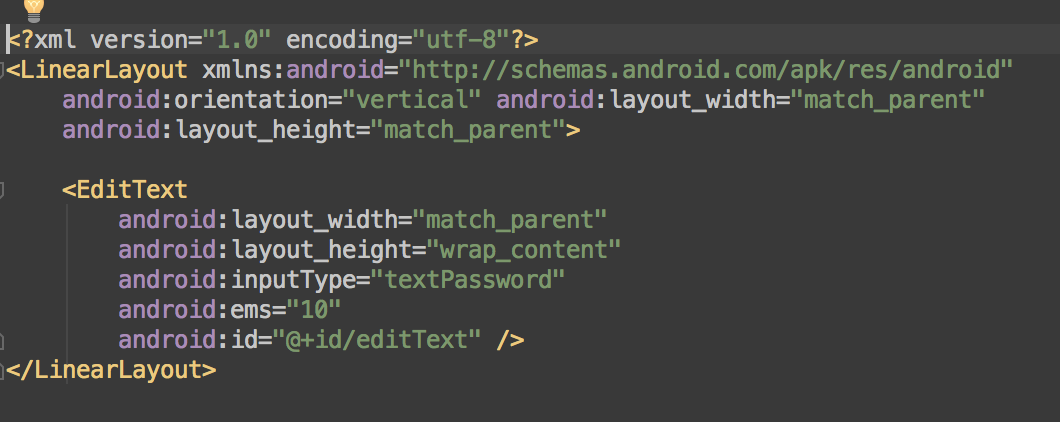
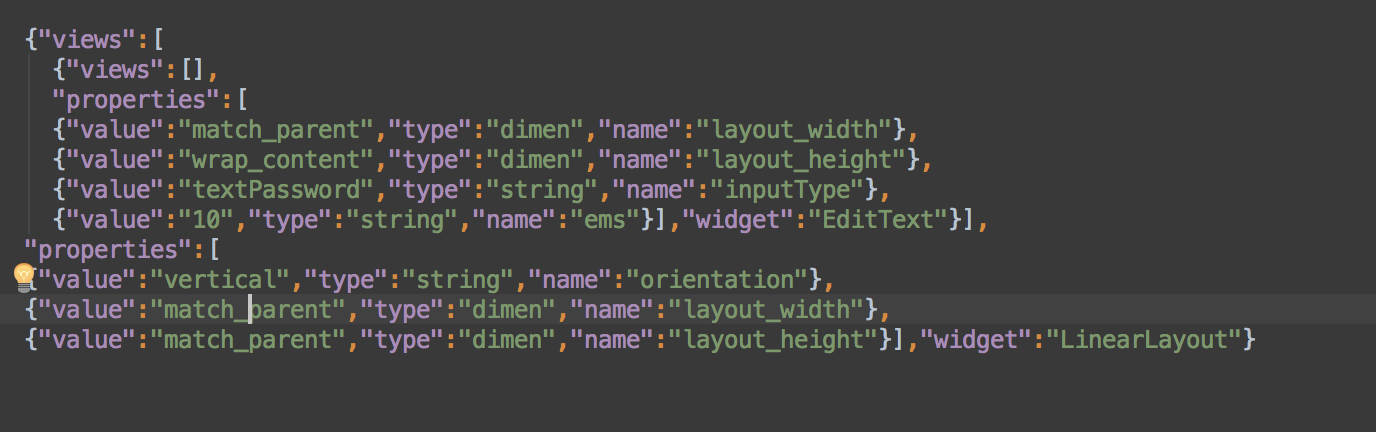
The library in client side understands the json and converts it to a view. The conversion happens using java reflection. Custom views present in the app can also be loaded with little fuss.
All you need to do is add a couple of lines in your activity/fragment to convert json object to a view and boom the layout can be updated anytime.
I would like to suggest this library for a starter with a basic requirement and would not like to invest much time to solve this problem.
If performance matters a lot to you and your use case is not just to display views and had to do something with the views, this library is not a perfect fit. I will go more detailed into a few solutions to overcome the cons.
But a lot can be learned from the approach used here — create a json with view properties , write code in your app which can understand the json and convert it to a view and do what ever else you want.
Rolling up custom solutions
One of the main drawback of the library is the performance hit to load a complex layout( Imagine the number of reflections taking place).
Since each app has its own design mantra and custom views, an ideal solution is to use custom views and avoid reflection while creating these views.
Adding custom view can also reduce the payload by a huge margin as they generally have default properties.
What about listeners?
Adding listeners crosses the mind of a developer after displaying views.This can be solved by creating a listening layer on top of this which can listen to and perform common actions in the app.
For example “action”:”date” can open a date picker.
This layer can also take care of data binding between views.
Understanding the requirements and predicting the use cases will play a huge role to create contracts for actions, data binding and create a custom wrapper to this library which can do magic to your app.
Источник


