- Android Sending Email Example
- 1. Create a New Android Application Project
- 2. Create the layout of the Main Activity
- 3. Code the Main Activity
- 4. Run the application
- Android Email App Using Javamail API in Android Studio
- Android Email App – Video
- Download Javamail API for Android
- Creating Android Email App in Android Studio
- Get source code of Android Email App
- Checkout these tutorials as well:
- 123 thoughts on “Android Email App Using Javamail API in Android Studio”
Android Sending Email Example
Posted by: Katerina Zamani in Email December 18th, 2013 0 Views
To send an email from your application, you don’t have to implement an email client from the beginning, but you can use an existing one like the default Email app provided from Android, Gmail, Outlook, K-9 Mail etc. For this purpose, we need to write an Activity that launches an email client, using an implicit Intent with the right action and data. In this example, we are going to send an email from our app by using an Intent object that launches existing email clients.
For this tutorial, we will use the following tools in a Windows 64-bit platform:
- JDK 1.7
- Eclipse 4.2 Juno
- Android SDK 4.4
1. Create a New Android Application Project
Open Eclipse IDE and go to File → New → Project → Android Application Project.
Fill in the name of the application, the project and the package in the appropriate fields and then click Next.
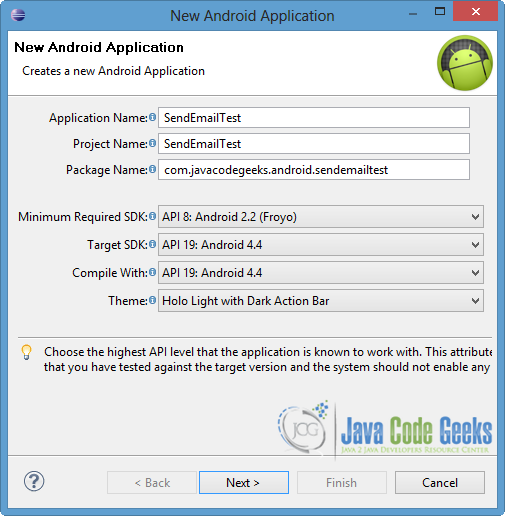
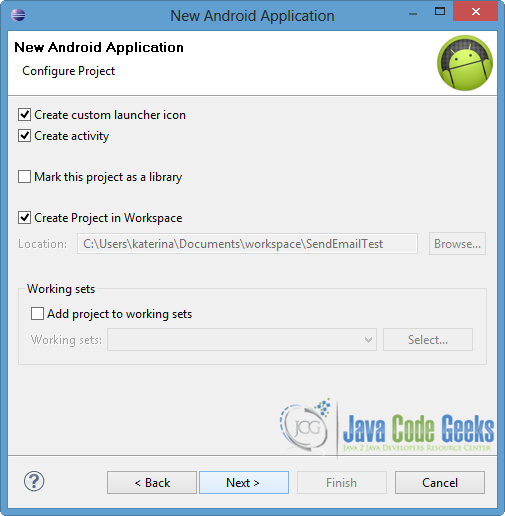
In the next window, check the “Create Activity” option. The new created activity will be the main activity of your project. Then press Next button.
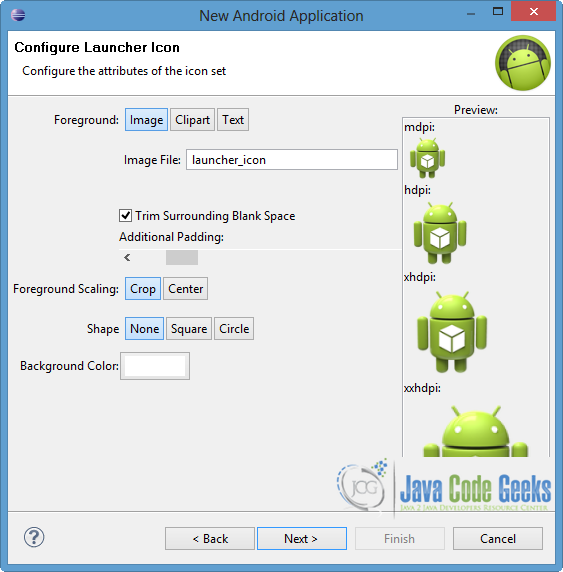
In “Configure Launcher Icon” window you should choose the icon you want to have in your app. We will use the default icon of android, so click Next.
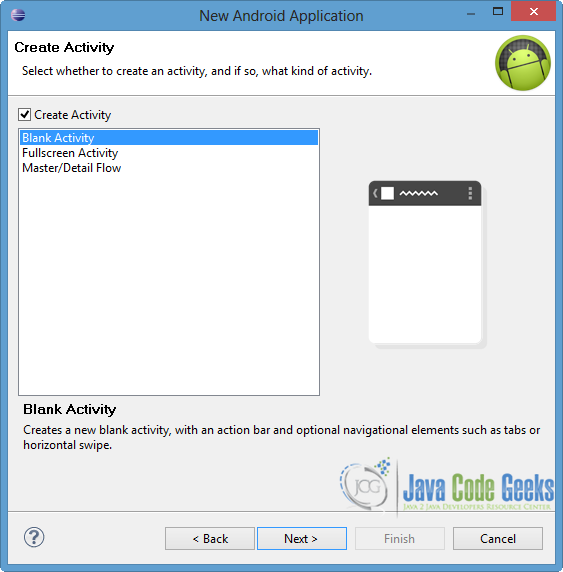
Select the “Blank Activity” option and press Next.
Specify a name for the new Activity and a name for the layout description of your app. The .xml file for the layout will automatically be created in the res/layout folder. Finally, press Finish.
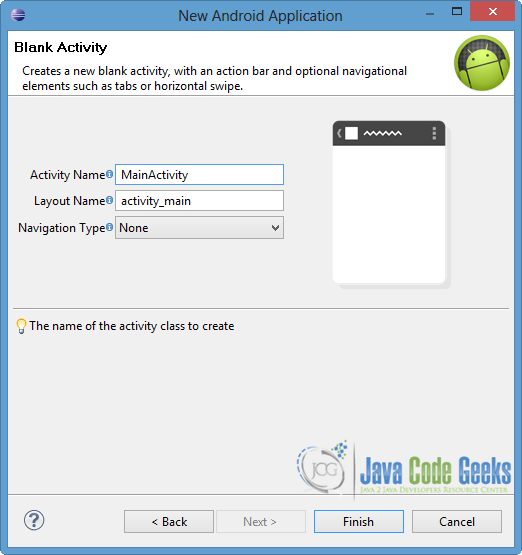
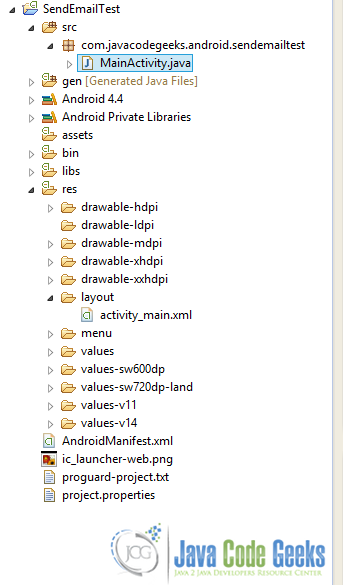
The picture below shows the structure of the created project.
2. Create the layout of the Main Activity
We want to send an email via our application, so we will use some EditTexts , where the user can fill in the necessary fields for an email creation. Also, we are going to use a Button , that enables the Intent when it is clicked.
Open res/layout/activity_main.xml file and go to the respective xml tab. Then paste the following.
3. Code the Main Activity
As we already mentioned we need an Activity , which contains an Intent and launches the email clients that are installed in the Android device. For this reason, we should define SENDTO as action in that Intent and mailto: as it’s data. Moreover, we ought to set the Intent’s type as message/rfc822 , in order to prompt only email providers. Another option for type could be text/plain , but this choice would launch and other clients that we don’t want in this app, such as Messaging .
In addition, Android provides us some further fields that can be used to complete some elements of an email client (for instance recipients, subject etc). These fields have to be attached to the Intent as extra data:
- EXTRA_BCC: email addresses for blind carbon copy
- EXTRA_CC: email addresses for carbon copy
- EXTRA_EMAIL: email addresses for recipients
- EXTRA_HTML_TEXT: supply an alternative to EXTRA_TEXT as HTML formatted text
- EXTRA_STREAM: URI holding a stream of data supplying the data that are sent
- EXTRA_SUBJECT: the subject of an email
- EXTRA_TEXT: the message body of the email
- EXTRA_TITLE: the title that is shown when the user has to choose an email client
In our application, we use EXTRA_EMAIL , EXTRA_SUBJECT and EXTRA_TEXT to fill in the appropriate fields in the email client.
Open src/com.javacodegeeks.android.sendemailtest/MainActivity.java and paste the following.
4. Run the application
To run our application, right click on our project → Run as → Android Application. The AVD will appear with the app loaded, as shown in the picture.
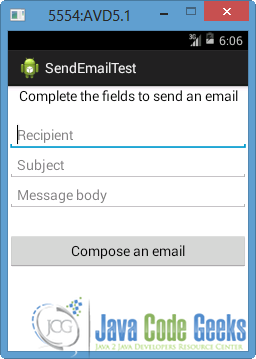
Lets fill in all the fields and press the button “Compose an email”.
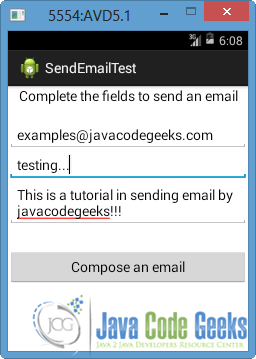
The default Email app of Android will launch, and the fields are filled in by the elements that we gave before, as you can see in the image below. If a problem occurs, you have to set up an account to the emulator.
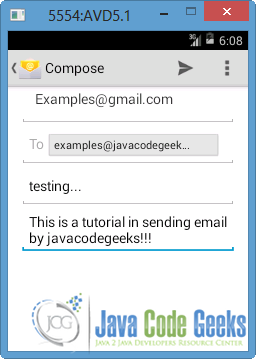
To send the email press the arrow at the top-right of the above screen.
It is good to mention that in the emulator there aren’t any other email clients, so the user can not choose a different one. If we run the app in our Android device, all existed email providers will appear (such as Gmail etc) so the user will have the option to choose another one.
Источник
Android Email App Using Javamail API in Android Studio
In this post we will create an Android Email App.
We will not use the default Android Email Client to send emails instead we will use Javamail API to create our own email sender. And you can also use this App for Email.
So if you are searching Best Email App for Android then try the app created by yourself 😉
Before going through the tutorial you can check the following video to see exactly what you will be creating in this tutorial.
Android Email App – Video
Download Javamail API for Android
- For this Android Email App we will use Javamail API, so before starting our android project download Javamail API from link given below
[download >
- You will get a zip file from the above link. Extract the zip and you will get three .jar files. We will use these .jar files in our android email app project.
Creating Android Email App in Android Studio
- Open Android Studio and create a new android project.
- First we will add the downloaded .jar’s to our project.
- From the left panel click on Android -> Project (see the image below)
 android
- Now you will get the libs folder inside projectfolder -> app -> libs . Paste all the three .jar files which you have downloaded above inside the libs folder. (See the image below)
 javamail api
- Now go to file -> project structure.
 project structure
- Now go to dependencies and from the right click on the green + sign and then click on file dependencies.
 file dependencies
- Now go to libs folder and add all the three .jar files (you can see in the image)
 adding jar android studio
- Now click on ok, ok and you have added the apis to your project.
- Now come to activity_main.xml and create the following layout.
 android email app
- Use the following code for creating the above layout.
- For this android email app we will use gmail to send emails. So create a new java class named Config.java and write the following code.
- You have to write your gmail username and password.
- Now create a new class SendMail.java. It will send our email. Write the following code in this class.
- Now come to MainActivity.java and write the following code.
- Finally add internet permission to manifest.
- Thats it now run your application.
 android email app
- Bingo! It is working absolutely fine. You can also download the source code of my project from below.
Get source code of Android Email App
So thats all for this Android Email App tutorial. Leave your comments if you are having any queries or trouble for this Android Email App. Thank You 🙂

Hi, my name is Belal Khan and I am a Google Developers Expert (GDE) for Android. The passion of teaching made me create this blog. If you are an Android Developer, or you are learning about Android Development, then I can help you a lot with Simplified Coding.
Checkout these tutorials as well:


123 thoughts on “Android Email App Using Javamail API in Android Studio”
Hii thanks for the tutorial its working fine with Gmail but I need to send email using my Yahoo account instead of gmail can you please help me regarding this.

You have to change the values according to yahoo mail
ya i tried using yahoo SMTP details its not working
Ok I will tell you after trying doing it with yahoo
Thanks in advance bro 🙂
hey! it doesnt work on mobile data but works fine on wifi. any solution for this?
It is showing me Message sent in toast but when i check gmail account no mail is received. Please help, i even tried different email accounts.
Secondly, what to do if we wish to send a doc file also as an attached document to the mail?
Please help
check config class.. you have to put your actual gmail username and password there
i will give correct username and password but every time got log mes javax.mail.AuthenticationFailedException…
Allow Access Less Secured App
I also gave permission. Never again
this security setting works for me thanks
Hello sir, I had also the same problem. I put my exact gmail account and password but I don’t still get any mails. Even though it tells me that the mail was sent. Please help me. Thank you
The application works properly, however gmail has a security setting which needs to be addressed.
You need to go to your security settings and turn on “Allow less secure apps:”.
Check out this post here for more details : https://www.drupal.org/node/2080923
I did that but still didn’t receive any mail
can u help me ?
Hi , thanks for this tutorial , but i have question : can i make this app accept any types of emails ( yahoo , hotmail , gmail , ….. ) ?
Same question! I already tried several different ways but I wasn’t successful.
I’m trying to send an Email with the Email address the user’s typing in a text field.
Any help is appreciated!
thanks for the code. but i am getting error in MainActivity.java file in Error:(3, 30) error: cannot find symbol class AppCompatActivity and Error:(31, 36) error: cannot find symbol method findViewById(int). i did all the dependencies in the exact way. waiting for your reply.
Actually this is the problem with your sdk, update your android studio and sdk. Or you can use Activity or ActionbarActivity instead of AppCompatActivity
yeah!! it is working now. can i have your email, so that i can contact you directly?.
Visit about page 😉
Thank u for your code!! Could you also show how to receive messages using JavaMail API, please? I tried to rework your code, but it wasn’t successful:(
Hello , this message is being translated by Google Translate because I do not speak English, I hope you understand .
//Setting sender address
mm.setFrom(new InternetAddress(Config.EMAIL));
//Adding receiver
mm.addRecipient(Message.RecipientType.TO, new InternetAddress(email));
//Setting sender address
mm.setFrom(new InternetAddress(>>email<>Config.EMAIL Reply
not working on my android device even no error in coding……
I implement the same as you have done!
but no message is received in the target email address.
I changed the config file also.
here is the logcat :
01-17 22:19:41.473 12231-12231/polimi.aap.yas.personalhealthrecord E/ViewRootImpl: sendUserActionEvent() mView == null
it says sign in attempt was blocked in my mail
You need to enable POP go to your gmail and from settings enable POP or IMAP
Thank you . Your code and this reply helped me a lot to put the application working. It turns out htat the POP/IMAP was turn off on gmail setting.
thanks for the tut..but when i have my mail and pass stored in config.java .what i want is when user uses my app and wants to send a mail to me, im not getting the mail to my mail ,instead it shows like u got a mail from sv53@gmail.com(this is in config file) to the mail which i entered in receipient field .
when a user send a mail using his mail id, i need to get mail to my sv53 mail id, but how to?
If you are having problems disable you anti-virus and check it again…
Also had to allow less secure app in google.
It works . Thanks man, God Bless You 🙂
It is showing me Message sent in toast but when i check gmail account no mail is received..
Cool tut, I wish I understood Android Studio better but I am just now teaching myself and could use help on a couple projects. I can only imagine how busy you must be, but if you would/could help me just a bit, I sure would appreciate it! If you are interested, please contact me via admin@mohtech.ca
Thank you in advance!
Mike
Hi mate, first of all i want to thanks to you for this tutorial, im having a problem when i click the send buttom, i got the following output:
03-15 08:40:21.396 3801-4071/ar.com.taxiexpress.taxiexpress E/AndroidRuntime: FATAL EXCEPTION: AsyncTask #3
Process: ar.com.taxiexpress.taxiexpress, PID: 3801
java.lang.RuntimeException: An error occured while executing doInBackground()
at android.os.AsyncTask$3.done(AsyncTask.java:300)
at java.util.concurrent.FutureTask.finishCompletion(FutureTask.java:355)
at java.util.concurrent.FutureTask.setException(FutureTask.java:222)
at java.util.concurrent.FutureTask.run(FutureTask.java:242)
at android.os.AsyncTask$SerialExecutor$1.run(AsyncTask.java:231)
at java.util.concurrent.ThreadPoolExecutor.runWorker(ThreadPoolExecutor.java:1112)
at java.util.concurrent.ThreadPoolExecutor$Worker.run(ThreadPoolExecutor.java:587)
at java.lang.Thread.run(Thread.java:841)
Caused by: java.lang.NoClassDefFoundError: ar.com.taxiexpress.taxiexpress.SendMail$1
at ar.com.taxiexpress.taxiexpress.SendMail.doInBackground(SendMail.java:74)
at ar.com.taxiexpress.taxiexpress.SendMail.doInBackground(SendMail.java:21)
at android.os.AsyncTask$2.call(AsyncTask.java:288)
Could you please helpme with this?
I get the same error. Can anyone help?
Error: java.lang.NoClassDefFoundError: com.sun.mail.util.MailLogger
You should check the gradle file
(App). If you have written duplicate about mail, it would have shown error message like you.
For example, in your gradle file,
If there are more than a line,
compile javax.javamail.5-
dependencies <
compile fileTree(dir: ‘libs’, include: [‘*.jar’])
-> this is two lines about javamail.
So delete one of them. 🙂 i solved the problem in this way
hey how to create new java class as u mentioned like config.java, Mainactivity.java etc on android studio 1.5.1. I am new to android coding.plz help
i got error at this line in main.xml
//Creating SendMail object
SendMail sm = new SendMail(this, email, subject, message);
sm.execute();
showing error as cannot resolve symbol. help me wit this…
I am not able to download your project.
i have some problem
Error:(27, 25) error: package R does not exist
error:cannot resolve symbol variable toolbar,error:cannot resolve symbol variable fab.kindly help in this regards
hi, nice tutorial, i’m got it ^_^
but now i’m to try for receive email, i hope you can help me :’)
thanks
hi i have to design an email client for my project assigned to me can someone help me with the same?
How do i check if email is successfully sent. For example if invalid recipient is used how will i know?
Hello sir, I put my exact gmail account and password but I don’t still get any mails. Even though it tells me that the mail was sent. Please help me. Thank you
I also enabled pop to my Gmail from setting enable pop but still i did not get any mail……please help me to solve this problem
Awsm tuttorial…its working…
in addition to this i want to add extra content with mail(like thanks from our team….) which will be sent to the recipient…and this content shows only when recipient receive the mail….how can i add this extra content with the mail.
please help me to solve this problem
It’s working fine .But whenever i was sending mail getting suspicious mail not allow less security apps ,
how can i achieve that?
Thanks for this blog,It’s helpful!
I want to use a login activity to authentificate the users and after I’ll get a new activity for exemple the inbox and button write new mail!!what can I do for do that idea??thanks in advanced
in my app I have an own text as an EditText which I want to send with an email. How can I add my own text instead of typing one in into the “message field” and send this one via email?
Hi same problem for me also. Whenever I filled all the fields ( receipent, Subject, Body ), it show message sent but I am not able to receive the message.
Please help me. Thanks in advance.
make sure you have enabled the settings in your gmail account
It is working perfectly fine. Thanks a lot. I created a new ID my POP and IMAP both are disabled in gmail settings but still it works.
hii i tried this code but am getting error in code can u please send me your code….. rameshec13@gmail.com
Cannot resolve symbol SendMail in the main activity. Please help! SendMail and execute go red.
SendMail sm = new SendMail(this, email, subject, message);
//Executing sendmail to send email
sm.execute()
I am getting below error please help me.I followed all steps as same in this article.
Источник


