- See your purchase history for the App Store, iTunes Store, and more
- How to see recent purchases on the web
- See your purchase history on your iPhone, iPad, or iPod touch
- See your purchase history on your computer
- If you can’t find an item in your purchase history
- Find out if a family member purchased the item
- Check if you purchased the item with a different Apple ID
- If you see purchases that you don’t recognize or unexpected charges
- Learn more
- About your Apple ID email addresses
- Email addresses you use with your Apple ID
- Apple ID email address
- Change your Apple ID email address
- Reset your Apple ID password
- Get a verification code
- Additional email addresses
- Add an additional email address
- Delete an additional email address
- Rescue email address
- Add or edit a rescue email address
- Delete a rescue email address
- Reset your security questions
- Learn more
- Identify legitimate emails from the App Store or iTunes Store
- Is this email legitimate?
- Update your account info safely
- If you received or acted on a likely phishing message:
- Защита Apple ID от взлома, или как отличать настоящие письма Apple от фейковых
See your purchase history for the App Store, iTunes Store, and more
To see which apps, music, and other content you bought, look at your purchase history.
See a list of your purchases from the App Store, iTunes Store, Apple Books, and the Apple TV app.
![]()
How to see recent purchases on the web
- Go to reportaproblem.apple.com.
- Sign in with your Apple ID and password.
- A list of your recent purchases appears. If you’re not sure what you were charged for but you know the exact amount, search for the amount. If there’s a problem with an item that you purchased, use this website to report the problem to Apple.
![]()
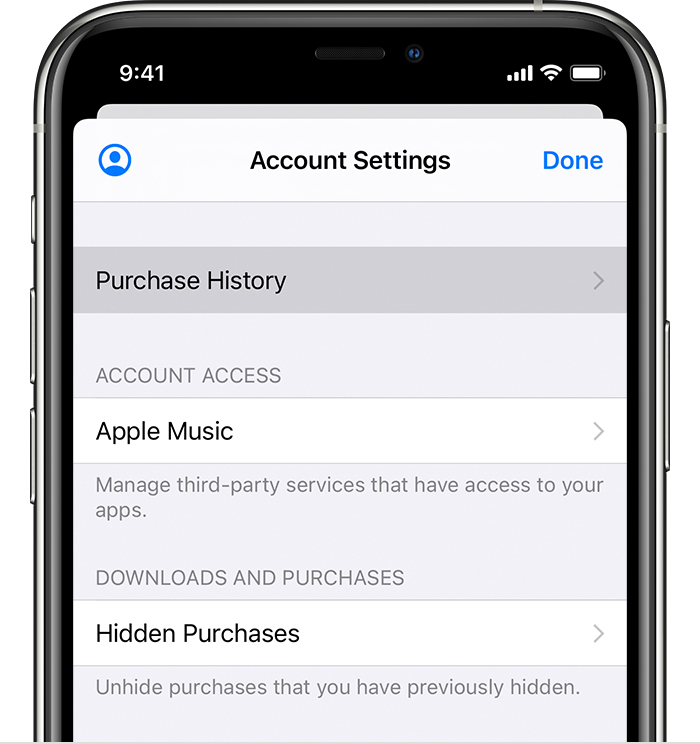
See your purchase history on your iPhone, iPad, or iPod touch
- Open the Settings app.
- Tap your name, then tap Media & Purchases. You might be asked to sign in.
- Tap Purchase History.

- Your purchase history appears. If you want to see purchases that you made more than 90 days prior, tap Last 90 Days, then select a different date range.
![]()
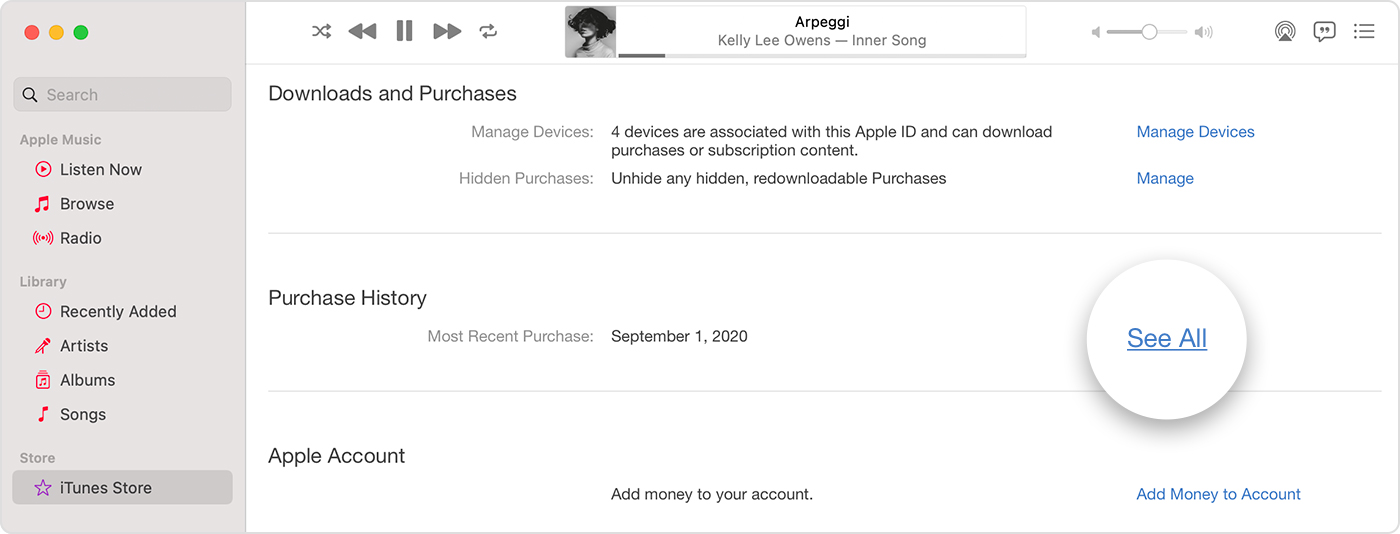
See your purchase history on your computer
- Open the Music app or iTunes. From the menu bar at the top of the screen, choose Account, then click View My Account.
- On the Account Information page, scroll down to Purchase History. Next to Most Recent Purchase, click See All.
- Find the item. It might take a moment for your Purchase History to appear. If you want to see purchases that you made more than 90 days prior, click Last 90 Days, then select a date range.
![]()
If you can’t find an item in your purchase history
If you can’t find the item you’re looking for, try these things before you contact Apple.
Find out if a family member purchased the item
If you use Family Sharing, your purchase history shows purchases that you made using your Apple ID, but you won’t see what other family members bought. To see what other family members bought, sign in with their Apple ID.
If family members have access to your device, you might want to require a password for every purchase.
To control what kids buy on their own devices, turn on Ask to Buy.
Check if you purchased the item with a different Apple ID
If you don’t see an item in your purchase history, you might have been signed in with a different Apple ID when you made the purchase. Sign in with that Apple ID to check if your purchases were billed to that account.
![]()
If you see purchases that you don’t recognize or unexpected charges
- If you see items in your purchase history that you don’t remember buying, check if someone else who uses your device, such as a family member, bought the item. If someone else is using your Apple ID and password, change your Apple ID password.
- Learn what to do if you don’t recognize a charge on your statement from your bank or financial institution.
- Learn how to request a refund.
![]()
Learn more
- If you see an in-app purchase in your purchase history but you don’t see it in the app, restore in-app purchases.
- Cancel a subscription.
- Learn about how App Store and iTunes Store purchases are billed.
- If you received a suspicious email notification about a purchase, the email might not be from Apple or reflect actual charges to your account. Learn how to identify legitimate App Store or iTunes Store emails.
Store availability and features might vary by country or region. Learn what’s available in your country or region.
Information about products not manufactured by Apple, or independent websites not controlled or tested by Apple, is provided without recommendation or endorsement. Apple assumes no responsibility with regard to the selection, performance, or use of third-party websites or products. Apple makes no representations regarding third-party website accuracy or reliability. Contact the vendor for additional information.
Источник
About your Apple ID email addresses
Learn how to add, change, or delete the different types of email addresses that you can use with your Apple ID account.
Email addresses you use with your Apple ID
Your Apple ID uses email addresses to sign you in to your account with Apple. With your Apple ID, you can access services like the App Store, Apple Music, iCloud, iMessage, FaceTime, and more. We use your email addresses to send you information about your account, and to help friends and family communicate and share with you.
Apple ID email address
In most cases, your Apple ID is also the primary email address of your Apple ID account.
Additional email addresses
Add extra email addresses to your account to help people find you on Apple services like FaceTime, iMessage, and Find My.
Rescue email address
Most people have a notification email address instead of a rescue email address. Apple uses this to send you important account and security related information. If you don’t use two-factor authentication or two-step verification (learn how to check what security method you use), you have the option to add a rescue email address to your account for more security. You can see it when you sign in to your Apple ID account page.
Before you can use a new or updated Apple ID, we’ll send you a verification email to make sure that the email address belongs to you.

Apple ID email address
When you create an Apple ID, you enter an email address. This email address is your Apple ID and the username that you use to sign in to Apple services like Apple Music and iCloud. It’s also the contact email address for your account. Be sure to check your email address regularly. We’ll send you email notifications to help you manage your account and make the most of your Apple ID.
Change your Apple ID email address
Reset your Apple ID password
If you know your current Apple ID password and want to change it, follow these steps on your iPhone, iPad, iPod touch, or Mac. If you’ve forgotten your Apple ID password and need to reset it, follow these steps.*
Get a verification code
With two-factor authentication, you’ll need a verification code to sign in with your Apple ID on a new device or browser. Learn how to get and use the code on a trusted device, or get a text or phone call.
* If you use two-factor authentication, in some cases you might be able to speed up the account recovery process or reset your password immediately by verifying a six-digit code sent to your primary email address.
Additional email addresses
Many of us have more than one email address that friends and family use to reach us. Add an email address that you commonly use to your Apple ID account, so people can easily find and communicate with you on Apple services like FaceTime, iMessage, Shared Albums, iWork collaboration, and Find My.
Add an additional email address
- Sign in to your Apple ID account page.
- Click Edit in the Account section.
- Under Reachable at, select Add More.
- Enter your additional email address. Make sure you’re not already using it as an Apple ID.
- We’ll send a verification to that address. Didn’t get the email?
- Enter the verification code and click Verify.
Delete an additional email address
- Sign in to your Apple ID account page.
- Click Edit in the Account section.
- To delete one of your additional email addresses, click next to the address.
Rescue email address
Having a rescue email address is optional but recommended if you do not have two-factor authentication or two-step verification. If you ever forget your security questions, you can use your rescue email address to reset them. We also send any account security-related notifications to your rescue email address. If you have two-factor authentication or two-step verification, you have a notification email address instead of a rescue email address and won’t need to remember security questions.
Add or edit a rescue email address
- Sign in to your Apple ID account page.
- Click Edit in the Security section. You might be asked to answer one or more security questions before you continue.
- To add a rescue email address:
- Under Rescue Email, click Add an Email Address, then enter your rescue email address. We send a verification to that address. Didn’t get the email?
- Enter the verification code and click Verify.
- To edit a rescue email address:
- Select Change Email Address under the address you want to edit, then enter the new address. We send a verification to that address. Didn’t get the email?
- Enter the verification code and click Verify.
If you had a rescue email address on file when you upgraded to two-factor authentication or two-step verification, you can also use these steps to edit your notification email address. If you remove the notification email, you won’t be able to add a new one.
Delete a rescue email address
- Sign in to your Apple ID account page.
- Click Edit in the Security section. You might be asked to answer one or more security questions before you continue.
- To delete a rescue email address, click next to the address.
Reset your security questions
If you’ve forgotten the answers to your security questions, follow these steps to verify your identity and reset your security questions. If you set up two-factor authentication or two-step verification, you won’t need to remember any security questions.
Learn more
If you receive suspicious email, learn how to identify fraudulent email.
FaceTime is not available in all countries or regions.
Источник
Identify legitimate emails from the App Store or iTunes Store
If you’re not sure whether an email about an App Store, iTunes Store, iBooks Store, or Apple Music purchase is legitimate, these tips may help.
Scammers often try to trick you into sharing personal or financial information by sending you messages or links to websites that might look like they’re from Apple, but their actual purpose is to steal your account information. Some phishing emails will ask you to click on a link to update your account information. Others might look like a receipt for a purchase in the App Store, iTunes Store, iBooks Store or for Apple Music, that you’re certain you didn’t make.
Never enter your account information on websites linked from these messages, and never download or open attachments included within them.
Is this email legitimate?
If you receive an email about an App Store or iTunes Store purchase, and you’re not sure whether it is real, you can look for a couple of things that can help confirm that the message is from Apple.
Genuine purchase receipts—from purchases in the App Store, iTunes Store, iBooks Store, or Apple Music—include your current billing address, which scammers are unlikely to have. You can also review your App Store, iTunes Store, iBooks Store, or Apple Music purchase history.
Emails about your App Store, iTunes Store, iBooks Store, or Apple Music purchases will never ask you to provide this information over email:
- Social Security Number
- Mother’s maiden name
- Full credit card number
- Credit card CCV code
Update your account info safely
If you receive an email asking you to update your account or payment information, only do so in Settings directly on your iPhone, iPad, or iPod touch; in iTunes or the App Store on your Mac; or in iTunes on a PC.
To update your password for the Apple ID that you use for purchases, do so only in Settings on your device or at appleid.apple.com.
If you received or acted on a likely phishing message:
If you received a suspicious email, please forward it to reportphishing@apple.com. If you’re on a Mac, select the email and choose Forward As Attachment from the Message menu.
If you think you might have entered personal information like a password or credit card info on a scam website, immediately change your Apple ID password.
Источник
Защита Apple ID от взлома, или как отличать настоящие письма Apple от фейковых
На днях, на наш редакторский E-mail, который является Apple ID, пришло письмо якобы от Apple, в котором сообщается, что нами совершена покупка приложения, стоимостью $21. В письме сказано, что «если вы не совершали эту покупку, то ее можно отменить по этой ссылке…, если ничего не предпринять, то деньги спишутся».
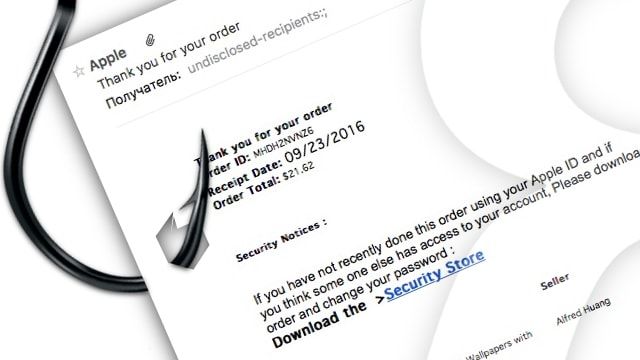
Подобные письма мы получаем очень часто и с улыбкой удаляем их. Для чего мошенники рассылают такие письма, и как распознать фальшивое сообщение мы расскажем ниже.
Расчет мошенников прост — как только пользователь видит, что с него вот-вот начнут снимать рубли, евро или доллары, он сразу же пойдёт разбираться. В письме есть и специальная ссылка для отмены заказа (подписки).
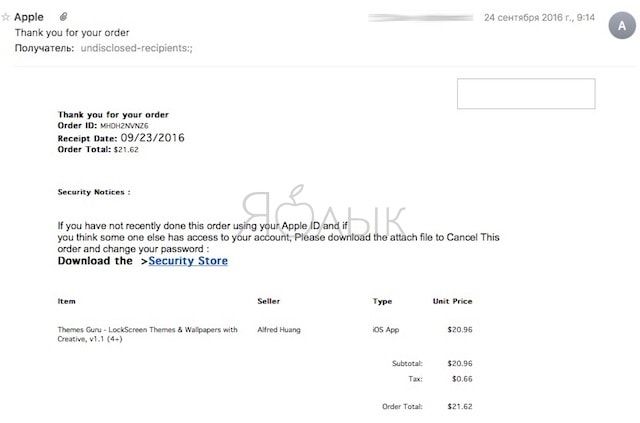
После перехода по ней пользователь оказывается на поддельном сайте, который внешне выглядит как страничка App Store. На нём есть форма приема данных о кредитной карте — её нужно заполнить для того, чтобы не допустить списания денег.
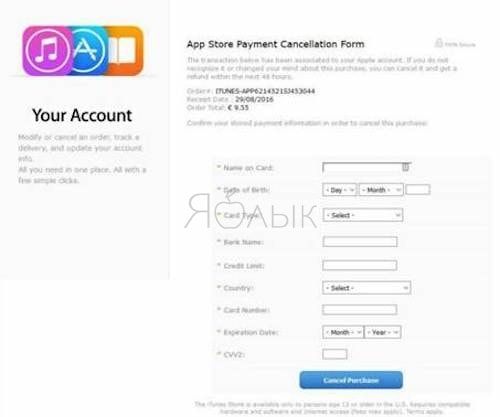
В реальности, конечно, происходит прямо противоположный процесс — деньги вам не вернут, а заберут.
При этом, купертиновцы напоминают, что сотрудники фирменного магазина приложений App Store ни при каких обстоятельствах не будут запрашивать у вас личную информацию и платежные данные.
Кстати, у Apple есть отличная инструкция о том, как отличить реальное письмо из компании от фишингового. Прочитать её полностью можно здесь, ключевые положения приводятся ниже:
- Проверьте адрес, с которого пришло письмо.
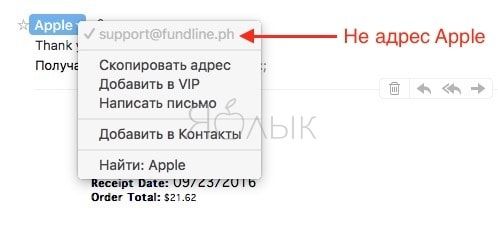
Ниже приведен перечень действительных электронных адресов Apple, по ссылкам из которых переходить безопасно:
no_reply@email.apple.com
appleid@id.apple.com
noreply@insideicloud.icloud.com
itunesaffiliates@apple.com
discover@new.itunes.com
News_Europe@InsideApple.Apple.com
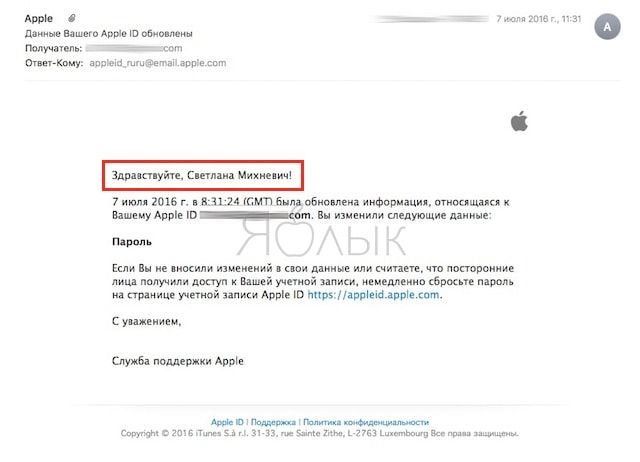
- Проверьте, есть ли в теле письма ваш актуальный Apple ID (он ДОЛЖЕН там быть!);

- Есть ли в письме «общее» приветствие вроде «Уважаемый пользователь» и т.п. Apple так НЕ пишет! В письмах к пользователям купертиновцы всегда обратятся к вам по имени (например, «Здравствуйте, Павел Быстров!»);
- Наведите курсор на ссылку и посмотрите, куда на самом деле она ведёт. Линки Apple обязательно содержат домен apple.com, и по ним сразу можно понять, куда вы попали.
Пример фишинговой ссылки:
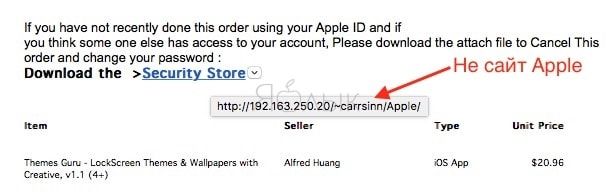
Пример ссылки на сайт Apple:
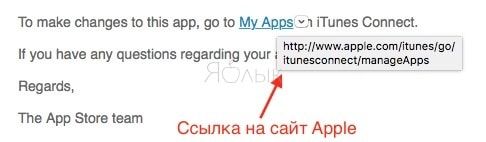
Пример ссылки на сайт Apple:

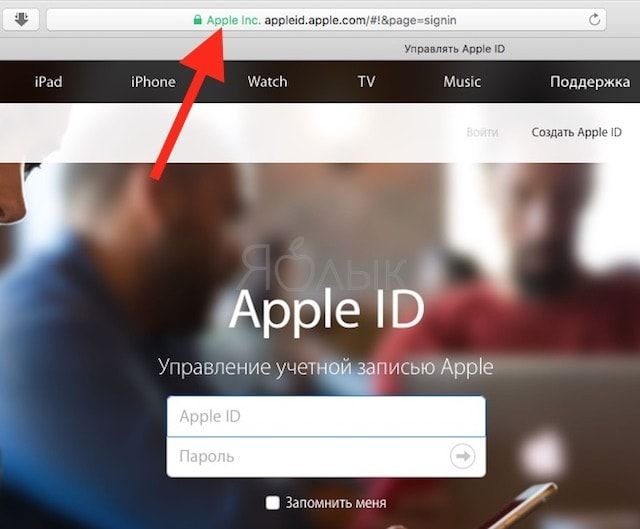
- Кроме того, в адресной строке современных браузеров (Safari 5, Firefox 7, Google Chrome и Internet Explorer 10) всегда производится проверка сайтов. Если у сайта есть расширенный проверочный сертификат RV, его название будет отображаться зеленых цветом;
- Не открывайте никаких вложений (квитанции, счета-фактуры). Apple так НЕ работает — к примеру, счет за Music всегда виден в письме сразу, его не нужно скачивать, подгружать и т.п.;
- И, опять-таки, не реагируйте на письма, в которых вас просят передать любую персональную информацию.
Источник


