- If you can’t send email on your iPhone, iPad, or iPod touch
- Before you begin
- Check the Outbox for unsent email
- Check your email address and password
- Contact your email provider or system administrator
- Remove your email account and set it up again
- Mail Support
- Mail Settings Lookup
- Incoming Mail Server
- Outgoing Mail Server
- Outgoing Mail Server (Mac OS)
- Incoming Mail Server
- Outgoing Mail Server (iOS)
- Featured topics
- Add an email account to your iOS device
- If your info on iCloud won’t sync
- Use emoji and symbols on your Mac
- Change the default web browser or email app on your iPhone, iPad, or iPod touch
- Before you begin
- How to change your default web browser or email app
- How to manage Mail settings for iPhone and iPad
- How to get a notification when someone replies to your email
- How to manage email accounts
- How to change preview lines
- How to Show To/Cc labels
- How to change swipe options
- How to toggle Ask Before Deleting
- How to Load Remote Images
- How to organize emails by thread
- How to Collapse Read Messages
- How to move a thread’s most recent message to the top
- How to turn complete threads on and off
- How to turn Always Bcc Myself on and off
- How to mark addresses
- How to turn Increase Quote Level on and off
- How to set your signature
- Any Questions?
If you can’t send email on your iPhone, iPad, or iPod touch
If you can’t send email from the Mail app on your iPhone, iPad, or iPod touch, there are a few things you can try.
Before you begin
There are a few things to keep in mind and check:
- When you make an iOS or iPadOS backup in iCloud or iTunes, it backs up your mail settings, but not your email. If you delete or change your email account settings, previously downloaded email might be removed from your device.
- Make sure that your device is connected to the internet.
- Check with your email service provider to find out if there’s a service outage.
- If you can’t access your email, or you can’t send and receive messages with your @icloud.com email address, learn what to do.
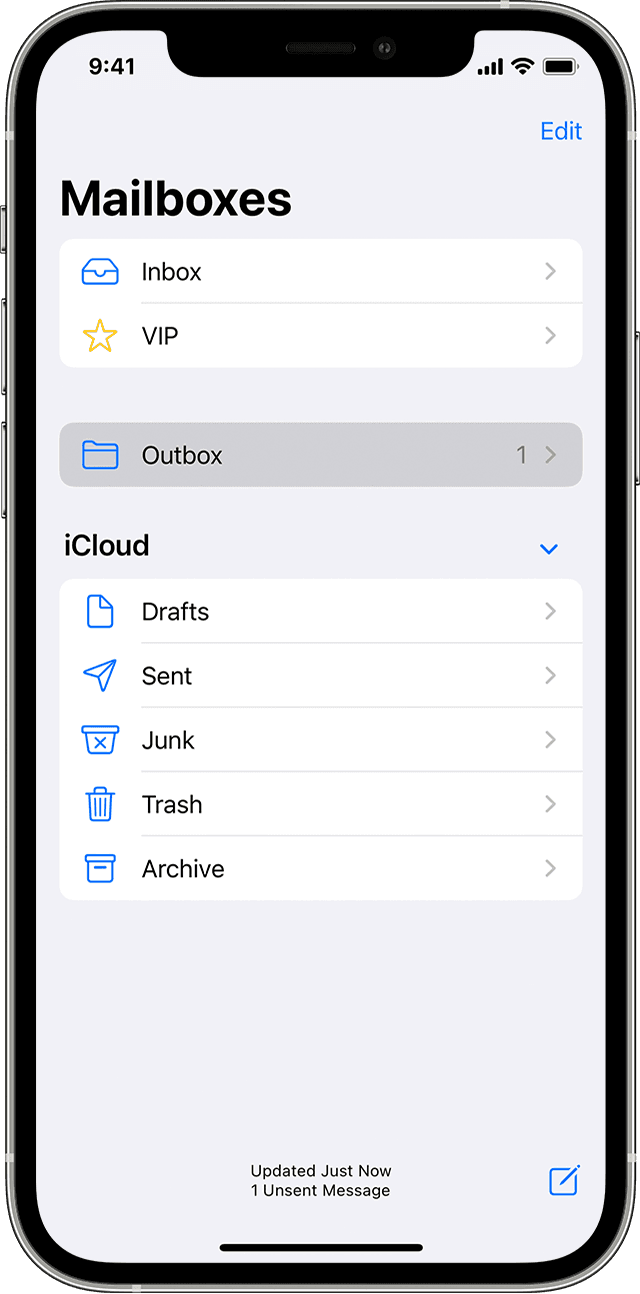
Check the Outbox for unsent email
If you get a message that says your email wasn’t sent, then that email goes to your Outbox. Check your Outbox and try to send the email again with these steps:
- In Mail, go to your list of mailboxes.
- Tap Outbox. If you don’t see an Outbox, then your email was sent.

- Tap an email in the Outbox. Make sure that the recipient’s email address is correct.
- Tap Send.
Check your email address and password
If Mail asks you to enter a password for your email account, make sure that your password is correct. To check your email address and password, sign in to your email provider’s website.
If you still get a user name or password error, contact your email provider or system administrator.
Contact your email provider or system administrator
- Contact your email provider or check their status webpage to see if there’s a service outage.
- Ask your email provider or system administrator if you turned on any security features or restrictions, like two-step verification, for your email account. You might need a special password or might need to request authorization from your email provider to send and receive email on your device.
- Check your email account settings with your email provider or system administrator to make sure that they’re correct.
Remove your email account and set it up again
- On your computer, sign in to your email provider’s website. Make sure that all of your email is there or make sure that your email is saved somewhere other than on your iOS or iPadOS device.
- On your device, go to Settings > Mail, then tap Accounts.
- Tap the email account that you want to remove.
- Tap Delete Account.
- Add your account again.
If the steps in this article don’t help, contact your email service provider for more information.
Источник
Mail Support
Mail Settings Lookup
Need to verify your email settings? Simply enter your email address below and we will use it to provide your Mail settings.
Incoming Mail Server
Kerberos Version 5 (GSSAPI)
Authenticated POP (APOP)
Outgoing Mail Server
Outgoing Mail Server (Mac OS)
Kerberos Version 5 (GSSAPI)
Authenticated POP (APOP)
Incoming Mail Server
Kerberos Version 5 (GSSAPI)
Authenticated POP (APOP)
Outgoing Mail Server (iOS)
Kerberos Version 5 (GSSAPI)
Authenticated POP (APOP)
Note: Apple may collect and use your domain address (i.e. yahoo.com, gmail.com, etc.) for purposes of improving our products and services. Otherwise, your full email address will not be stored and will not be used by Apple or shared with any other entities.
Featured topics
How-to and troubleshooting tips to get the most out of the Mail app
Add an email account to your iOS device
There are two ways you can set up an email account in the Mail app on your iPhone, iPad, or iPod touch — automatically or manually. Learn which option is best for you.
If your info on iCloud won’t sync
Learn what to do if you need help. For example, the changes you made to Contacts, Calendars, or Reminders on one device didn’t appear on all of your devices.

Use emoji and symbols on your Mac
macOS includes features that make it easy to find and type special characters like emoji, accents, and currency symbols.
Источник
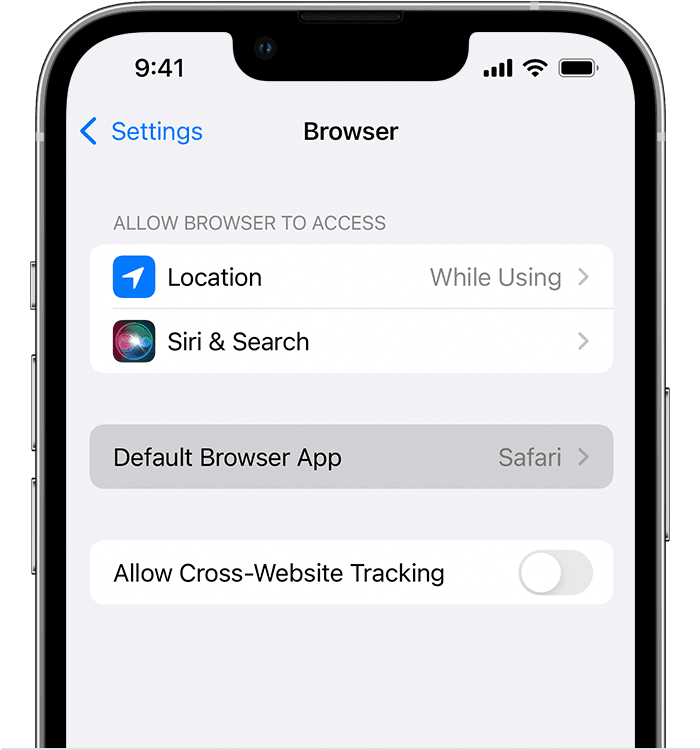
Change the default web browser or email app on your iPhone, iPad, or iPod touch
With iOS 14 and iPadOS 14 and later, you can change which app opens when you click a website link or an email address as long as the app supports it.
Before you begin
- Make sure that you have iOS 14 or iPadOS 14 or later, and that you have the app properly installed on your device.
- Make sure that the web browser app or email app supports this feature. If you aren’t sure, contact the app developer.
How to change your default web browser or email app
- Go to Settings and scroll down until you find the browser app or the email app.
- Tap the app, then tap Default Browser App or Default Mail App.
- Select a web browser or email app to set it as the default. A checkmark appears to confirm it’s the default.
If you don’t see the option to set a web browser or email app as your default, the developer might not support it. Contact the app developer to learn more.
If you delete a web browser app, your device will set Safari as the default browser app. If you delete the Safari app, your device will set one of your other web browser apps as the default. To use the Safari app again, you’ll need to reinstall it on your device.
If you delete an email app, your device will set the Mail app as the default. If you delete the Mail app, your device will set one of your other email apps as the default. To use the Mail app again, you’ll need to re-install it on your device.
Источник
How to manage Mail settings for iPhone and iPad
 Source: Bryan M. Wolfe/iMore
Long gone are the days when you needed your Mac to customize your email the way you liked it. Now you can set up Mail on your iPhone or iPad, with a couple of taps. The best part is, there are all sorts of ways to customize your accounts and make them your own. There are a lot of useful features that you can find if you manage Mail settings for iPhone and iPad.
That includes how they’re previewed, what swipe actions do, the style of flags displayed, how threading works, your email signature, and more!
How to get a notification when someone replies to your email
- Launch the Settings app from your Home screen.
- Tap on Notifications. Scroll up until you find Mail.
- Tap on Mail.
Select on the switch beside Allow Notifications. This will turn it from gray to green.
 Source: iMore
Select the sound you’d like to have.
 Source: iMore
You can choose to adjust and customize your notifications to add sounds, notifications in the notification center, badge app icons, or to have notifications appear on your lock screen.
How to manage email accounts
Before you can manage Mail settings for iPhone and make changes to any of your email accounts, you need to know where to look.
- Launch the Settings app from your Home screen
- Scroll down in the Settings menu until you see Mail.
- Tap on Accounts
Tap on the email account you want to manage.
Source: iMore
How to change preview lines
The number of preview lines lets you choose between more text per message, or squeezing in more messages. Choose the amount that’s right for you.
- Launch the Settings app from your Home screen
- Tap Mail. You may have to scroll a little to find it.
Choose Preview and select the number of lines to change the Mail preview display.
Source: iMore
How to Show To/Cc labels
If who sent or who was copied on an email isn’t vital first-glance information for you, you can hide it and then expand it only when/if you really want to see it. Otherwise, you can make sure it’s always visible immediately.
- Launch the Settings app from your Home screen
- Tap Mail. You may have to scroll a little to find it.
Tap the switch next to Show To/Cc Labels so that it turns green.
Source: iMore
How to change swipe options
Swipe gestures make it super fast to triage your email, especially on the go. Pick the options that best match how you use email.
- Launch the Settings app from your Home screen
- Tap Mail. You may have to scroll a little to find it.
Tap Swipe Options.
Source: iMore
Tap Flag or Move Message to set the slide direction.
Source: iMore
How to toggle Ask Before Deleting
Ever delete an email by accidentally tapping in the wrong place? You can force iOS to ask before deleting a message or, if that’s too slow, make sure it deletes immediately.
- Launch the Settings app from your Home screen
- Tap Mail. You may have to scroll a little to find it.
Tap the switch next to Ask Before Deleting so that it turns green.
Source: iMore
How to Load Remote Images
Remote images are pictures store on the server that make email better looking or more informative, but also take time and bandwidth to download. They can also sometimes contain tracking pixels, so newsletters or deal mails know, for example, that you’ve opened the email.
- Launch the Settings app from your Home screen
- Tap Mail. You may have to scroll a little to find it.
Tap the switch next to Load Remote Images so that it turns green.
Source: iMore
How to organize emails by thread
Some people want all their individual emails shown in chronological order. Others want all emails from the same conversation grouped together. Pick the option that works best for you.
- Launch the Settings app from your Home screen
- Tap Mail. You may have to scroll a little to find it.
Tap the switch next to Organize by Thread so that it turns green.
Source: iMore
How to Collapse Read Messages
- Launch the Settings app from your Home screen
- Tap Mail. You may have to scroll a little to find it.
Tap the switch next to Collapse Read Messages so that it turns green.
Source: iMore
How to move a thread’s most recent message to the top
Threads can be convenient but also confusing. Sometimes, in a conversation, you lose track of which message was the most recent. If you want to, though, you can make sure the latest message is always on top.
- Launch the Settings app from your Home screen
- Tap Mail. You may have to scroll a little to find it.
Tap the switch next to Most Recent Message on Top so that it turns green.
Source: iMore
How to turn complete threads on and off
To save space, you can choose only to see the latest messages in a thread. If you want to see all of them, all the time, there’s an option for that.
- Launch the Settings app from your Home screen
- Tap Mail. You may have to scroll a little to find it.
Tap the switch next to Complete Threads so that it turns green.
Source: iMore
How to turn Always Bcc Myself on and off
Want to makes sure you always get sent a copy of your own email? It’s not just for POP email anymore; you can get a blind copy every time.
- Launch the Settings app from your Home screen
- Tap Mail. You may have to scroll a little to find it.
Tap the switch next to Always Bcc Myself so that it turns green.
Source: iMore
How to mark addresses
If you want to make sure you’re sending an email from or to people at a specific domain — for example, if I want to make sure I’m sending from my futurenet.com address to my colleagues at futurenet.com, I can have iOS mark (i.e., highlight) those addresses. It’s a way to avoid mistakingly sending from or to the wrong address or people.
- Launch the Settings app from your Home screen
- Tap Mail. You may have to scroll a little to find it.
- Tap Mark Addresses.
Type the type of address you would like to mark.
Source: iMore
How to turn Increase Quote Level on and off
Email has evolved to include a quote system that tries to distinguish your reply from their reply from the previous reply. and so on. One quote level is the previous message, two the message before that, three — you get the idea. If you need to make it clear who said what, you can adjust the quote level to make it super obvious.
- Launch the Settings app from your Home screen
- Tap Mail. You may have to scroll a little to find it.
- Tap Increase Quote Level
Tap the switch next to Increase Quote Level so that it turns green.
Source: iMore
How to set your signature
Want to make sure all your emails finish with your preferred flourish? Add a signature!
- Launch the Settings app from your Home screen
- Tap Mail. You may have to scroll a little to find it.
- Tap Signature.
Add your new signature.
Source: iMore
Any Questions?
Is there anything you would like to learn about how to manage Mail settings for iPhone or iPad? Let us know in the comments below!
Updated October 2020 The post is up to date with the latest version of iOS.
Источник


